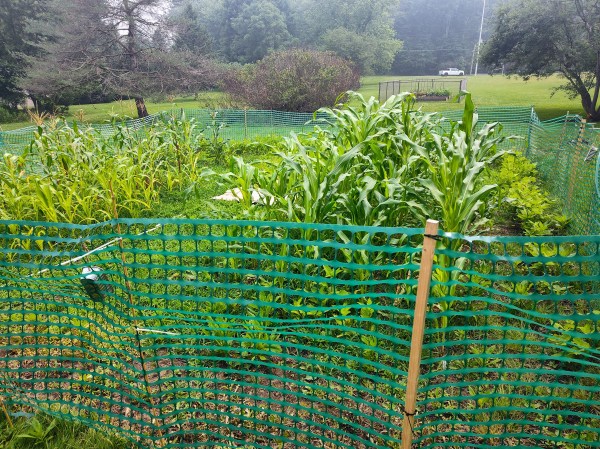
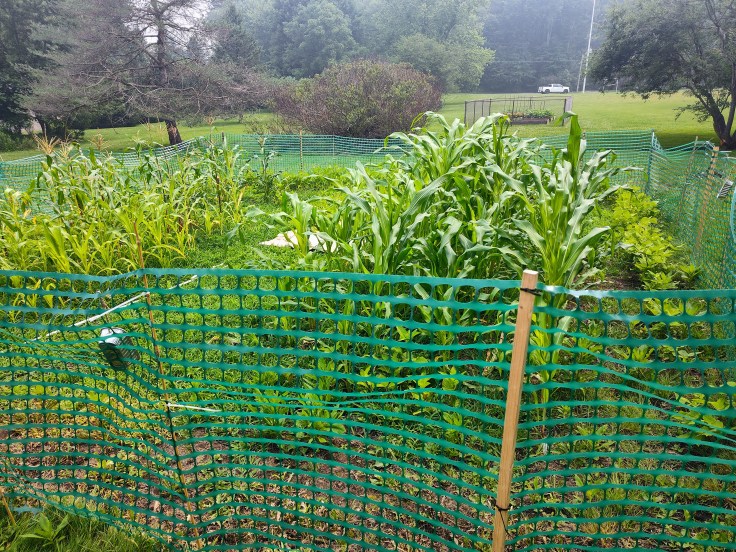
For the most part, our fence has done a really good job of keeping animals out of our garden. Last year’s garden and issues with rabbits, squirrels, deer, and potentially raccoons getting into it. The deer were the most destructive. They tore through the mesh fence we had, snapped our stakes, and ate corn and melons. Near the end of summer, we basically gave up on sections of the garden because we knew we couldn’t prevent them from getting in. To this point for this year’s garden, things have gone pretty well. We’ve had problems with rabbits getting in since they can chew through our plastic snow fencing, but they haven’t been too destructive. We don’t think we can prevent them from gaining access, so we just try to distract and deter them.
Before we installed our fence this spring, we saw a lot of evidence of animals in our freshly tilled beds. There were deer hoof prints, lots of rabbit poop, prints that could have been from a dog, and few piles of unidentifiable poop. But because we have dogs in our neighborhood, didn’t have our fence up yet, and hadn’t planted anything, we didn’t think too much about it. Later, after the fence was up, we still had animals getting into our garden beds.
What Animals Do We Have in the Garden?
By far, the most common animal we have in the garden, besides birds, is a rabbit.
We Can’t Say “No” to Rabbits
We’ve had two rabbits who’ve been around our garden since spring. They’ve essentially made our yard their home, which we’re okay with. The two of them seem to live in a burrow at the back edge of our property and like to come out and explore our yard in the mornings and evenings. We absolutely love rabbits, as you know by the affection we have for our pet bunny, Mia. And even though Eastern Cottontails aren’t considered endangered, their habitats are always at risk due to urban sprawl and development, so we’re thrilled to offer them a space where they’re safe. They like to take refuge in a brush pile behind our garage as well as under a hibiscus bush we have at the side of our house. They’ve also gotten quite comfortable around us, which is cool but not all that good when it comes to getting them out of our garden. When we see them in the garden, we’ll go open the fence and go inside as well and try to calmly “guide” the rabbits toward the gate opening. Eventually it works, but there are times when they’ll run full speed at the fence, which isn’t fun. That last thing we want is for the rabbits to get hurt.
Even though our fence is much stronger than last year’s, it’s no match for rabbit teeth, which chew through it in record time. They’ve chewed small holes in the fence and know how to enter and exit each bed. We tried to deter them with Irish Spring soap and aluminum baking pans, but neither has worked. We also tried to repair the fence by installing a piece of pressure-treated wood over the holes, but they just chew new ones, so we aren’t doing much to address the issue this year. We do have plans to fix it for next year’s garden, though.
Once inside the garden, the rabbits aren’t too destructive. They used to chew on the young corn stalks but stopped after realizing they don’t like the taste. They also chewed down a couple young sunflower plants, some cucumbers, and a melon that was close to being ripe, but it hasn’t been too bad. It’s a small price to pay to keep wildlife around.
How High Can Deer Jump?
Our fence stands four feet above the ground. I know that deer can jump higher than this, but when combined with growing plants right up against the fence, I thought it’d be enough to keep them out. Then, when we saw hoof prints in the garden earlier this summer, I increased the height of the fence posts and ran twine around the perimeter of the garden, about two feet higher than the top of the fence. This idea came from our neighbor, and, in theory, it makes it impossible for deer to get into the fence other than at the gate. However, in spite of this, we saw a hoof print in the soil on Sunday. I thought it was a fresh one, but I’m not wondering if it was an old one that was covered by plants and grass. That would make me very happy. I think that as long as we grow corn and aren’t willing to put up an eight-foot fence, we’ll have to deal with them.
What Poop Is This?
Don’t worry. There will be no poop pictures in this blog post. For the second time this year, we have animal poop in our garden that I can’t identify. In spring, I thought the poop was some sort of a canine, perhaps a coyote, fox, or dog that got loose. We even saw canine footprints in the dirt. On Sunday, we saw two fresh piles in our garden. It was reminiscent of dog poop but slightly different in shape, and the color was odd. It confused both Magz and me, and we soon started researching what animal it could have been from. After looking into it, we still aren’t completely sure, but I think we’ve narrowed it down to a fox or a raccoon. This pile looks a bit like both animals’ poops, but because we can’t find any footprints, it’s hard to tell. Both animals are common in our area, and of the two, we’d prefer it to be a raccoon, but I’m unsure how it would have gotten in. Raccoons don’t jump like foxes do, and our fence was up, albeit down a bit, when the animal would have entered.
Either way, I never expected that a portion of gardening would consist of identifying unknown animal scat to figure out what animals are getting into our garden. Hopefully, this is a one-off, and it doesn’t continue. I think this will improve each year as we further address our fencing. Have you had animals get into your garden? If so, what animals were they and how did you deal with it?
Jeremy Clarkson’s Amazon Prime original Clarkson’s Farm is one of our favorite shows. The show provides a less-than-glamorous look at everything that goes into growing the food that Britain eats. And even though he is far from the average farmer, given his financial success in the entertainment and journalism industries, the show has been lauded by farmers across the globe. I wrote about the show in an earlier post, which I think is worth checking out, as it dives into everything that can be learned from the show. I’m revisiting the show in this post because it’s where we first learned about naming garden beds, or fields, in the case of a farmer.
In the first season (it may have even been the first episode), Jeremy invites Kaleb to the farm to have him become the farm manager. As a test, Jeremy asks Kaleb to go through the field names without looking at a map. This was the first time I had heard of a farmer naming fields. I worked on a dairy farm early in high school and don’t remember him ever referring to a field’s name. Granted, my job was mostly milking cows, but I think I would have heard him referring to a field by its name if he gave them names. The cows had names; the fields didn’t.
But I think naming fields is brilliant. When you have a bunch of fields in close proximity to each other, it can be really difficult coming up with directions for farm workers. Think about the last time you attempted to give directions solely off reference points instead of road names or route numbers. It isn’t easy. By naming the fields and using those names on a map of the farm, everyone can quickly identify the field’s location. Granted, using numbers or letters is equally efficient, but it does lack creativity and fun.
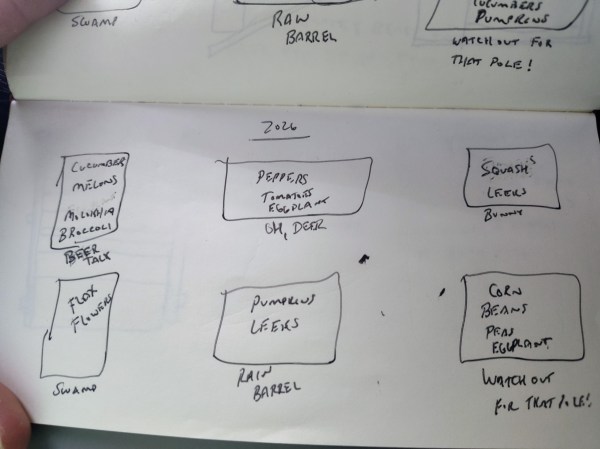
Last year, our garden consisted of 5 beds, and it was confusing trying to talk about the same bed if we weren’t standing outside looking at the garden. Saying “the bed behind the garden” worked because it was the only bed there, but it was a struggle anytime we needed to talk about the 4 beds beside each other on our second lot. So, this year, we wanted to come up with garden bed names to help us quickly identify which one we’re talking about when discussing seeds, plans, harvesting, etc.
These are the names we came up with:
Beer Talk – This is the bed we often hang out by and talk with our neighbor over a can, bottle, or glass of beer.
Oh, Deer – This bed was where we grew our corn last year. Deer got into the bed and ate a lot of our late-season corn. We aren’t growing corn there this year, but the name remains.
Bunny – This is a new bed for 2026. It’s where a lot of rabbits hung out before creating the garden bed. They still hang out in the yard and grass that surrounds the bed.
Swamp – This bed struggles with drainage. When we get a lot of rain in the spring, it’s the last bed to drain.
Rain Barrel – This bed is the one closest to our rain barrel, so this one makes a lot of sense.
Watch for That Pole! – An homage to the movie George of the Jungle, we found a cemented, hollowed-out metal pole in the middle of this bed last year. We think it may have been a clothesline pole in the past, and instead of removing it, the previous owners broke it off at the base.
Our garden bed names for the 2026 season.
Those are the 6 names. We may change them in future years, or we may keep them as they are. But it was a lot of fun figuring out creative names that fit the beds, and it’s a lot easier talking about specific beds now. Have you ever named your garden beds to make things a bit easier? If so, I’d love to hear the names you came up with.
In this week’s update, we finally harvested our first cucumbers from this year’s garden. We also picked more zucchini, our corn is producing ears, our melons are showing major growth, we harvested a bunch of beans, and more. Let’s dive in!
First Cucumber Harvest
Until last week, our cucumber plants were perplexing. As a refresher, we’re growing a variety called Bushy, which originally came from Russia and does well in cool climates. I started them from seeds and transplanted 4 plants into the garden, with 3 of them surviving. What has confused me about this cucumber is that the name Bushy implies a contained plant that doesn’t sprawl out. That hasn’t been the case, as the plants have vined out feet from the roots. Yesterday, I revisited the seed listing, and this variety still produces 5-foot vines, so they’re growing as expected.
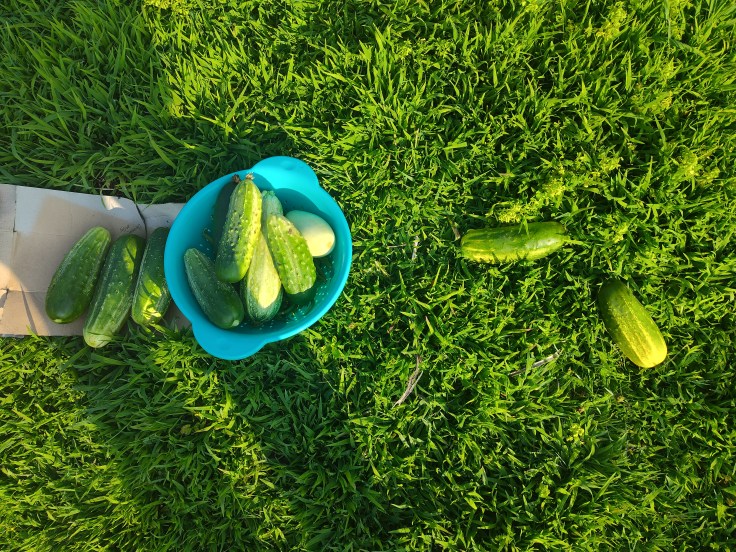
Cucumber Harvest
The other thing that’s perplexed me about them is how long they’re taking to grow. It felt like this year’s cucumbers (and other vegetables) were taking longer to mature than last year’s garden; however, looking at my weekly blog entries from last year, I learned that we didn’t pick our first cucumbers until the second week of July. So, at most, we’re a week late, which is almost entirely the result of the weather. The craziest part is that on Wednesday of last week, our cucumbers were only 3 or 4 inches long, but by Sunday evening, we picked 6 that were 7 to 8 inches long, with 2 of them being overripe. Magz cut 2 of the cucumbers into chunks, and we ate them raw with dinner. The Bushy cucumber is a very tasty variety that is firm enough to hold up to brining for pickles but still tender enough to be eaten fresh.
Experiencing New Summer Squash Varieties
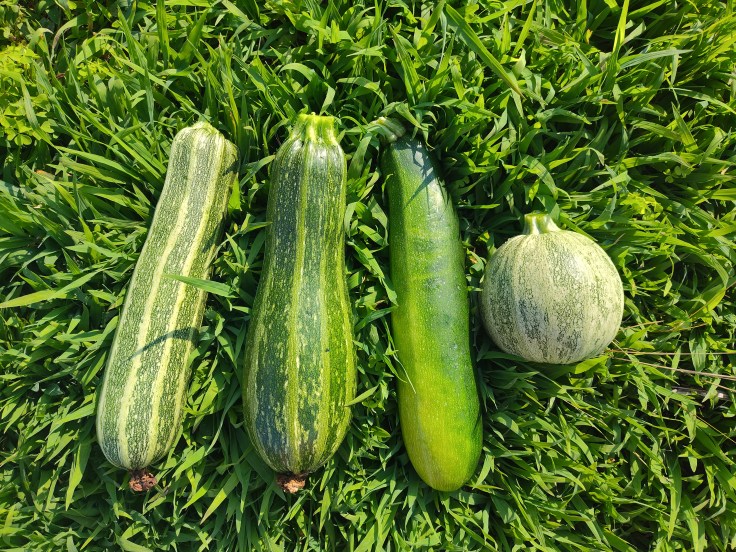
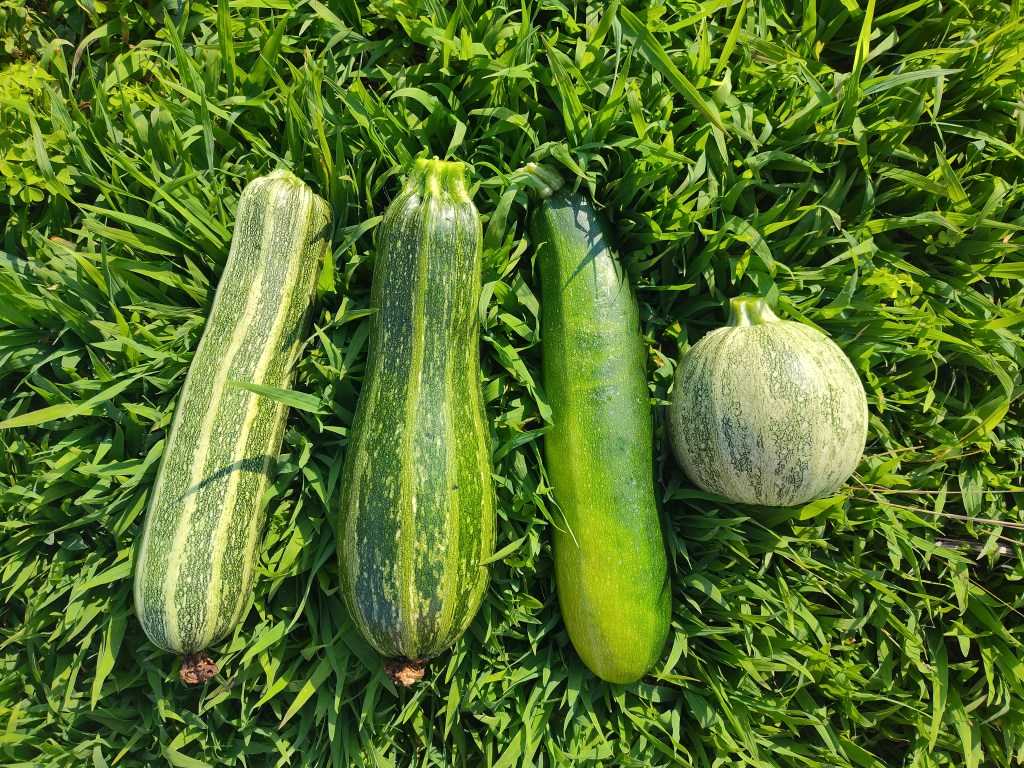
In last week’s update, I wrote about our first zucchini harvest for the year, which was a Costata Romanesca. Since then, we’ve picked 4 or 5 more of them as well as 3 or 4 Lebanese White Bush, 2 Ronde de Nice, and 1 Black Beauty. The Lebanese White Bush is an heirloom variety that produces 4-to-5-inch squashes that are light green in color. The Ronde de Nice is a French heirloom that has an acorn shape but is a summer squash. It can be dark or light green and is typically picked at 4 inches in diameter. The Black Beauty is the dark green zucchini that comes to mind for most people when they think of a zucchini. It has a smooth skin with an even color, and we pick ours when they’re 8 to 10 inches in length.
Costata Romanesca, Black Beauty, and Ronde de Nice summer squash
We’ve eaten at least one of each variety except for the Black Beauty, and all are delicious. My dad and stepmom visited us this past weekend, and we were able to send them home with some Costata Romanesca, Ronde de Nice, and Lebanese White Bush. My dad messaged me yesterday and said that they fried the Ronde de Nice and loved it. In a future blog post, I’ll review each variety and detail the flavors.
Corn Tassels and Ears
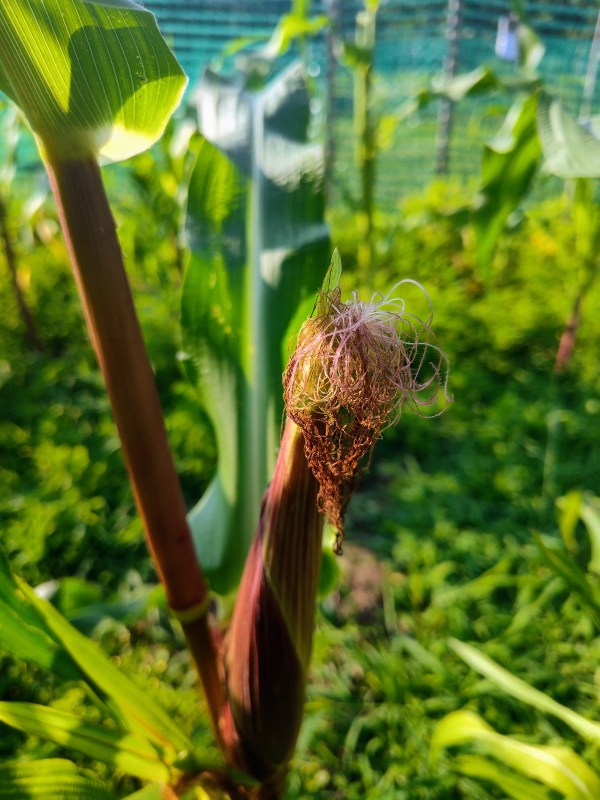
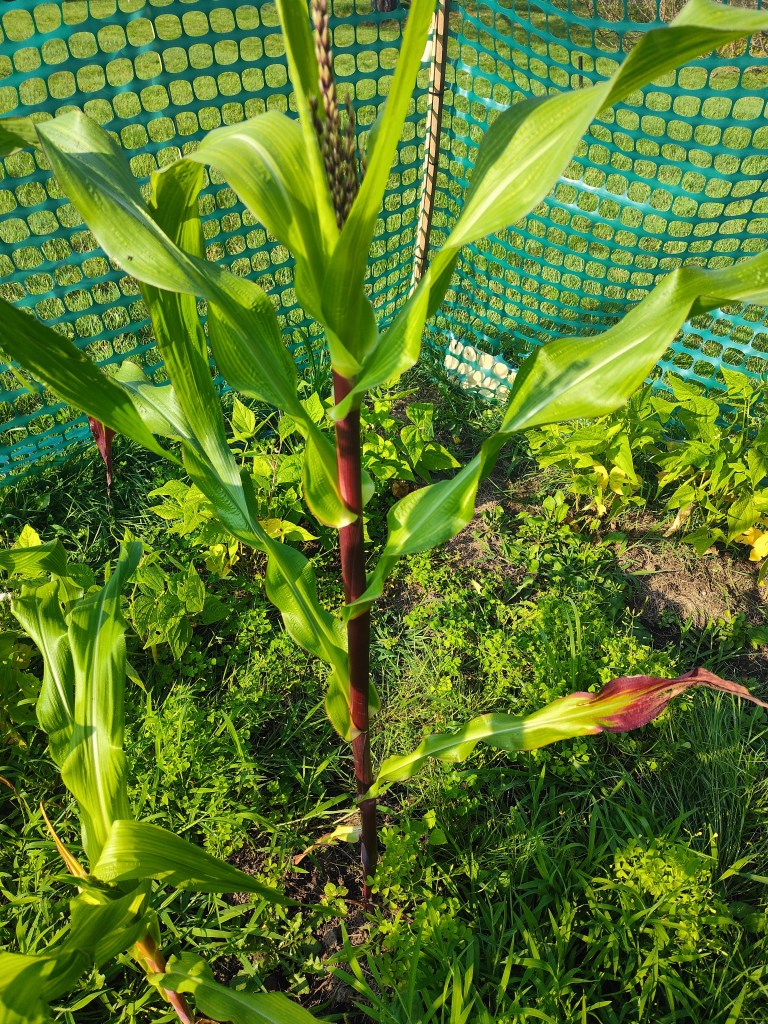
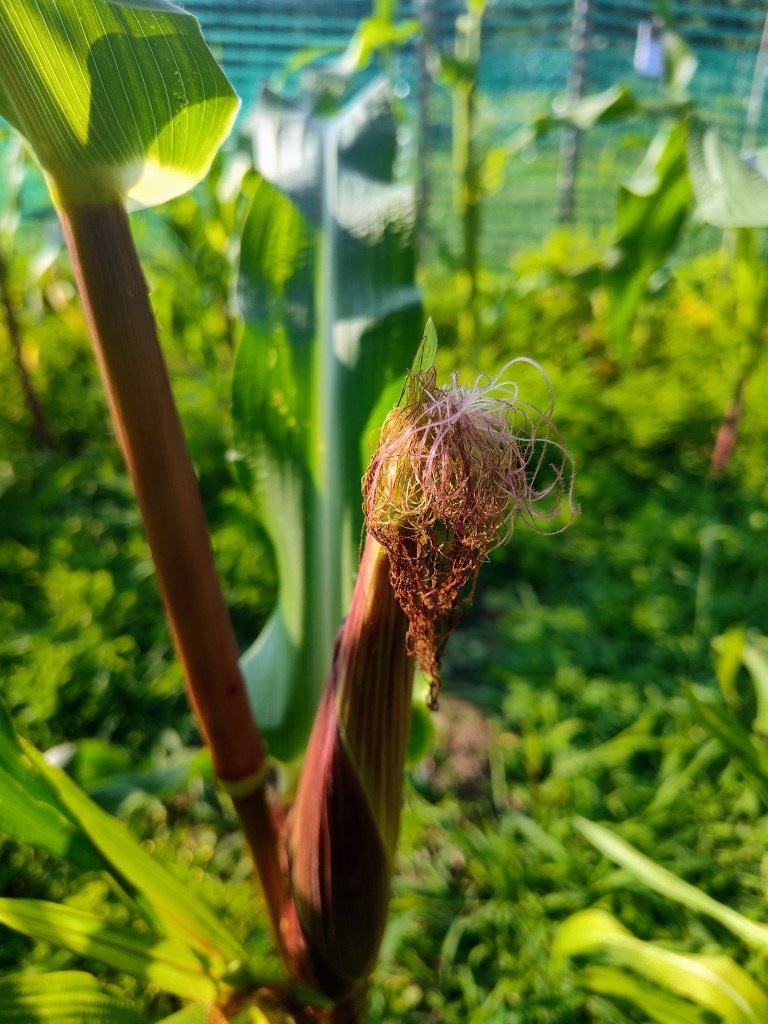
Our corn has really taken off over the past week. Our Painted Mountain corn has the most beautiful reddish-purple stalk, and even the tassels and silk have a purple tinge to them. They’re almost 6 feet tall and have ears developing. Meanwhile, our Sweet Mexican corn is approaching 7 feet tall, and the tassels are starting to appear. Nearly every day, we go out to the garden to tap the stalks to help germinate the ears.
Painted Mountain corn stalk and tasselPainted Mountain corn ear
A Bean Harvest
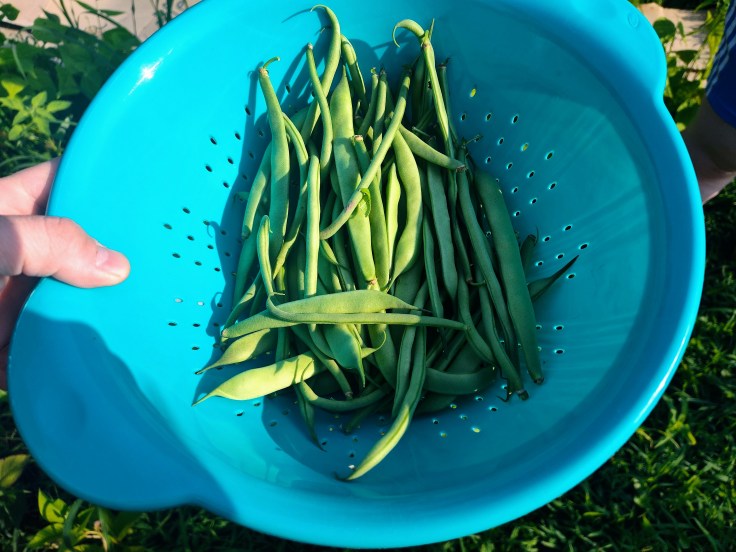
On Sunday, we had the joy of being able to harvest a full dinner’s worth of beans. We grew beans last year and were able to eat some, but they didn’t grow well, and we never had enough ripen at once to have as a meal. This year, conditions seem to be perfect for growing them, because we’re having a ton of success. We picked Beurre De Rocquencourt and Maxibel Haricot Vert, yielding a quart in total. Magz steamed them, melted butter over them, and added a pinch of Kosher salt and black pepper.
First bean harvest of 2026.
Even though we ate the two varieties together, you could taste a difference between the two beans, which I love. Yesterday, that harvest was followed up with another quart of beans, with Cherokee Wax beans comprising the bulk of the haul.
A Grab Bag of Topics – Potatoes, Peppers, Flax & More
Our potatoes continue to do well with the exception of one bag of Adirondack Blues. For some reason, that bag never took off, and on Saturday, I noticed that the plant that had been growing in it died. It’s not a big deal since we have 19 other bags that are doing well, and we’re going to use that bag to transplant a couple of the Gochugaru pepper plants I started late. In other pepper news, one of our habanero plants is producing fruit. It currently has 3 or 4 small peppers on it, each about 2 inches long.
Our flax and sunflowers are looking great. The flax plants are about 2 feet tall and have a lovely light purple flower on top. Not knowing how they grow or what to expect from them has made the process of growing them all the more fun. What we didn’t realize is how much flax you need to grow in order to turn it into a sizable amount of yarn/thread. We thought that growing a few rows of it would yield a decent amount, but it looks like we’ll need to grow an entire bed of it in the future. Meanwhile, our sunflowers are 4 feet tall (Mammoth variety) and 12 inches tall (Teddy Bear). The plants are looking healthy, and we’re hopeful that we’ll get heads to form on them this year and that we can prevent the squirrels from attacking them.
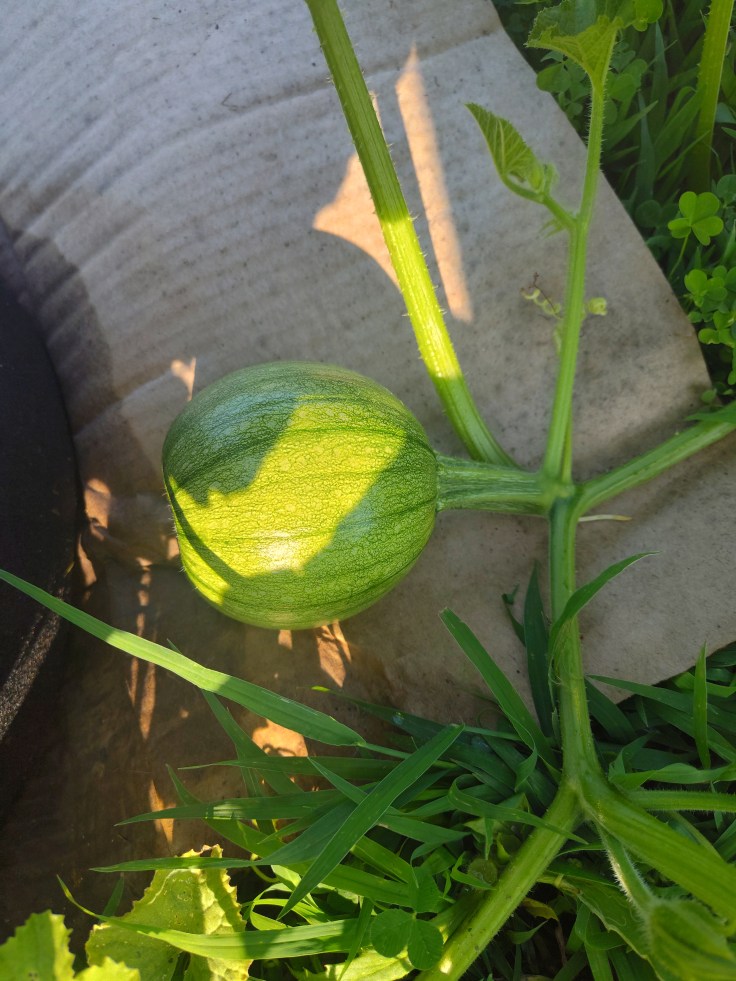
Lastly, we’re beginning to see progress from our melons. All 3 varieties are vining nicely and producing flowers, but the Montreal Market and Pride of Wisconsin are stealing the show. Both have fruit growing. The Montreal Market is nearly the size of a softball, while the Pride of Wisconsin is close to tennis ball size. Happy Gardening!
This is a post I originally came up with last fall, but it was too late in the growing season to make sense. This post is going to be regularly updated to share what we’re currently growing. It’ll be a way to keep everyone in the know with what’s currently in the garden and containers.
Beans
Our beans are being grown in two sections of our property. We have the majority of them growing in the ground in one of our garden beds alongside our corn. These are our bush-habit beans, so they won’t grow too tall and don’t have to be trellised. They’re growing along the perimeter of the bed, alongside the fence. The 7 varieties we’re growing here are Cranberry (shelling), Missouri Bill (shelling), Black Turtle (shelling), Maxibel Hericort Vert (snap), Blue Lake 274 (snap), Beurre de Rocquen (snap), and Cherokee Wax (snap). All of our bush beans have germinated, with the majority of the plants about 2 inches tall. These were planted close together and shouldn’t need to be thinned. Update: As of mid-July, all of our beans are doing very well. They’re all about 18 inches tall, have flowers, and small beans growing.
Rows of corn and bean plants
We also have 3 pole beans growing elsewhere on the property in the trellising containers that I built. These are located alongside our garage and by our potatoes. Update: Of the pole beans we planted, only the Iroquois Skunk pole beans have grown. The other varieties failed to germinate, so we replaced those with the Skunk pole beans. The first planter has done very well and has a lot of beans growing on the vines.
Corn
We enjoyed growing corn so much last year that we wanted to expand upon the 3 varieties we planted, which we did by buying 9 varieties for this year’s garden. As mentioned above, our corn is growing in the same bed as the beans, which was intentional since they are companion crops and are two-thirds of what the Native Americans called the Three Sisters, along with squash. In the right circumstances, corn stalks can be used as the pole that beans will climb, eliminating the need for a trellis system.
The 9 varieties are Hopi Blue (flint), Painted Mountain (flint), Northern Lights (flint), Country Gentleman (sweet), Luther Hill (sweet), Stowell’s Evergreen (sweet), Sweet Iroquois Black Mexican (sweet), Hjeirleid Blue (sweet), and Bear Paw (popcorn). Of these, we grew the Hopi Blue and Sweet Iroquois Black Mexican last year. Everything else is new to us. We’ve also never grown popcorn before, so that’ll be exciting.
Update: After starting with full rows of flint, popcorn, and dent corn and half rows of sweet corn, all the varieties now have full rows. Germination went pretty well even though oppressive heat and excessive rain occurred not long after the second sowing occurred. The corn has a wide range of heights, from ankle height for the newest plants to 6 feet tall for the flint corn we planted first. There are multiple varieties that are in tassel and putting on ears to the point where silk is showing.
Cucumbers
We’re only growing 2 varieties of cucumbers this year. One is called Bushy, and it’s a non-vining variety that produces cucumbers that can be used for slicing or pickling. I started 4 of these inside and transplanted them into our garden. Of the 4 plants, 3 are still alive and have sprawled much more than I thought they would based on their name. Update: We have had a lot of blossoms and many small cucumbers, with the largest being roughly 5 inches long. We should be able to pick them soon.
The other variety is the Mexican Sour Gherkin, also known as the Mouse Melon cucumber. These put out vines and need to be trellised. The cucumbers are small, roughly the size of a golf ball, and look like baby watermelons. We’re growing these in one of the planters I built from the Ikea chair. I started the first batch of these inside and transplanted them. Unfortunately, they didn’t transplant successfully, so I had to restart them by direct sowing. They have yet to germinate. Update: These never germinated.
Eggplant
We greatly enjoyed growing and eating eggplant last year. We bought an Asian variety from our local greenhouse and enjoyed slicing and roasting them all summer. This year, we again opted to buy 2 starts from the greenhouse over seeds. They were a couple of inches tall when purchased and have grown since being transplanted into the garden, but they aren’t looking the healthiest. Some of the leaves turned brown at first, which I think is the result of a watering issue (Too much or too little? Who knows?). We also had some small flying bugs that were causing damage, but I think these have been addressed with Sevin spray. Update: The plants are about 15 inches tall but have yet to flower. Last year, I think I remember the plants flowering and putting on fruit earlier than this, but the plants look healthy now. At one point, I was convinced the plants were dying, but they look very healthy now.
Leeks
I don’t understand how to grow onion-adjacent vegetables. I’ve never tried to grow bulb onions, but I’ve never been able to get spring onions to reach maturity so that they can be harvested. They start out looking great and eventually die off. This year, we passed over onions in favor of leeks, but it looks like it could be the same result. I started 12 cells of them inside and transplanted them when they were 3 inches tall. Update: I believe that the transplanted leeks died. However, in a stunning turn of events, the seeds that I planted have germinated and have greens on them 10 inches long. I’m still unsure if we’ll get a full-size leek out of it, but I’m really excited by the progress so far.
Melons
Pennsylvania isn’t the first state that comes to mind when you think of growing melons, but we had decent success last year with them. We grew heirloom varieties that weren’t native to the region. They also weren’t bred for cool climates, yet we still harvested a half-dozen or so fruit. This year, we focused on varieties that were bred to have success in cool areas. They are Cream of Saskatchewan, Montreal Market, and Pride of Wisconsin. We are growing 4 of each, and all were directly sown into the garden bed.
Update: I believe that 9 of the 12 plants remain and are having success to varying degrees. A few plants have vined out and have small, ping-pong ball-sized fruits on them.
Molokhia
I also struggle to grow greens. I’ve never been able to successfully grow lettuce. Last year, we grew mustard greens with some success, but they quickly got out of control. Molokhia is the only green we’re growing this year. It’s a vegetable that is popular in Middle Eastern and African cuisines and is also known as Egyptian Spinach. Molokhia plants enjoy hot weather, so I started the seeds inside to give them a head start. They germinated well, and I was able to transplant 6 plants; however, in the first days after being transplanted, they began not looking so great and have since died. I directly sowed another line of seeds, which have germinated, but it’s still too early to know if they’ll succeed.
Update: The tallest of our Molokhia plants are 6 to 7 inches tall. Because this is the first year we’ve grown it, we’re a little unsure how things will progress until we harvest some of the leaves. What we do know is that it should be harvested when the plant is 12 inches tall.
Peas
We grew one type of peas last year. They were a snap variety, which I love to eat. They were successful in that we harvested some pods, but we didn’t get the yield I was hoping for. That was largely because I planted them when I was feeling overwhelmed by all the other plants and didn’t give them the attention they deserved. This year, we’re growing 3 varieties: Green Arrow (shelling), Sugar Ann (snap), and Oregon Sugar Pod (snow). I was more careful with organizing the rows of peas this year than I was last year, and it’s going to pay off as the plants grow.
Update: We have rows of each pea variety growing, with the majority of the plants roughly 10 inches tall. They’re also putting on blossoms. I think we’ll get some pods to develop, but I wonder if they were planted too late due to weather.
Peppers
Peppers were another vegetable we had issues with last year. I started seeds and we bought starts, but none of the plants ever produced a mature pepper. Peppers can be tough to grow, and I don’t believe I was ready to correctly handle them last year. This year, we bought 4 varieties: Gochugarju (hot), Jaluv an Attitude (hot), Habanero (hot), and Takii’s New Ace (sweet bell). We bought the Takii’s New Ace largely because it can produce mature fruit quicker than other varieties, which is important in northern states where it can take until June to regularly get above 70 degrees. I also started a lot of cells for each variety and was intentional with developing a good root nest before transplanting.
Update: Peppers remain the most problematic vegetable for me to grow. There are still a few plants in the garden, but the others have died. We have a couple of fruits developing on a gochugaru plant, but I was hoping for more success with them this year. We still have the 4 plants that I started in the basement still growing in containers, and they’re looking good. I’m unsure if I’ll transplant them into the garden bed or to another container at this point.
Potatoes
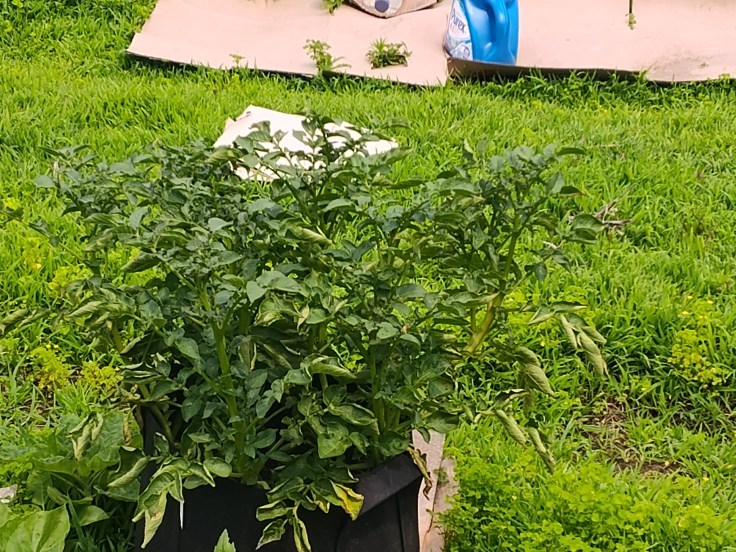
I recently wrote in-depth about how we’re growing our potatoes in bags this year and how well it’s going. If you didn’t read that post, I recommend checking it out. We’re growing 4 potato varieties this year: Red Norland (early season), Adirondack Blue (midseason), German Butterball (late season), and Magic Molly (late season). They’re all doing very well.
An example of our potato plants
We split each of the 4 varieties into 5 grow bags for a total of 20, and they’ve all needed to be hilled with dirt to the point where we won’t be adding any more dirt to the bags. Within a few days of planting, some of the plants began poking through the soil. We were adding more dirt on a daily basis for a while until we decided to buy enough dirt to top off all of the bags in early June. I am shocked with how well and quickly they’ve grown. Still, we’ve had several of the bags begin to show plants poking through the soil, so we’re seeing a lot of growth and may only be a month away from harvesting our first potatoes. From here on out, we’ll only have to water the bags, monitor them for weeds, and wait for the plants to flower and die off.
Update: Our potatoes continue to be the most productive and successful vegetable. All of our bags have plants growing, with the majority of them completely full. The most successful bags have plants that are 18 inches above the top of the bag and are starting to put on flowers.
Pumpkins
We loved growing pumpkins last year and had a lot of success with them despite not knowing what we were doing. We harvested 3 of them, making pumpkin pie with them for Thanksgiving. They made the most delicious pumpkin pie we’ve ever had. We would have been able to harvest more of them had deer not broken through our fence and ate some of the pumpkins.
This year, we’re only growing 2 varieties—Winter Luxury and New England Sugar Pie, which grew last year. We’re being really intentional with how we’re growing our pumpkins this year, with 5 hills built for each variety. Weirdly, only 1 plant of each variety has germinated so far, and we’re going to re-sow seeds. Update: After re-sowing the seeds, all 10 of the hills germinated. All of the plants currently have flowers, with one plant vining out and beginning to grow fruit.
Squash (Summer)
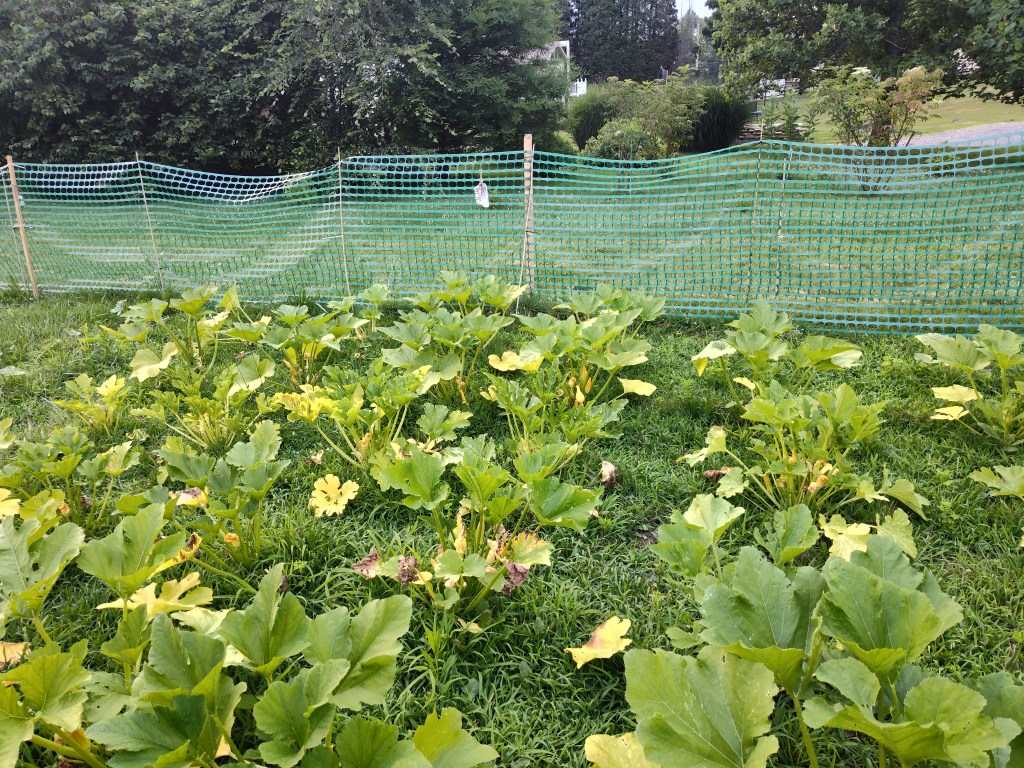
We are growing a ton of summer squash with 7 varieties: Black Beauty (Zucchini), Costata Romanesca (Zucchini), Early Summer Crookneck (Yellow Squash), Lebanese White (Zucchini), Ronde de Nice (Zucchini/Scallop hybrid), White Scallop (Patty Pan), and Yellow Crookneck (Yellow Squash). We love squash, if you couldn’t tell.
Costata Romanesca, Black Beauty, and Ronde de Nice summer squashOur rows of squash plants
We directly sowed 5 of each variety, and all have germinated. Update: Our squash has taken off like crazy, and we’ve harvested multiple fruits: 1 Black Beauty zucchini, 2 Costata Romanesca zucchini, and 1 Ronde de Nice squash. We have more that are close to being picked and several baby yellow Crooknecks growing.
Squash (Winter)
We’re also growing 3 varieties of winter squash: Burpee’s Butterbush (Butternut), Turks Turban (Gourd), and Burgess Buttercup (Buttercup). We started 3 of each variety directly in the garden, and then our neighbor gave us 5 more buttercup starts. Three of the starts didn’t make it, but I replaced them with seeds from our stash, giving us 14 winter squash plants, assuming everything germinates. Update: After re-sowing the winter squash seeds, we had successful germination. Unfortunately, the buttercup squash our neighbor gave us aren’t doing too well; however, the seeds I planted have grown into healthy-looking plants.
Tomatoes
We’re growing a ton of tomatoes this year, so buckle up. After growing some rare and colorful varieties last year, we returned to growing all red tomatoes. The varieties are Aichi First (Slicing), Early Cherry (Cherry), Heinz (Paste), Korean Long (Paste), Large Red (Slicing), Little Bing (Cherry), Martino’s Roma (Paste), Mountaineer Pride (Slicing), Sub Arctic Plenty (Slicing), and Umpqua Beauty (Slicing). I don’t remember the exact number, but I think I started 6 cells of each variety and transplanted a total of 20 or so plants. Not all have survived, but we probably have around 16 plants, with 13 of them in the garden and 3 Little Bing plants in a planter. Immediately after transplanting our starts, I started more Heinz, Early Cherry, and Aichi First seeds, which have since germinated.
Update: Our tomato plants have put me through the wringer this year. They started out perfectly, but then an issue with grass growing in the garden bed combined with me forgetting to trim leaves on the plants led to them looking sickly. That was followed by torrential rainstorms that yielded 3.5 inches of rain in less than 12 hours. Since then, we’ve had warm weather and more consistent precipitation, which has salvaged the majority of the plants. We have lots of blossoms and small fruits growing on the plants. Our most successful variety has been the Little Bing, which is being grown in a planter. It looks healthy and has dozens of small tomatoes on it.
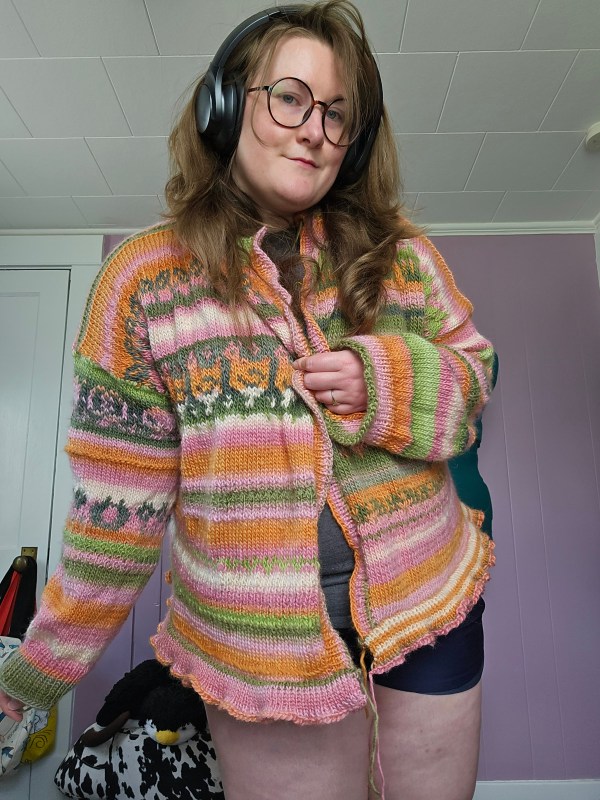
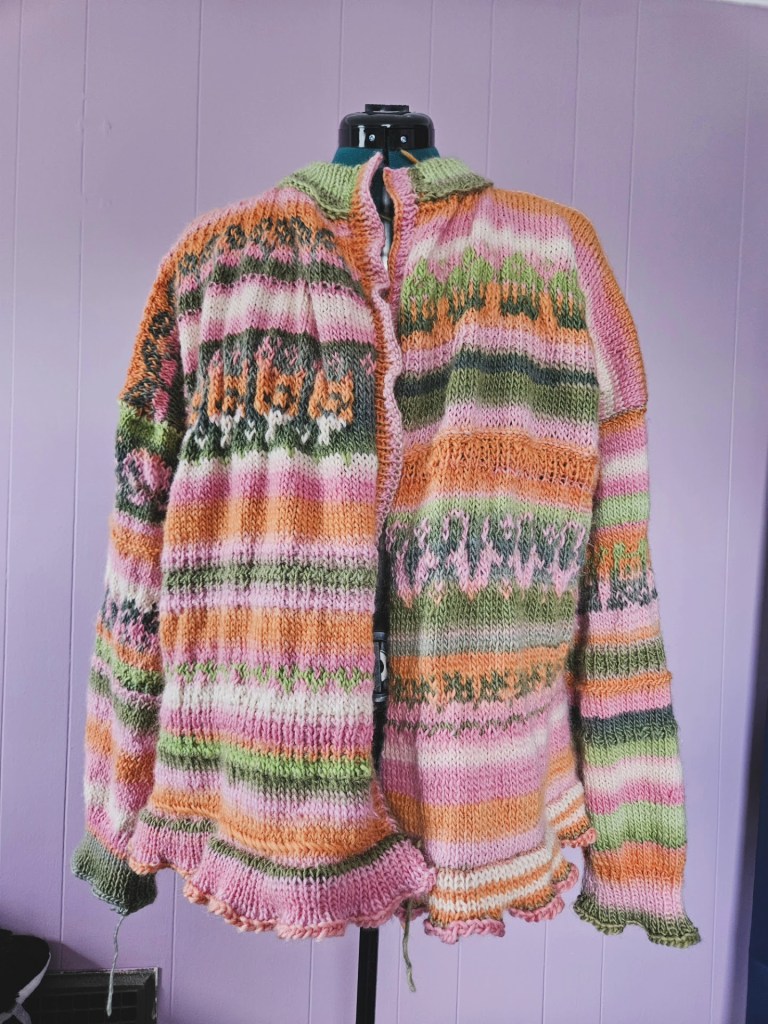
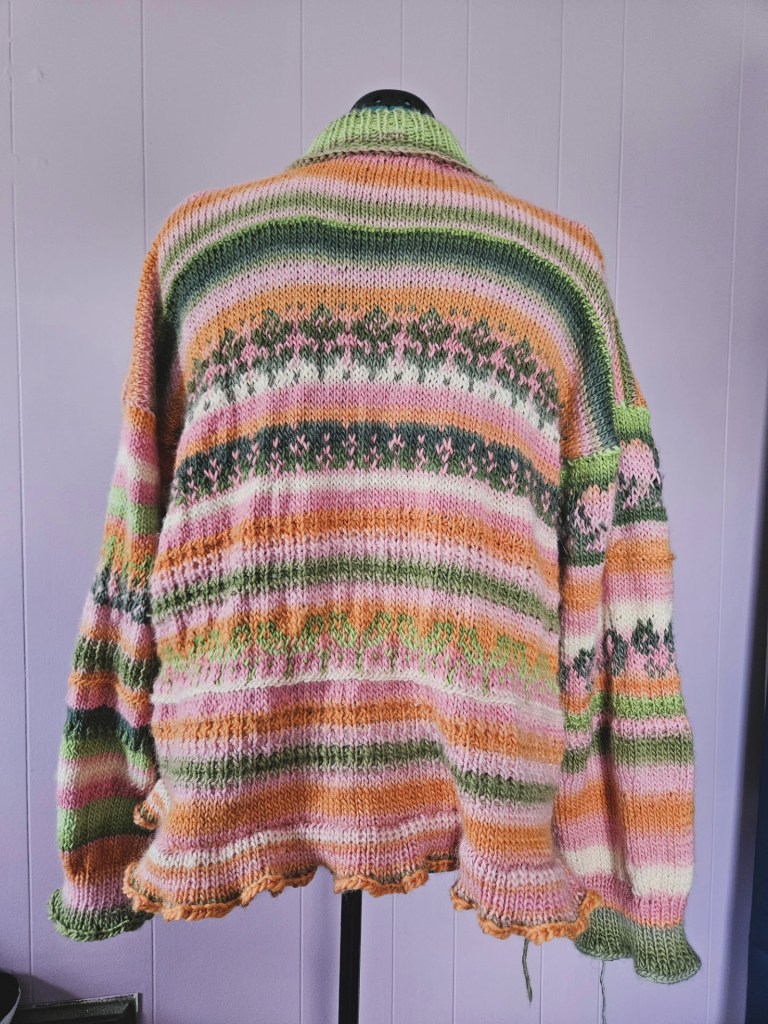
I wanted to make a cardigan that celebrated our garden, with a yarn inspired by Beatrix Potter, that was made from wool, and featured a fair isle design. To do this I used Pacific Knit Co’s farm doodle deck and Knit Picks’ Chroma Worsted Weight yarn in the colors Beatrix and New Leaf. The Chroma yarn has become a fast favorite of mine for its durability and delicious halo. The yarn is comprised of 70% super wash wool and 30% nylon. This was a bit of a stash busting project, and a splurge. I wished to use up three skeins of deadstock New Leaf, finding the pink-orange-white of Beatrix was the perfect spring-inspired color palette upon which to build. Using a gift card from Christmas, I purchased 6 skeins of Beatrix, although I had to repurchase more with this project using thirteen skeins in total. Not cheap! But worth the splurge to create a piece I plan to wear for the rest of my life that celebrates the garden we have created here at our new house. It’s our in-town farm, as our friend calls it.
The bulk of this project was done on US 8 straight needles, and seamed together using a 5.5 mm crochet hook. The bottom ribbing was created using a US 4 circular needle. The size reduction of 1.5 mm, changed the gauge to create this floral ruffle along the bottom edge. At complete accident! But I like it. In addition, I used mostly stockinette stitches, with 1×1 ribbing at the cuffs, collar, button band, and bottom hem, and the seersucker stitch for added texture, in between color work sections. Will I add buttons? I am uncertain. The original plan was to use buttons, and have purchased buttons, yet I like to wear my garments first beforehand, to see if I want to wear the garment closed. Since yesterday was the Summer Solstice, I have a while to wait!
This garment took approximately 4 months to complete, along side other sewing, crochet, and knitting projects.
A lot has changed in the 2 years since this blog was launched, and I thought, it might be time to update my introduction.
In 2023, my plan was to finding a new landing place for me to explore writing again, after Muirin Project, my blog from 2016-2019. I wanted to showcase my novel, catalog my knitting and sewing journey, journal my bible study, and share my love for creative expression in many artistic mediums.
Now I have added some new things to the mix – Japanese learning, Kpop, garment workers/conscious consumption, and most excitingly: gardening! Which welcomed my husband to the site to share his experiences with gardening and bring awareness to why natural ecosystems, seed saving, and eating local matter. He is also preparing to share his other favorite hobby – woodworking.
Now, for something I question – should I change the site name? I am uncertain for SEO purposes and the likelihood of broken links. I don’t think it is wise. But this site is so much more than just my work, it is the harmonizing voices of myself and Kyle which is how I think the world becomes a better place – working together. Let’s keep the honmoon sealed. ❤
If you’ve been reading my gardening articles for a bit now, you know I’ve written about using my woodshop to create things for the garden. Some examples are the planter box and trellis for our beans, the trellis system for our snow peas, and the fence posts I’ve been cutting. Lately, I’ve been looking forward to getting back into the woodshop and doing serious woodworking again. The garden and our screened-in porch projects took precedent over woodworking projects this spring and summer, and I’m now ready to get back at it.
As I’m thinking about and planning my next projects, I wanted to write about blending two of my favorite hobbies: gardening and woodworking. I mentioned the ways I’ve used my woodshop to build things for the garden this year, but only the planter box was somewhat serious woodworking. It was the only thing that required glue, but not even that project needed me to use my table saw. In this post, I’ll go over some future project ideas I’d like to pursue and a previous piece that I built and we still use. And if I have fun writing about this, and it seems interesting, I may write more woodworking articles.
A Planting Table
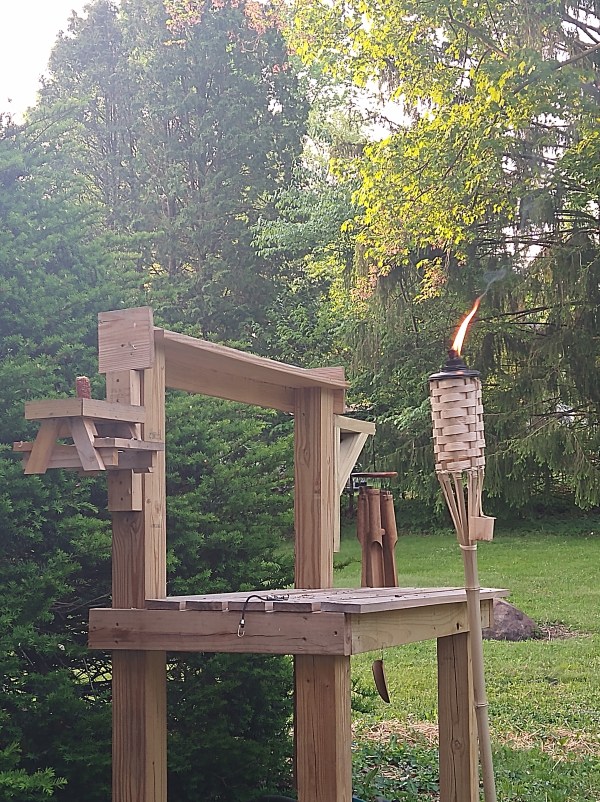
In 2022, I wanted a planting table that would aid in the process of transplanting starts, starting seeds, mixing the soil, and filling the containers of our container garden. I’ve always been a fan of the classic planting table that includes multiple areas for storage, a place to hang tools, and a flat surface to work on. There are a lot of videos of woodworkers and makers building these, including Bob Clagett (I Like to Make Stuff), Norm Abram (The New Yankee Workshop), and Steve Ramsey (Woodworking for Mere Mortals). These three makers represent three versions of a planting bench. Bob Clagett’s was made of dimensional cedar, Norm Abram’s was based on an antique found in Savannah, Georgia, and built from recycled pine, and Steve Ramsey’s was built with scrap wood, largely reclaimed pallets. A planting table can be made as cheaply or expensively as you’d like. I went somewhere in the middle of these three.
I didn’t have any recycled or reclaimed wood to use for the project, so we bought pressure-treated lumber for it. This included two 4x4x8s and numerous 2x4x8s and 1x6x8s. The 4x4s served as the main strength of the table, with one at each corner. The 2x4s were used as the main framework to connect the 4x4s to each other, while the 1x4s became the slats for the tabletop and shelves. Here are two pictures of how it turned out:
Planting table with our containers on it.Planting Table
This table was a blast to work on. Dimensional lumber, which you can find in the big box stores (Home Depot or Lowes), is really easy to use, and I would encourage everyone to try building one for your gardening needs. I used my table saw to rip the 1x6s down to narrower pieces, but I could have bought 1x4s instead and not needed a table saw. If I didn’t need to rip those pieces down, the entire thing could have been built with a circular saw and a drill. It’s a perfect project to dip your toes into woodworking if you’re curious.
Tips if You Want to Build One
Bulk cut all the pieces that are the same length. Because all but one of the slats for the top were the same length, I set up a stop block on my miter saw and cut all the pieces in quick succession. This made it so I didn’t have to measure each piece and potentially have small differences in the lengths. This was also the case with the bottom shelf pieces.
Clamps are your best friend. Clamps weren’t required to build this table, but they were really helpful. It can be difficult to hold pieces together with one hand while you’re using a drill with the other. Clamps hold it all together so that both hands can be used for drilling. They also work to prevent the pieces from moving off your mark.
Use a level. This applies when you are attaching the 2x4s to the 4x4s. You’ll measure up from the bottom or down from the top to mark where the 2×4 will go on the 4×4, but it’s wise to use a level to ensure the slats will sit flat and the entire table will be level when assembled.
What I Would Do Different
In general, I’ve been pleased with how the planting table turned out and continues to serve us. However, there are some areas that I’d like to improve and address in the future. The first is trimming the table slat closest to the front. It sticks out over the 2×4 framing piece by an inch or so, which has resulted in that piece cupping and needing to be attached with extra screws. I would like to remove this piece and trim it down so it sits flush on top of the 2×4.
I’d also like to add hooks to the bottom of the top shelf and chicken wire to the back to hold tools. The last improvement I’d make is having a water source and a place to rinse veggies when they’re pulled from the garden. This would be a bit more complicated than the other improvements, but I want to cut a hole in the table slats where a plastic bowl or dish washing basin would sit. That basin would have a hole in it with a small piece of PVC attached for the water to drain into a bucket below. I will also need to have a water source. For that, I want to attach a simple outdoor spigot or faucet that a hose can connect to and mount it close to the basin. Because the planting table is close to where we’re going to add another rain barrel, we’ll have a water source without needing to run a long hose. These are minor improvements, but once they’re done, I think the planting table will be even more useful.
Future Woodworking Projects for the Garden
Planters – These include all the types of planters, including planter boxes that sit on the ground, ones that are attached to porch railings, and window boxes.
Garden Bench – Magz and I want to eventually have our garden be a place where we can sit and enjoy nature. It won’t just be a place to work in, but also a place to relax. Having a bench in our garden would also provide us with a place to rest while working.
Whirligigs – Whirligigs are an area of woodworking that I’m interested in. If you’re unfamiliar with them, they are a nifty decoration that spins when the wind blows. They can be bought or made, and there are endless possibilities for design, style, color, etc. Norm Abram built one on The New Yankee Workshop, and the YouTube video below features the Whirligig Festival. I have a lot of ideas floating around in my head of how to build different versions.
Garden Gate – We’re eventually going to upgrade our fence, likely to something that we build out of wood. When that happens, I want to design and build an aesthetically pleasing garden gate similar to what you see in English gardens. They are incorporated into the fence and can be as ornate or as simple as you want.
Greenhouse – We have talked about wanting to have a greenhouse for some time. We want to be able to start plants outside sooner than we currently can. You can buy greenhouses, but they can be expensive. Instead, we’ll probably build one that perfectly fits our needs and is cost-effective.
Swing – I want to build multiple swings. One is a porch swing or bed that hangs from the ceiling. The other is a covered swing in the garden. Similar to the garden bench, a swing would help in our pursuit of creating a relaxing garden.
Arbor – I have a lovely vision of an arbor in our garden that you can either walk under or sit under. The arbor will be placed so that vining plants, such as cucumbers, squash, or flowers, can climb the arbor, leaving you totally immersed in nature.
To me, woodworking and gardening perfectly go together. They’re both creative, can be hard work, and result in the satisfaction that you built or grew something from scratch. Building something with one hobby that can be used in another hobby is a cool experience. I also try to build something instead of buying something whenever I can. Is woodworking one of your hobbies? If not, what are your favorite hobbies? I hope you enjoyed reading about my experiences with woodworking and gardening. Have a great day.
In several of my weekly gardening updates, I have mentioned that we installed a rain barrel. I have known several people with them and have been excited to have one of my own for quite a few years. The opportunity to save some money on water? Sign me up!
Before buying our house last summer, we had been renters, so this was our first opportunity to have a rain barrel. As we were planning our garden, the idea of having one for this year came to mind as a potential reality rather than a long-term thought. We knew that we’d need a large amount of water for the garden, and we were looking to reduce our dependency on city water.
Our Barrel
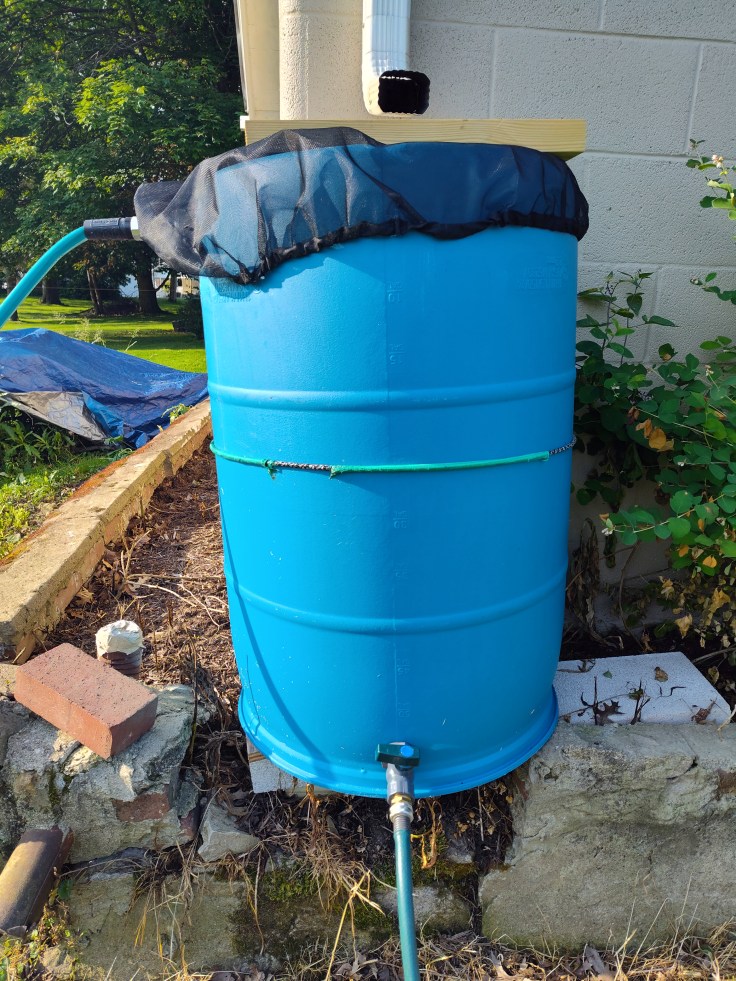
We picked up a 55-gallon food-safe blue barrel from Rural King. It was previously used for transporting drink concentrate. It was $30, so it would quickly pay for itself. We also needed to buy the spigots and a filter for keeping leaves and other debris out of the barrel. Those items came from Amazon.
Rain barrel
When adding a rain barrel, you can either buy one that is completely put together or repurpose something else. We went the latter route and saved money ($50), but it is a good deal of work. Instructions can also be vague, and YouTube videos may not apply to your setup. It’s also helpful to have power tools for cutting and drilling and have confidence in your ability to operate them. We were able to keep costs down because we have the power tools and only needed to buy a drill bit for the holes that the spigots go through. In total, I think it took an hour to get everything set up. Future ones will take less time now that we know what we’re doing.
If someone isn’t interested in converting a regular barrel into a rain barrel, they can easily buy one. A quick Google search shows many options with prices ranging from $50 to above $100. Some of the lower-priced options are collapsible, which sounds a bit precarious, and the more expensive options hold more than 55 gallons. These rain barrels typically include everything you need to get started.
What Makes a Rain Barrel a Game-Changer?
Simply put: Being able to convert rainwater into water for the garden is a difference-maker. Instead of paying for water (like we do) or using water from a well or spring, you get to use water that would normally run off the roof and be drained somewhere else. In our case, this was the yard, and it was running off into our garden beds. Converting something free into a usable resource has given us a sense of freedom that I didn’t expect.
Having the rain barrel has made us more aware of how much water we use when watering the garden and our flowers. It’s a 55-gallon barrel, but because there is an overflow spigot near the top, it probably holds around 52 or 53 gallons. We water with cans that hold a combined 4.5 gallons, so we get around 11 or 12 trips when using both cans, which is enough to water the entire garden. As a result, we are aware of the importance of not overwatering because the excess runs off, and it’s wasting the water we collected.
Using a rain barrel has also helped to contribute to the slow and quiet nature of gardening that I love. Because the rain barrel is gravity-fed without pressure, it doesn’t fill the cans as fast as our garden hose does. And that’s okay. It’s nice to take a break and let the cans fill at a slower pace. It’s also quieter than a typical hose setup due to the lack of pressure.
Naturally, a big reason to use a rain barrel is the money you can save. At the top, I said that we probably spent around $50 on everything. We don’t know what we pay for water on a per-gallon basis, but we will save enough money with the rain barrel this summer to pay for it. Gardening can use a lot of water, especially when you first start seeds, and being able to use free water that doesn’t need to be treated is wonderful.
Since we started using our rain barrel, we’ve found ourselves excited to see rain in the forecast, especially if it’s been dry in recent days or weeks. Every gardener gets excited for rain after a dry spell, since it means the plants are getting water, but with a rain barrel, you also get excited for your barrel to refill. A full rain barrel after a dry spell means your plants are watered AND you have a full supply to pull water from as needed. Speaking of refilling the rain barrel, I’m amazed at how fast it will fill. A half-inch of steady rain will fill it from empty in a few hours.
Get a Rain Barrel if You’re Able To
If you’re a gardener (flower or vegetable) and have the chance to, I recommend buying or creating a rain barrel. The financial, environmental, and plant health benefits vastly outweigh any negatives. It’s a relatively simple process to set one up, and they can be placed almost anywhere with a downspout.
Magz recently told me that some states have some restrictions against collecting rainwater, which I looked into. It appears that most of the restrictions apply to only using the rainwater for non-potable (aka non-drinking) purposes. That is an understandable restriction. Rainwater is not necessarily safe to drink, especially if it’s running off your roof and through a gutter/downspout system. Please don’t drink it. If you live in an area with more severe restrictions, I recommend trying to change those laws. Many university extension offices (here’s Penn State’s as an example) as well as the Environmental Protection Agency argue for the benefits of a rain barrel. Local municipalities and states should recognize those benefits as well.
We currently have one rain barrel but are planning to get at least one more. Collecting twice the amount of rainwater would further reduce our reliance on city water. When we create that rain barrel, I’ll take pictures and create a step-by-step article.
So, that is our experience with rain barrels and the benefits we’ve seen so far. Water conservation is very important, and being able to participate in it, even minimally, can be a difference-maker. Rain barrels also help to reduce run-off and soil degradation thanks to the presence of grass. The benefits vastly outweigh any perceived negatives. If you have the chance to, I recommend getting one. You almost certainly won’t regret it.
Do you have a rain barrel that you use for your garden? If so, what are your experiences with it?
As a kid, one of my favorite pastimes was designing. I loved the fashion styling flash games from Lizzie McGuire and My Scene. I designed my own catalog of clothes for a made-up brand with my friends in 4th grade, illustrating with my school supplies and piecing it together with scrap paper. Mary-Kate and Ashley’s movies captured my imagination through their use of clothes to characterize each sister’s personality.
That’s So Raven enveloped me in imagination, not from her psychic abilities, no, Raven Baxter’s closet pulled me in! Raven’s room was a stunner as well, like Zenon Kar’s space station cabin, and my Fashion Polly’s colorful playsets that folded out like Richard Hammond’s caravan. My friends and I discovered shows like What Not To Wear and Trading Spaces, which launched my sketches from clothing brands to interior design. I had a notebook full of room drawings. There were designs with slides, hammock beds, and intricate themes. I drew a Survivor-themed room with a tribal council area on the lower level, an outer space room with circular windows and futuristic lighting, even a beach room with a lofted bed, sunset paint scheme, and a pool placed in the middle of the floor. I wish I knew what happened to these sketches; it’s been such a long time.
When I discovered Animal Crossing in 2020, I was curious what the fuss was about, and later the next year, we bought a Nintendo Switch, opening a world of design I thought was lost to childhood. I was thrilled! Animal Crossing New Horizons debuted in March 2020, and because of the unique time, it had a huge following for its charming island life. You begin your game landing on a deserted island as part of a Nook Inc. Getaway Package, and assist Tom Nook in developing the island with the help of Timmy, Tommy, Dodo Airlines, Blathers, Isabelle, and the villagers who move to the island with you.
But what about the fashion and the home decor? This game first places you in a tent that you upgrade into a house, with subsequent expansions costing large sums, but with a relaxed payment policy. You also gain the ability to design custom things with Nook Mile redemption upgrades, craft unique recipes from resources on the island, and buy items from Nook’s Cranny and clothing items from Able Sisters. A ridiculous amount of my gameplay, even years later, comes from pairing and collecting new clothing items for my character to wear on her adventures. This game loves coordination!
As a player who is well-versed in the Animal Crossing fashion catalog, I wait and anticipate finding my favorite pieces with each new island. The game has four seasons, with clothing corresponding to the season at play, including specialty garments for holidays. Currently, as I play in June, it’s wedding season and Able Sisters is selling traditional Japanese wedding attire, Nook Shopping is selling Father’s Day items, and International Children’s Day pieces, which include a paper crown that is oh so cute!
How has this impacted my own personal style, though? Well, it has brought me back to the mindset of creating a full look. Working from home or working in professional painting at jobsites for most of my adult life has killed the style I used to have. I no longer felt the need to put together a look, but instead I got used to throwing on pieces and wearing things for function, not fashion. But that’s not who I really am, just what the environment of life drifted me into. I was missing intentionality, Animal Crossing lit that spark once again. My little character doesn’t just get dressed to do life; she wears a head-to-toe look with hats, bags, glasses, specialty socks, clever shoes, cute tools, and interestingly paired garments. This game got me out of jeans and a t-shirt, or a hoodie and leggings, because this game has trousers in many fabrics and shapes, shorts in colorful prints, skirts in a bouquet of fancy, coats, hats a plenty, tops that span the seasons – it’s a blast to explore! There are dresses – modern and traditional. I can where a kimono! I change her outfit at least once, maybe three times a session. You can also curate hairstyles and experiment with colors.
This exercise has shown me that pink hair is something I’d like to try. It’s my most-used fashion color. It has inspired me to introduce cute socks of varying heights and weights to my wardrobe, even making some of them. I’ve started wearing hats anytime I leave the house – it pulls the look together! My taste in bags has changed; no longer an option for a sleek purse that looks designer, instead give me a duck bag with feet. I love colorful knitwear, flowing skirts, and shoes that are beyond my comfort zone of boots and Converse. Taking those moments in the game to pair weird combinations together has positively impacted my design sensibility. When I plan a sewing or knitting project, I take into account what I’ve learned from dressing up my character, seeking to inject the whimsy and delightful wares of Animal Crossing into my real-life closet. I’m not the only one; I’ve seen this across Pinterest, YouTube, and Instagram.
But what about interior design? Well, this game not only presents the opportunity to design your house and the island, but you can also download Happy Home Paradise to design vacation homes for clients. This has really challenged me in a fun sandbox way to care about how a room is put together. I’ve become far more intentional about my furniture layout, what types of pieces I want to bring into my space, and how I want to pair pieces for a style that tells a story.
Buying a house last year was the icing on the cake of this new foray into design, as we have painted rooms and dug the garden beds, I’ve felt like it is Animal Crossing come to life. I have this canvas to put my stamp on. Moving from rented landlord-beige homes to a space where we can be colorful, it has shown me that the little details do make a space more welcoming and conducive for creating. The simple act of moving our dining room table from one side of the room to the center, allowing for walkways on either side, has made the room a place I want to be instead of a place I pass through. By filling the empty gaps of cabinets in our kitchen with tables, shelves, and a microwave stand, we have transformed the empty space into a room that feels complete. The simple change of painting my sewing room lavender created an entire mood, a calming and happy vibe that makes me excited to work within those four walls. The garden beds and the screened-in porch have been works of dimension, the outdoor space has useful and designated spaces for us to use that make it more beautiful and purposeful.
I am filled with a sense of possibility again, like the girl who sketched those rooms in a notebook, instead of a person muddling through life. In this time when we feel burned out by AI and stale creativity, it’s been electric to feel the sparks of imagination. The crafting aspect of the game has inspired me to be more creative in my own house. We repurpose, re-finish, and build things in our house from scratch. Because of life’s twists and turns, I have a lot of second-hand pieces that at first felt like a let down, like I was poor, but now I see them as incredibly meaningful items that I have the pleasure of caring for in my home. The game’s customization tools, such as kits for sale or the custom services of Cyrus, demonstrate how a coat of paint truly pulls a room together without buying something new.
Did I think when I purchased Animal Crossing New Horizons that I would see an impact on my own design sensibility? Not at all, but it has been the gift that keeps on giving. It’s an incredibly cozy game, full of wonder that I have grown fond of, year over year. Four years later, I still look forward to running around the island, hunting for recipes, wishing on shooting stars, and besting those pesky Happy Home Academy judges. I hope that I never lose my zeal for dress up and design because it is such a fun little way to relax in this wild and wacky world.






 One Rabbit Riot