Upcycling an Ikea Chair Into a Garden Trellis

In 2021, we bought a pair of Ikea Poang chairs. They’re pretty iconic and are what many people envision when they think about Ikea chairs. We used to sit in them every time we would shop at Ikea and dream of buying them when it made sense. That time came in 2021, and at first, we loved them. However, over time, they lost their luster. They were really low to the ground, making them hard to get out of, and they were narrow, so it was difficult to work on a computer or do anything with your hands, like cross-stitch or knit.

Ikea Poang chair
Ikea Poang chair

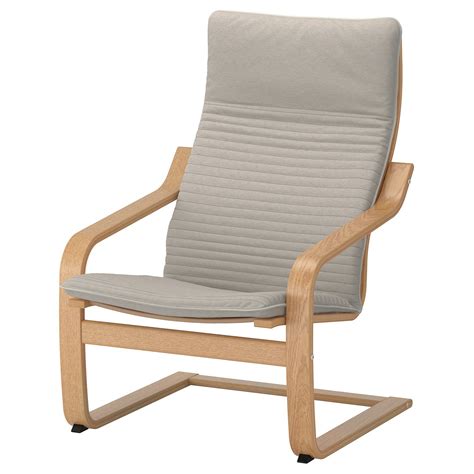
After moving in 2024, we decided that these would become outdoor chairs on our porch. Although the chairs weren’t designed to be outdoors, the wood can be treated to resist the weather, and the cushions were brought inside at night. They worked decently well on the porch; however, the same design flaws persisted: too narrow and low. When we built our table and stools, we no longer had a need for the Ikea chairs since the stools are primarily where we sit. And when we want something more “loungey” or have people visiting, we have folding chairs that recline flat. When not in use, they can be folded and stored away, taking up less space than the Ikea chairs. That left us with a decision to be made about the Ikea chairs.

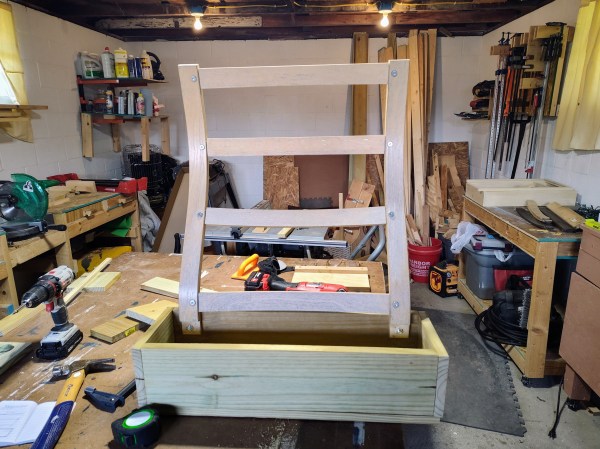
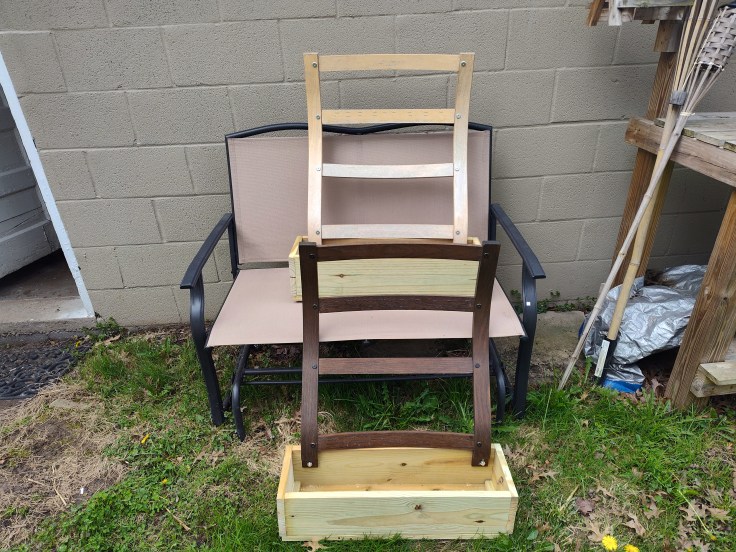
We aren’t people to throw things away unnecessarily, and we didn’t want to donate these chairs because they sat outside for nearly a year. Throughout the entire process, Magz had the idea of trying to use these chairs in our garden. We talked about simply setting a planter where the seat would be and letting nature take over them, as well as cutting out the seat support and growing a plant up from the ground through the chair. Eventually, I had the idea of using the back of the chair as a trellis system. You can’t see it in the above picture, but behind the cushion are two vertical pieces with several horizontal pieces between them, creating a ladder system. That’s essentially what a trellis is anyway. So, with that in mind, I set out to make it all happen.

Disassembly, Design, and Construction

If you’ve ever put together a piece of Ikea furniture, you know that they are all pretty similar. All of the individual wooden (or wood-adjacent) pieces are connected with screws, bolts, or barrel nuts (I had to look up what they’re called). Although assembly can be overly complicated, once you’ve put one piece of Ikea furniture together, you have an idea of how everything goes together. And while durability and longevity aren’t Ikea’s strong points, thankfully, it was a bonus in this case, because as easily as the chairs went together, they came apart.

With the pieces separated, we were left with two cross pieces, the back section that will be used for the trellis, two seat support pieces, and the two large side pieces that comprise the arms and bottoms for each chair. There was a seat section for each chair that was incredibly difficult to pull the staples from. We ended up getting rid of that piece. The back of each chair was the original inspiration for this project, but as I took the chairs apart, I could see ways to use the remaining pieces. The sides can either be cut down for individual lengths of wood or can be transformed into a planter stand. Meanwhile, the cross pieces will be used to build additional planters or in another woodworking project in the future. I typically don’t throw anything away if there’s a possibility that it can be used again.

Ikea Poang, Upcycling, Garden Planter
The first upcycle Ikea Poang chair into a garden planter.

Designing the planters for the back pieces was straightforward. I measured the width of them, added two inches, and that was the interior width of the planters. I had a bunch of leftover pressure-treated 1x6s from last year’s porch project. I kept them their full width and cut pieces to length to make the four sides of the planters. Initially, I thought I would need to have two rows of these boards so that each planter was roughly 11 inches tall. However, after attaching the sides for each planter and feeling confident that one row would provide enough dirt and be sturdy enough to not tip over, I kept the planters separate. This was great, because it meant I had two planters mostly finished when I thought I only had one planter halfway done.

With that decision made, I had to figure out the bottom. I did this by using scrap pieces and ripping full-width pieces on the table saw to cover the opening. I also added support pieces for extra attachment points. Also, a note on the connectors I used. For the most part, I used coated exterior 1 1/4-inch screws that went into pre-drilled holes to reduce the likelihood of the wood splitting. This mostly worked; however, there were times when I used exterior brad nails for efficiency and simplicity. I also used outdoor-rated wood glue to hold everything together. I’m confident that these planters are built well and should stay together for the foreseeable future.

Next up was the most complicated part: attaching the back piece to the planter. On the chair, this piece connected to a cross member with a short bolt that screwed into an enclosed nut that was pressed into the back side of the piece. There was no way to reuse this setup with the planter since the bolt was too short. Instead, I determined that a 3/8-inch bolt would go through the existing hole. I managed to clamp the back piece to the planter in order to drill a small pilot hole through the plant. I then drilled that hole out with a bigger bit and ran a zinc-coated bolt through everything and tightened it down with a nut. With both sides connected, I added a screw through both pieces on each side to make sure everything is secure. And with that, it was all done.

Ikea Poang, Upcycling, Garden Planter
Both upcycled Ikea Poang chair trellis planters.

In total, I think each planter took about two hours, and it was pretty easy to bring this idea to fruition. I’m also very proud of our ability to reuse and upcycle something that a lot of people would have thrown away. I’m really excited to plant in these this year and see how beans or cucumbers will climb the trellis system. I’ll definitely follow up with other posts about how we reuse the other pieces (if they’re used in a garden-related project) as well as how successful these planters are. If you’re interested in doing something like this, don’t be afraid to take a chance and upcycle something into a planter for your garden. It’s a lot of fun and gives your garden extra character.

It’s Okay to Admit You Don’t Like It

A place I didn’t expect to reach this year, was the mental head space of dislike for a dream I’ve had for most of my life. Now could it be burnout and I just need a break? Probably. But I also think it might a healthy thing to acknowledge something you thought you would love, may not actually bring you joy as you wished.

What am I talking about? Sewing. I don’t like sewing as much as I want to. It is tedious, extremely complicated, and requires a level of patience I lack. I’ve been a sewist for 5 years now. I devoted a large amount of my time over the past five years to the study of garment construction, and I realized that it is not my medium, yarn is, and its not a failure to admit I don’t like sewing as much as knitting and crochet.

I think I have known this for about a year, yet refused to verbalize my feeling because it felt like I failed the one thing I always wanted to do. But why is that a failure?

Just because it’s not my passion, doesn’t mean I am going to stop sewing. I think having this space to put less pressure on it to be “my thing” could make me enjoy it more!

Because then I am free to create, to fail, to be a slow learner, to take breaks from sewing when I am ready to cry. I don’t have to feel pressured to get my skills up to par for selling my work. I don’t have to feel pressure to design my own patterns or build a business on sewing. I can go back to basics of what has always been at my core – art. I am an artist, I don’t set out to be, but I know its there inside me too afraid to commit to the bit.

I love what sewing brings me. It’s a fantastic skill to have. I can design my own clothing made to measure and that is luxurious even if my sewing skills are mid.

I can experiement with my style through upcycling. I love how I can recycle and repurpose fabric instead of donating. That is a important part of comsumption. We buy and buy but don’t think about the life cycle of the garment, but with needle and thread you can leave the buy and declutter cycle.

Sewing has taught me to be a wiser comsumer as well. I buy garments that I can’t sew. Complex garments. I also price compare fabric against pieces in store to figure out what is more cost effective to sew. Such as buying a 6.99/yard, one yard cut of cotton jersey to make one long sleeve basic tee. You can buy these from retailers for 35 USD compared to sewing one for 7 USD.

It’s not always cheaper, but sometimes it is and that is a huge win!

Finally, by allowing myself to feel these feelings, my hope is that I will be free to explore and create unencombered by goals of monetizing my hobby, instead that I enjoy the creative process again.

Have you ever tried sewing? Did you find it challenging?

Flannel Upcycling – Skirt from Sleeves

When planning an upcycle, one thing that I consider with care is how to use the entire garment in the most innovative way possible. Maybe it’s all those episodes of Project Runway guiding me?

When I began my flannel upcycling project, and planned to transform them into vests, they needed a real purpose.

I began this project last year, as the summer was winding down, with fall whispering in the trees. Fall is an unmistakable inspiration for me. I love the color palette, traditional fabrics, and the academic style that returns to fashion every autumn season.

Sleeves Find New Life

Knowing how much yardage there is hidden in those sleeves, I had an idea – a plaid skirt with alternating colored plaid skirt panels connected by a waistband.

To do this, I cut the sleeves carefully from the shoulder seam to retain as much width and length as possible. This would become the bottom of the skirt. Next, I cut the cuffs from the sleeve; this tapered end was perfectly shaped for the waistline of the skirt for a flared effect.

For the waistband, I had yet to understand elastic, and was growing tired of waist ties, so I got a bit creative! I decided to use buttons, four of them to start, and created an adjustable button closure skirt, like the hook and eye of a bra band. The buttons were actually repurposed from the buttons of the shirt. For ease of getting dressed, I sewed the skirt on all the side seams, leaving a 2.5-3 inch opening to adjust the waistband, in a way that the fabric would cross over for security.

If you are looking for an easy and cute fall upcycle for the new season, I would highly recommend this project! You can even pair the vest and skirt together for a complete outfit!

Upcycling Pillowcases into a Vest and Skirt

What if the clothing we wear is more than just a garment, but connects us to the fibers of our being?

What if a pillowcase, from a loved one no longer here with you, could be more than just an item cluttering your closet? How could you repurpose it so the memories can walk with you in the new days ahead. All while the smell of their laundry detergent, and their home, so distinct to your senses, that being near it makes you feel comfort.

That is what this project is to me. More than an upcycle, or a thrifty hack, but a way to process feelings. Find a way forward. So the things left behind, that remind of what is missing, can do more than drown us in memory and stuff, but become a tangible way of healing.

A Simple Denim Upcycling Project for Beginners

What do we do when an item of clothing doesn’t fit? Rehoming is always a good idea, but here is another one – upcycling. What if you could transform that garment into another garment you will wear? Here’s an easy upcycle using one pair of jeans.

The Process

To begin, I cut off the legs of the denim above the knee. This was important. To hem the denim to the same length, including the excess fabric needed to fold over for a waistband, the leg section needed to be longer than what was cropped.

I carefully cut open the side seams, avoiding both the pocket and the rivets. The belt loops were set aside for later.

I then cut the leg pieces to the proper width, adjusting the fit with try ons, before sewing. The top of the section was hemmed for a waistband and the bottom hemmed with the rest of the short.

I sewed this very carefully with my machine. I did break a needle but, it happens just use caution and wear glasses to protect those eyeballs. Always know where your fingers are too when using a sewing machine.

Next I repaired the worn denim around the belt loops and attached the cut off belt loops to a new section and tada: you have a new pair of shorts for summer!

Playing Animal Crossing Has Improved My Style

As a kid, one of my favorite pastimes was designing. I loved the fashion styling flash games from Lizzie McGuire and My Scene. I designed my own catalog of clothes for a made-up brand with my friends in 4th grade, illustrating with my school supplies and piecing it together with scrap paper. Mary-Kate and Ashley’s movies captured my imagination through their use of clothes to characterize each sister’s personality.

That’s So Raven enveloped me in imagination, not from her psychic abilities, no, Raven Baxter’s closet pulled me in! Raven’s room was a stunner as well, like Zenon Kar’s space station cabin, and my Fashion Polly’s colorful playsets that folded out like Richard Hammond’s caravan. My friends and I discovered shows like What Not To Wear and Trading Spaces, which launched my sketches from clothing brands to interior design. I had a notebook full of room drawings. There were designs with slides, hammock beds, and intricate themes. I drew a Survivor-themed room with a tribal council area on the lower level, an outer space room with circular windows and futuristic lighting, even a beach room with a lofted bed, sunset paint scheme, and a pool placed in the middle of the floor. I wish I knew what happened to these sketches; it’s been such a long time.

When I discovered Animal Crossing in 2020, I was curious what the fuss was about, and later the next year, we bought a Nintendo Switch, opening a world of design I thought was lost to childhood. I was thrilled! Animal Crossing New Horizons debuted in March 2020, and because of the unique time, it had a huge following for its charming island life. You begin your game landing on a deserted island as part of a Nook Inc. Getaway Package, and assist Tom Nook in developing the island with the help of Timmy, Tommy, Dodo Airlines, Blathers, Isabelle, and the villagers who move to the island with you.

But what about the fashion and the home decor? This game first places you in a tent that you upgrade into a house, with subsequent expansions costing large sums, but with a relaxed payment policy. You also gain the ability to design custom things with Nook Mile redemption upgrades, craft unique recipes from resources on the island, and buy items from Nook’s Cranny and clothing items from Able Sisters. A ridiculous amount of my gameplay, even years later, comes from pairing and collecting new clothing items for my character to wear on her adventures. This game loves coordination!

As a player who is well-versed in the Animal Crossing fashion catalog, I wait and anticipate finding my favorite pieces with each new island. The game has four seasons, with clothing corresponding to the season at play, including specialty garments for holidays. Currently, as I play in June, it’s wedding season and Able Sisters is selling traditional Japanese wedding attire, Nook Shopping is selling Father’s Day items, and International Children’s Day pieces, which include a paper crown that is oh so cute!

How has this impacted my own personal style, though? Well, it has brought me back to the mindset of creating a full look. Working from home or working in professional painting at jobsites for most of my adult life has killed the style I used to have. I no longer felt the need to put together a look, but instead I got used to throwing on pieces and wearing things for function, not fashion. But that’s not who I really am, just what the environment of life drifted me into. I was missing intentionality, Animal Crossing lit that spark once again. My little character doesn’t just get dressed to do life; she wears a head-to-toe look with hats, bags, glasses, specialty socks, clever shoes, cute tools, and interestingly paired garments. This game got me out of jeans and a t-shirt, or a hoodie and leggings, because this game has trousers in many fabrics and shapes, shorts in colorful prints, skirts in a bouquet of fancy, coats, hats a plenty, tops that span the seasons – it’s a blast to explore! There are dresses – modern and traditional. I can where a kimono! I change her outfit at least once, maybe three times a session. You can also curate hairstyles and experiment with colors.

This exercise has shown me that pink hair is something I’d like to try. It’s my most-used fashion color. It has inspired me to introduce cute socks of varying heights and weights to my wardrobe, even making some of them. I’ve started wearing hats anytime I leave the house – it pulls the look together! My taste in bags has changed; no longer an option for a sleek purse that looks designer, instead give me a duck bag with feet. I love colorful knitwear, flowing skirts, and shoes that are beyond my comfort zone of boots and Converse. Taking those moments in the game to pair weird combinations together has positively impacted my design sensibility. When I plan a sewing or knitting project, I take into account what I’ve learned from dressing up my character, seeking to inject the whimsy and delightful wares of Animal Crossing into my real-life closet. I’m not the only one; I’ve seen this across Pinterest, YouTube, and Instagram.

But what about interior design? Well, this game not only presents the opportunity to design your house and the island, but you can also download Happy Home Paradise to design vacation homes for clients. This has really challenged me in a fun sandbox way to care about how a room is put together. I’ve become far more intentional about my furniture layout, what types of pieces I want to bring into my space, and how I want to pair pieces for a style that tells a story.

Buying a house last year was the icing on the cake of this new foray into design, as we have painted rooms and dug the garden beds, I’ve felt like it is Animal Crossing come to life. I have this canvas to put my stamp on. Moving from rented landlord-beige homes to a space where we can be colorful, it has shown me that the little details do make a space more welcoming and conducive for creating. The simple act of moving our dining room table from one side of the room to the center, allowing for walkways on either side, has made the room a place I want to be instead of a place I pass through. By filling the empty gaps of cabinets in our kitchen with tables, shelves, and a microwave stand, we have transformed the empty space into a room that feels complete. The simple change of painting my sewing room lavender created an entire mood, a calming and happy vibe that makes me excited to work within those four walls. The garden beds and the screened-in porch have been works of dimension, the outdoor space has useful and designated spaces for us to use that make it more beautiful and purposeful.

I am filled with a sense of possibility again, like the girl who sketched those rooms in a notebook, instead of a person muddling through life. In this time when we feel burned out by AI and stale creativity, it’s been electric to feel the sparks of imagination. The crafting aspect of the game has inspired me to be more creative in my own house. We repurpose, re-finish, and build things in our house from scratch. Because of life’s twists and turns, I have a lot of second-hand pieces that at first felt like a let down, like I was poor, but now I see them as incredibly meaningful items that I have the pleasure of caring for in my home. The game’s customization tools, such as kits for sale or the custom services of Cyrus, demonstrate how a coat of paint truly pulls a room together without buying something new.

Did I think when I purchased Animal Crossing New Horizons that I would see an impact on my own design sensibility? Not at all, but it has been the gift that keeps on giving. It’s an incredibly cozy game, full of wonder that I have grown fond of, year over year. Four years later, I still look forward to running around the island, hunting for recipes, wishing on shooting stars, and besting those pesky Happy Home Academy judges. I hope that I never lose my zeal for dress up and design because it is such a fun little way to relax in this wild and wacky world.

I Made Furniture From Fabric Scraps

Do you ever look at an item you want to buy and think, how hard can that be to make? Well, that’s exactly how we got here.

Floor Culture

I’ve been moving my sewing room around, I took down my sewing table and moved to the floor. Which I know sounds extreme, but seriously, sitting on the floor is underated. My back and hips don’t get tight and my posture is improving. In the West, I think we have been foolish to move away from sitting on the floor and should acknowledge how wise other cultures are to sit on the floor for health and posture.

I have a wicker chair that is good for sitting in when I want a break from the floor, but what I was missing was an in between piece of furniture that I could move depending on my needs. I settled on a floor cushion that could be used as a seat, a workspace, folded up in a cushion or rolled into the corner for yoga to add more stretch breaks to my life.

Quick Fix

But here’s the catch, I decided I needed this piece of furniture on a whim and that’s what I am trying to remove from my purchasing decisions – less impulse purchases. I want to become less of a consumer and use what I have, so I thought could I make what I want? Similar cushions for sale online were 100-400 USD and with the tarriffs looming, I was feeling a bit nervous to buy something.

But then I remembered my Mom made a pouf, she knit the cover. I’d watched Morgan Donner make things from her scrap and fashion a mattress from braided fabric. I had also begun saving my fabric scraps and sorting them into bags that were taking over my crafting closet. I just had to settle on the cover fabric and design.

Design and Materials

A large rectangle seemed like the ticket with corners I could sew crisply and easily stuff at the end. There was this one extra wide cut of fabric I bought from Joann’s last summer which caught my eye. It’s a fabric I bought because I enjoyed the design but didn’t want to wear it. It looks a bit like denim and had a lovely swirl pattern that I thought, would compliment the lavender paint of the room. With the fabric sorted, it was time to tackle the pattern and stuffing!

I measured the fabric into two large rectangles and four slimmer sections to form the sides. These I sewed inside out to leave only one end open to stuff. I sewed this by hand over the course of a day, I’d say in total the sewing portion of this project was the easiest part. What lay ahead next was tricky, blister inducing  and stressful.

Stuffing and Scraps

I had bags upon bags of scrap fabric in varying sized pieces ready to be repurposed into stuffing, but the thing with fabric cabbage is that it’s not uniform. Which means there will be a lot of cuts to make. This I foolishly chose to do with my old fabric scissors, instead of using my rotary cutter and mat. I wish I had. The repetitive cutting motion wore a blister on my thumb and aggrevated an old injury on my finger joint.

My hands were tired, weak, and wrecked by the end of day one. Worse the cushion was 1/3 full. Not what I was expecting! How could it take that much stuffing?! With my bags of fabric scraps depleted, I moved on to new sources of cushion comfort. Such as yarn that I was given secondhand, which I had no creative plan for. This yarn was a super bulky, acrylic yarn, about 300 yards left, and perfectly fluffy for stuffing. I cut this into pieces and carried on auditing my stash.

I repurposed some old clotbes into stuffing, a blanket Mia’s little bunny chompers had chewed into swiss cheese, and more leftover yarn floating around my sewing room. Yet, I still lacked the floof I was after so I broke down and browsed the interweb. I knew polyfill was an option, but it’s also polyester and the point of this was to repurpose and use up things, not go to Walmart for polyfill, which happened to stretch very little. When I made a bolster pillow for our couch out of an old sheet, I went through 5+ bags of it. Whuch made me wonder, are there alternatives to polyfill on the market? There are! I found a small business, selling cotton filling that shipped. This got me to comfortable fluff, I still need a bit more but I’m going to revisit it later.

Voila! A piece of furniture made (mostly) from what I had in my house that used up some trash in the process. I am pleased. 😁

Create a website or blog at WordPress.com

Up ↑