The harvest season awakens something in me. I know it is the season that everything dies, but it does so beautifully. Humidity, also bids farewell for 6 months, and with it the best time of the year for getting dressed awakens from its slumber. But what are you to do when the itch to buy something new descends, as it did upon your mind last August? I’m determined to find new ways to scratch this itch, without over consuming and overspending. May I introduce you to my newest sewing obsession – applique?
Applique is like drawing on my clothes. I love it! Items from my wardrobe that I don’t like anymore can be erased and sketched upon once again with needle, thread, and scrap fabric. Or sometimes you get the double whammy of upcycling a garment with applique, from another garment you aren’t vibing with anymore. This is what did to re-imagine three hoodies from my existing wardrobe with patches and cut up scraps from projects that didn’t work out, to recycle and enjoy those projects in a new form.
1: Removing and Replacing a Portion of the Garment
Sometimes, try as you might, you have to cut out a portion of fabric from damage. This is what happened to this hoodie. It used to have block letters, embroidered by machine, that I had grown tired of. Even though I had good memories from the destination this hoodie used to spell out across the front, I had grown tired of being a billboard for this place. I tried to remove the embroidery, very carefully, but my stitch ripper did its thing too well and made holes. To remedy this, I cut a large section of fabric, bigger than the area I needed to replace to fix this problem. Next I secured this to the hoodie, by hand sewing, but you could sew this with your machine very easily. Just watch for pins! Finally, I cut out a moon and some birds, abstract style, from scrap fabric, sewing those to the newly repaired hoodie. It’s ready to wear once again!
2: Why Not Add a Separating Zipper and Patches?
Sometime it is not the graphic, but the overall function of the garment that needs an upgrade. I do wear this light blue hoodie, but not as much as I could, if the hoodie had a full zip, so I could wear it as a jacket. To make this upgrade, I purchased a separating zipper, usually labeled as a jacket/coat zipper. Before I began my cut, I marked where to cut, ensuring I would cut evenly in the middle of the garment. Next, I pinned the zipper in place, adjusting this several times, for perfect placement. I sewed this by hand, which I highly recommend, since a special sewing foot and some direction is needed to sew zippers without obliterating your needle.
I was quite pleased with its new functional form, but it was still missing some personality. It was time to cover the Nike logo. Once again, I tried to seam rip the logo, but those logo’s are quote stubborn. Instead, I changed it up to sew these Canadian Geese patches and a moon to this area of the hoodie, inspired by the film Fly Away Home.
3: Cover and Forget the Old Screen Printing
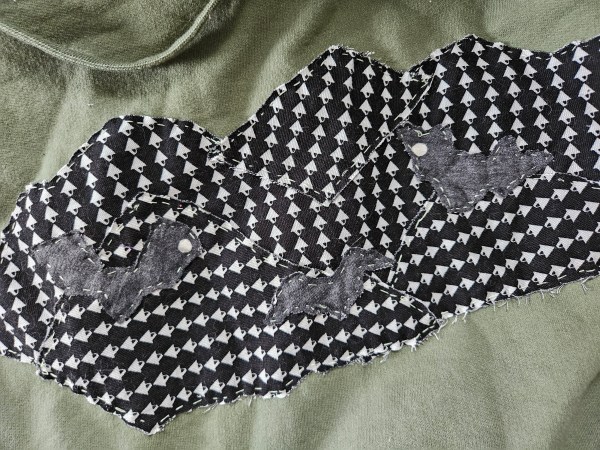
Now for the easiest upcycle – covering a screen print graphic with applique. For this design, I layered pieces of the background fabric, which was cut to be mountains, into a night sky. When choosing an applique this sizable, I recommend trying this one before you sew the pieces into place. By doing this first, I noticed the graphic was extending into the armpit, not desirable for comfort or the image I was creating with this applique pieces. I trimmed from the sides and tried again, before I began to sew. I first sewed the sky and then placed the bats. These bats were also free hand cut on the fold.
By changing up the graphic from a business, to piece of artwork, I can share something I am interested in with the world. Bats. Bats are great pollinators and help us maintain the mosquito population. They are also ambassadors of spooky season. Through some sewing and a little imagination, I transformed an unworn hoodie into a favorite piece of art. I hope this inspires you to get creative with something you might toss in the donate pile, and give your garments a second chance with a dash of applique!
Recycling is an important thing we should do. In the United States, only 21% of all the plastic gets recycled, and of that percentage, roughly 60% actually makes it through the entire process and is turned into something else. Of course, recycling is about more than just plastic, but plastic is the biggest problem. Plastic takes a minimum of 20 years to decompose, but some research suggests it can take up to 500 years for certain types to break down on their own. In the past, metal, glass, and paper/cardboard served the roles we now use plastics for, and all are easier to reuse, repurpose, and recycle. Take cardboard, for instance, which decomposes in two months. Plastic has its positives: it’s stronger, lighter, more flexible, and cheaper to produce than other items. Yet, we’ve become so dependent upon it that our landfills and oceans are full of it, and at this point, it may never go away.
Let me say that I’m not the greenest person you’ll ever meet. We have two gasoline-powered cars, and I don’t see the benefits of buying an electric vehicle, considering the damage that is done to mine the lithium needed for the batteries. The majority of our outdoor power tools are gas-powered, with the exception of our push mower, which is battery-powered and has plenty of problems. I like gas-powered things for their simplicity and how easy they are to work on. I also don’t believe that humans are the sole culprit behind climate change, nor do I think we can be the sole reason it is reversed and saved. I believe that the Earth’s climate has always been cyclical and that we’re currently in a warming trend.
That being said, it is my belief as a Christian that God created the Earth and gave humans the responsibility of stewarding it and all that’s on it, and we’ve failed in just about every aspect. We treat animals and the Earth’s natural resources with a level of disrespect that we would be offended if we were treated the same way. Most don’t think about or value the sacrifices made by the animals when we consume them, and few stop to consider how we need to put resources and nutrients back into the land to replenish what we’re taking from it. I despise fast fashion because of the toll it’s taking on the land and those who make the garments. I also can’t stand the gross willingness to exchange our natural resources for a quick buck. At the same time, I despise greenwashing and any attempt to profit off people’s convictions, especially if there’s nothing behind a company or person’s marketing.
That tangent may have been unnecessary, but I wanted to explain the position I am coming from. I want to be as respectful and loving toward the Earth as I can, but I don’t think that should come at the cost of humans, especially those in underdeveloped areas (have we learned nothing from colonialism?). I think we should put forth real efforts to recycle, but recognizing that it remains a flawed process and system, reusing items is equally, if not more, important. This is where I found myself as I began to think about how to recycle in the garden. To me, it’s only natural to seek out ways to reuse items when you already care enough about the land to reduce your dependency on commercial farming.
Here are some ways we’ve been able to recycle and reuse household items in the garden.
Yogurt Containers
I first learned about using yogurt containers in the garden after watching an MI Gardener video on YouTube. He recommended cutting the small single-serving containers into 1-2″ strips and using them as labels for starting seeds or in the garden. This is a great way to repurpose these containers since many gardeners buy the plastic/vinyl labels anyway. Any plastic container can be cut for this purpose as long as the marker you’re using to write the seed name stands out from the plastic. To me, the best part of using plastic containers this way is that they can potentially be used for multiple years, but if they can’t, you can still recycle them when you’re done using them.
I used yogurt containers in two other ways. One was for soaking bean seeds overnight and transporting them out to the garden for planting. The second way was to start seeds in them. This wasn’t as successful as the dedicated starting cells, but I’m planning to try it again next year. In theory, yogurt containers should work well since they hold more soil than the starting cells you can buy. My attempt at using them this year failed because I didn’t cut enough drainage holes in the bottom to help the excess water run out.
Gatorade (or Other Plastic) Bottles
We keep our seed starting setup in our basement, so I carry water to the plants rather than the plants to a water source. You may remember that I initially recommended using a cheap spray bottle for starting seeds, but I eventually switched to Gatorade bottles and watered the seeds from the bottom. You can use any bottle for this purpose, but Gatorade bottles are a nice size.
Woodworking Scraps
As a woodworker, I accumulate a lot of scraps. I struggle to throw away any pieces, even if it’s unlikely that I’ll ever be able to use them again. Thankfully, gardening gives me a way to use scraps that can’t be used in other woodworking projects. I’ve found that a lot of my cut-offs from squaring up pieces of lumber are the perfect size to stake up plants. I will use any unfinished wood, including pressure-treated, and tie the plant to it with a garden twist tie. Using these cut-offs saves money, since we aren’t buying anything new, and they should last multiple years.
I also used scraps to build the planter box and trellis system for our long beans. This project wasn’t technically recycling anything, but I decided to mostly use scraps instead of breaking down a full-size board.
Rabbit Droppings
Not everyone will be able to do this, because I’m not advocating for you searching through your yard for wild rabbit poop. However, if you’re lucky enough to have an adorable pet rabbit like we do, you can use their droppings as fertilizer. In fact, you can use most animals’ poop, but I would stay away from dog and cat feces. Rabbit poop is considered “cold” manure and doesn’t need to be composted or broken down before being applied to the garden. Basically, any animal that produces pelletized poop (goats and sheep are also in this category) can be directly applied. However, other animals, like chickens and horses, have “hot” manure and must be composted first. These animals can carry pathogens and diseases in their feces, and the poop can literally burn the plants if immediately applied. And dog or cat poop should never be used as fertilizer.
Rabbit poop, in particular, is a great fertilizer because it’s high in nitrogen, which is slowly released as the droppings decompose. When you figure that a domesticated rabbit produces up to 200 droppings each day, it can be a substantial fertilizer source, saving you a lot of money. Do yourself a favor: Adopt a rabbit, experience how wonderful they are as pets, and get the added benefits for your garden.
Milk & Juice Bottles
In the spring when the weather can be a bit volatile, it’s not uncommon to have frost advisories after your plants are in the ground, and they need to be protected. There are products sold to meet this need, including ground sheets, but my dad always kept his gallon-size milk bottles to keep his young plants insulated from the cold air. It’s easy to do. Cut either the top or bottom of the bottle off and place it over your plants. That’s it. This keeps warm air trapped inside, prevents the cold air from reaching the plant, and works as a greenhouse, which will help your plant to grow quickly. Milk bottles aren’t the only option, either. You can also save bottles that once held juice, vinegar, tea, etc. If the bottle was able to hold a consumable liquid, it’s probably okay to use in your garden. Just be sure to thoroughly clean it first.
Compost
This feels a little like cheating, but isn’t composting the ultimate act of recycling? You take food scraps that you didn’t eat and convert them into nutrients for your soil. These scraps can be the rinds of melons or strawberry tops. They can also be produce that has gone bad. Throw them in your composter, and they’ll eventually be converted into quality compost that can be mixed into your soil, which adds nutrients to help with your future gardens. If you don’t already compost, I recommend giving it a try. You can buy affordable composters or even build one yourself, and with a little bit of work and a lot of time, you can have a soil amendment that is nearly free.
Cardboard
Like plastic, we use a lot of cardboard in modern society. With all the online shopping and shipping that takes place, it’s common to have multiple cardboard boxes arrive at your house each week. Like I said in the intro, cardboard is great because it quickly decomposes, so no matter what you do with it, it isn’t going to cause long-term harm to the environment. Like most people, we always recycle our cardboard, but before doing that, we look for ways to reuse it. If we need to change the oil in the cars soon, we keep a few sheets on hand to put under the car when doing the oil change. We have also started keeping specific boxes and cardboard packaging to create Halloween and Christmas decorations. But cardboard can also be used in the garden. Because it breaks down so quickly, cardboard is a great form of mulch and compost. In the fall, after everything has been harvested and the plants have been pulled, you can lay sheets of cardboard on top of the soil and allow them to decompose. In the spring, this material will be organic matter that will improve soil quality.
Produce Containers
Eventually, if everything is successful in your garden, you’ll need containers to put your vegetables in after harvesting. We bought a couple of orchard baskets to use in the garden to make it easier to transport everything into the house, but those won’t work for storing vegetables. That’s where saving and repurposing produce containers come in. The plastic packages for cherry tomatoes, strawberries, and blueberries work perfectly for your smaller tomatoes. If you can find any of the cardboard/paper containers used at orchards, those are perfect for your larger tomatoes, peppers, potatoes, and tomatillos. Finding a way to repurpose what you have will save you a lot of money versus buying something specifically for this purpose.
Future Recycling Opportunity: Egg Cartons
I haven’t tried this yet, so it may be a massive failure, but I saw some of our leftover pressed paper seed starting cells yesterday and noticed how similar they are to egg cartons. I’m talking about the cardboard/pressed paper ones; not the foam ones. They’re about the same size as the cells we have, and with a drainage hole added, they would probably work to start seeds. I am going to give this a try next year to see how they do and will report back.
Recycling Where Possible
None of what I mentioned in this post is what most would traditionally call recycling. But it’s a literal understanding of it. It’s repurposing things that may otherwise end up in a landfill. And at the end of the day, the plastic from the yogurt may eventually wind up there anyway, but we’re giving this plastic a second life before it ends up in the recycling bin. I think it’s important to make attempts to improve the environment where possible, especially when we’re already dedicated to sustainable gardening through crop rotation and doing as little tilling as possible. I hope that you found this post helpful and may consider one of the things I mentioned.