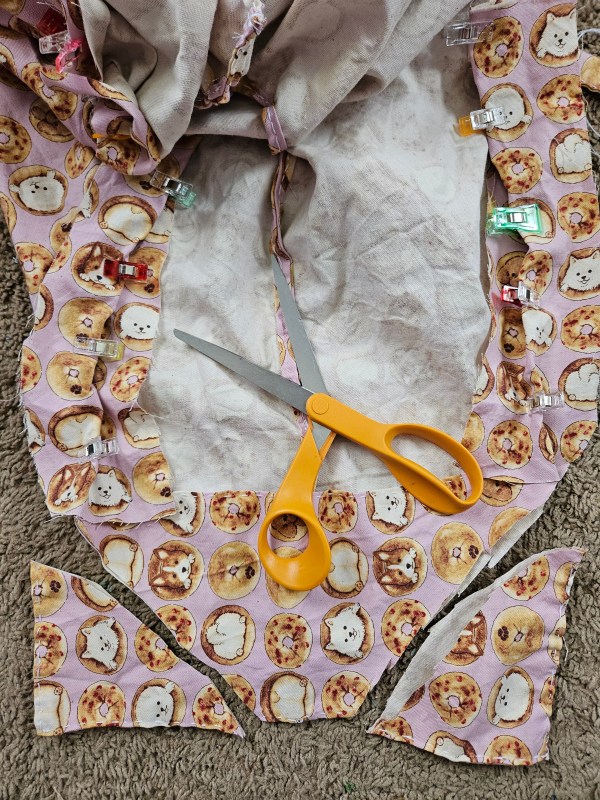
Okay, as a millennial, I can’t hear the word pivot without thinking of this scene from Friends. But, silliness aside, Ross was correct; you have to pivot and pivot well. The longer I sew, the more agitated I get when I make foolish cutting or measuring mistakes in my garments. Like my shortalls from last year, I tried them on over the weekend because it is feeling warm and springlike here, and I was shocked by how poorly I fit the shorts. The top portion of the shorts fits excellently, but not the shorts. No one wants weird bunching when it comes to shorts, and that was exactly the problem!
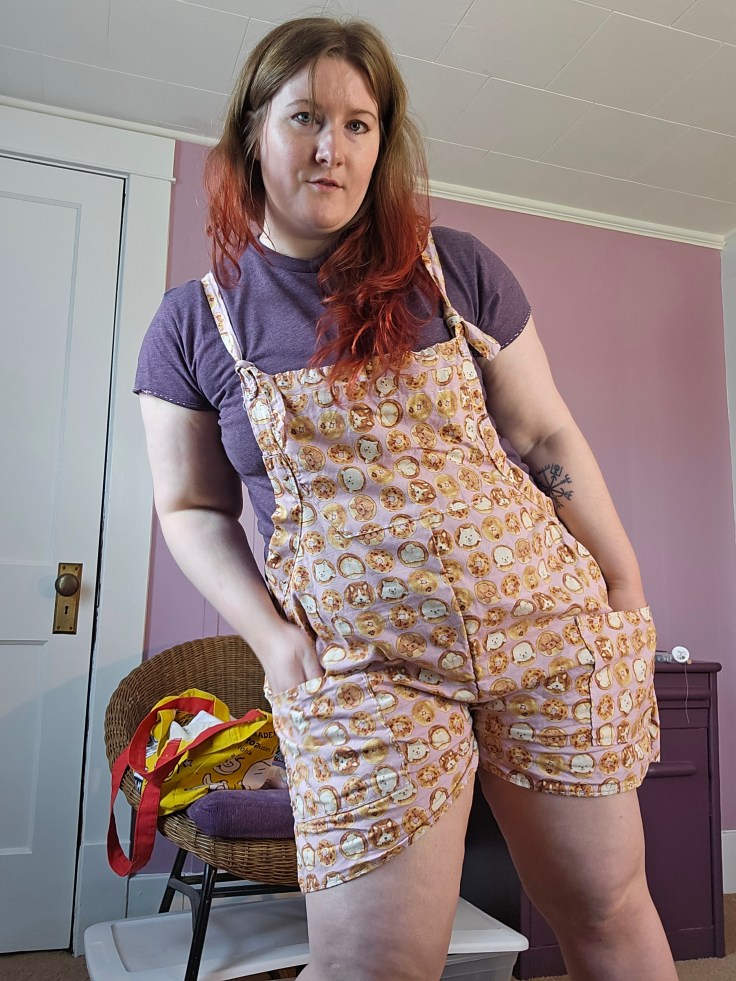
At first, I went through the stages of grief – denial, anger, bargaining, depression, and finally acceptance that no matter how delusional I chose to be, these shortalls are uncomfortable. I would not wear them. This made me feel so many regrets. The pink overalls I drafted completely from scratch, using a special fabric featuring corgis and bread from a Japanese fabric brand called Kokka Fabric, sourced from my local fabric shop, Firecracker Fabrics. The second pair was cobbled together as a challenge of fabric and repurposing. The fabric was 1 yard of 59″ cotton twill from Mood Fabrics, and the pockets were sourced from a pair of shorts in my closet. I refused to scrap these. But what could I do to fix these? With all the patterns at play, adding in a new fabric sounded scary. Cutting these into bags or future quilting projects was throwing in the towel too soon for me.
My solution came to me one night, as I was washing my face; I didn’t have to make a drastic change. I had to address the problem – the way I cut the curve of the pants. I could remove the section that divided the fabric into legs, and transform the shortalls into pinafore dresses with a few cuts and stitches! It was a success! The shorts are now a skirt, by cutting away the curved line and sewing a straight seam on the back and front of the skirt. I also made a quick swap to the back bib of the brown floral pair, adjusting the square bib to the triangle shape of the pink ones. This adjusted the fit of the dress in an excellent way. The purpose of the triangle, I believe, from the fit change on my garment is to eliminate gapping between your shirt and the back bib, so the fit follows the line of your body.
Now, sewing is not the only place to pivot, obviously. Problem-solving is a fundamental part of the creative process. Projects rarely work out the way you want, from knitting to cooking to building a piece of furniture. In this fast fashion, consume and donate, culture poisoning my country’s culture, we are losing the art of problem-solving. This has been exacerbated by the rise of AI and ChatGPT. Why think at all? Why imagine, ponder, or research? Why try if you aren’t going to get “expert” results? That is what the rise of optimization culture is creating: the fear of trying. But you have to try to become an expert. AI is not an expert; it is a thief, stealing the knowledge of humans who have spent years and decades striving to know, unafraid to try and fail. It’s literally the scientific method. So if you are an impressionable person, who is growing up in this current era, don’t give up your creative ability for AI to do it for you. You will lose crucial thinking and creative skills if you don’t exercise your mind and problem-solve on your own. Just do it.
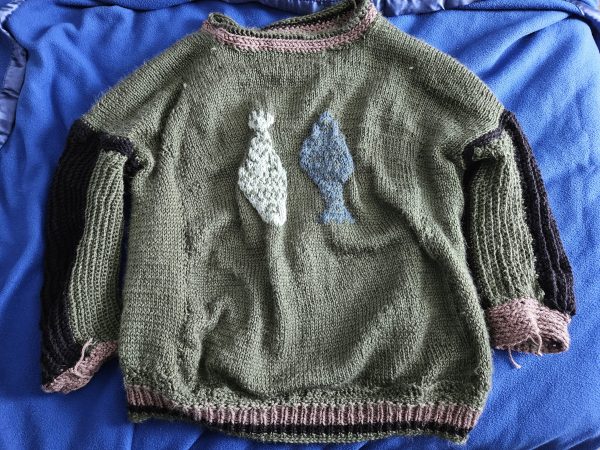
In 2025, sardines and other tinned fish became more than just food; they appeared on beaded bags, shirts, and prints. They also made their way to the fiber arts community, which inspired me to make a fish print sweater for Kyle, who enjoys fishing IRL and in video games. I just like the video game version.
The Design Concept
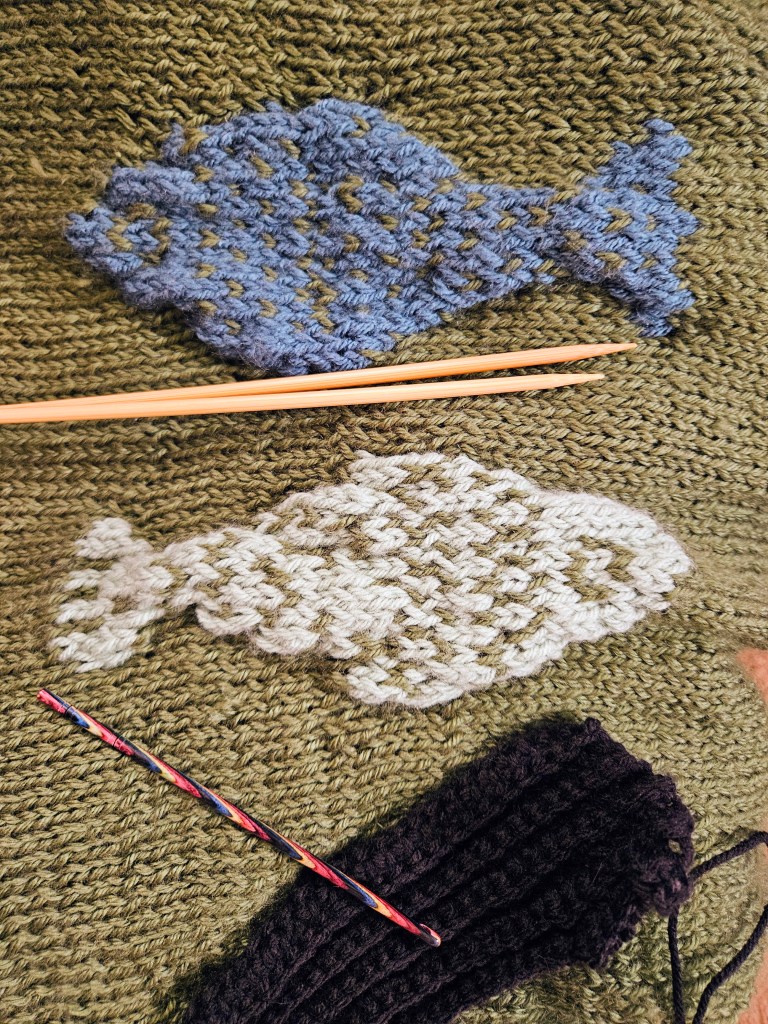
When planning a garment with a colorwork motif, I always consider scale, placement, and repetition. To do this, I use what I learned in art class many years ago – the seven fundamentals of art. So I consider line, shape, color, value, form, texture, and scale. In the catch-of-the-day sweater, it was important to make the fish wearable and to ensure good form and function. How do I make the fish on this sweater make sense? I decided to hang freshly caught fish on the sweater to help with the scale of the art. I placed them in the center, on the front, only to keep the perspective of this in focus. I thought placing more fish would become overwhelming to the eye and become unwearable.
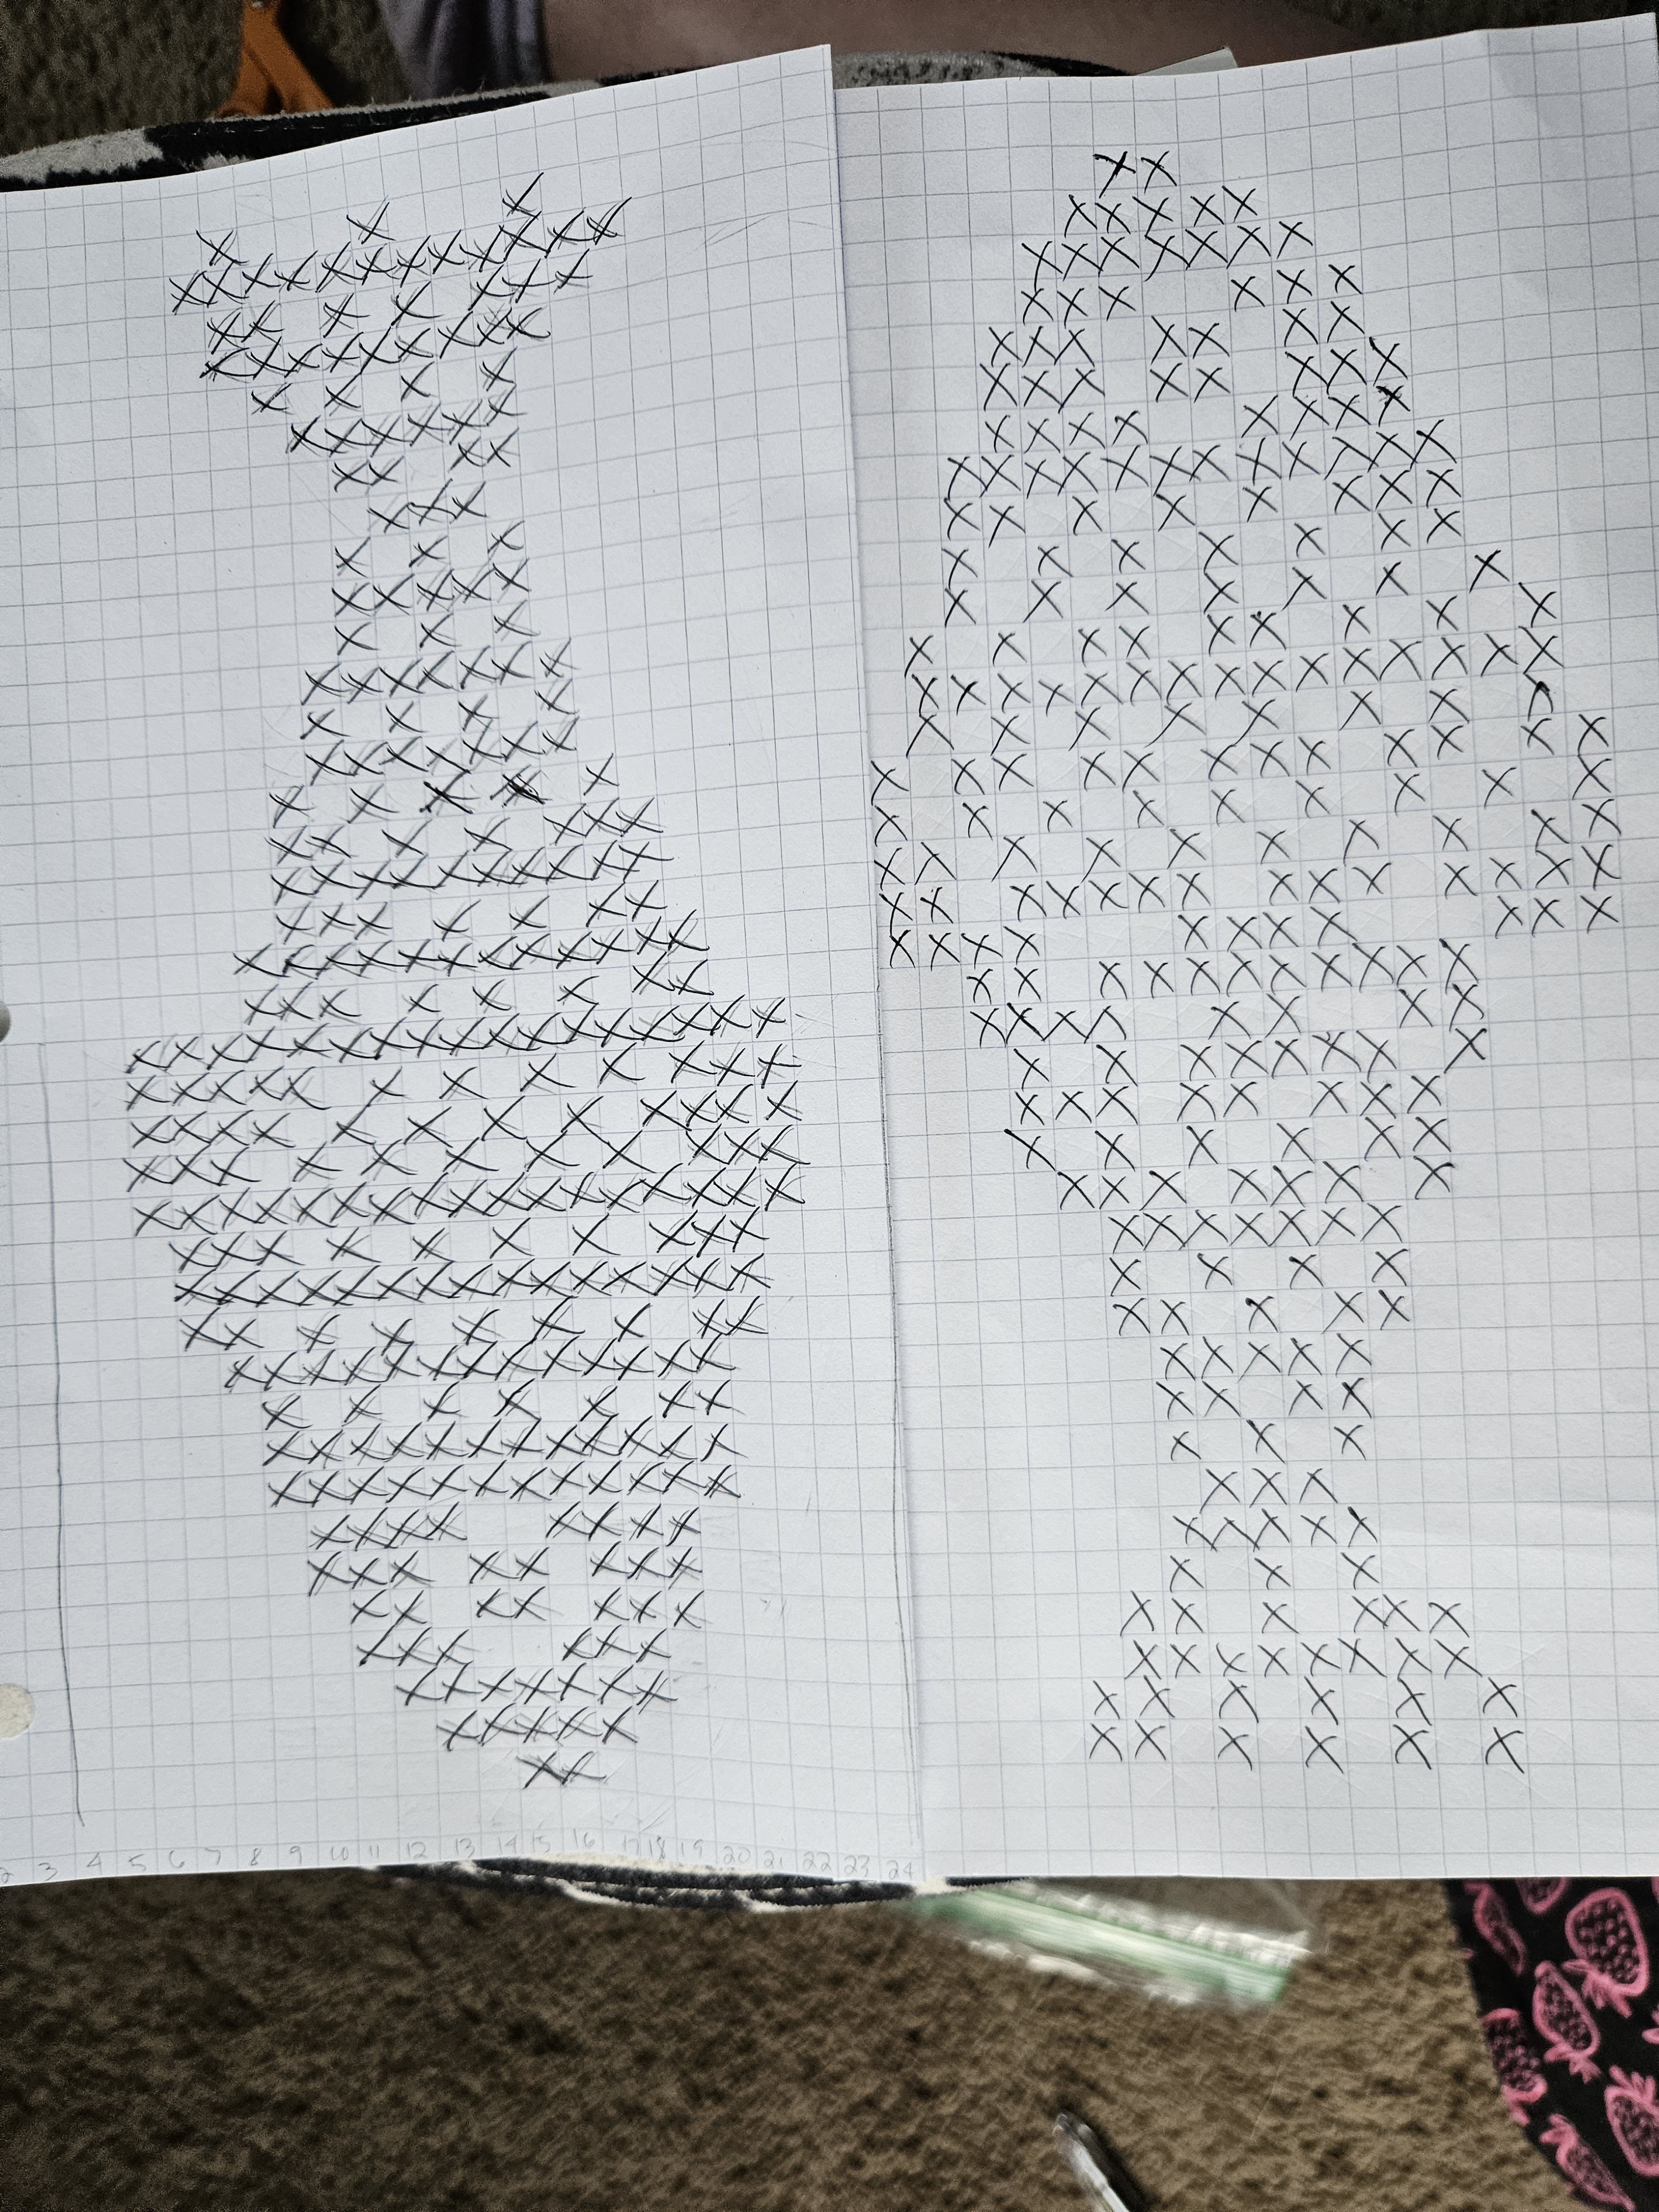
Adding more fish would have required adjusting the scale and the color, meaning I would have simplified the sweater down to two yarn colors only, with sections of fair isle colorwork, which is a smaller, more concentrated technique. But I like the color contrast of using two colors, representing two types of fish with slightly different scale patterns. How big is too big? How do you represent a fish, with their scales and texture? For this, I went to Pinterest to find cross-stitch or knitting colorwork charts for inspiration. I believe I settled on a cross-stitch pattern because it had the detailed lines and scale I was looking for. I wanted the fish to look realistic, although it could be in an imagined world like Animal Crossing New Horizons or Stardew Valley. Whimsical? I think that is the best way to sum it up.
To make my pattern, I used the cross stitch reference and transferred it to graph paper by hand, tweaking some areas to make the inspiration my own. I did this in the same application for my Red Velvet Cosmic Knit Tank project. Next, I needed to determine the scale of the fish within the sweater pattern. It’s important to plan out how many stitches you need to complete the colorwork section across your rows and keep it centered. To do this, subtract the number of stitches in your colorwork pattern from the number of stitches in your row. Divide the sum by two and adjust to keep the stitches on either side equal, to keep the pattern centered. It is also important to note how tall the color work pattern is compared to the garment you are knitting, to allow enough room above and below that the graphic motif makes sense and doesn’t look misplaced on the garment. I think I literally held my pattern up to Kyle’s chest to figure it out.
Fiber Content
For this sweater, I went in a different yarn direction to try something new. I chose a wool and acrylic blend from Knit Picks called Mighty Stitch. It was underwhelming. The yarn, while soft, pills something fierce. It is also a slim worsted weight, which was exaggerated by the large needle size I used – US 10 or 6 mm. This created a breathable, airy sweater, but dang, did it throw off my pattern and design. Eventually, I had to face my fate – I was running out of yarn, and my panel was too narrow. Not exactly the outcome you want after spending a week on the front panel with the intricate fish design. I would rather start over than frog the color work, always.
I had some decisions to make. I originally purchased the Mighty Stitch on sale, but when I ran out of yarn, it was not on sale, and I wasn’t interested in doubling the price of this already too expensive project that was in the process of failing. So like Miss Frizzle recommends, I got ready to “Take chances, make mistakes, get messy!” I went to my closet of yarn and fabric and began to dig through the stash for something else I could introduce into the design. I found a warm-toned gray and neutral black yarn from Big Twist that was also worsted weight. Because the Mighty Stitch is a washable yarn, I felt comfortable combining the two yarns. I had already introduced acrylic yarn to the project through the mint and teal fish, using scrap Big Twist for those sections. Always check your fiber content, though, to avoid incompatible fibers that will make the project hard to care for over time.
Making a Change
The original design was changing from color palette to overall concept. This sweater would need to have color blocking sections now, to stretch the main green color. I decided to not only change up the design, but to change up my technique, opting for crochet on the sleeves to make the sleeves go faster. Knitting is a slow craft, and for some reason, knitted garments for Kyle have this curse of going horribly wrong and also knitting up slowly because of the hiccups. I wanted him to be able to wear this sweater for the bulk of the winter season of 2025-2026, and I was knitting this in August-October, so I took a shortcut. But in my defense, the texture of the sleeves, ironically, looks like fish scales to me. Especially with the gray and black colors!
The second change I made was adding width to the sides of the front panel to make the sweater a drop shoulder. I then knit the back panel wider from the start, and added a section of gray on the middle to upper back panel. It adds a nice contrast to the overall composition of the sweater, while making the sleeves feel cohesive.
Men vs Women Shoulder Shaping
The shoulders gave me such grief in this project! I’m used to making sweaters for myself and my female form. The bust makes the shoulders rest differently than I realized, and this came back to bite me. For a man’s sweater, the back needs to be longer. Especially the shoulder section on the back of the sweater is going to ride up the back, and be too long in the front. This happened, and I was bamboozled on how to fix it. Enter short row shaping and the principles of perspective and scale.
I learned that I needed to add short rows, meaning only working a section across a row to add length to a specific portion of the back panel, the back middle. To do this, you work back and forth on the section, evenually go back to working across the entire row. In addition, I made the back collar and back ribbing longer to compensate. These simple changes made the sweater appear the same length back and front, draping across the shoulders pleasantly, even if one side was technically longer. It doesn’t matter because of the role of perspective. Magic!
Final Thoughts
I learned a tremendous amount of knowledge from the Catch of the Day sweater, and I am grateful it all came together in the end to make a sweater that Kyle enjoys wearing. I have saved my patterns to attempt this again in the future with better yarn and proper dimensions to make the pattern fit well from the start, instead of scrambling to adjust at the end.
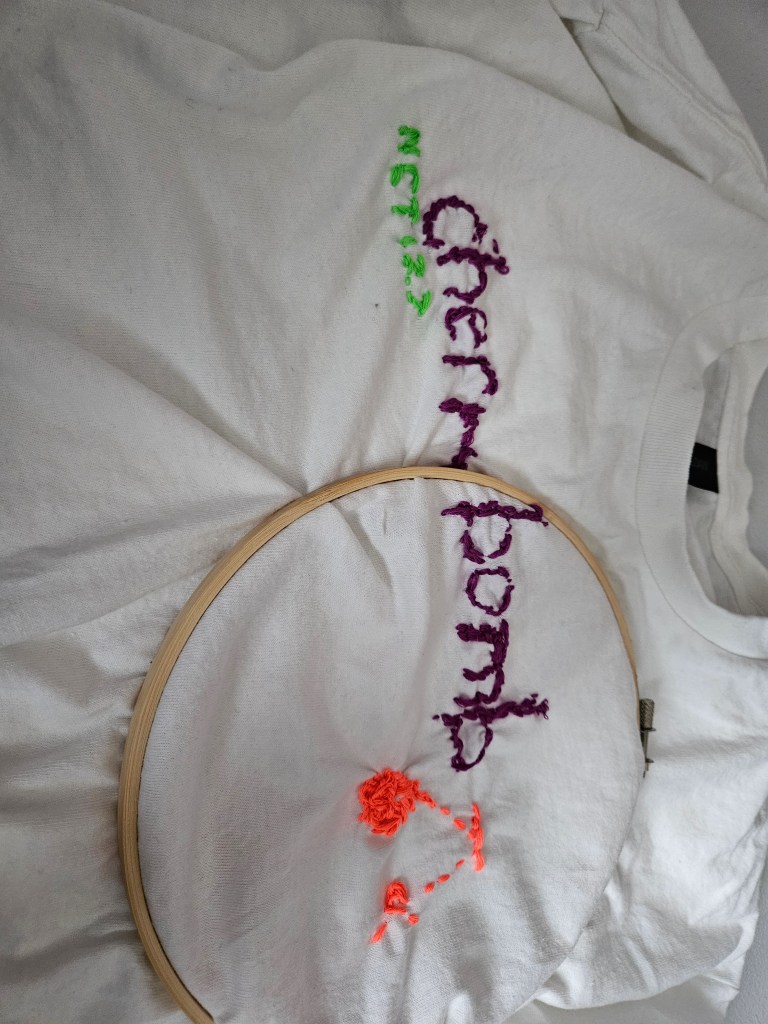
In 2025, one of my goals was to try my hand at crafting my own K-Pop Merch. Some bands are easy to find Merch for, and others, well, you are left to your own ingenuity. The bands I selected to try for this are NCT 127 and NMIXX, which I have tried and failed to find band tees for that I liked. For this project, I used two different techniques – embroidery and stranded colorwork knitting.
NCT 127 Embroidery
My first idea was to pick up a blank T-shirt from the craft section and get to work. The shirt I chose was a Gildan tee from Walmart, which I DO NOT recommend. This shirt is so freaking thin. Horrible quality compared to the blanks I have found at Michael’s, Dollar General, or even Hobby Lobby. But as I was dubious of my embroidery skills, I went ahead with the Walmart shirt as practice. That was the right call, because dang, embroidery is not as straightforward as it looks.
For this project, you will need: an embroidery hoop, embroidery floss bundles, a marker or pen to sketch your design on your shirt, and backing like embroidery interfacing or a fabric scrap that I used (because I forgot that the embroidery needed a backing).
For the design, I chose something simple. The song, the band, and a little imagery. I love their early album Cherrybomb (2017), but the song is almost 10 years old now, and it’s kinda hard to find any NCT Merch with it at this point. Seemed like the perfect option for a first try. I wasn’t expecting my stitches to be so tight; I felt like I was fighting myself across the whole piece. This was because I forgot about the backing for stability, and all this embroidery on this poor quality shirt, yeah, it wasn’t great. Afterwards, I added a backing to the embroidery with a scrap piece of another t-shirt.
Is it my best work? No. But is it a start for making better projects in the future? Yes! And I wear it anyway in the garden and as a sleep shirt.
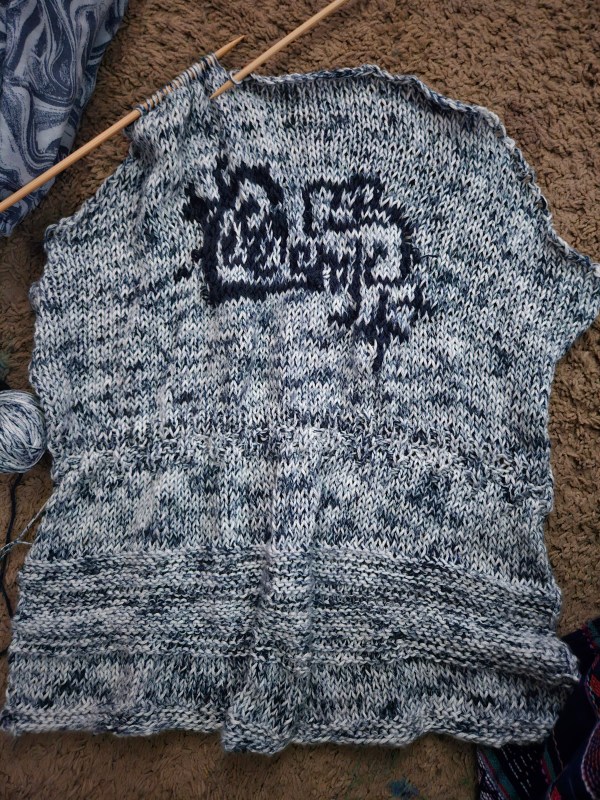
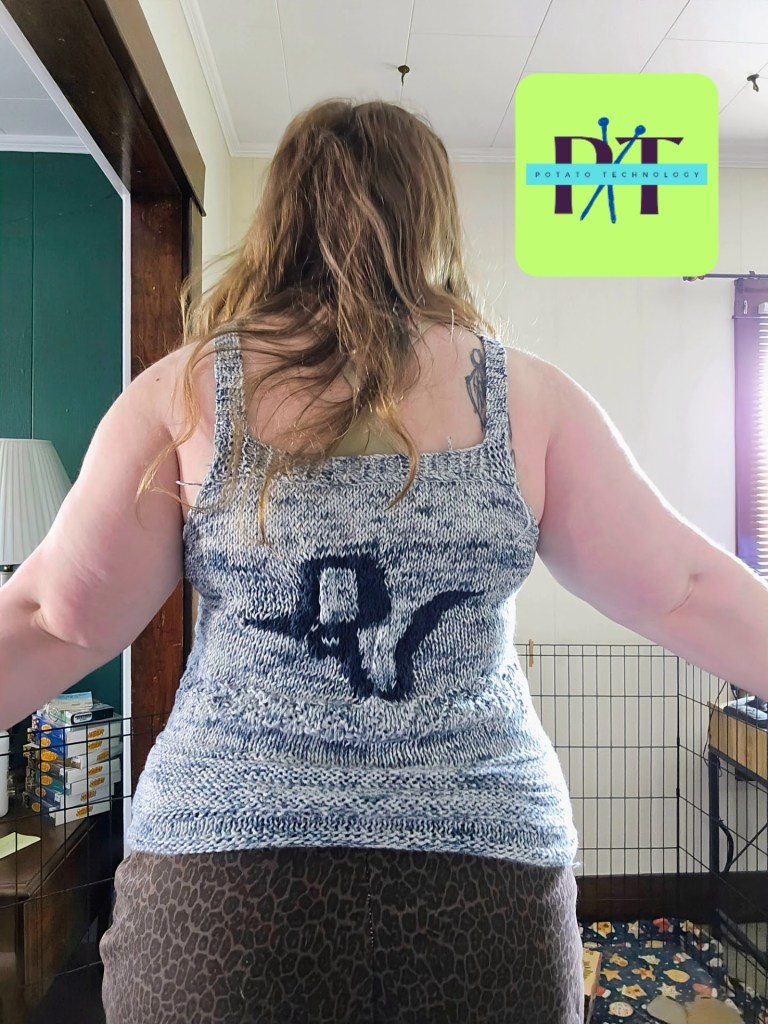
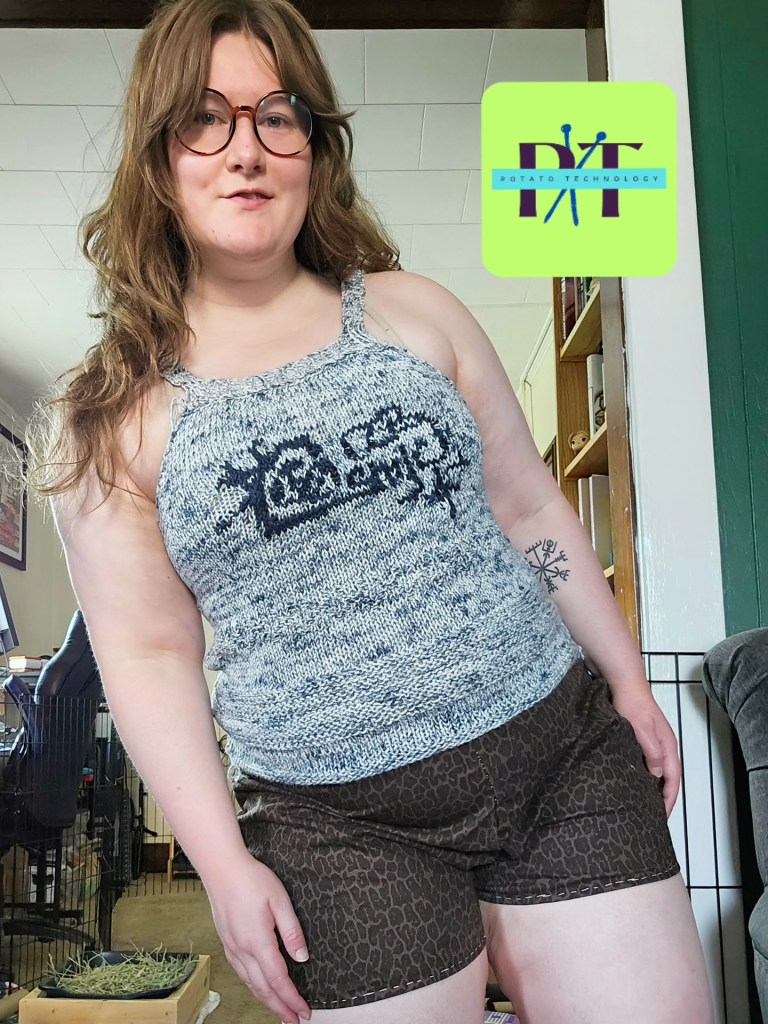
Red Velvet Knitting
My desire for Red Velvet Merch was entirely motivated by the confusing announcement in April 2025 that members Yeri and Wendy did not renew their contracts with SM Entertainment, but Red Velvet was not disbanding. They have become one of my top girl groups after their release of Cosmic in 2024, so it seemed only appropriate to use the album Cosmic as my muse for a cotton knit tank with stranded colorwork. It’s a bit easier to find Red Velvet Merch on sites like Teepublic, from which I have bought a shirt. This project was more about expressing my love for this album, and I hope that Cosmic will not be their last release as a group.
You will need: a pencil, pen, graph paper, and stitch markers. (Along with your basic knitting supplies – needles, yarn, scissors, tapestry needle)
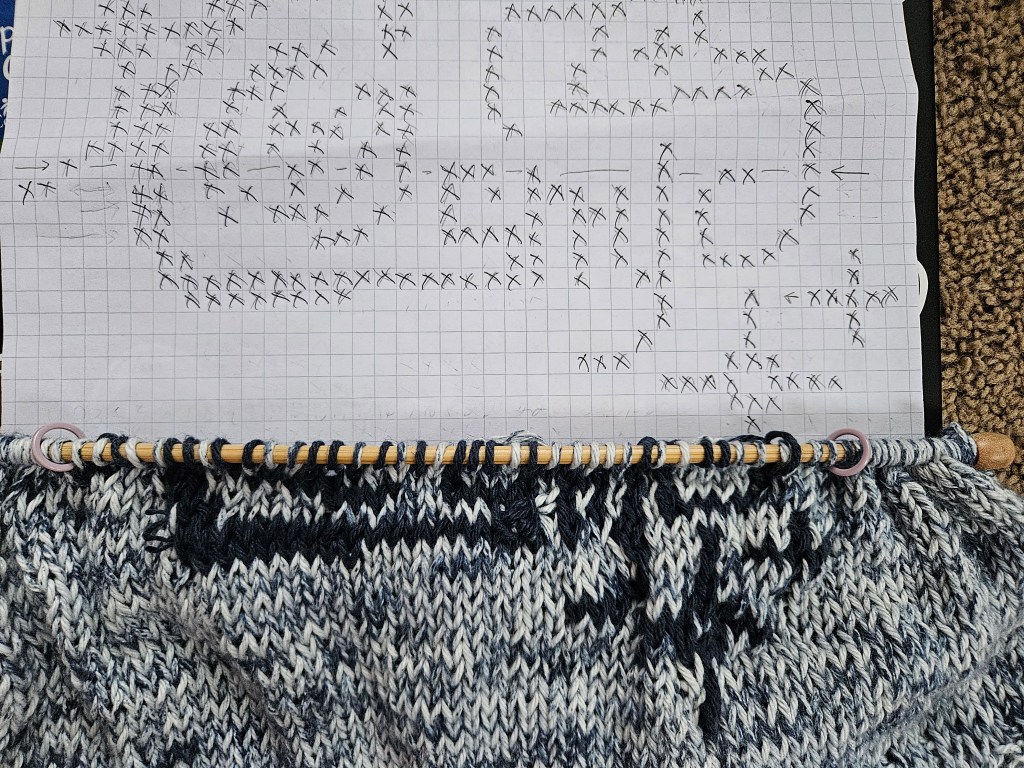
To start, I searched Pinterest for album artwork and a logo. I found a lot of options to use as a compass for the project, but decided the simplest option would be best. I opted for one color to keep the floats simple. To make my colorwork charts, I always use graph paper and a pencil to be able to adjust the marks that I transfer from the image. Once I am happy with my design, I trace over it in pen and use a pencil to cross out the lines of the pattern as I complete the project to mark my progress. To understand the dimensions of the image as I worked, I also marked the “canvas” with stitch markers. It is also important to note your garment construction and how that relates to your chart. I made this tank knitting bottom up, so I began working on my colorwork from the bottom of the chart.
I am thrilled with how this project turned out! As my first stranded colorwork project with this complex of a design, it was far easier than I thought to complete. You just have to plan out your image and be patient with your floats. Try not to hold too tightly and remember that blocking will help the tension relax.
Should I have posted this before Halloween? Yes, most definitely! But I forgot, so here we are, and I think that getting this posted before Thanksgiving is still fair. Fall is still here, even though Black Friday is coming at you like asteroids headed for Smallville.
We made a haunted house from recycled cereal boxes and other sources of repurposed cardboard to transform what could have been trash into a piece of Halloween decor from what we already had! The only materials we had to purchase for this project were acrylic paint and felt. We used Apple Barrel brand paint, which is less than 1 USD at Walmart or less than 3 USD on Amazon for big bottles. We also purchased sheets of felt that were 25 cents a sheet. For the adhesive, we used Tacky Glue for construction and Mod Podge to smooth out seams.
Our inspiration was the Addams Family mansion from the 1992 movie version. We wanted an old, mansard-roofed, Second Empire-style, Victorian-era house to play the role of haunted house. I wish our actual house was a bit more historical. It was built probably in the 1930s, but I question if it is a bit older, from the 1910s, from the style of woodwork. So a nice, old spooky build was just the ticket. We gathered inspiration from Pinterest and set forth to construct the house. We used two Honeycomb cereal boxes glued together, which are a bit taller than the average box. For the roof, we chose cardboard from a 12-pack of Wild Cherry Pepsi cans and some mac n cheese boxes for the roof line. The porch was constructed with a Wegman’s 12-pack of sparkling water. Miscellaneous cardboard scraps supplied the porch beams, door, and shutters.
To paint this, I bought an array of colors to mix custom shades. For realism, weathering and highlights, it is important to mix depth into the shades. If you have ever watched Bob Ross paint, you will know that he is always adding depth to his paintings with colors that exist in the natural scenes, but that your eyes may not recall what the colors on their own actually look like. If you want to paint a sky, you need more than just sky blue. If you are going to paint a tree, you need more than just brown and green.
I put two layers of paint on the pieces, which I painted after they were glued and fully dried. The first layer was necessary to block out the cardboard and the branding, which I could see shining through the matte paint. This was an excellent time to try mixing shades. I was able to try several colors underneath the final layer, which helped me determine the color scheme of moody charcoal, black, and burgundy for the roof and trim. The paint not only adds character but also preserves the pieces under a layer of acrylic. The final touch was a cutout silhouette of Gomez and Morticia in the window.
This project took a lot of drying time, and therefore was a month-long project that was finished a few days before Halloween. Because of this, I did not accomplish all I wanted to do, including moss, more weathering, ghosts, etc. Next year, I plan to add on. In the meantime, I am sharing this to inspire you to craft with trash for the upcoming holiday season. Let’s celebrate sustainability and underconsumption and make those decorations with repurposed materials! It truly is a blast. Happy Crafting!
I was inspired to get crafty by these YouTube creators:
Did you know that you can find daily highs and lows in a database to use for temperature blankets? I didn’t either until a year ago. (Yes, this project post is long overdue.)
I learned this from the lovely Toni Lipsey of TLYarnCrafts, which saved me when I spontaneously decided to make a temperature project last year for Christmas…after Thanksgiving.
I am a last-minute Christmas gift maker, along with many people out there. I am not special or organized, but I’d like to change the second one. Anyways!
What is a temperature blanket?
It is a fiber-based project, knit or crocheted, whose color palette and sometimes its pattern are determined by the daily weather of a specific location over a certain time span. I thought you had to track every day, but you do not, which is amazing because you can make this project on a whim. Although the actual work time will be longer than you may expect, it was for me.
It’s a fantastic stash-busting project or a way to use colorful yarn you may not put together in the same project. You can do whatever you want, and that is what makes this project such a special one. Your color changes will be different depending on what date range you choose and where you live.
It’s like a fiber fingerprint of a certain time, a memory, crafted into fabric.
The traditional date range is a year of weather, usually highs, which is what I did with my first project, but you can do whatever you want, and isn’t that amazing? You can do lows, weather patterns, etc. I had the idea of honoring a family member’s birthday by researching the temperature on their birthday every year since they were born. It truly is a free-form, fascinating way to engage with crafting and nature!
Materials, Temperatures Recorded, and Yardage
I chose to stash-bust my backlog of half-used acrylic skeins for a random color palette, but it can be whatever you like. You can use wool, cotton, or alpaca. You can plan an entire color palette that is unique to your design sensibility. I think an ombre in the same color family would be lovely if you can find the yarn swatches to do this. I think that with the right design eye, this usually random-looking project can look exquisitely planned out.
I believe the most important part of the project is getting the data recorded down into a spreadsheet or notebook, whatever fits your crafting style, so that you can see what temperature ranges are the most common and therefore which ranges will be the most common through the piece. I had a really tough time deciding this, and in hindsight, I wish I had tallied how many of each I had before knitting, because for one color, I almost ran out! It would have been so much easier to have swapped the colors I was using according to the yardage I had instead of choosing at random. I think that is why crafting practice and crafting community are so vital to this work, because sometimes you don’t know until you try, and sharing our experiences informs the greater knowledge for us all.
For my temperature data, I am an analog gal, so I recorded my temperature highs in a notebook and checked off each day as I went to keep track of my progress. I highly suggest doing this in some capacity because otherwise, you are going to have to count rows, and checking off progress in a spreadsheet or notebook is just quicker.
If you are a beginner knitter or crocheter, might I also recommend Caron or Big Twist acrylic yarn for this project? The value for yardage and lack of splitting of these yarns make a huge difference for a first crafting experience, so that this project easily transforms from a skein of yarn to a lovely blanket made with your own hands.
Would you make a temperature blanket? Have you ever tried to make one before? Did you enjoy your experience?
I’ve been looking at how to make a custom overalls pattern, based on drafting techniques, which I began with this post: Drafting Shortalls from Scratch. But how to construct them? Well, that’s what I plan to explore today! To do this, yesterday, I cut out another pair of overalls, this time for the fall-winter-spring season, to retrace my steps.
Step One
With your pieces cut out according to your measurements, you should have four leg pieces – two front and two back. The next two bib pieces should be cut out, with the back piece cut a bit differently to accommodate the straps. This is to anchor the straps at the middle of your shoulders to keep the overalls securely on your frame.
Step Two
I like to begin with the pants or shorts portion of an overall project, because they are foundational to the silhouette. I like to pin the leg pieces together to try on before sewing. Remember to leave several inches of the outer thigh seams pinned for the flies and buttons.
Once you know that the pieces will fit, with seam allowance accounted for, I begin sewing the leg pieces together, leaving out the crotch seam and the top part of the inseam, to attach the two pieces as one pair of pants. After these have been sewn together and I have tried them on, I will move on to the bib.
Step Three
For less bulk, I like to cut the seams of the crotch portion and leg seams that will join together, with pinking shears, to make my hems less thick. This lets the sewing machine, or your hand sewing needle, pass through the seam with ease, and is more comfortable to wear.
How do you join pants? Well, you leave the top of the inseam open so that those two inseams will line up together, making the two legs join at the top where the pelvis is. Remember this is a bifurcated garment, so you want your final shape to be two tubes, joined to make one tube at the top. I’ve messed this up several times; it’s okay even if you sew it wrong the first thousand times. That is what mockups and seam rippers are for!
Step Four
For the bib of these overalls pictured above, they were cut into short pieces, so I just had to join these pieces together. I added a facing to the inside of the bibs, which is just a piece of the fabric’s right side facing inside, so that the bibs are finished cleaner around the neckline.
I inserted the straps between the facing and the bib for a clean and secure stitch. The straps were finished with a loop on either side of the front bib to tie around, instead of the metal fastenings. I was inspired by Lucy and Yak Dungarees.
Step Five
The final touches are the bias tape, the side buttons, and the five pockets. I find the bias tape the most mundane thing; therefore, I choose to do that next, which is a 1-2″ ribbon of the fabric used to finish the raw edges still exposed on the sides.
Step Six
Next, I created the flies on either side by folding over the fabric to make the button placket and button hole placket. This was planned out when I cut out the overalls. After making the button holes and finishing them with either the machine or by hand, I mark out on the other side where the holes overlap to mark for buttons.
Step Seven
Finally, I sew the pockets. I chose a large, half-rounded bib pocket on the front, two smaller rectangle pockets on the backside, and medium side pockets sewn across the hip. Next? Enjoy your creation and feel a sense of accomplishment. You did something hard, and probably felt lost at times, but you persevered to learn a new skill. It’s not cringeworthy to try. So go for it! ❤
A very silly but confounding thing happened yesterday as I was in the homestretch of my current crochet project. It is something that has never happened to me before. I was stumped. What happened you ask?
Well, I’m crocheting my first cardigan and to do this I decided to use Caron Blossom Cakes, specifically three cakes in the colorway Blossom. It’s a lovely tonal yarn with hints of sakura, periwinkle, and hydrangea blooms.
This fiber is one of the first affordable yarns to bring me joy in this confusing time of losing Joann. (Thankfully, Big Twist has been saved!) The Caron Cakes were the the buzz of Michael’s, drawing me in for a hope that I’d find a new favorite, and truly I have. This yarn is stunning. Soft to the touch, a half and half blend of cotton and acrylic. It never splits due to its structure which has made my first big project with a crochet hook a delightful experience.
When I first bought the yarn I was being cautious, purchasing the yarn on a bogo sale. I bought 3 cakes containing 481 yards of worsted weight yarn – enough for a sweater. Honestly this was far too scant of a amount, as time will prove. My intial plan was to make a skirt, but as it usually goes will my projects, I call an audible and make something new.
This should have been enough yarn, but I made the decision to oversize this cardigan and pick up more yarn if neccessary – and it was! Yesterday, I finished the body of the cardigan and began my final steps – the sleeves. To my shock I realized, the body panels had consumed 1 2/3 of the cakes. Leaving 1 1/3 cakes left for the sleeves, and these sleeves were going to be long. Much longer than I planned!
I usually knit my sweaters with a drop shoulder to shorten the sleeve length I have to knit because sleeves are so boring to knit! And they eat up yarn beyond my expectation everytime. To my horror, the sleeves were inset, not off the shoulder!
Not only would I have to knit the whole length, oversized, but I would need to using my new crochet skills to employ shoulder shaping – something I still get stuck on knitting. I quickly pulled up the yarn on my phone and was hit with a one-two-three punch – Blossom was out of stock, it was a Michael’s exclusive, and it is discontinued!
I was stunned! Like how do all those things happen right as I ran put of yarn?! 😲
I’ve been knitting since 2013, consistently since 2020 and I have never had a yarn disappear like this. On top of losing Sully last week, I was spiraling. I always have a plan for my knits, a yarn back up plan to piece in yarn if needed, but this project I wanted to be special. All in one color, like a “real” fiber artist. I was putting far too much pressure on this garment.
I’ve seen so many small businesses and artists this week, speak out about how the tariffs are effecting their businesses. Some are seeing 50% of their income being held hostage as the new rules are unclear. It’s left this dark, frustrating haze in my mind, like we’re in the final act of a Totally Spies episode and the evil genius might win.
I went to my stash and found that it was not what I thought it was either. I had a stash of final Joann yarn that I bought almost a year ago, left in my closet after the news with colors I didn’t remember and with less skeins than I recalled. Yeah it was, another pothole in the road. But dang, what is the point of creativity if you give up?
Some of the most beautiful garments were made with limitations. Why can’t I am for such success? I create on a budget, and I enjoy being a scrappy fiber artist – why change my approach now just because August has been heavy? Never give up!
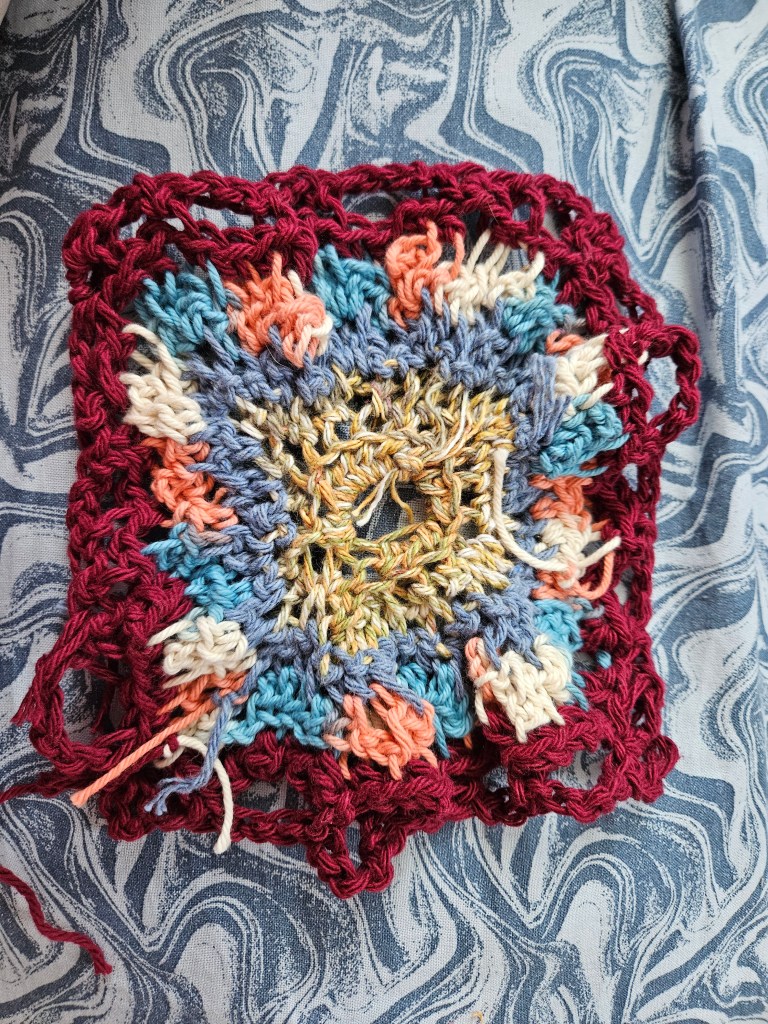
The 2020s have brought many trends and crafts to my attention, but the one craft that has caught my attention, and kept me craving the ability to do it, has been crochet. I love the loops, the lace holes/open weave of its stitching structure, the texture, the projects’ talented crocheters’ design, and most importantly, the granny square projects! I am a colorful knitter, and the granny square scratches that artistic place in my brain. It brings me instant happiness.
In Spring 2024, I made my first attempt to crochet, and it was doomed from the start. I bought a cheap hook, neither ergonomic nor very hooked. The hook failed over and over again to grab the loops. The yarn over motion became yarn slip away, which made the process of learning how to execute crochet stitches dang near impossible! I was busy, not in the headspace to learn a new skill. My frazzled mind became evident in my tight, tortured stitches so snug the hook would not easily pull up a loop. So I set aside my desire for crochet for over a year.
During that time, I recentered my mind and learned new skills that I can see now, in hindsight, that made learning crochet in July 2025 so much easier! I slowed down my sewing and focused on fiber arts, mainly knitting, in the year that followed. During this year of reset, I tried new things that prepared me to be a better student of crochet. I knit socks, I learned colorwork, circular knitting, and explored new fibers and stitches. I learned how to work with my tension, and adapt to a looser weave for colorwork and circular knitting. I learned how to pick up stitches and new ways to construct knit garments. I suspended what I thought yarn crafting was, opening my mind to new techniques, which I believe prepared me to learn a completely different approach – crochet.
Why is crochet such a big jump from knitting? Well, I think for me, because I learned knitting first, my muscle memory was guiding my approach. My brain was shifting into its comfort zone when I would pick up that first crochet hook and reject the notion of using one tool, instead of two needles. My thinking was rigid, just as it was when I first began my language learning journey into the world of Japanese. When learning, we have to hold what we know and what we have done loosely, all while inviting a new guest to the party. A teachable spirit is really a mind of hospitality for the new skill.
I think a good teacher and good exposure also help. When I first tried to learn in 2024, I went to a former neighbor who crocheted and asked her for advice. She let me borrow a book, but didn’t offer much more than that. Although we were in the same town, on the same street, we never crafted together, and when I asked for advice when I got stuck, but she didn’t respond. It sucked. This time around, I went to a tried and true source – TLYarnCrafts, the wonderful Toni Lipsey. Her tutorials saved me when I got overwhelmed by the instructions in my library book. My library was a great source of inspiration, though – I borrowed ‘A Modern Guide to Granny Squares’ by Celine Semaan and Leonie Morgan. This book helped me understand the magic loop and had lovely diagrams to get me started.
Three other crafters who helped me get excited to crochet are YouTube creators – Lizfoolery, Blondie Knots, and Mark Vogel. Mark’s recent granny square vest project was so lovely, I was determined to learn crochet just to make that piece. But it’s not just wearables that have motivated me. I want to make a seashell basket, a flower bookmark, a fish potholder, a pie purse, and blankets! The classic Chevron to replace the one that my great-grandma made, which was lost in 2021, and the star blanket by Betty McKnit. I have also downloaded the hexi-granny cardigan pattern from TLYarnCrafts for a fun, cool weather wearable.
To wrap up, I’ve been crocheting for two weeks now and have made two wonky granny squares, a pair of crochet stays/vest that is 90% done, and a sweater that is cast on with a few inches complete. It feels surreal and also so natural. I love crocheting! Maybe because it is new to me, but I look forward to getting a few rows done each day. It’s become my fun crafting, where I can relax and get lost in the rhythm of loops and yarning over.
Have you ever crocheted? What helped you get through the process of beginning to do the thing? I hope you have a lovely day, dear reader. Thanks for spending a little time here with me in this [I hope] cozy corner of the internet. You make these little moments of reflection an exciting part of my making process. ❤
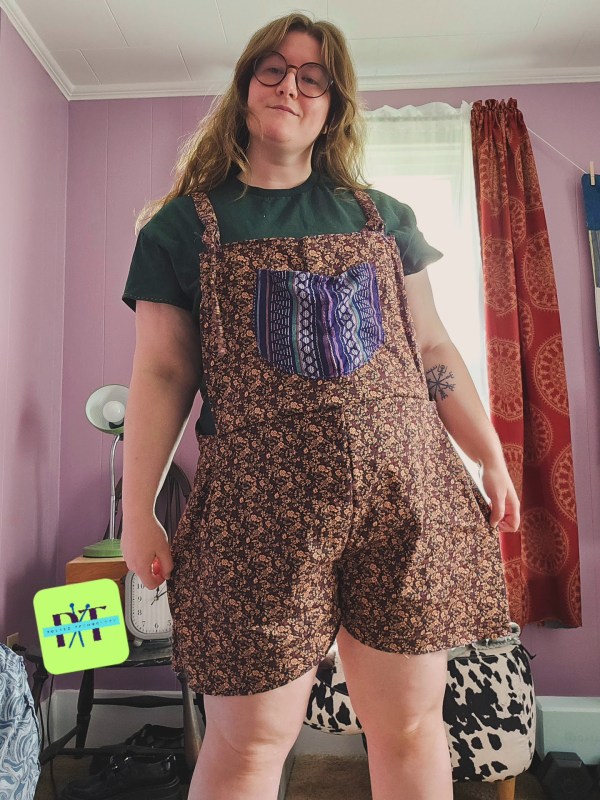
Do you ever think of something you’ve accomplished and wonder if you could do it even smaller? Well, I set a challenge for myself. A year ago, I wrote about creating a summer dress with a button-front from less than 1.5 yards of fabric. That post inspired this one, as this summer I was able to squeak out a pair of shortalls (overall shorts) from a yard of 59″ stretch twill from Mood Fabrics. This was not my first overall attempt, but I think my most ambitious because this yardage was for a pair of shorts with some abundant pockets, but I changed my mind after seeing a variety of overalls styled for spring and summer. I’ve owned this style before in denim. My favorite version I’ve purchased was a pair of vintage ’90s denim shortalls that were baggy and breathable for those swampy summer days. The more fitted versions I’ve found in stores in recent years are not my cup of tea, because for me, overalls are best when they are oversized.
When I cut these overalls out, I had just completed my draft of an overalls pattern from 2 yards of 44″ cotton twill from Kokka Fabrics, and I was itching to make more without fabric shopping, so I went for a dig in my fabric/yarn closet. It’s more of an antique clothing press, to be fair. This is where I found my gold – 1 yard of 59″ across cotton twill in a fun pattern, sturdy enough for a bottom weight garment with just enough fabric to cut the shorts, the bib, the straps. That was all I could muster for sure. I set aside the project and got to work on my Kokka Fabric project, which taught me so many things about sewing overalls that I had overlooked in past attempts.
Firstly, the back bib is not a rectangle. Secondly, a facing for the bib makes the project feel more professional. Thirdly, the buttons on the side need to be properly assembled with the fly for the right stability. Finishing the edges with twill tape made from the project’s fabric helped create a crisp look. Fourth, the overalls need pockets in order for the garment to sit well on the body. Lastly, I did not accomplish these with my 1-yard of fabric overalls. I took some shortcuts.
I ran out of fabric for the pockets, the fly, and the twill tape. To remedy this, I kept the shape to a romper style and less of a traditional overall. The bib is rectangular on both the front and back. The pockets were added from a previous project; I upcycled shorts into pockets. The side does not have any fastening, instead I sewed up the seam and let the boxy cut of the shorts and stretch of the fabric help me compensate for my lack of fabric.
So if this project is a pair of overalls that is not a traditional overall, but more of a romper, why am I writing about this?
Well, because the finished product is a wonderfully comfortable garment, practical for many things – gardening, sewing, cooking, knitting, farmers market, apple picking, cleaning, walking in the woods, going to the beach, etc – and I made it without being an expert. I made this garment through hand sewing, so you don’t even need a sewing machine if it’s out of your current budget. I purchased this fabric on sale for 10 USD/yard. I used less than a spool of thread, and repurposed the pockets from an item in my closet that I didn’t want to wear anymore. Have you seen the price of overalls? They are expensive, even the short version. A low-quality version will still set you back 30 USD.
I made these with 10 USD of fabric for a midsize frame, so this is accessible to all of us, not just the slim people. A lot of popular and cheap DIYs on the internet are made for very small bodies, which makes me nervous that if I try it, it will be expensive, but this wasn’t. Making these overalls was incredibly rewarding, too. These aren’t even the best pair I’ve made this summer, I’ll share the other ones soon! But these ones will have a special place in my heart because they are unique, comfortable, and made with my own hands. So if you have an idea of how you could make something by hand, make it happen! It’s a lot easier than you think, a great learning experience, and there are tons of resources here online to help you succeed!
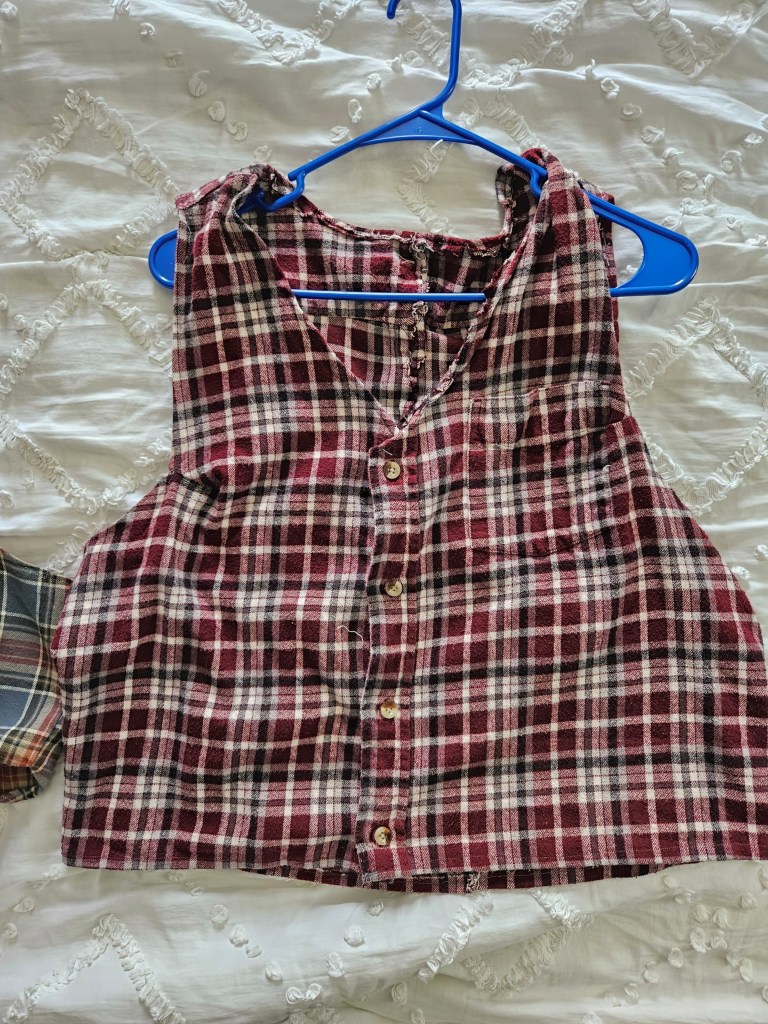
Last summer, I wanted to introduce vests into my wardrobe. I have made vests before for Kyle, but have not sewn a vest for myself before; I have knit them. Because this was a spontaneous idea, I needed to be budget-conscious and find a way to use what I had to make a vest. So I went to my closet and got creative! I had a few flannels in my closet that were hanging there, waiting for me to wear them, but I didn’t. That’s when I looked at the shirts closely – there was a button placket, shoulder yoke, and a sturdy fabric, with room to crop them. I saw the vest within the shirt, so I grabbed my scissors—and was a bit too zealous with the first one! Don’t be like me, have a plan. So how did I make this upcycle work? And what did I learn from my failed attempt?
Shoulder Seams, Yoke, and Waist Length
The crucial points of cutting, I would say, are being aware of the shoulder seams, accounting for the back yoke width, and properly measuring your waist length for a proper fit.
Shoulder seams on a flannel are boxy and loose. To achieve the set-in sleeve opening that accentuates and reveals the shirt underneath, you need to cut away the shoulder line – but not too much. Be mindful of how far into the shoulder you plan to cut, so that you are left with a proportional line.
The shoulder yoke is a technique used to tailor the shoulder line, while leaving the fabric below the shoulder loose. As a result, there will be more fabric on the back of the vest, which may affect the fit of the arm openings and possibly require a dart to remedy the loose fabric. If not, the back will gape open, looking awkward and like a mistake. A vest should hug the body, be tailored, or else the upcycle will look exactly like you cut up a flannel.
The length of the vest determines the style and balance of an outfit. One of my vests I cut too short, and this limits how I can wear it. I find it cuts me off in a regency high-waisted fashion that is fine when I wear it with a high-waisted skirt, but with pants or my linen Darcy shirt, it’s awkward. The other vest was cropped, in a careful fashion, ending at my hip and balancing my body line like a well-tailored garment. It’s far more versatile.
Cutting the neckline is crucial. For the front, a tapered cut to the button placket provides the classic look. Be careful not to cut too low for a historical silhouette. Also, remember not to cut the back the same as the front! I made this mistake and had to sew the cut portion back into my vest. This should be a crew neck line, straight across, with a slight dip in the middle for comfort.
Why a Flannel Shirt?
I chose flannel shirts as my medium to work with for three specific reasons. The first one I already mentioned – cost. We had just moved into our house and paid quarterly taxes. The vests were not a necessity, just a whim, so it made sense to me to take an existing item, I didn’t wear to create something I would wear. It’s funny how the sustainable option is sometimes the free option too. Secondly, flannel is a sturdy fabric, appropriate for the structure of the vest, that could be sewn without the addition of a lining, which I could add later if I wished, when I was more comfortable spending money on fabric. Thirdly, flannel is a classic pattern that reminded me of the woven woolen coating fabrics that vests have been sewn with for centuries, so it was a good match! I hope this inspires you to repurpose items you have to make something new! For the rest of the flannel, the pieces I cut away, like the sleeves, stay tuned to see what I did with those. It’s one of my favorite makes. 🙂