Blending Gardening & Woodworking

If you’ve been reading my gardening articles for a bit now, you know I’ve written about using my woodshop to create things for the garden. Some examples are the planter box and trellis for our beans, the trellis system for our snow peas, and the fence posts I’ve been cutting. Lately, I’ve been looking forward to getting back into the woodshop and doing serious woodworking again. The garden and our screened-in porch projects took precedent over woodworking projects this spring and summer, and I’m now ready to get back at it.

As I’m thinking about and planning my next projects, I wanted to write about blending two of my favorite hobbies: gardening and woodworking. I mentioned the ways I’ve used my woodshop to build things for the garden this year, but only the planter box was somewhat serious woodworking. It was the only thing that required glue, but not even that project needed me to use my table saw. In this post, I’ll go over some future project ideas I’d like to pursue and a previous piece that I built and we still use. And if I have fun writing about this, and it seems interesting, I may write more woodworking articles.

A Planting Table

In 2022, I wanted a planting table that would aid in the process of transplanting starts, starting seeds, mixing the soil, and filling the containers of our container garden. I’ve always been a fan of the classic planting table that includes multiple areas for storage, a place to hang tools, and a flat surface to work on. There are a lot of videos of woodworkers and makers building these, including Bob Clagett (I Like to Make Stuff), Norm Abram (The New Yankee Workshop), and Steve Ramsey (Woodworking for Mere Mortals). These three makers represent three versions of a planting bench. Bob Clagett’s was made of dimensional cedar, Norm Abram’s was based on an antique found in Savannah, Georgia, and built from recycled pine, and Steve Ramsey’s was built with scrap wood, largely reclaimed pallets. A planting table can be made as cheaply or expensively as you’d like. I went somewhere in the middle of these three.

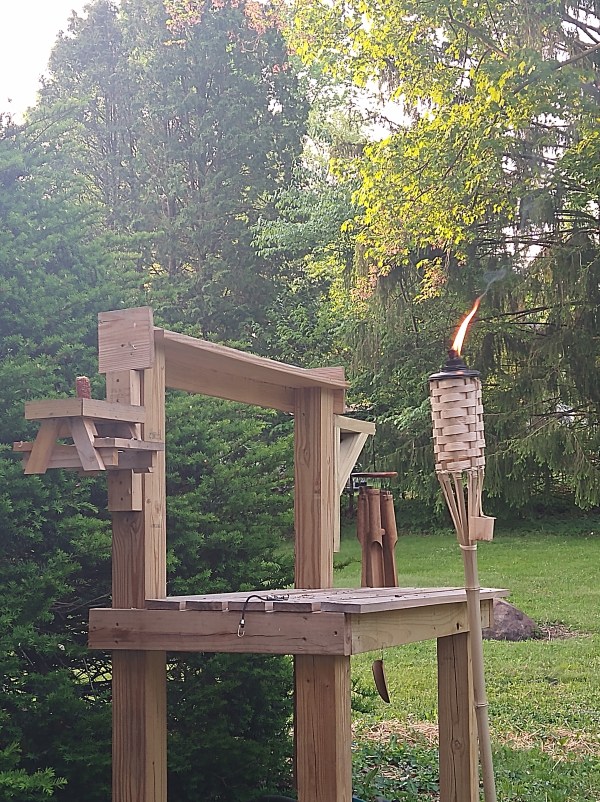
I didn’t have any recycled or reclaimed wood to use for the project, so we bought pressure-treated lumber for it. This included two 4x4x8s and numerous 2x4x8s and 1x6x8s. The 4x4s served as the main strength of the table, with one at each corner. The 2x4s were used as the main framework to connect the 4x4s to each other, while the 1x4s became the slats for the tabletop and shelves. Here are two pictures of how it turned out:

This table was a blast to work on. Dimensional lumber, which you can find in the big box stores (Home Depot or Lowes), is really easy to use, and I would encourage everyone to try building one for your gardening needs. I used my table saw to rip the 1x6s down to narrower pieces, but I could have bought 1x4s instead and not needed a table saw. If I didn’t need to rip those pieces down, the entire thing could have been built with a circular saw and a drill. It’s a perfect project to dip your toes into woodworking if you’re curious.

Tips if You Want to Build One

  • Bulk cut all the pieces that are the same length. Because all but one of the slats for the top were the same length, I set up a stop block on my miter saw and cut all the pieces in quick succession. This made it so I didn’t have to measure each piece and potentially have small differences in the lengths. This was also the case with the bottom shelf pieces.
  • Clamps are your best friend. Clamps weren’t required to build this table, but they were really helpful. It can be difficult to hold pieces together with one hand while you’re using a drill with the other. Clamps hold it all together so that both hands can be used for drilling. They also work to prevent the pieces from moving off your mark.
  • Use a level. This applies when you are attaching the 2x4s to the 4x4s. You’ll measure up from the bottom or down from the top to mark where the 2×4 will go on the 4×4, but it’s wise to use a level to ensure the slats will sit flat and the entire table will be level when assembled.

What I Would Do Different

In general, I’ve been pleased with how the planting table turned out and continues to serve us. However, there are some areas that I’d like to improve and address in the future. The first is trimming the table slat closest to the front. It sticks out over the 2×4 framing piece by an inch or so, which has resulted in that piece cupping and needing to be attached with extra screws. I would like to remove this piece and trim it down so it sits flush on top of the 2×4.

I’d also like to add hooks to the bottom of the top shelf and chicken wire to the back to hold tools. The last improvement I’d make is having a water source and a place to rinse veggies when they’re pulled from the garden. This would be a bit more complicated than the other improvements, but I want to cut a hole in the table slats where a plastic bowl or dish washing basin would sit. That basin would have a hole in it with a small piece of PVC attached for the water to drain into a bucket below. I will also need to have a water source. For that, I want to attach a simple outdoor spigot or faucet that a hose can connect to and mount it close to the basin. Because the planting table is close to where we’re going to add another rain barrel, we’ll have a water source without needing to run a long hose. These are minor improvements, but once they’re done, I think the planting table will be even more useful.

Future Woodworking Projects for the Garden

  • Planters – These include all the types of planters, including planter boxes that sit on the ground, ones that are attached to porch railings, and window boxes.
  • Garden Bench – Magz and I want to eventually have our garden be a place where we can sit and enjoy nature. It won’t just be a place to work in, but also a place to relax. Having a bench in our garden would also provide us with a place to rest while working.
  • Whirligigs – Whirligigs are an area of woodworking that I’m interested in. If you’re unfamiliar with them, they are a nifty decoration that spins when the wind blows. They can be bought or made, and there are endless possibilities for design, style, color, etc. Norm Abram built one on The New Yankee Workshop, and the YouTube video below features the Whirligig Festival. I have a lot of ideas floating around in my head of how to build different versions.
  • Garden Gate – We’re eventually going to upgrade our fence, likely to something that we build out of wood. When that happens, I want to design and build an aesthetically pleasing garden gate similar to what you see in English gardens. They are incorporated into the fence and can be as ornate or as simple as you want.
  • Greenhouse – We have talked about wanting to have a greenhouse for some time. We want to be able to start plants outside sooner than we currently can. You can buy greenhouses, but they can be expensive. Instead, we’ll probably build one that perfectly fits our needs and is cost-effective.
  • Swing – I want to build multiple swings. One is a porch swing or bed that hangs from the ceiling. The other is a covered swing in the garden. Similar to the garden bench, a swing would help in our pursuit of creating a relaxing garden.
  • Arbor – I have a lovely vision of an arbor in our garden that you can either walk under or sit under. The arbor will be placed so that vining plants, such as cucumbers, squash, or flowers, can climb the arbor, leaving you totally immersed in nature.

To me, woodworking and gardening perfectly go together. They’re both creative, can be hard work, and result in the satisfaction that you built or grew something from scratch. Building something with one hobby that can be used in another hobby is a cool experience. I also try to build something instead of buying something whenever I can. Is woodworking one of your hobbies? If not, what are your favorite hobbies? I hope you enjoyed reading about my experiences with woodworking and gardening. Have a great day.

Weekly Garden Update #21 – Humidity, Sagging Fences & Work Is Paying Off

In this week’s update, it is late July in Pennsylvania, which means the humidity level has been ratcheted up to 10. You sweat if you’re outside for more than five minutes, regardless of how active you are. We’ve also been dealing with some of our fence sections sagging. How have we addressed that problem? We’re beginning to harvest vegetables from the garden on a daily basis, so we’re seeing the hard work pay off in a big way. Finally, what will the seed of the week be? Let’s dive in.

Always Drenched in Sweat

Depending on where you live, your view of July’s weather will vary greatly. If you live in the Southern Hemisphere, it’s winter and one of the coldest months of the year. However, if you live in the Northern Hemisphere, it’s peak summer. In the United States, we have multiple versions of summer. West of the Rockies, it’s a searing dry heat where temperatures regularly surpass 100 degrees Fahrenheit, but with little humidity. Along the Pacific Coast, there’s humidity, but the temperature remains comfortable due to the proximity to the ocean. East of the Rockies, especially in states that have a coast (Atlantic Ocean, Gulf of Mexico, or the Great Lakes), it is often hot and humid. In Western Pennsylvania, where we live, the air temperature may only be in the mid-80s, but when you factor in the humidity and UV Index, the real feel is often in the 90s. High-pressure systems occasionally come through to knock down the humidity, but at this point in summer, we are usually stuck with it until mid-August.

I’m someone who tolerates the heat pretty well, but humidity is rough. Regardless of what time you get outside, you will sweat, and that’s where I’ve found myself over the past week or so. Apart from a couple of days early last week, the temperatures have consistently been in the mid-to-upper-80s with high humidity. Despite the uncomfortable conditions, the garden still needed to be tended to. The plants needed to be watered after we went several days without rain, the weeds needed to be addressed, and the ripe vegetables needed to be harvested. It wasn’t always fun, but it does serve as a reminder of how hard farmers work to grow/produce our food. When we’re able to harvest a ripe vegetable, it makes all the hot and humid days worth it. When you are working outside in the middle of summer, the importance of staying hydrated, wearing sunscreen, and taking breaks can’t be overstated.

Mending Fences

Okay, so I didn’t really mend the problematic fence sections since they weren’t technically broken, but I wanted to use the phrase nonetheless. If you remember, we bought deer fencing for our garden. It’s extruded plastic that is seven feet tall and comes in rolls. It’s been nearly flawless to this point, with any issues being my fault. Recently, though, some of the longer sections have started to sag in the middle. I think this is the result of less tension, since the sections are longer than normal, as well as grass growing at the bottom, which pulls the fence down a bit. In some places, it was so bad that I could have stepped over the fence if I wanted to, and if I can do that, a deer can jump it.

The fix was pretty easy: I cut some fence posts from leftover pressure-treated lumber. If you’re interested in doing this yourself, I started by cutting the pieces to length. For us, this was six feet. I wanted them to be long enough to sink into the ground at least a foot. After that, I ripped the pieces to width (one inch) on the table saw. With that done, I went back to the miter saw and cut a point on one end at a 30-degree angle. This helps them go into the ground more easily. With the pieces cut, I hammered them into the ground and attached the fence with a few staples and twist ties. It ended up being a quick and easy fix. If you have a workshop and some tools, you can make your own fence posts rather than pay for the finished product.

Hard Work Is Paying Off

There were different points in the gardening process where I was unsure if all our hard work was going to be worth it. Struggles with germination, inconsistent weather, and other things out of our control led me to question if we were going to harvest anything from the garden this year. Thankfully, that is no longer a question, and we’re regularly harvesting vegetables with plenty more on the way. We have more cucumbers than we know what to do with, and there are probably more than 100 tomatoes on the vine. Plus, the corn is growing nicely, and we’re going to have lots of melons, squash, pumpkins, and tomatillos. I’ve said it before, but if you’re curious about gardening but have yet to pull the trigger, you should. You can start small with one or two containers of your favorite vegetables. It’s not a ton of work with only a few plants, but the payoff is well worth it.

Cucumbers, Tomatoes
Cucumbers & Tomatoes

Notes From the Garden

  • We harvested our first full-size tomatoes this week. Two were Cherokee Purples (or maybe Black Krims?) and two were Queen Aliquippas. We haven’t eaten them yet, since we only pulled them on Saturday night, but it’s definitely a big step.
  • We continue to have a problem with grass growing in our beds, largely the beets and carrots bed, so I’m trying something new. I took some black garbage bags and laid them on the problem areas, using ground staples to hold them down. The goal is to suffocate the weeds by preventing sun and water from reaching them.
  • The first cantaloupes and watermelons have started growing. They’re quite small right now, but they look like tiny versions of the fruit, which is cute.
  • Our third spaghetti squash is bigger than the first two now, and our first squashes have turned from light green to a creamy yellow, so they are ripening.
  • Our first Tendergreen cucumbers were harvested on Sunday, marking the first time that we’ve harvested this type of cucumber.

Seed of the Week

The seed of the week this time takes us to France for the Noir des Carmes melon. This muskmelon is a true cantaloupe, whereas most cantaloupes that we find in stores are simply muskmelons. From what I understand, true cantaloupes tend to be grown in Europe. The Noir des Carmes melon dates back to the 18th century and is named for Carmelite monks who grew it. These melons don’t have the tan colored “webbed” skin that we often find in the United States. Instead, this melon stays greenish black for most of the growing process until it transitions to yellow and green, indicating that it’s ripe. It also has a smooth rind. We got our seeds from Southern Exposure.

Weekly Garden Update #20 – Tomatoes, Corn Silk, Beans & More

In this week’s update, we have a lot of tomatoes ripening, but do we know the variety of each? It’s questionable. Our corn is starting to develop ears and silk. Along the same lines, we’re harvesting some beans, and there are a lot of blossoms on the other varieties. Finally, I’ll go over some general notes from the week, including pictures, and highlight this week’s Seed of the Week. Let’s dive in.

So Many Tomatoes

We have more than a dozen tomato plants, and the majority of them have fruit that is starting to ripen. Our paste tomatoes, which I originally thought were pear tomatoes, continue to grow and are now more than three inches long. Our actual pear tomatoes also have lots of fruit, and we harvested the first one on Saturday, immediately eating it. All of our pear and paste tomato plants have dozens of fruit on them. Then there are the Queen Aliquippa plants. These are the tallest tomato plants we have (more than three feet tall) and are growing lots of fruit. The problem we’re having is knowing when they’re ripe. Because they remain green when fully ripe, it’s not as obvious as red tomatoes. Thankfully, they develop a blushy red color on the bottom when they’re fully ripe, which will make it a bit easier to know when they’re ready.

That brings us to our Black Krim and Cherokee Purple tomatoes. These tomatoes look VERY similar to each other, growing to similar sizes when ripe and having similar colors and markings. Both are a deep red on the bottom with a dark blue/purple on the top. I think we bought two Cherokee Purple plants and four Black Krims, but it could be the other way around. The numbers could also be wrong. We kept the plant marker with the plants, but it’s currently buried under straw. If necessary, I’ll dig around to find it, but I’m hoping that we’ll be able to delineate between the two before that point.

Tomatoes
Black Krim or Cherokee Purple Tomatoes

Corn Silk Developing

Over the past week, our Butter & Sugar and Black Mexican-Sweet Iroquois sweet corn plants have grown to a point where they’re in tassel, with roughly half the plants now developing ears with silk showing. I think they’re still weeks away from being ready to be harvested, but they’re well on their way. The other variety, Hopi Blue, continues to grow and is close to five feet tall now. The three rows of Black Mexican-Sweet Iroquois that I planted a couple of weeks ago have germinated with nearly a 100 percent success rate. I’ll likely thin these seedlings as needed this week.

Corn
Corn Silk

Beans Are Finally Starting to Produce

We haven’t had the greatest success with growing beans this year. The late spring and overabundance of rain stunted their growth, and to this point, they’re still only about 18 inches tall. In the past, we’ve had bean plants reach 30 inches tall. That being said, we are starting to see some bean pods on the plants. We’ve been pulling Provider bush beans for about a week now, but only a few pods per plant. Although the pods are pretty small, they’re delicious eaten right out of the garden. Our Jamapa plants are also putting on pods, with at least one being five inches in length. This bean is a shelling variety, though, so we’re going to let it dry on the plant as much as possible before harvesting. Finally, we have the Kebarika beans. These can be harvested as snap beans or as shelling beans. Our plants have been flowering for about a week now, so the bean pods will be following.

Notes From the Garden

  • Last week, I weeded and thinned our carrot and beet bed. You may remember that we’ve had a lot of issues growing both this year; however, I’m refusing to give up. My hope is that by clearing the area around the plants and thinning them to only one root every four inches, they’ll be able to develop and be harvestable.
  • We now have four spaghetti squashes on our plant. The first two are about seven inches in length, the third one is now four inches in length but still green, and the newest one is still a baby with the blossom only recently falling off.
  • The mystery plant beside our spaghetti squash has started to put on fruit. After flowering, the fruit starts yellow and turns green.
  • We are beginning to become inundated with cucumbers. Our Boston Pickling cucumbers are rapidly growing. We’ve already harvested three, and there are at least a half-dozen more on the vine that will be ready in the next couple of days. Our burpless variety has produced two more full-size fruit, but we’ve had a pest getting to them. There have been little scrapes all over the fruit, and it’s the only variety with these, which is confusing. We’ve added some straw beneath the vines and fruit to help with any dampness problems, and I sprayed some insect killer on the plant.
  • Our tomatillos are coming on furiously. I understand why people say that you can quickly become overwhelmed by how many you’ll have. We have three plants, and each of them has more than two dozen husks.
  • The first White Scallop patty pan squash that we saw is now about four inches in diameter and two inches tall. Everything I’ve read has said that these will grow to six inches in diameter and three inches tall when fully ripe. They should be ready within a week.

Seed of the Week

This week’s Seed of the Week is the White Scallop, mostly because it’s doing so well, and we’re close to harvesting our first one. The White Scallop is a patty pan summer squash that is rounder and flatter compared to a zucchini. It’s one of the oldest squash varieties and has been grown by Native Americans for hundreds of years. Baker Creek, which is where we bought the seeds, writes that these were first depicted by Europeans in 1591, so we have evidence of them being grown for at least 400 years. These are very easy to grow. The plants don’t vine out or sprawl, but instead grow vertically and stay compact. They’re supposed to be one of the best-tasting squashes. We’re very excited to eat these.

Up Next

We’ll harvest our first White Scallop squash this week. We’re also hoping to harvest more tomatoes, especially some of the larger varieties. We’ll also likely harvest more cucumbers and need to figure out how to preserve them. Happy gardening!

Recycling in the Garden

Recycling is an important thing we should do. In the United States, only 21% of all the plastic gets recycled, and of that percentage, roughly 60% actually makes it through the entire process and is turned into something else. Of course, recycling is about more than just plastic, but plastic is the biggest problem. Plastic takes a minimum of 20 years to decompose, but some research suggests it can take up to 500 years for certain types to break down on their own. In the past, metal, glass, and paper/cardboard served the roles we now use plastics for, and all are easier to reuse, repurpose, and recycle. Take cardboard, for instance, which decomposes in two months. Plastic has its positives: it’s stronger, lighter, more flexible, and cheaper to produce than other items. Yet, we’ve become so dependent upon it that our landfills and oceans are full of it, and at this point, it may never go away.

Let me say that I’m not the greenest person you’ll ever meet. We have two gasoline-powered cars, and I don’t see the benefits of buying an electric vehicle, considering the damage that is done to mine the lithium needed for the batteries. The majority of our outdoor power tools are gas-powered, with the exception of our push mower, which is battery-powered and has plenty of problems. I like gas-powered things for their simplicity and how easy they are to work on. I also don’t believe that humans are the sole culprit behind climate change, nor do I think we can be the sole reason it is reversed and saved. I believe that the Earth’s climate has always been cyclical and that we’re currently in a warming trend.

That being said, it is my belief as a Christian that God created the Earth and gave humans the responsibility of stewarding it and all that’s on it, and we’ve failed in just about every aspect. We treat animals and the Earth’s natural resources with a level of disrespect that we would be offended if we were treated the same way. Most don’t think about or value the sacrifices made by the animals when we consume them, and few stop to consider how we need to put resources and nutrients back into the land to replenish what we’re taking from it. I despise fast fashion because of the toll it’s taking on the land and those who make the garments. I also can’t stand the gross willingness to exchange our natural resources for a quick buck. At the same time, I despise greenwashing and any attempt to profit off people’s convictions, especially if there’s nothing behind a company or person’s marketing.

That tangent may have been unnecessary, but I wanted to explain the position I am coming from. I want to be as respectful and loving toward the Earth as I can, but I don’t think that should come at the cost of humans, especially those in underdeveloped areas (have we learned nothing from colonialism?). I think we should put forth real efforts to recycle, but recognizing that it remains a flawed process and system, reusing items is equally, if not more, important. This is where I found myself as I began to think about how to recycle in the garden. To me, it’s only natural to seek out ways to reuse items when you already care enough about the land to reduce your dependency on commercial farming.

Here are some ways we’ve been able to recycle and reuse household items in the garden.

Yogurt Containers

I first learned about using yogurt containers in the garden after watching an MI Gardener video on YouTube. He recommended cutting the small single-serving containers into 1-2″ strips and using them as labels for starting seeds or in the garden. This is a great way to repurpose these containers since many gardeners buy the plastic/vinyl labels anyway. Any plastic container can be cut for this purpose as long as the marker you’re using to write the seed name stands out from the plastic. To me, the best part of using plastic containers this way is that they can potentially be used for multiple years, but if they can’t, you can still recycle them when you’re done using them.

I used yogurt containers in two other ways. One was for soaking bean seeds overnight and transporting them out to the garden for planting. The second way was to start seeds in them. This wasn’t as successful as the dedicated starting cells, but I’m planning to try it again next year. In theory, yogurt containers should work well since they hold more soil than the starting cells you can buy. My attempt at using them this year failed because I didn’t cut enough drainage holes in the bottom to help the excess water run out.

Gatorade (or Other Plastic) Bottles

We keep our seed starting setup in our basement, so I carry water to the plants rather than the plants to a water source. You may remember that I initially recommended using a cheap spray bottle for starting seeds, but I eventually switched to Gatorade bottles and watered the seeds from the bottom. You can use any bottle for this purpose, but Gatorade bottles are a nice size.

Woodworking Scraps

As a woodworker, I accumulate a lot of scraps. I struggle to throw away any pieces, even if it’s unlikely that I’ll ever be able to use them again. Thankfully, gardening gives me a way to use scraps that can’t be used in other woodworking projects. I’ve found that a lot of my cut-offs from squaring up pieces of lumber are the perfect size to stake up plants. I will use any unfinished wood, including pressure-treated, and tie the plant to it with a garden twist tie. Using these cut-offs saves money, since we aren’t buying anything new, and they should last multiple years.

Long Beans, Gardening

I also used scraps to build the planter box and trellis system for our long beans. This project wasn’t technically recycling anything, but I decided to mostly use scraps instead of breaking down a full-size board.

Rabbit Droppings

Not everyone will be able to do this, because I’m not advocating for you searching through your yard for wild rabbit poop. However, if you’re lucky enough to have an adorable pet rabbit like we do, you can use their droppings as fertilizer. In fact, you can use most animals’ poop, but I would stay away from dog and cat feces. Rabbit poop is considered “cold” manure and doesn’t need to be composted or broken down before being applied to the garden. Basically, any animal that produces pelletized poop (goats and sheep are also in this category) can be directly applied. However, other animals, like chickens and horses, have “hot” manure and must be composted first. These animals can carry pathogens and diseases in their feces, and the poop can literally burn the plants if immediately applied. And dog or cat poop should never be used as fertilizer.

Rabbit poop, in particular, is a great fertilizer because it’s high in nitrogen, which is slowly released as the droppings decompose. When you figure that a domesticated rabbit produces up to 200 droppings each day, it can be a substantial fertilizer source, saving you a lot of money. Do yourself a favor: Adopt a rabbit, experience how wonderful they are as pets, and get the added benefits for your garden.

Milk & Juice Bottles

In the spring when the weather can be a bit volatile, it’s not uncommon to have frost advisories after your plants are in the ground, and they need to be protected. There are products sold to meet this need, including ground sheets, but my dad always kept his gallon-size milk bottles to keep his young plants insulated from the cold air. It’s easy to do. Cut either the top or bottom of the bottle off and place it over your plants. That’s it. This keeps warm air trapped inside, prevents the cold air from reaching the plant, and works as a greenhouse, which will help your plant to grow quickly. Milk bottles aren’t the only option, either. You can also save bottles that once held juice, vinegar, tea, etc. If the bottle was able to hold a consumable liquid, it’s probably okay to use in your garden. Just be sure to thoroughly clean it first.

Compost

This feels a little like cheating, but isn’t composting the ultimate act of recycling? You take food scraps that you didn’t eat and convert them into nutrients for your soil. These scraps can be the rinds of melons or strawberry tops. They can also be produce that has gone bad. Throw them in your composter, and they’ll eventually be converted into quality compost that can be mixed into your soil, which adds nutrients to help with your future gardens. If you don’t already compost, I recommend giving it a try. You can buy affordable composters or even build one yourself, and with a little bit of work and a lot of time, you can have a soil amendment that is nearly free.

Cardboard

Like plastic, we use a lot of cardboard in modern society. With all the online shopping and shipping that takes place, it’s common to have multiple cardboard boxes arrive at your house each week. Like I said in the intro, cardboard is great because it quickly decomposes, so no matter what you do with it, it isn’t going to cause long-term harm to the environment. Like most people, we always recycle our cardboard, but before doing that, we look for ways to reuse it. If we need to change the oil in the cars soon, we keep a few sheets on hand to put under the car when doing the oil change. We have also started keeping specific boxes and cardboard packaging to create Halloween and Christmas decorations. But cardboard can also be used in the garden. Because it breaks down so quickly, cardboard is a great form of mulch and compost. In the fall, after everything has been harvested and the plants have been pulled, you can lay sheets of cardboard on top of the soil and allow them to decompose. In the spring, this material will be organic matter that will improve soil quality.

Produce Containers

Eventually, if everything is successful in your garden, you’ll need containers to put your vegetables in after harvesting. We bought a couple of orchard baskets to use in the garden to make it easier to transport everything into the house, but those won’t work for storing vegetables. That’s where saving and repurposing produce containers come in. The plastic packages for cherry tomatoes, strawberries, and blueberries work perfectly for your smaller tomatoes. If you can find any of the cardboard/paper containers used at orchards, those are perfect for your larger tomatoes, peppers, potatoes, and tomatillos. Finding a way to repurpose what you have will save you a lot of money versus buying something specifically for this purpose.

Future Recycling Opportunity: Egg Cartons

I haven’t tried this yet, so it may be a massive failure, but I saw some of our leftover pressed paper seed starting cells yesterday and noticed how similar they are to egg cartons. I’m talking about the cardboard/pressed paper ones; not the foam ones. They’re about the same size as the cells we have, and with a drainage hole added, they would probably work to start seeds. I am going to give this a try next year to see how they do and will report back.

Recycling Where Possible

None of what I mentioned in this post is what most would traditionally call recycling. But it’s a literal understanding of it. It’s repurposing things that may otherwise end up in a landfill. And at the end of the day, the plastic from the yogurt may eventually wind up there anyway, but we’re giving this plastic a second life before it ends up in the recycling bin. I think it’s important to make attempts to improve the environment where possible, especially when we’re already dedicated to sustainable gardening through crop rotation and doing as little tilling as possible. I hope that you found this post helpful and may consider one of the things I mentioned.

Weekly Garden Update #19 – Cucumbers, Eggplants, Starting More Corn & More

In this week’s update, we harvested and began eating from our garden. I’ll tell you what vegetables they were and how we ate them. We also started more corn for a late harvest and planted the last melons we’re growing this year. I’ll provide a general update on everything we’re growing as well. Finally, this edition of the Seed of the Week takes us to the American Southwest, where a variety of corn has been grown for over 800 years. Let’s dive in.

First Harvest

This week saw us achieve a goal we set at the start of the garden: Harvest something from our garden and eat it the same day. That included three cucumbers and two eggplants. Two of the cucumbers were from plants gifted to us by our neighbor, but one was a Boston Pickling that I started from seed, making it the first fruit harvested from this year’s garden that I started from seed. We ate the cucumbers raw by slicing them and eating them on the side with dinner. For the eggplants, Magz sliced them into coin shapes and roasted them in oil and seasoning. They were delicious. We’ve found that doing as little as possible with high-quality, fresh vegetables is the best thing for them. We have a lot more cucumbers coming on, and there are more eggplants that are close to being harvestable, so we’ll be eating a lot more of them moving forward.

Starting More Corn

We had some open areas of our garden beds where potatoes weren’t growing, which we think is the result of poor drainage and too much rain early on. In the open rows, we wanted to grow more of something that we’ve had great success with: corn. We still had some Hopi Blue and Sweet Mexican/Black Iroquois seeds left, but because the Hopi Blue corn takes a lot longer to reach maturity, we planted the rest of the Sweet Mexican/Black Iroquois seeds. All three varieties (the above two and Butter & Sugar) have done exceptionally well, and a late planting of corn could lead to us having sweet corn in September.

At the same time, we planted all the remaining melons and squashes that we’re growing this year. In a few more open spots, we dedicated two of them to the White Scallop Winter Squash, three of them to Ali Baba Watermelons, and four to the Noir de Carmes cantaloupes.

A General Update (With Pictures!)

  • Our tomatoes continue to put on fruit, with the Cherokee Blue, Black Krim, and Queen Aliquppa growing close to full size. Now, we just wait for them to ripen.
  • Our Cal Wonder pepper plants have quite a few fruit on them, but they haven’t reached full size or started to ripen yet. Our plants also haven’t grown to full height, which is weird. I read that peppers are one of the slowest-growing plants and require hot temperatures and full sun, which we’ve had lots of this summer. I’m still holding out hope for them.
  • Our melons, squash, and pumpkins are all doing well. We have spaghetti squash that are close to softball size and many cucumbers that are growing. Most of the other plants are producing blossoms.
  • The tomatillos have been growing their husks for more than a week now, with one of them larger than a golf ball. There are many husks starting and even more flowers coming on at the same time.
  • We are finally starting to see some progress with our beans. The first batch of Provider beans has a few beans on the plants, which is major progress, even if the pods are small. Our Kebarika and Jamapa plants have started to produce flowers.

Seed of the Week

Our Seed of the Week this time is the Hope Blue corn variety. It’s a very old type of corn that has been grown in Northern Arizona for over 800 years by the Hopi Native American tribe. This variety is a flint/flour type of corn and is milled down into cornmeal or flour. The Hopis use it to make a ceremonial type of bread called piki. But even though this variety is primarily used for flour, it can be eaten as sweet corn.

The kernels of Hopi Blue corn are dark blue, nearly black, and the stalks grow up to nine feet tall. We got our seeds from Fedco out of Maine, and on the listing, they quote one of their growers, who says that the corn is “crunchy, corny and wholesome.” We’ve had great success with our Hopi Blue seeds. They overcame torrential downpours within a week of being sown and have excelled. The stalks are currently taller than our fence (so about 4 1/2 feet) and are gorgeous. If you’re curious about growing different varieties of corn, give this one a try.

Up Next

This week, I’d love to see some of our tomatoes begin to ripen. Our cherry tomatoes are pretty much full size, so ripening is the next step. I also think we’ll harvest some of our beans. Beyond that, we’re enjoying how relaxing it is to watch our garden grow. Each day, something new happens or we can see measurable growth. For example, we had a cucumber grow multiple inches in one day. It’s unbelievable. I hope your garden is doing well. Happy gardening.

5 Easiest Seeds to Grow

A couple of weeks ago, I wrote a post on the 5 hardest seeds to grow this year. If you haven’t read it yet, I recommend checking it out. In it, I went over the 5 seeds that I’ve had the most trouble with this year. It could have been the result of an error on my part, poor weather, or something else entirely, but for whatever reason, I couldn’t get them to grow.

Today, we’re going to look at the 5 seeds that I’ve had the best luck growing this year. I didn’t treat these seeds any differently from the ones listed in the previous post, yet they took off and are growing abundantly. With each seed, I’ll go over what has made them a success and why I think each was easy to grow. Let’s dive in.

5.) Queen Aliquippa Tomato

I’ve written about this seed so many times that people will get sick of it. We didn’t know this tomato variety existed until we saw it in this year’s Sow True Seeds catalog. They’ve been selling it for years, but this was the first year we requested their catalog. As a refresher, this tomato variety is named for Queen Aliquippa, a Seneca nation leader who lived in Pennsylvania during the 18th century. She is so well-known in Western Pennsylvania that a town, a school, and businesses are named in her honor. In fact, the town of Aliquippa is only 10 minutes from where Magz and I went to college.

These seeds could have been a bust, and I still would have been happy we bought them. Thankfully, that hasn’t been the case. Of the first batch of tomato seeds I started, only 3 are still alive, and 2 of them are Queen Aliquippas. I treated the Queen Aliquppas the same way as the other tomatoes; however, the others didn’t take off.

These plants have gone through a late Spring that resulted in them getting leggy at the start, multiple torrential downpours, and a week of excessive heat, but they remain our best-looking tomato plants. We have since transplanted a few more plants that I started later, and they are also looking good. The Queen Aliquippa tomato plant is unique among the others we’ve grown. It has potato leaves that aren’t serrated like a typical tomato plant. When ripe, the fruit will also mostly stay green with a bit of amber at the bottom. To this point, we’ve loved growing this variety, and assuming we like how they taste, we’ll continue to grow it in future years.

4.) Seminole Pumpkin

These pumpkins have done exceptionally well so far. We have plants that were started indoors and transplanted outside and ones that were direct sown. Regardless of how they were started, they’ve grown well. We don’t know how many of these plants we’re growing because I misplaced the labels when transplanting the ones I started from seeds, but we think there are 3 or 4 of them. The ones that were transplanted have vined out about 2 feet from the roots and are getting ready to produce flowers. The ones that were directly sown are smaller since they were started later, but all of the plants look healthy.

Even though these are called pumpkins and have pumpkin leaves, the fruit doesn’t look like a typical pumpkin. It’s buff-colored rather than bright orange and reaches about 6 inches in diameter. They can be stored for up to a year but can also be picked early as a summer squash. These have required little attention. Since transplanting or starting them, we’ve made sure they have been consistently watered, and I side-dressed the older plants with some bone meal. If you’re looking for a smaller and historical variety to grow (these were grown by the Seminole people of Florida) and you live in a hot and humid climate, you’ll love these.

3.) All Corn Varieties

Before we started gardening, a common remark I’d hear was that growing corn is hard or not worth having in the garden. I don’t remember any family members trying to grow it. Now, that could be because fresh sweet corn was plentiful and cheap where I grew up, so it may not have been worth the effort in people’s minds. Magz and I first tried growing it in containers in 2022 and had success with it. We had 3 stalks in each tote, and they produced small ears that were delicious.

This year, we bought 3 varieties: Hopi Blue, Black Iroquois/Mexican Sweet, and Butter & Sugar. The Hopi Blue is a flint corn for grinding into meal or flour, the Black Iroquois/Mexican Sweet is a dark-kernel sweet corn, and the Butter & Sugar is the common bi-color sweet corn. We planted a row of each on the same day in May after the threat of frost had passed. Immediately, we had a week of heavy rain that totaled more than 3 inches. I was nervous that the seeds had washed away because some of the soil had been relocated, exposing the seeds. We covered them over again, and within 2 weeks, nearly all of them germinated.

At this point, all 3 varieties are doing well. The Hopi Blue is more than 4 feet tall already and can grow up to 9 feet tall, while the others are about 3 feet tall and should only reach 5-6 feet tall. Yesterday, when I was checking out the plants, I noticed the tassel developing inside the leaves for the first time. Corn is an easy, low-maintenance vegetable to grow. Besides weeding and watering, the only thing I’ve done is give the plants consistent nitrogen. Corn is a heavy feeder, so it needs extra nutrients to reach full height and develop big, full ears. If you’ve been on the fence about growing corn, it’s worth a shot. It doesn’t require a lot of work, and seeing corn grow is a beautiful experience.

2.) All Cucumbers

Cucumbers are another vegetable we’ve had success growing in the past. In our container garden, we grew a pickling variety, and we were pulling multiple ripe cucumbers off it daily. This year, we bought 3 varieties to grow: Boston Pickling for pickles, Tendergreen, which can be harvested for pickles or left on for slicers, and Richmond Green Apple, an Australian heirloom. We were also gifted 2 starts of a burpless variety from our neighbor.

I started the 3 inside and transplanted 2 plants of each variety into the garden. At the time, they didn’t look good. Like other plants, they were leggy at the time, and the weather wasn’t friendly to growing cucumbers. However, within a couple of weeks, they took off and now have blossoms on them with small fruit growing. The starts we were gifted also weren’t healthy when we transplanted them, but they’ve taken off and have produced 2 fruits already. These have required little maintenance other than a side-dressing of fertilizer. We may need to trellis or stake them at some point, but up until now, they’ve grown nicely without any assistance.

Bonus: Most Melons, Squash & Pumpkins

Because I didn’t want to have a listing for all melons, squash, and pumpkins, in addition to already having all corn and cucumbers, I wanted to add an honorable mention or bonus section. In this section are all melons, squash, and pumpkins. The Seminole pumpkin deserved its own listing, but most of the things I wrote about it apply to all of these. Quickly, these are all the melons, squash, and pumpkins that we are growing:

  • Ali Baba Watermelon
  • Noir de Carmes
  • Tigger Melon
  • Black Beauty Zucchini
  • Candy Roaster Melon
  • Golden Glory Yellow Zucchini
  • Queensland Blue Winter Squash
  • Zapallito Del Tronco Zucchini
  • Ping Tung Eggplant
  • White Scallop

Of the above seeds, the only ones that haven’t done well are the Black Beauty Zucchini, Golden Glory Yellow Zucchini, and the Ping Tung Eggplant. I don’t know why the zucchinis didn’t do well since they were planted at the same time as the Zapallito Del Tronco, but they didn’t. Only 1 Black Beauty and none of the Golden Glory seeds germinated. The eggplants were started indoors and never got to the point where they could be transplanted outdoors. The others have all done well.

I started a lot of the squash, melons, and pumpkins indoors. They immediately took off, but we couldn’t transplant them right away due to the weather. As soon as the weather broke, they were moved outdoors, but I had little faith in them doing well. All but 3 of the plants lived and are thriving. We also directly sowed a bunch of them later in early June, and they’ve done exceptionally well. All of the plants look healthy and are growing vigorously. What’s most interesting is how all the squash, all the melons, and all the pumpkins have similar leaf structures and growing behaviors, but have subtle differences between the varieties. For example, the Seminole pumpkins have silver lines on the leaves that the other pumpkin plants don’t.

We bought additional seeds (these are the ones in orange text) in late June to have a wider variety of pumpkins and squash. To put into context how quickly and easily these grow, I started them on Saturday evening. By Tuesday morning, the Hokkaido had germinated, and by Wednesday evening, the Dark Green Yuxi Jiang Bing Gua and Sugar Pie Pumpkin seeds had as well. Consistent moisture levels, full sun, and warm temperatures are the perfect recipe for these. If you find a variety you are curious about, give it a go. Odds are that it will do well.

1.) Provider Bush Bean

I love beans. In the United States, we’ve done a horrible job of educating people on how many bean varieties there are and all the ways we can use them in food. In most grocery stores, the only fresh beans you’ll find are green beans, and you may find some edamame or snap peas, which aren’t beans but are similar enough to include them here. I think that a lot of Americans picture canned beans when they think of beans. Whether these are green beans, black beans, pinto beans, or kidney beans, the average American doesn’t envision bags of dried beans or fresh varieties that are a color other than green. I’ve grown bush beans in the past, but this year, we found ourselves interested in growing other varieties.

American history is filled with people of the past growing bean varieties that were vitally important to their culture and heritage. Baker Creek sells a variety that was found in a New Mexico cave and dates back 1,500 years. In the South, Southern peas (also known as asparagus beans or Cowpeas) were preserved by slaves as a way to save their heritage. It’s the same in Latin America, South America, and Asia – beans (and all seeds) tell stories.

We attempted to grow 5 varieties this year: Kebarika, Jamapa, Red Bush, Provider, and Chinese Red Noodle. We’ve had moderate success with the Kebarika and Jamapa and nearly no success with the Red Bush beans. However, the Provider and Chinese Red Noodle beans have excelled. I planted the Chinese Red Noodle beans in a planter box I built, and they are currently climbing the trellis to a height of 7 feet.

I planted the Provider beans in our bed with the Kebarika and Jamapa, and they’ve done pretty well. They’re not real tall yet (about 18 inches), but are still growing and have started to flower. But when our Red Bush beans failed (only 1 successful plant among a full row of seeds), I planted more Provider beans in the same row around the lone Red Bush bean plant. So, it was the same growing conditions. Within 2 days, almost all the seeds germinated, and at the time of writing this, the plants are nearly the height of the Red Bush bean plant, which is more than 2 weeks older. As Magz pointed out, the name Provider is pretty on point. These plants provide.

So, there it is. These are the (more than) 5 plants that I’ve had the easiest time growing this year. All have a few things in common: they grow in spite of the weather, my mistakes, and questionable soil quality. They’ve all required little maintenance and make you believe in yourself as a gardener. Have you tried any of these varieties? If not, I recommend giving them a go. Do you have any favorite seeds to grow?

Weekly Update #18 – Farmer’s Market, Restarting Beds & Sneaky Rabbit

In this week’s update, we went to a local farmer’s market and got to meet many people who are as invested in gardening as we are, we restarted a few of our garden beds, and we had a cute but unwanted visitor in one of our gardens. Finally, in the Seed of the Week section, virtually travel with me to the Middle East and learn about an Iraqi melon variety.

Farmer’s Market

Last week, we were looking forward to Saturday to visit the weekly farmer’s market in a nearby town. Our town has its own farmer’s market, but it takes place on Thursdays from 3 to 6 p.m., which makes it tough to attend. I work until 5 most days, so we wouldn’t get there until 5:15 at the earliest, and by that point, most of the items are gone. Early last week, our neighbor told us about the farmer’s market in the next town, and this market is held on Saturday mornings from 9 to 12, which is much friendlier to our schedule. We got up in time on Saturday and arrived by 9:45, and it was a great experience.

There were probably between 20 and 25 vendors, and they sold a lot of items, including produce, flowers, meat, baked goods, honey products, wooden kitchen utensils, and yarn. We came home with a bunch of red beets, green and yellow zucchini, 3 strawberry plants, a wooden flour scoop, and a skein of yarn. But it wasn’t just the items that got us excited. We were able to make connections with people in our area who have similar interests to ours and are motivated to grow their own food and be makers. Magz talked with a vendor who raises sheep and sends the wool away to a local mill to be spun into yarn. We also talked with the gardener who sold us the strawberry plants about the best way to grow them.

Lastly, the town’s library has a booth at the market each week, and we were able to become members. Up to this past Saturday, we haven’t had library cards since we moved to town in 2021. Our town’s library doesn’t have a great selection and is in the basement of the borough building, so it doesn’t feel like a library. Becoming members of our new library has us excited for the potential to get more involved in the community and find new books to read. I’m especially excited to check out their reference section for gardening books and to request such books from other libraries.

Restarting Garden Beds

For the past few weeks, we’ve been having some issues with grass growing out of control in a couple of our beds. It choked out the carrots and beets and also wasn’t allowing some of our greens to grow. Given that most of those plants were among the first things we planted, we weren’t confident that they’d grow to maturity at this point. So, we decided to get the mower and tiller out, and we mowed down everything that was growing and turned the soil over to start fresh. In those beds, we planted more winter squash/melons/pumpkins that we recently bought, more carrots and beets, and the strawberry plants we bought on Saturday. By restarting the beds, the plants will have a great chance to thrive, since the rows are spread out and everything is marked.

We’re also going to be turning over the soil where our potatoes were planted (they didn’t grow), where we pulled our ground cherry plant (also didn’t grow), and where a couple of our melons didn’t work. In their places, we’re going to plant a few more cantaloupes and watermelons, some late-season corn, and a final row of shelling beans. While it’s getting late in the season, there’s still time to get a late crop of seeds in the ground. July means hot temperatures for germination and plenty of sunlight to help the plants grow once they start.

A Potentially Unwanted Visitor

On Thursday evening, I was looking out the kitchen window at the backyard. It was close to 8 p.m., and I was about to get a shower. I saw two rabbits, which isn’t unusual. We have a populated woodland community on our property, and the rabbits are some of the most active members. They love our yard because we don’t cut our grass super short and have places that provide shade and protection. To this point, we haven’t had any issues with them getting into our beds or eating our plants. This day, however, one rabbit was outside the fence and one was inside.

The one that was inside the fence was getting dangerously close to one of the melon plants that Magz is passionate about and recently started. I quickly ran outside to get the rabbit out of the garden, which was an interesting experience. Thankfully, it left the way it entered, which revealed a hole in our fence that likely opened when we started the fence or was the result of the mower getting caught in it. I was able to put a new section of fence in and closed up the hole, and we haven’t had any more visitors, so fingers crossed that they stay outside the fence.

Seed of the Week

This edition of the Seed of the Week takes us to Iraq and the Ali Baba watermelon. We bought our seeds from Baker Creek, who originally got the seeds more than 2 decades ago from an Iraqi farmer who preserved them. Thankfully, that farmer and seed companies like Baker Creek have shared and preserved the seed, because it is now nearly impossible to get seeds from Iraq following decades of warfare.

Watermelon, Baker Creek, Ali Baba Watermelon
Ali Baba watermelon

We’ve never grown these before, but the Ali Baba watermelon plant produces an oblong fruit that grows to between 12 and 30 pounds and has a rind that is lighter in color compared to the watermelon we typically eat in the United States. We started these seeds in at least 3 spots, and they germinated successfully and quickly. All of our plants have produced their second set of leaves and will begin vining out next. As long as we keep them well watered, they should continue to grow and hopefully put on fruit. We’ll keep you updated on their progress.

Up Next

A small addition to the weekly update: we harvested our first cucumber last night. It was a burpless variety that our neighbor gave us and was about 5 inches long. It’s definitely a monumental occasion. Between now and next week’s update, we have plans to start a couple more rows of corn and beans in some spare space we have. We’re also going to start at least 1 more cantaloupe or watermelon plant. Hopefully, we’ll also get to harvest a few more items. Until next week, happy gardening!

Weekly Garden Update #17 – Visible Growth, Tackling Grass & Side Dressing Plants

In this week’s update, we’re starting to see our garden really take off. Plants that were already big have started to bloom and produce fruit, while plants that were small or looked a little unhealthy have started to grow and look like they’re going to make it. We also needed to tackle some of the grass in the beds that was becoming unruly, and we side-dressed many of our plants with bone meal. Finally, what is this update’s seed of the week?

Visible Growth

Since last week’s update, we’ve been blown away by how much growth there has been in the garden. The tomato plants we bought from the greenhouse, as well as the original Queen Aliquippa plants I started, have all started to blossom and produce fruit. The Cherokee Purple, Black Krim, and Yellow Pear plants all have fruit on them, while the Queen Aliquippa plants have numerous blossoms. Our pepper plants are the same way, with two of the Cal Wonder plants having at least one fruit. The small starts that we transplanted last weekend have grown and are looking healthy.

Our melon, squash, and cucumber plants are also showing a lot of growth. The spaghetti squash plant we bought at the greenhouse has 15 or so blossoms on it, while another plant that I started inside (we think it’s a pumpkin) is also blossoming. All but a few of the plants in our melon bed are doing very well, including our cucumber plants, where we’re starting to see baby cucumbers growing behind the blossoms. Lastly, our eggplants are growing a lot of fruit, with the largest being roughly three inches in length. It’s safe to say that the heat and sunshine have been wonderful for our garden.

Mowing Inside Our Garden Beds

This weekend, we realized that we needed to deal with the grass that was growing in the last garden bed we planted in. We had been using long shears to trim everything, but Magz smartly suggested that we try getting the mower in between the plants. Yesterday, we did and had so much success that we used the mower in our other beds, which made for much less work by hand. I maneuvered the mower while Magz helped me not run over any plants. While no plants were harmed, I did run over a wooden marker, but after 30 minutes or so and many squeaks from Magz, we were done. She is my Richard Hammond. We’ll be using this method moving forward to save time and work.

Side Dressing Plants

With our plants growing well and starting to bloom, I applied a layer of bone meal to our tomatoes, peppers, beans, and our more mature melons, squash, and cucumbers. I like bone meal because it’s easy to apply and gets absorbed pretty well, but I want to find a better fertilizer. I like bone meal when transplanting starts, but I would like to find something more water soluble or even a liquid fertilizer for side dressing needs later in the season. The bone meal has worked, though. The day after I applied it, we got a nice rainstorm, and the plants looked perkier afterward.

Seed of the Week

This week’s featured seed is the Black Krim tomato. We’re growing these from seed and from starts that we purchased at a greenhouse. These tomatoes are originally from the Crimean Peninsula in the Black Sea and were named after the Isle of Krim. They gained popularity in that region during the 1850s but didn’t become commercially available in the United States until the 1990s. They may have been the first “black” tomato to be sold in the U.S. These are the first black tomatoes we’ve grown.

Up Next

At this point in the garden, we’re largely managing the garden. We’re dealing with weeds, making sure the plants are properly watered, and generally ensuring that everything is healthy. There’s a chance that by next week’s update, we’ll have harvested at least one tomato, eggplant, and/or cucumber. How are your gardens doing? Happy gardening!

5 Hardest Seeds to Grow

Of the 82 seed packets we ordered earlier this year, we have planted nearly all of them, with only the fall crops still remaining. So, I wanted to write two articles: one on the hardest seeds to start and a second on the easiest ones.

I’m starting with the hardest seeds. My experiences with these are just that – my experiences – and are in no way an indictment on them or the seed companies they were purchased from. I could have done something wrong that caused failure, and if you’re curious about them, you should still buy them. Without further ado, here they are.

5.) Principe Borghese Tomato

We bought these seeds to be our paste tomatoes for the year, opting for this heirloom Italian variety over the more popular Amish Paste or San Marzano. We were intrigued because of their history, that they could also be sun-dried, and because they were spherical rather than the typical oblong. Unfortunately, we had nothing but problems with them.

I started these seeds the same way and at the same time as all the other tomato seeds; however, for some reason, these didn’t germinate as well as the others, and the ones that did germinate got leggy within a few days. Side note: Nearly all our tomato starts got leggy due to inadequate lighting, but these starts were worse than the others. When I attempted to harden them off and transplant them into the garden, none of them made it. To be fair, only one variety of tomato plants successfully transplanted due to poor weather conditions, but these were the worst. Later, I attempted to direct sow them in the garden once the soil temperature was warm enough, but it’s been at least two weeks now, and we’ve seen no signs of germination. These seeds not working is disappointing because we were excited about them. There’s a good chance we’ll try them again in the future, but we’ll buy a second type of paste tomatoes if we do.

4.) Calabrese Broccoli

We wanted to grow broccoli this year despite having no experience with it. We chose the Calabrese variety because it is supposed to be a traditional-style broccoli that produces smaller heads and multiple side shoots. Everything I read made me confident that it would grow well in our area. I started them indoors 4-to-6 weeks before the last frost, as the seed packet suggested.

The seeds germinated well, but the new starts immediately struggled. I didn’t know this at the time, but broccoli is sensitive to warm temperatures. That is something I struggled to monitor and control with our seed-starting setup because I started vegetables with different temperature requirements at the same time. Additionally, our current grow light gives off heat but needs to be very close to the plant to provide enough light. This created a lose-lose scenario. Understanding this, we may direct sow late in summer for a fall crop. I think this will result in a better growing experience, but it’s anything but a “set it and forget it” seed.

3.) Husk Tomatoes – Ground Cherries & Tomatillos

I’m combining these two because they’re part of the same husk tomato family, grow in similar manners, and seem to be susceptible to the same issues. This is another vegetable/fruit that we’ve never grown before. Actually, we don’t think we’ve ever eaten ground cherries before and have only had tomatillos in salsa. We had similar issues with these that we had with other seeds: When they germinated, they went leggy pretty fast. One difference, though, was that these seeds took a long time to germinate and were slow to grow after they did.

When it became clear that getting any fruit off our starts was going to be a struggle, we bought a plant of each at the local greenhouse. They were very healthy and already had fruit forming. We transplanted them into one of our garden beds and quickly encountered issues. It started with the three-line potato beetle that required a non-organic spray to treat and has only continued with the plants struggling to grow. I think it’s the result of too much moisture in the soil, but as a bright spot, our ground cherry plant is still producing fruit, and last evening, we were able to harvest one. It wasn’t ripe enough yet, but it was rewarding to get something from it.

We also bought a few more tomatillo starts and transplanted them into a different garden bed with better drainage. I preemptively sprayed them to prevent beetle infestation and staked them. They’re still doing very well with dark green leaves and fruits that continue to develop. We’ve learned a lot since we first started these seeds, and we’re certain that 2025 won’t be the only year we grow them.

2.) Ping Tung Eggplant

We gave these seeds a shot because they were unique compared to the Italian eggplant that is more common in the United States. These originate in Taiwan and have a more cylindrical shape compared to the bell shape of the Italian style. Before purchasing, we were aware of the struggles that some gardeners have experienced with these seeds. Some talked about the issues of successfully moving from germination to transplanting. That’s the same problem we had. They germinated quite well, but like other plants, they quickly went leggy and died. I tried restarting them in May, but they didn’t even get past the germination stage. It’s quite a bummer.

We bought two eggplant starts from the greenhouse, and they’ve been doing very well since being transplanted. I don’t think they’re Ping Tung eggplants, but they are an Asian variety. They have been flowering for more than a week, and several fruits are beginning to develop. We were also gifted an eggplant start from our neighbor. We were unable to transplant it right away, so the plant was looking unhealthy by the time it was transplanted, but it has since recovered and is growing nicely. The Ping Tung seeds may just be difficult to start; I’m unsure, but I think we’ll give this variety another shot in the future, either this fall or next spring.

1.) Ishakura Bunching Onions

The final item on this list is an Asian-variety bunching onion seed. We chose these because we like Asian vegetables and were intrigued by being able to grow onions in the spring. Like the Ping Tung eggplant seeds, there were some mixed reviews from gardeners, so I knew there was a chance of some issues. I attempted to start these inside, which is what the seed packet recommends. In fact, it says to start these up to three months before the last frost date, so I had an expectation of slow but consistent growth, because it’s hard to keep starts going that long without needing to transplant them.

I began them in normal seed cells and had successful germination in the expected timeframe. They grew to about three inches and then stopped. They didn’t grow any taller or thicker. I thought that it could have been part of their growing process and that they would take off after being transplanted, but that wasn’t the case. Transplanting them was difficult due to the fragile root structure, and none survived. I later attempted to direct sow a row of them in the garden, but none germinated. This seed was easily the most disappointing of the season. Part of that is because we were excited about these onions and never experienced a hint of success.

I think part of this was the result of poor growing conditions. I think that growing them in a container would yield better results. You can tightly pack these seeds in, so in a 12″ diameter pot, you can probably grow two or three dozen plants. This would also allow for better moisture management. Still, for how easy the seed description said they were to grow, these were a letdown.

Giving Up or Trying Again

This is the decision we’ll find ourselves with next spring. Do we give up on these seed varieties and buy a different seed or a start, or do we try again with the knowledge we didn’t have before? It’ll likely be a combination of both. We had a conversation last evening about these seeds, and we are unsure if we’ll buy husk tomato seeds next year. They’re quite difficult to start, and the starts are very affordable. That doesn’t mean we won’t try starting them from seed again in the future, but I want to have confidence in successfully growing them to harvest before going back to the starting point again. The Calabrese broccoli seeds may be the same way.

But I think we’ll buy the bunching onions, Principe Borghese, and Ping Tung seeds again. I can pinpoint what went wrong with all of those, make changes, and be confident that we’ll have a different result. We’re going to upgrade our growing light, which will help, and our weather this spring was unusually bad. An improvement back to the norm would have a big impact.

I am planning on doing this article each year as we try new seeds. I’m also going to be doing a post on the five easiest seeds to start. Happy gardening!

Create a website or blog at WordPress.com

Up ↑