In this week’s update, some of our early crops were ready to be harvested. We’ll tell you what plants and how they turned out. We also encountered an unfamiliar pest and were forced to turn to non-organic pesticides. Finally, Magz helped me to realize that it’s okay to say we’ve done enough for this year and that the rest can wait until next year.
First Harvest
Over the past few weeks, we’ve been able to watch our plants grow by leaps and bounds. Our greens have developed their baby leaves, our bean and melon plants have their second sets of leaves, our corn is 4 inches tall, and our radishes have started to poke their roots above the soil. Taking note of this, we went out on Sunday and harvested about half of our French Breakfast radishes and took the first cut from some of our greens (Komatsuna and Cherokee Blue). The greens were harvested at the baby leaf stage and were delicious in a salad. They both had a peppery taste with the Cherokee Blue being the spicier of the two. Its spiciness is comparable to horseradish.
Radishes and greens
The radishes weren’t too big (about 1/2-inch in diameter and 3 inches long). This is slightly narrower than the seed packet says they should be, but that is likely the result of us not thinning them enough or the ground being a bit too compacted still. Either way, we ate them raw in a salad, and they were delicious. Radishes aren’t something that I remember people eating a lot of growing up, and most of the people who did eat them were a bit older. I only started to try them within the past few years and find that they add a nice little “pop” to a salad. They’re also very nutritious, providing calcium, Vitamin C, riboflavin, and niacin, among other nutrients.
Tomatillo Pest
Last week, when I was walking through the garden, I noticed that our tomatillo leaves had a lot of holes in them. Even worse was that something was eating its stem, which isn’t something I’ve encountered before. A quick Google search revealed that it was being attacked by the three-striped (also called three-lined) potato beetle. I did some research and learned that despite its name, this beetle doesn’t go after potato plants and only rarely goes after tomato plants, a relative of the tomatillo in the nightshade family. Trying to find an insecticide revealed the unfortunate information that organic measures generally don’t work against these beetles. Instead, you need specific chemicals to go after the larvae.
In our case, we found Garden Tech Sevin at our local Tractor Supply. While it doesn’t list the three-lined potato beetle among the insects it kills and repels, it does list the Colorado potato beetle, which is closely related. Since spraying the plant, including the undersides of the leaves, we haven’t seen more damage, but only time will tell if we caught it in time. It’s starting to produce buds, and you can see where the fruit will grow eventually, so we’ll see and keep you updated.
Knowing When to Stop
For months, we’ve planned on having six garden beds for this year. If you’ve been following along, you’ll know that we have plants in four beds, have one bed finished and ready for planting, and another that has been started but isn’t completed. I’ve been feeling stressed about needing to finish the last bed in recent weeks with all the other things that need to be done. This past weekend, Magz kindly told me that we don’t absolutely have to have the sixth garden bed this year and that it can wait until next year.
For a lot of people, this realization may seem obvious, but I’ve always struggled with reaching this conclusion. If I have a plan in place, I feel that I have to see it through, even if it’s unnecessary or not good for my physical or mental health. My natural inclination is to put myself in stressful situations by pushing through even when it isn’t needed. Having a wife who will help me to see that we can wait until next year’s garden to have that sixth bed is wonderful, because even at 33, I am unable to see that myself.
We still have starts and seeds that need to be planted in the ground, and we could certainly fill that sixth bed this year, but we also don’t have to. We’re going to have plenty of plants and work to do with our five beds. We will circle back to that final bed this fall, when we can till it for our winter cover crops.
Up Next
Over the next couple of days, we’re going to need to fence in the fifth garden bed so that we can plant in it this week. After a rainy weekend, plus thunderstorms in today’s forecast, Tuesday through Friday are looking nice with sunny skies. Our plan is to plant our squash and zucchini seeds this week and transplant our remaining melon, tomato, and pepper starts.
In this week’s update, I share a planter box I made over the weekend to grow some beans in, and we had a lot of germination take place. We also got to experience how gardening can help spark conversation and make friends.
Building a Planter Box
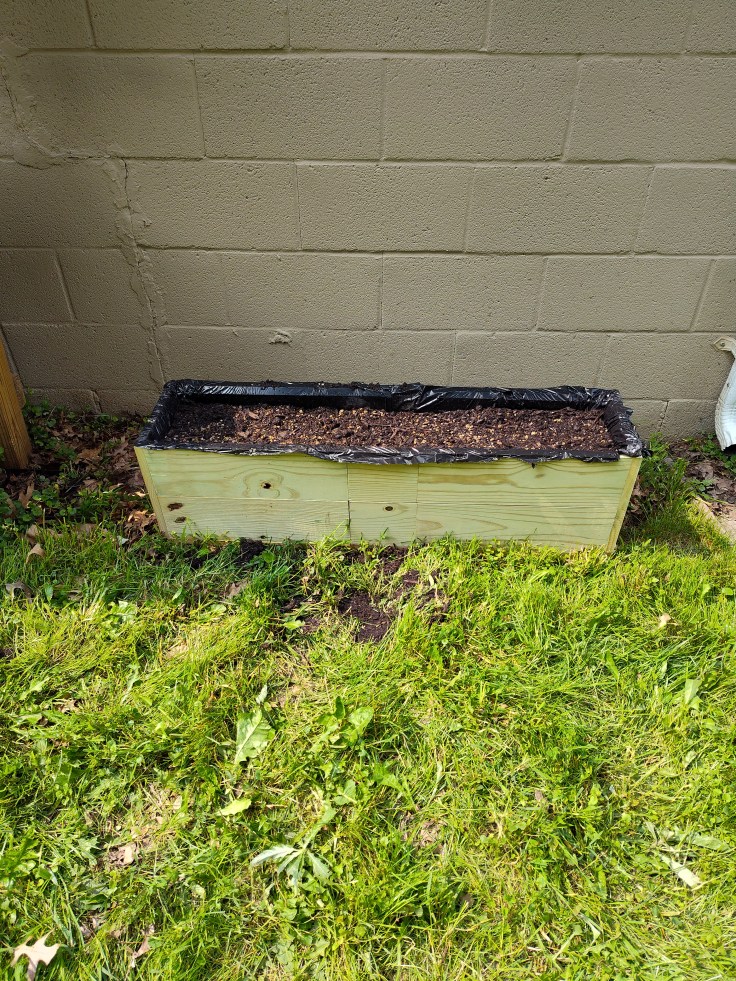
When we were picking our seeds for the year, we bought a packet of Chinese Red Noodle long bean seeds. These plants produce pods up to 18 inches long, and the plants can grow up to 7 feet. Safe to say that they need some support to climb that tall. But because these grow so tall, we couldn’t plant the seeds in the same space as our other beans since they grow to different heights. Instead, we decided to plant them outside our garden beds in a raised box and in a location where they can have ample space to reach their full height. A lot of gardeners would buy something for this purpose, but because I love woodworking and building things, I had to make it.
Planter box filled with soil and seeds
It would have been nice to make the planter box out of cedar, red oak, teak, or fir, but I didn’t want to waste the red oak I have on this project and didn’t have any cedar, teak, or fir. Instead, I had a bunch of pressure-treated lumber left over from our screened-in porch project. Pressure-treated lumber often gets a bad reputation, but it is a versatile product that is affordable and will last a long time if maintained. Decades ago, it wouldn’t have been safe to use in gardening applications, but it’s now perfectly safe as long as you aren’t chewing on it.
My goal was to use as many scrap pieces as I could without having to cut too many of the full-size pieces. That’s why there are smaller pieces between the two longer pieces on the sides. This allowed me to only take a little bit from one of the remaining full-size 1x6s I have left. All told, the box is 11 inches front-to-back, 40 inches wide, and 10 inches tall. There are vertical supports inside to attach the stacked side pieces to each other, corner supports to connect the four sides, and horizontal supports to strengthen the sides. There are also a few holes in the bottom for drainage and feet on the bottom to lift the box off the ground. It’s quite heavy and should serve our needs.
Planter box
Once the box was done, we lined it with a couple of black garbage bags. A lot of gardeners will buy black plastic that is sold specifically for gardening, but it’s essentially the same thing as the thick garbage bags people use for collecting lawn clippings. They both serve the same purpose: lining the box so there’s some separation between the lumber and the soil. It should also help the box last longer and create less of a mess.
With the liner installed, we cut drainage holes into the bottom and filled it with soil and Garden Tone and planted the seeds. After a thorough watering, it was ready to go. The seeds are supposed to take 5-8 days to germinate, so we’ll monitor them. The box was placed on the side of our garage/my woodshop where the plants will be in direct sunlight for most of the day. The only time it won’t get sunlight is at the very end of the day. To accommodate the trellis system, I’m going to build two brackets that will hang on the garage. The brackets will have holes in them to hold a dowel or bamboo stake, which will have garden twine tied to it. That twine will hang down to the planter box so the plants can climb.
Germination Update
In last week’s update, I mentioned that we were going to restart some of our seeds. That was the result of some of the starts not doing well and the rain preventing us from transplanting them for a few weeks. It led to some plants being leggy. There was also the fact that I messed up starting some of them, and I wanted to get a second chance with them. Last week, I restarted all of our tomato varieties, peppers (Cal Wonder and Scotch Bonnet), melons, cucumbers, eggplants, tomatillos, and ground cherries. I took extra time this go around by pre-moistening the soil and pressing it down a bit to pack the cells a bit more. The soil remains light and airy, but there’s more soil now for the roots to grow in.
In the 5 or 6 days since sowing the seeds, most of the varieties have germinated. The majority of the tomatoes and nearly all the melons have already sprouted and are looking healthy. This morning, I moved the cells with germinated plants in them off the heat mat and into another tray under the grow light. I’m attempting to be a bit more proactive with moving the starts sooner this time. The goal is to have the starts inside for a few weeks so that they can develop strong root structures before moving them outside.
In the garden beds, we have also started to see the successful germination of seeds, including corn, beans, carrots, and beets. The root crops have been growing pretty well for a few weeks now, but things have been a bit slower with the corn and beans. Corn is a slow germinating plant, so patience is key, but with the heavy rains we had not long after sowing, as well as the cool weather, I don’t think we were overly confident in their germination. However, on Sunday, we noticed that both had sprouted. The corn stalks were only about an inch above the soil, and the beans about two inches, but sure enough, they’re growing. That is incredible news! And with how fast bean plants grow, we should see them take off pretty quickly since we’re supposed to finally get some seasonally-appropriate temperatures this week.
Meeting a Neighbor
Yesterday, when we were working in the garden, our neighbor from across the street walked over and introduced herself. She is an older lady whom we hadn’t met yet, but she wanted to say hello and bring us a few cucumber starts that she had. It was such a wonderful gift and a great way to get to know a neighbor. Gardening is a great way to make friends and spark conversation.
Up Next
That’s it for this week’s update. Between now and next week’s post, we’re going to finish tilling the last bed, plant some sunflowers in front of the corn rows, and sow some butterfly pea seeds in a store-bought planter box. Thanks for reading, and Happy Gardening!
In this week’s update, we were able to finally get our vegetable starts in the beds, spent a lot of time in the garden watering and weeding, and got a start on the last two garden beds. Plus, I share a few mistakes I’ve made with our garden and my plans to remedy them.
Transplanting Starts
In last week’s update, I mentioned that we had transplanted a bunch of flowers we bought last weekend. Those were planted in various places throughout our yard; however, due to cool overnight temperatures (high 30s) and a ton of rain (over 3 inches in a 24-hour period), we were uncomfortable with transplanting our vegetable starts. This past weekend, we were able to get them all in the ground. That included all the plants I started from seeds as well as a few starts we bought from the greenhouse. These were Black Krim tomatoes, tomatillos, ground cherries, and spaghetti squash. These were plants that we either didn’t have seeds for or wanted more security in transplanting larger starts.
Transplanting a tomato start
Transplanting these was straightforward but time-consuming. Fitting the starts into beds that already have seeds takes some planning. We want our plants to complement each other by pulling and supplying nutrients in a mutually beneficial relationship. We also want to make sure we’re giving them enough space while also planning for more starts to be transplanted in the future. This process appears to have been successful.
We were very intentional in adding the appropriate soil amendment for each plant and also tried to keep the soil loose around the plant. If you remember back to the beginning of my writing about our garden, our soil is compact clay. We don’t think it’s ever been grown in, so the grass was pretty thick with well-developed roots.
Spending Time in the Garden & Watering
With seeds and plants in the ground, we’ve been able to spend a lot of time in our garden. We’ve largely transitioned from the planning phase to the establishing phase. We’re in the garden on a daily basis, checking for progress and assessing the need for natural pesticides or weeding. We also water on a daily basis at this stage while the seeds are still germinating or the transplants are taking root, and it takes a lot of water! We really enjoy watering with cans because it’s a more hands-on experience and bought a second watering can to help.
Nasturtium, tomatoes, tomatillos, and ground cherries
Regular watering also means we’re getting to put our rain barrel to use. Earlier in the spring, we bought a 55-gallon blue barrel and converted it into a rain barrel with water coming from our garage’s downspout. It’s difficult to believe how quickly it fills. A steady rain over a few hours will fill it from empty. It’s been nice not having to pay for the water we’re using. At the time of writing this, we have only had to fill one watering can with city water. Everything else has come from the rain barrel. I’m sure that will change throughout summer when it’s hotter and we may go a week or two without rain, but it’s still a wonderful blessing. We also plan to buy a second barrel for the other side of the garage. It’d be nice to eventually have three or four barrels around our house so we only have to use city water on rare occasions.
Starting the Final Beds
On Sunday and Monday, we got the final two beds started. On Sunday, Magz mowed down a large portion of grass and did the first pass with the tiller. On Monday, I followed up by tilling it a second time and also going back to a bed I started a few weeks ago and giving that one its first pass. With those beds started, we can see the finish line. We’re only a few tiller passes away from being done with that step in the gardening process, which feels like a huge accomplishment. It will also mean that the hardest work is done. When they’re done, the work will mostly consist of what I call maintenance: watering, weeding, and amending the soil. That will eventually lead to harvesting time.
What’s Next? Recognizing Seed Starting Mistakes
Between now and next week’s update, the plan is to continue tilling the last two beds, build a raised planter box for our long beans, and restart some seeds. The plan was always to start additional seeds once the first batch of seedlings was transplanted. We want to take advantage of the beds we have and grow as much as possible. What I didn’t plan for was the mistakes I made when starting our initial batch of seeds.
I have experience starting seeds and have had success doing so. However, before this year, it had been three years since we gardened, and I felt rusty. I turned to YouTube and blogs to refresh my memory, and I think they led me a bit astray. When putting the seed starting mix in the cells, I kept the soil loose rather than pressing it a bit, which resulted in the roots struggling to develop. I noticed a big difference between our starts and the ones we bought at the greenhouses. The greenhouse starts had roots that wrapped around the soil and allowed everything to come out in one cube. Meanwhile, our starts were loose with shallow roots. I think the soil composition had something to do with this. Other things I’m confident I messed up are how I watered the seedlings and the way I thinned them.
Moving forward, I’m going to make the following changes:
Tamping down the soil a bit before adding the seeds and also pressing down the soil that is added on top. In recent days, I’ve read about the importance of having contact between the soil and seed, which makes sense.
Pre-moistening the soil rather than relying on watering after the seeds are sown.
Watering from below rather than above. I went back and forth between using a spray bottle and a cup to water the seeds/starts. It became difficult to not flood the cells or potentially damage the young starts. This time, I’m going to fill the trays and allow the cells to dry out a bit in between waterings.
I will be thinning the starts by cutting them at the soil surface rather than plucking. I’ve learned that pulling the starts disturbs the roots of the plants you want to keep, which I saw evidence of.
I will follow up with how successful these changes are. Have you made mistakes in your garden that forced you to make changes? If so, I’d love to hear about it. I hope the mistakes I learned can help you in your garden. Happy Gardening!
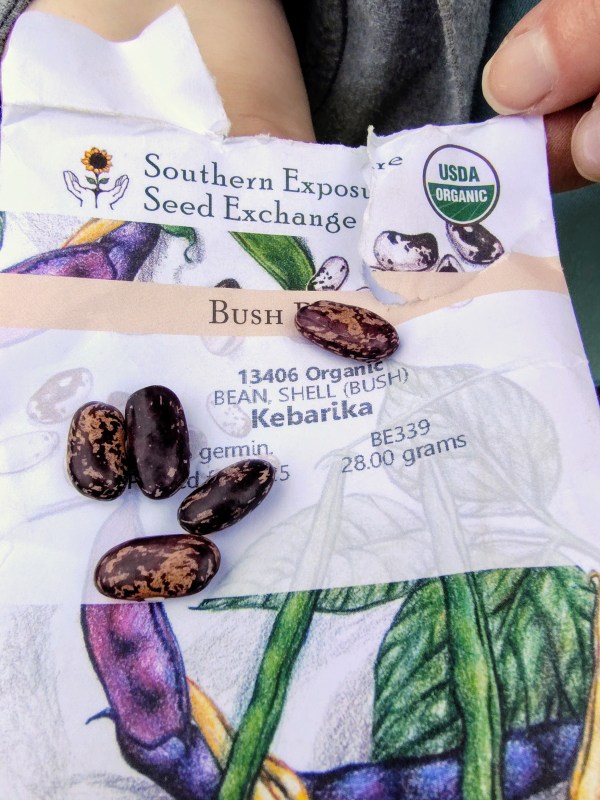
I originally wanted to write a seed history post on this seed, the Kebarika bean. Unfortunately, I have struck out with my research. Instead, I wanted to share the seed’s beauty with everyone and also discuss some of the information I was able to find. It’s an heirloom variety from Kenya and was probably introduced to the United States sometime in the 1970s or 1980s. According to sources, it first appeared in the 1985 edition of the Seed Savers Exchange Yearbook. It was later provided to the Victory Seed Company by seed conservationist Mark Futterman in 2004. Victory Seed Company has an excellent resource that compiles Futterman’s seed notes; however, for the Kebarika bean, it only mentions the years he grew it.
Kebarika Bean Seeds
Beyond that, there’s very little information. It doesn’t appear to be an overly popular bean and has a relatively short life as a commercially-grown seed. I attempted to determine the word’s meaning in Swahili, but that led to a dead end. Also, the auto-detect feature of Google Translate read the word as being of Malagasay origin, which is one of the languages spoken on Madagascar, so that’s very confusing.
My plan is to continue researching the seed and its history in an attempt to learn anything about it. In the meantime, though, we’re going to see how it grows and tastes. It’s a shelling bean, so we’ll dry the pods to save the beans to be rehydrated in the future. I’m also planning to do actual seed origin posts in the future.
In this week’s update, the rest of our fence materials arrived, and we were able to install it around the majority of our garden beds. We also visited two local-ish greenhouses on Saturday and Sunday. This is our first chance to buy flowers to decorate our yard since we bought our house last year, and we’re taking advantage of it. After we bought the flowers, we spent some time this weekend planting the majority of the flowers we got.
Installing Our Fence
If you’ve been following the blog for a bit, you’ll know that we recently decided on the type of fence we’re using with our garden and purchased the materials we needed. As a refresher, we are using an extruded plastic mesh fence that is often used at orchards to prevent deer from getting to their fruit trees. Our fence came in 7-foot x 100-foot rolls and included zip ties and ground staples for anchoring. We bought 5-foot bamboo stakes in a pack of 50 that we attached the fence to.
Installed fences
The stakes went into the ground 8 inches, giving us roughly 50 inches above the ground. We placed a stake every 5 feet and used 3 zip ties per stake to attach the fence. We then put a garden staple between the stakes to anchor the fence to the ground. In general, it was a great process, and I think we made the right decision. It took about 45 minutes to install the stakes and another 45 to attach the fence. We were surprised by how easy it was to unfold the fence since it was folded into fourths. We also didn’t have too much of an issue with the fence stakes pulling over as we tensioned the fence.
We know that this fence won’t keep out everything, and a deer could jump it if it really wanted to. But at the same time, we’re pleased with how durable and affordable it is. We would definitely recommend it to anyone looking for a cost-effective garden fence option, especially if you’re planning to upgrade it in a year or two. As an aside, we initially planned to put a smaller fence around each of our individual garden beds but ultimately went with one big fence to simplify things.
Greenhouse Exploration
This weekend was highlighted by visiting two greenhouses in our area. Both are family owned and have been in operation for over 80 years. Actually, one has been in business since 1919. Between the two greenhouses, we bought quite a few plants, including hibiscus, salvia, and begonia. The majority of them are perennials that can overwinter here. We also bought a few annuals and wildflower seeds for our furthest back flower bed. Almost all of the flowers and seeds we bought are pollinators.
Flowers
Finally, we also bought a few vegetable starts. They are either plants that we didn’t have seeds for or really like the vegetable and wanted to ensure we had a great start to build upon in case we have trouble transplanting our starts. We also bought two cilantro plants to keep Mia (our bunny) in a constant supply.
After we got back from the greenhouses on Saturday and Sunday, we planted some of the flowers but still have a few that need to be transplanted. The weather was uncooperative both days, with a cold front coming through our area, which has led to cool weather, cloudy skies, and wind. It’s not a lot of fun out in the garden when it’s that windy and cold, so we planted the flowers we could and will handle the rest over the coming days.
Up Next
With the fence up, we are finally comfortable with planting most of our remaining vegetable seeds and transplanting our starts. The starts have been on our screened-in porch hardening off so that they won’t experience shock when transplanted into the ground. With the fence up, the risk of little critters getting to the plants has dropped considerably. We’re going to start transplanting our starts today.
We have been having successful germination of the seeds that Magz directly sowed last week. All of the greens and brassicas have germinated, while the root crops (carrots, beets, parsnips, and radishes) should germinate sometime this week. Once the rest of our seeds are planted and the starts have been transplanted, we’re going to start some more seeds inside to increase our potential yield, get our potatoes into the ground, and finish the last two garden beds. At that point, all of the prep work will be done…finally.
How is your garden coming along this year? Have you been able to get your seeds or plants in the ground yet? We’d love to hear from you. Thanks for reading. Happy gardening!
Gardening is not fast-paced. It’s quite the opposite. It takes many months to go from seed to harvest. Most of the time, you will see little day-to-day progress. Instead, progress is seen across the weeks and months. A plant may not show growth from one day to the next, but from one month to the next, it can grow twice its size, start blossoming, or ripen. Unfortunately, I am not a patient person. Actually, I doubt that many of us are patient. It’s probably the result of living in modern society.
Technology allows us to be perpetually connected with people on the other side of the world, to get instantaneous results when we have a question that needs to be answered, and have items delivered to our house a day after ordering. Those are all great, but if there’s anything that doesn’t meet our expectation of speed, it’s easy to become impatient and frustrated. Someone isn’t going as fast as you think they should when driving? We tailgate and pass as soon as we can. A cashier takes longer than we want in a store? We either bolt to the next register when possible or are short in conversation when it’s our turn. Things that used to be treated with patience are no longer.
Garden Beds
I think that’s why gardening maintains a vital place in our fast-paced society. You really can’t rush gardening. If you try to speed up the process, it won’t work. Roots won’t have the necessary time to establish, plants will wither if it’s still cold in the spring, and the fruit won’t mature if it’s harvested too quickly. So, what am I struggling with in our garden?
Seed Starting & Germination
My struggle with patience in this year’s garden started immediately. I wrote about my process of tracking the start dates for all the seeds we bought. I generally wrote down the earliest date for each seed, counting back the weeks from what is typically our last frost date. I didn’t take into account the possibility of not being able to transplant the starts into the ground because of excess moisture or low temperatures. I also didn’t consider the ramifications of seeds taking off and needing to figure out a plan until we can transplant them outside.
You can probably see where this is going. As soon as that start date arrived, I (generally) was ready to start the seeds. In my head, if I were late by a day or two, that plant was certainly going to fail. My focus was very much on the immediate and not on the long-term. Then, if a seed hadn’t germinated at the beginning of its germination window, I assumed it had failed. In reality, seeds can take the entirety of the germination window (and sometimes even beyond) and still be okay.
Tilling
Oh, the process of tilling. I will likely be writing a standalone post on the repeated tilling we’ve done. We started digging the beds in March, which was plenty of time, and got the first four established quickly. What we didn’t account for was grass regrowing before we could plant. Beds that we thought were in good shape have been overtaken by grass that hadn’t been killed. We’ve had an incredibly rainy spring, which has resulted in an out-of-control yard that didn’t give our garden beds a break. We’ve had to mow the beds on the lowest setting before re-tilling them, which was a bit frustrating. A positive is that we’ve learned the best way to use the cultivator to kill as much of the grass as possible when tilling. This has resulted in healthier soil that looks ready to be planted in.
At the time of this writing, though, we still need to finish the first bed, do another pass on a second, mow down the grass and re-till beds 3 and 4, and establish 3 or 4 others. That’s where the need for patience comes in. It’s tough being patient with this process because we’ve already put in a lot of work and needing to redo that work is a bit frustrating. There’s a lot of the “trust the process” going on here. Yes, it’s been a lot of work, and there’s still more to be done, but each time we till a bed, we make more progress. More grass is killed, and the bed becomes more suitable for planting.
Weather
I think weather may seem like a bit of a copout here because almost every outdoor project requires patience with the weather. Very rarely does the weather cooperate with our plans, and this is absolutely the case in Western PA. If you want it to be sunny, it’ll rain. Looking for rain? It’ll be blazing out. This year’s garden has been one long battle with the weather and it not doing what we need.
Mid-March was mild and allowed us to get an early start on tilling. That was followed by a lot of rain in late March and throughout most of April. That led to grass retaking the garden beds. Finally, in May, we’ve been getting the weather we need to address all the beds. My patience was certainly tested during this time period. When it was raining, all I could think about was how quickly the May 15th (average last frost) date was approaching. I also saw all the work that still needed to be done: beds re-tilled, new beds started, seeds sown, and starts transplanted.
The craziest part is that this impatience has now gone in the other direction. We are actually in a good place with some seeds sown and most of the beds taken care of. We’re also now on the right side of May 15th, where we aren’t late with our planting. I’m now finding myself so excited that I need to be patient and wait to plant the rest of our stuff. Would it be problematic to plant everything else now? Probably not. The nighttime lows aren’t problematic. But there also isn’t a reason to rush at this point. What a difference from a week ago.
Lessons to Learn
As I mentioned in the intro, it’s my belief that everyone struggles with patience. I think it’s part of the human condition and the result of the first sin. The Old Testament provides many examples of the Israelites’ battle with patience and trusting God. I think that same struggle has been passed down through the generations, and the struggle to be patient is perhaps harder than ever when we live in a world that is constantly pushing for better efficiency and quicker responses. There’s very little opportunity to sit, dwell, and ponder over things. I think about how philosophers, theologians, and inventors from centuries past would simply sit and think about their subject, working through problems. As Christians, we would say that it is the Holy Spirit leading us in these moments. We rarely give ourselves the freedom to sit and be still. I’m perhaps more guilty of that than anyone I know. I am always looking for the next thing to do or the next step in the process. In my mind, very rarely is that next step sitting and waiting.
I think that’s why gardening is both incredibly tough but also very rewarding. It’s tough because very little of it is in our hands. We can’t do much to speed up germination or plant growth. Sure, we can give them nutrients to aid in the process, but the plant still takes a certain amount of time to reach maturity. Attempting to expedite that process can actually cause more harm than good. The reward that comes in the end when you’ve picked the perfectly ripe fruit makes everything worth it, though. And while the growing process is taking place, if we can simply learn to find peace and comfort in the quiet and slow, I think we’ll learn to handle our fast-paced environment a bit better.
We’ll never be able to keep up with modern society, and I don’t think that should be the goal. If you’re a believer, you’ll know that our faith journey can be a slow one. Sometimes, it feels like two steps forward and one step back. There are even times when it feels like the opposite: one step forward and two steps back. But being patient on the journey and letting Jesus refine us as we draw closer to Him is incredibly important. Salvation is very quick, but sanctification is a slow grind at times. It’s like gardening: germination can happen in a few days, but the process of getting the plant to full maturity is slow.
I’ll leave you with this. John Muir is one of my favorite people in American history. He was a 19th-century writer and naturalist who helped establish multiple national parks, founded The Sierra Club, and his influence helped to establish the National Park System. He’s important to this conversation about gardening and patience because he lived during a time of rapid growth and industrialization. When he was born in 1838, there were 26 states. When he passed away in 1914, there were 48. During this period of population growth, he wrote about the importance of nature and getting away from society to find peace. One of my favorite Muir quotes is: “And into the forest I go, to lose my mind and find my soul.” It’s pretty easy to see what he was talking about. I think there’s something deep within us that makes us want to connect with nature. For Muir, it was escaping to the mountains. I love doing that too, but I think we can also find a similar reprieve from society in natural places closer to home, like our gardens. If we allow our gardens to become places of peace of tranquility, where we don’t take our phones, but instead be content with talking to our plants and watching them grow, I feel that we can let some of the stressors of modern society wash over us. If we do, all of a sudden, the impatience we feel with gardening may take a backseat to the calm the garden provides us.
Do you struggle with patience when it comes to gardening? If so, how do you combat it? Likewise, what does your garden mean to you? Is it simply something that provides food for you or is it a place or escape?
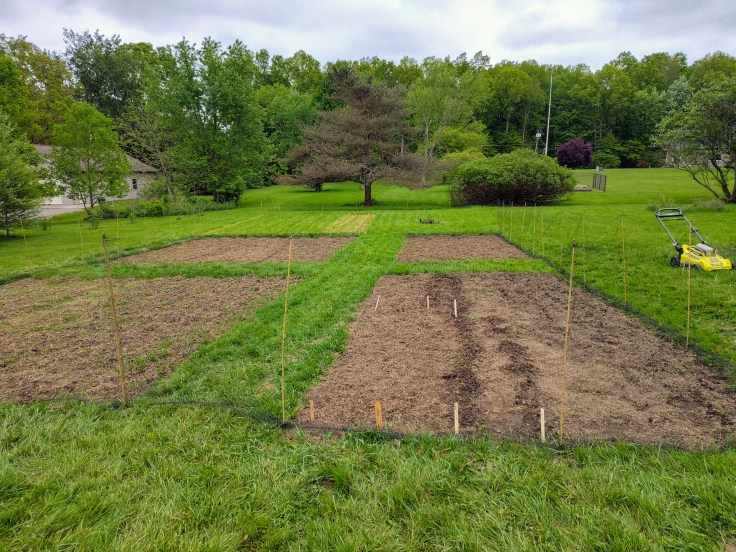
In this week’s garden update, the weather and schedule finally cooperated, and we were able to get our third and fourth garden beds completely tilled. We were also able to put seeds in the ground. If you’ve been following our journey, you’ll know that our weather this spring has been brutal. After a long and harsh winter, spring started out cold. It then rained a lot and only recently began to dry out and be warm enough at night for sowing to be a possibility. Some of our seeds, such as mustard greens, were supposed to have been in the ground in early April, so we’re more than a month behind. However, on Saturday and Sunday, we were able to (mostly) get caught up.
Garden Beds
We planted (and by we, I mean both of us on Saturday, but it was all Magz on Sunday) onions, carrots, beets, greens, and some flowers. Something I don’t think either of us expected was the difficulty of planning where everything should go in the garden. You have companion planting to think about to ensure that beneficial plants are placed near each other. We also want to succession plant some veggies like greens, beets, and carrots to ensure a harvest all season. That means not planting too much to start but instead reserving enough space to plant more in the coming weeks.
We also want to plant flowers in our garden beds to help control pests while simultaneously attracting pollinators. The plan is to have these flowers intermittently planted with our vegetables to create a garden that is both productive and beautiful.
Not all of our seeds are planted, nor have our seedlings been transplanted. We’re planning to wrap that all up over the next week. May 15th is typically the last frost date in our area, so the plan is to sow the rest of the seeds and transplant our starts in the days around that date.
What Else Has Been Going On?
In addition to directly sowing some seeds, we were quite busy this past week. We began the process of hardening off our transplants by taking them outside and exposing them to fresh air and sunshine. That will make the process of transplanting our starts much easier, as they’ll be less likely to experience root shock.
Seed Starts
We also bought and received the fence that I wrote about in last week’s update. We ended up buying it from Amazon because, once again, none of the stores in our town had it in stock. We could have ordered it and had it shipped, but it would have taken nearly a week to get here. We’ll now need to figure out the style of post or stake we’ll use to attach the fence to the ground. Oh, and between everything else going on, the grass has been growing out of control, and keeping up with the mowing has been a struggle. I love our battery-powered mower, but it definitely has its drawbacks when the grass is really long.
While we’re waiting for the ground to dry out so that we can direct sow some seeds and dig the rest of our garden beds, we realized that we need to figure out how we’re going to keep critters out of our veggies. Where we live, the most problematic animals are deer and rabbits. We definitely have squirrels and birds, but we aren’t going to keep them out.
We’ve always known that we’re going to need a fence, but reaching the point where we need to pick out the one we want to use snuck up on us. Ideally, we would have a limitless budget to pick a fence option that works and is pleasing to the eye. However, that isn’t the case, and choosing an option that is cost-effective is a top priority. I’m going to use this week’s update to discuss what fence option we’re going to use and how we reached that decision.
Short-Term, Not Long-Term
Because we don’t have a limitless budget to build or purchase our dream fence this year, we recognize that the fence we get this year isn’t the one we’ll have forever. There’s a good chance we’ll begin upgrading our fence as soon as next year. But that doesn’t mean we want to buy something that is completely disposable or junk. We don’t need a permanent solution at this time, though. We also want the fence to be minimal and not an eyesore, which removes some of the more expensive and permanent options.
What We Considered
Let’s start by discussing the fence styles we knew wouldn’t be possibilities given our budget and desires for an aesthetically pleasing fence.
Wood fencing – picket fencing is beautiful and iconic, but it’s also expensive ($60 for an 8-foot section of 6-foot-tall panel), regardless of whether or not you’re buying the panels or just the materials to build everything yourself. Also, because we need a fence that’s high enough to keep deer out, a picket fence gives off a vibe that you don’t want your neighbors to see what you’re doing. Rather unfriendly.
Vinyl fencing – see above, only more expensive ($109 for an 8-foot section of 6-foot-tall panel).
Metal fencing – not only is it very expensive ($152 for a 6-foot section of a 6-foot-tall panel), but it also wouldn’t successfully keep the critters out. Deer may not be able to jump it, but rabbits can hop through the spaces.
Chain link fencing – this fencing is very expensive ($139 for a 50-foot roll of 6-foot-tall fence), and it also doesn’t create the vibe we’re looking for. It looks like playground fencing and is anything but minimally intrusive. Our neighbors use this type of fencing for their garden beds, and it doesn’t look natural or happy. It also doesn’t work well because rabbits have learned to dig under it.
Rolled metal fencing – this can be either the chicken wire style with hexagonal openings or the welded type with square openings, but I’m including both in this. It’s pretty affordable (a 150-foot roll of 5-foot fencing can be purchased for $61), relatively easy to install, and successful at keeping the critters out. It can also be used for plants to climb. As a bonus, it looks pretty good.
Rolled plastic fencing – this can be called multiple things, including poultry fencing. It has 3/4-inch openings, is pretty durable, and easy to install. It’s decently affordable ($33 for a 25-foot roll of 4-foot-tall fence). It’s also green, so it blends in with the surrounding nature and doesn’t look out of place.
Construction barrier – this is exactly what it sounds like. It’s the plastic fencing that goes up around construction sites to prevent people from trespassing. It’s often found in orange, but you can find it in green. It’s pretty similar to snow fencing. It’s decently affordable ($45 for a 100-foot roll of 4-foot-tall fence) and very durable, but is an eyesore. The orange was a non-starter, but even the green looks out of place.
Deer fencing – this is also called extruded mesh rolled fencing. It is largely used to prevent deer from getting to orchard trees. It’s not overly durable, but there are many examples of people successfully using it to protect their gardens. It is extremely affordable ($23 for a 100-foot roll of 7-foot-tall fence).
What Did We Choose?
In the end, we’re choosing the deer fencing. It provides us with the ideal blend of price, size of roll, and attractiveness. We’re going to need somewhere between 600 and 700 feet of fencing. The deer fencing is less than $200 in total, while some of the others are well over $300. Because we needed to buy so much stuff to get our garden started this season and we screened in our back porch this year, we wanted to keep costs down where possible.
This deer fencing will not last forever, but we’re okay with that. If it breaks down or gets torn, we can replace it. We are also confident that if we take our time with installing it, it can last longer than expected. We can also repurpose the fencing in the future by using it as netting to protect plants from birds. Since it’s so easy to set up and tear down, this type of fencing will also allow us to replace it with long-term solutions a little at a time. Similarly, at the end of the season, we’ll be able to take the fence down and store it. We’ll let you know how installing it went and what we think of it throughout the growing season. Happy gardening.
Out of busyness, I skipped last week’s garden update. Rather than mail it in with a very light garden update, I ended up taking a week off and coming back this week with a full update. I apologize for skipping last week’s post. We worked on screening in our back porch last week, and it was time-consuming and tiring. In this week’s update, I learned that I’ve made a mistake when it comes to starting seeds, started a bunch of new seeds, and continued learning the importance of patience with gardening.
Seed Starting Mistake
Each day, I check our seed starting trays to see if the plants need water or can be transplanted to a larger growing cell. Two weeks ago, I noticed that a few were a bit laggy and didn’t look as healthy as they did at the start. Since starting the seeds, I had kept the trays on the heat mats and under the lids. I also turned on the grow lights once germination happened. I did a quick Google search and was reminded that the heat mats should be switched off and the lids removed as soon as germination happens. I immediately unplugged the heat mats and removed the lids, but it was too late for some of the starts, and I needed to restart some of them.
When this happened, I was down on myself. I really hate making mistakes when it comes to gardening, especially when starting seeds. Maggie reminded me to be nicer to myself, which is something I always need to be told. It’s incredibly comforting to know that mistakes are okay. I have to remind myself that it has been three years since we gardened, so it’s natural to forget some of the details. And I suppose that if mistakes are going to be made, it’s best for them to happen at this stage rather than when they’ve been transplanted and are a lot further in their development.
Transplanting, Restarting, and Starting
After learning that I needed to restart some of the seeds, I kept looking for opportunities last week in between the porch project to transplant starts, start new seeds, and restart some of the ones that failed. Sadly, it took until Friday, when the weather wasn’t great and we needed a day to rest, to find that time. That afternoon, I transplanted a bunch of tomato, pepper, and cantaloupe starts. I even transplanted a dahlia start that had outgrown its small starting cell. We didn’t buy any larger planting pots for this year’s garden after finding 10 or so of the peat pots from our previous garden. Beyond those, we’ve been reusing plastic containers that would otherwise be recycled.
Then, on Saturday morning, I took the time to restart the seeds that had failed and start some new ones that I hadn’t been able to get to. The ones that needed to be restarted were some tomatoes, peppers, cantaloupes, and dahlias. We also had to restart all of the eggplants, tomatillos, ground cherries, broccoli, and onions. The new seeds we started were our cucumbers, winter squash, pumpkins, and melons. We were originally going to start our beans at the same time; however, I read that they don’t need to be started indoors since they grow so fast. Instead, we’ll wait to direct sow them in the garden. With the newly remembered knowledge about heat mats, domes, the importance of air circulation for starts, and watering needs, we wait.
Gardening Requires Patience
I am not a patient person. I struggle to give things time and want to rush them. This is the case for gardening. At this time, we have a few plants that could be transplanted into the ground outside and other seeds that can be directly sown into the garden. However, the weather has been uncooperative, with cold temperatures at night that keep the soil temp low and consecutive rainy days, which isn’t ideal when seeds are trying to germinate or young plants are trying to establish roots. The rain has also prevented us from tilling the last two garden beds. I know that we’ll be able to get all of this done, but not rushing the process is difficult for me.
Up Next
This week, we wait for the recently-planted seeds to germinate and to see how the starts do after being transplanted. The healthy ones have done very well in the first few days, while the ones that weren’t looking great in the original cells still don’t look too good. We also need to mow our grass for the first time this year, which will include mowing down the areas for the new beds and handling some of the grass that has regrown in the existing beds. Finally, we have plans to finish our screened-in porch when we can get to it and to work in the garden. We had success with setting up our rain barrel and have noticed its impact on the ground around where the downspout originally deposited water. I’m hoping for a pretty eventful week in the garden. Happy gardening to you.
As a refresher, we bought the Earthquake MC440 cultivator. It has a 40cc 4-cycle engine and has tines that adjust the working width between 6 and 10 inches. We’ve had it for over a month now and have probably put between 15 and 20 hours on it, so I feel it’s a good time to review it.
Pros
Let’s get this out of the way now: There are a lot more pros than cons to this cultivator, and I cannot recommend it enough.
Power
Despite only being a 40cc engine, this cultivator has plenty of power. If you don’t have a good grip on it and are prepared to hold it back, it will be ripped out of your hands if you use full throttle. Typically, half-throttle is about all you need for most of the cultivating work. It’s powerful enough to break ground in lawns that have never been dug before, allowing it to take on jobs generally reserved for larger tillers.
Mobility
Before we bought our cultivator, I didn’t know that some of the smaller ones don’t have permanently attached wheels. Instead, they’re only used when moving it to and from the garden beds. Ours has a set of wheels that adjust to determine the depth of the tilling tines. When you aren’t actively cultivating, you can raise the wheels back up for transportation. The tiller is also nimble enough to be maneuvered in tight spaces and stored in the corner of your garage.
Weight
This is connected to the mobility section, but the weight of this cultivator makes it a breeze to use. At only 32 or 33 pounds, most people can lift it if necessary. This makes it easy to lift out of the garden bed or into the back of a vehicle for transportation.
Cost
This was one of the biggest reasons we bought this cultivator. While many larger machines were approaching $500, we spent less than $300 for ours. That amount is higher than some of the smaller cultivators we considered, but this one provided us with the perfect balance of size and power at a cost we were comfortable with.
Durability
I know that we have only had our cultivator for around a month, but we have used it a lot. We also haven’t gone easy on it. We’re asking it to cut through ground that has never been anything but grass and turn over the soil below the grass up to a depth of 4 or 5 inches. We’ve also run it for hours on end, and it has yet to give us an issue. It fires up within a few pulls each time (as long as I remember to turn it on), hasn’t stalled, and the tines remain undamaged.
Cons
Weight
The same thing that allows this cultivator to be mobile and easy to maneuver is a con. The heavier a cultivator or tiller is, the easier it is to get the tines deeper into the soil. That leads to less work for the person running the machine. I’ve thought a bit about how to add some weight, possibly by attaching something to the frame, but I haven’t pursued it.
Mud & Weeds Getting Twisted Around the Tines
This may not be a con with this specific machine or just cultivators in general, but I’ve found that the tines don’t do a great job of preventing mud from getting caked on them. This can reduce the effectiveness of the tines when cultivating. It’s not a huge deal, as it generally only happens when the ground is pretty damp, but it is an inconvenience. Similarly, grass can become twisted around the metal bar that the tines go on. This doesn’t impact the cultivator’s ability to perform, but we typically remove the tines and pull out the grass before putting it away each time we use it. Thankfully, this is an easy process with only one cotter pin on each side holding the tines on. It only takes a few minutes to remove the grass before you’re back in business.
Noise
If you read our post on picking out a cultivator, you’ll remember that we placed a lot of weight on how loud a cultivator would be when considering the power supply. It’s a reason we went with a 4-cycle engine over a 2-cycle. I still think it was a wise decision, because a 2-cycle engine would have been louder, but this cultivator is anything but silent. If the RPMs are kept low, it’s not loud at all; however, if you need extra RPMs to get through tough ground or thick grass, it quickly becomes noisy. I wouldn’t want to use it without some form of ear protection. That being said, any cultivator that uses an internal combustion engine is going to be loud, and it’s still much quieter than a leaf blower, so there’s that.
Would I Recommend the Earthquake MC440?
I would absolutely recommend this cultivator for anyone looking for a lightweight, cost-effective option. While it’s designed to turn over soil and work in existing garden beds, it can punch far above its weight class and does a great job in untouched ground. It has its limitations, but if you are uncomfortable with spending $500 on a large tiller and only plan to use the machine occasionally, this is a perfect cultivator.