Our Irrigation System Failed (an Opportunity to Learn & Improve)

Our irrigation system didn’t work. When I wrote my previous posts on our irrigation system, I hadn’t had the chance to fully test it. All of the PVC components were together, and, I thought, the tubing was ready to be connected once all the holes were drilled. Unfortunately, when we were ready to give it a trial run, there were multiple failure points that I hadn’t planned for. What went wrong, how are we watering our garden this year, and what’s the plan for the irrigation system moving forward? I’m going to answer all those questions.

What Went Wrong?

I wish I could say that only one element of the irrigation system went wrong, but that isn’t the case. There were several things that contributed to it not working.

Not Drilling the Drip Holes Correctly

The tubing we bought for our system didn’t have holes already drilled in it. I wanted to be able to determine how close the holes would be. That alone wouldn’t have been a big deal. But the other issue is that I drilled the holes too big. When we were buying supplies for the system, I grabbed the smallest drill bit at our local Ace Hardware store, which was 1/16″. That is very small when you’re used to drilling holes in wood or metal. The smallest bit I tend to use is 1/8″, which is double the size of the bit from Ace, so I thought it’d work fine.

However, when you’re drilling holes for irrigation, a sixteenth of an inch might as well be a mile. I also drilled through the tubing so that there is a hole on both sides. The goal was to have the tube lay flat and water plants on both sides. The plan and reality were completely different things.

When we hooked the hose to the system, the holes let so much water out that it looked like a fountain, which wasn’t what we were going for. Combined with how close the holes were and that I drilled some before the tubing reached the plants, there was so much pressure loss that the water couldn’t reach the plants at the end of the tube. I attempted to fix this by filling some of the holes with Flex Seal caulking and Gorilla Glue tape, but it hasn’t worked.

Remedy: There are a couple of easy ways to fix this in the future. One is to buy tubing that already has the holes drilled in it. Tubing that is designed for irrigation purposes will have the right-sized holes, and they’ll be correctly spaced. If we don’t want to go that route, I would buy the same tubing I got this year, but I’d use a much smaller drill bit. I think a 1/64″ would probably work. I also wouldn’t drill through both walls of the tubing. Finally, I would lay the tubing out in each garden bed to figure out how much was needed and mark where the plants will start. That way, there aren’t unnecessary holes, which cause a loss of pressure.

Inadequate Water Pressure

I was sort of prepared for this problem, but I didn’t think it would be as large of a problem. I even wrote about water pressure and the role of gravity in my tips post. It quickly became evident that our rain barrel was unable to provide enough pressure to push the water through the irrigation system. Our rain barrel is only a couple of feet higher than our garden beds, so it was only generating a few PSI of pressure, which isn’t enough. Perhaps if the holes in the tubing were smaller and there were fewer of them, it would work for some of the closer beds, but that’s not a guarantee. I thought that the hose bib connected to our hose would provide enough pressure to operate the system, but even that failed thanks to the holes I drilled. Are you sensing a theme?

Remedy: Without fixing or replacing the tubing, there isn’t a remedy that can be applied in the near future. We could build a platform for the rain barrel to get it higher off the ground and generate more pressure, but building a platform to get it high enough would be expensive and potentially dangerous. That isn’t an option we’re interested in pursuing. Another option is to buy an RV pump that could generate pressure for the system. This type of pump typically runs off a 12-volt battery, which would allow us to use solar energy to charge it, but I also think it could be modified to run off AC power via an extension cord.

Measurements Unclear/Inaccurate

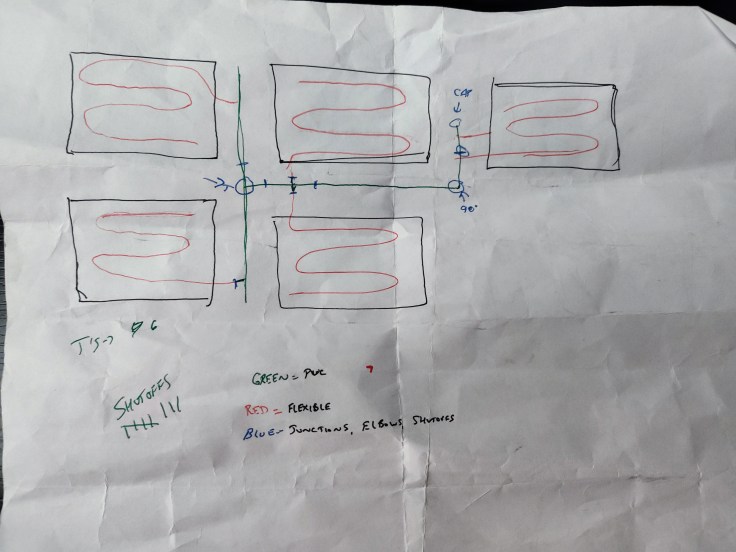
This problem applies to a few aspects of the irrigation system, and not all of them were the result of an error we made. All of the tubing we bought was supposed to be 1/4″. The first 200 feet that we bought didn’t specify if this was the interior or exterior diameter. I was planning on it being the interior diameter. It turned out to be the exterior diameter. This caused a big problem because the connection I got to go between the PVC pipe and the tubing was based on the tubing having a 1/4″ interior diameter. Now, had I learned this in that first 200-foot section of tubing, it wouldn’t have been a big deal. Unfortunately, though, I didn’t check it until we ordered 600 more feet and drilled holes in all of it.

The worst part of things not being measured correctly or not having their measurements clearly listed is that the last section of tubing we bought had a slightly larger interior diameter than the first two sections. I went back and checked the Amazon listing for it, and it was supposed to be identical to the other sections. I’m unsure what happened, but the clamps we bought didn’t fit this larger interior diameter.

Remedy: I learned that there are reducers for this type of a project that allow you to transition from one size of tubing to another. I just had to find the right one because there are a lot of versions available, all with different measurements. First, I needed to convert all of the measurements into the same system and format. In my situation, I went with standard and decimal points. This made it easy to compare sizes and guarantee that the reducer I bought would fit both sizes of tubing. Eventually, I determined that I needed a 5/32″ x 1/4″ reducer. The 5/32″ side fit the interior diameter of the tubing, and I would need a small section of tubing with a 1/4-inch interior diameter. The goal was to go from the 1/4-inch barbed fitting that was connected to the PVC pipe to the new 1/4-inch interior diameter tubing to the reducer to the tubing we already had. We also needed new hose clamps to fit the 1/4-inch side of the reducer and barbed fitting.

How Are We Going to Water Our Garden This Year?

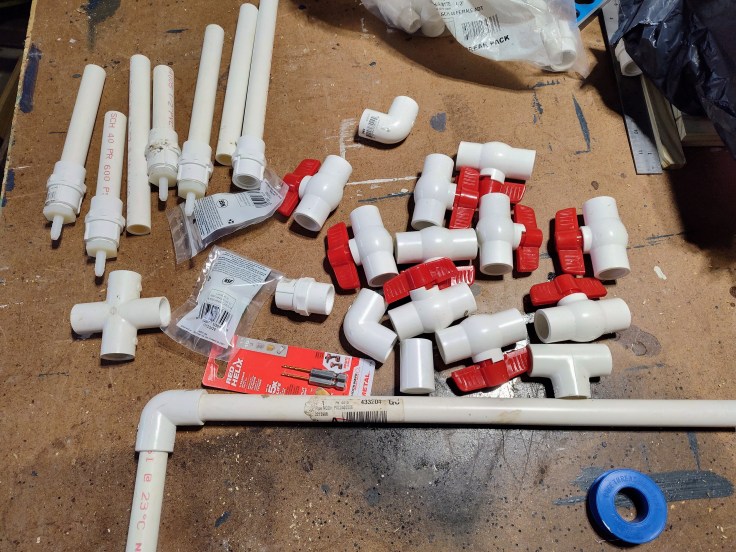
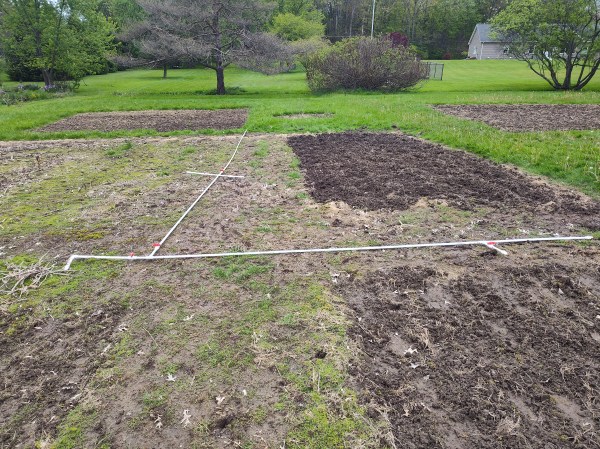
Even though I listed a remedy for each problem in the previous section, you may have guessed that we haven’t fixed our irrigation system so that it can be used this year. That is true. Even after buying the reducer and ensuring that all the components fit, the holes I drilled were too much to overcome for this year’s garden. The tubing won’t go to waste, though. Magz is going to craft something with it. She mentioned a basket that can be used outside, which would be really cool and useful. Meanwhile, the PVC pipe, the connectors, and valves are all able to still be used this year.

We forgot until about midway through the irrigation project that we have a sprinkler that we previously used to water our container garden in 2022. When we realized that the irrigation system wasn’t going to work, Magz mentioned the possibility of using the sprinkler again. We gave it a go, and it works perfectly. The sprinkler connects to a small section of hose that attaches to one of the PVC fittings we were using for the irrigation system. We’re still able to use the PVC portion of the system, which is great. We connect our garden hose to one of the three hookups we have in our garden beds. We then attach the small hose section and sprinkler closest to the bed(s) we want to water. Once that section is watered, we move the sprinkler by relocating the hose or connecting to a new PVC section. We have to move things around a bit, but it’s still much better than using watering cans for everything, and we can use a lot of the valves to divert water as needed.

It’s not the outcome I had hoped for when I began planning and designing this system, but it is still an efficient way to water everything. And because we weren’t able to use the rain barrel with the irrigation system, we’re using the same water source with the sprinkler. We’re also still going to use the rain barrel by filling cans to water plants in bags or planters.

Will We Revisit the Irrigation System in the Future?

Absolutely. The failure of the irrigation system for this year’s garden is only going to be a one-year setback. We have the bulk of the materials needed for the system and only need to buy replacement tubing to make it work. I also still believe in the effectiveness of an irrigation system relative to other watering methods. The plan is to either buy pre-drilled irrigation tubing that fits our fittings or buy the same tubing that we did this year but be more intentional with drilling the holes and use a smaller bit. Doing that, along with addressing the water pressure problem, can still see this become a successful and useful system in 2027.

Last evening, we did a walkthrough of our garden, and I was disappointed in myself for not thinking of the sprinkler before I went down the rabbit hole of an irrigation system. Because we were already buying a new fence this year, we could have avoided wasting money on an irrigation system that failed. I voiced that, and Magz is always so good at pulling me out of that mindset and helping me see things more clearly. The truth is that if I didn’t try the irrigation system this year, I probably would have wanted to try it next year. I also think that I would have made the same mistakes next year that I did this year because you can’t learn what doesn’t work until it fails. It would have taken me one round of buying the wrong size of tube to learn what works. And because we did try the irrigation system this year, we have the PVC portion in place, which is how we’re able to connect our hose and sprinkler. Not all is lost just because it didn’t work this time. Happy gardening!

6 Tips for Building an Irrigation System

Last week, I wrote about building an irrigation system for our garden. In it, I went over the process of designing the system, purchasing the supplies, and putting everything together. I wrote that post before the irrigation tubing was attached to the PVC pipe. Since then, we’ve started to attach the tubing and have learned a lot of things about building an irrigation system, so I thought I’d share some of those lessons.

1.) Buy Extra Pieces

When you’ve designed your system and figured out the pieces you need, buy at least one extra of each joint, elbow, valve, and connection. Also, buy another full section of PVC pipe and an extra 100 feet of the irrigation tubing if you can. It’s similar to any woodworking project: buy at least another full board than you think you’ll need. That way, if something was measured or designed wrong or something was incorrectly cut, you have extras and may be able to avoid another trip to the hardware store or having to place another online order…which brings us to tip #2.

2.) Plan for Extra Trips to the Store

Like any project, it seemed like we never got everything we needed in a trip to the store. Before we began, we understood that we would likely need to make more than one trip since this was a project we had never attempted before, but even I underestimated how much running and how many online orders would be needed. Two Saturdays ago, we picked up the majority of our components, making two separate trips that day. The first trip included buying all the PVC pipe and some of the joints. The second trip was to a different store to buy components that the first store didn’t stock. A third trip was needed to pick up something that needed to be special ordered (and because I forgot a couple of things). That doesn’t even include the multiple Amazon orders we’ve made to buy shutoff valves and irrigation tubing. I thought that 200 feet of tubing would be plenty. It was enough for two beds. We ultimately ordered 600 more feet.

3.) Gravity Is Both an Enemy & a Friend

The plan for our irrigation system was to connect it to our rain barrel and use that water as much as possible. It’s a couple of feet higher than the majority of our garden. This is a good thing. You don’t need a lot of water pressure to move it throughout the irrigation system, and each foot of elevation is roughly equal to 1 psi of pressure. When working properly, we can water our garden without spending any money on water or electricity. That’s the good part of gravity.

That negative part of gravity is that our garden isn’t level, and two of our beds go up in elevation from where the rain barrel sits. I knew this when I designed the system but thought that the pressure would still be enough to overcome the elevation gain. That hasn’t been reality. When using our hose hookup and city water, it’s enough pressure, though, so there’s a solution. We ended up moving the PVC pipe in this section of the garden so that where we connect the hose to the PVC pipe is positioned at the highest point of elevation in the garden. This will help us overcome the elevation problem, but if we still feel like we aren’t getting adequate pressure from the rain barrel, we’ll either elevate the barrel higher by building a stand for it or buy an RV water pump that can be powered via an extension cord or with a simple solar panel setup. If you’re planning to build an irrigation system, never underestimate the elevation changes in your garden relative to your rain barrel if you have one.

4.) Lay Everything Out First

This one may seem obvious, but it’s wise to leave everything disconnected until it’s all laid out and you’re confident in the positioning of everything. It’s tempting to connect components before everything is positioned so that you can see progress, but it’s best to wait. I didn’t do this and have run into some problems as a result. Because the main hookup and PVC section needed to be moved (gravity!), the direction of angles and valves needs to be changed. They started out left and should be flipped to face right. Thankfully, because I didn’t use cement on the joints, it isn’t the end of the world; just a minor annoyance. It still could have been avoided, though.

5.) Have Patience

That dreaded ‘P’ word again. Patience is such a big deal for me (I’m still learning) that I wrote an entire blog post about it last year. In the garden, it seems to be a requirement every step of the way. The same is true with building an irrigation system. Anytime you’re doing something for the first time, you’re going to run into issues. It’s inevitable. In the case of our irrigation system, issues included multiple trips to the store and placing multiple online orders, not accounting enough for gravity, and not having enough time to prep everything before we needed to install the system. Those are frustrations in the moment, but they can be overcome.

6.) Drill Drip Holes Before It’s in the Garden

This was probably the most frustrating aspect of building our irrigation system. I intended to drill all the drip holes on my drill press before the tube was ready to be installed in the garden. That didn’t happen. I ran out of time, and the tubing got tangled, causing a big mess. The result was needing to use my battery-powered drill to add the holes while the tubing was on the ground. It was hot, sweaty, dirty, and difficult to evenly space the holes. I made sure that I drilled the holes ahead of time for the tube in the second bed. It went much easier. The drill press makes it easy to have consistent spacing between the holes, drill the holes in the center of the tubing, and ensure the holes are vertical instead of at an angle. Even without a drill press, drilling the holes anywhere that isn’t the garden or yard is wise. You can get out of the sun or rain, and in general, it makes for a more relaxing experience.

If you’re thinking of building your own irrigation system, I hope these tips help.

Designing and Building an Irrigation System

If you’ve been a reader of the blog for a while, you’ll know that last year’s garden was our first one after we bought her house. We turned a large section of our yard into five garden beds, which was enough work that we never got around to figuring out an efficient way to water everything. We installed a rain barrel that reduced the amount of city water we had to use. It also reduced the amount of walking we had to do, since the rain barrel was close to the garden beds, but we still largely relied on watering cans for the bulk of the watering. It certainly wasn’t the hardest thing ever, but it was quite time-consuming. It took between 45 minutes and an hour to water everything, which got tiring toward the end of summer. It also wasn’t the most efficient use of water, which would be spilled when carried.

We knew that this setup was unsustainable and needed to be improved for this year’s garden. Initially, the conversation was just about getting the water source (hose bib) closer to the garden, making it easier to maneuver the hose around the plants. That remains a long-term goal, but it would have still required us manually watering every plant. The best idea quickly became an irrigation system that allows the water to be directed to the right place, reducing water and time waste. There are kits available from companies such as Drip Depot, but they can get very expensive, with one that would fit our needs costing at least $200. That was more than we wanted to spend, considering it wasn’t customizable. Instead, I set out to design my own.

Designing an Irrigation System

I had two requirements for the irrigation system from the beginning: a standard garden hose needed to be attachable, and it needed to be customizable and adaptable if our layout or needs changed in the future. I was also hoping to be able to buy as many of the items locally as possible, which would help me to visualize things and test connections in person. But before choosing materials, I needed to plan how the water line would go through our garden beds.

Irrigation System, Garden
Irrigation System Schematics

Rigid or Flexible Line?

Every irrigation kit I’ve seen uses flexible tubing for all aspects of it, which probably works well if a garden is small or everything is confined and in close proximity. That wasn’t going to work for us. Most of the flexible tubing used in irrigation systems is 1/4 inch. This size of tube works very well within the beds where water needs to be precisely directed. Anything thicker than 1/4 inch would be difficult to have precision with. Additionally, 1/4-inch tube works because you don’t need to move a large volume of water once it’s already been transported into the garden bed. However, where irrigation kits fail and get too expensive, in my opinion, is getting the water to the individual beds.

You need a 1/2-inch tube to efficiently transport water from the hookup to the beds. Some irrigation kits include a section of 1/2-inch tube, but you’re stuck with a set amount of it that may not meet your needs. Kits with this size of tube in them also get very expensive. So, I decided to MacGyver my own setup and use items you can buy at a hardware store. I have some plumbing experience and felt confident that we could use PVC pipe to carry the water throughout the garden and to the individual beds. I also did some research before starting this project and learned that others have done something similar. I settled on 1/2-inch pipe rather than 3/4-inch pipe because 1/2 inch will carry enough water, and it’ll keep costs low. A 10-foot piece of 1/2-inch PVC costs around $6.70 at our local hardware store. It’s even cheaper at Lowe’s and Home Depot.

The Path

Our garden consists of three sections. The first section has four beds in a 2×2 layout with a walkway between them. There’s a second section of one bed to the back left of the first section. Finally, the third section is behind the garage and consists of one bed. Because of how far apart some of the beds are, there’s no way to run one continuous line. There wouldn’t be enough water pressure for the entire length, and it would lead to overwatering at the beginning and underwatering at the end. Instead, we will need to use shutoff valves to divert the water to the correct beds at a given time. At this point, I started to walk through the garden and sketch out the potential schematics. This is what I came up with:

Figuring out where shutoff valves and joints will go was the most difficult part of the design. The shutoffs are important for diverting the water to the appropriate beds since we will want to water the beds individually to ensure that they’re watered evenly. It means we’ll need a shutoff placed at each bed as well as between them. The one placed at each bed allows water to go into the bed. The valve between each bed prevents water from going too far and forces the water through the open valve. But the shutoff can’t be placed in the main section of PVC. Instead, there has to be a joint and a short section of pipe that leads into the garden bed. It’s in that short section of PVC where the shutoff has to go. The goal of our irrigation system is to place the PVC in the walkways. The PVC will connect to the flexible tubing at each garden bed. The tubing will route up and down the rows in the garden bed, allowing the water to be directed to the root system of each plant. With a rough plan in place, we hopped in our Subaru and headed to the hardware store.

Gathering the Supplies

The night before we went to the store, we took measurements to get a rough idea of how much PVC we would need. It was just short of 60 feet, but knowing that we’d need more for the length between the main section and the beds, we bought seven 10-foot pieces. Besides needing to carry these pieces around the store, this was the easy part. The difficult part was figuring out what pieces we needed and how many of each.

Irrigation system, garden
Irrigation System Pieces

If you’ve never been in the plumbing/PVC section of a hardware store, you’d be shocked at how many joints, collars, connectors, and valves there are. And because they’re all white PVC, they largely look like each other. You have to make sure you’re looking at the right size of joint to confirm it fits the pipe you’re using. Then, you have to check that the connection type is correct. There are two: threaded and slip.

Getting the right connector type is important. Then you have to make sure you’re getting the right joint. There are t-joints, 3-way, 4-way, elbows, and many more. If you get the wrong one, your project likely won’t work. We both knew that gathering all the items was going to take a long time in the store and was likely to take multiple trips. Both proved to be true. Our first trip took about an hour. They had the PVC pipe and joints that we needed, but they didn’t have enough shutoff valves or any pieces that would connect the PVC to our garden hose or to the 1/4-inch irrigation tubing. After transporting the PVC pipes home, which was a funny scene (imagine a Subaru Forester with a section of white PVC hanging out the sunroof like a unicorn), we went to Ace Hardware in search of the remaining items. Ace really is the place with the helpful hardware folks. An employee helped me find the connectors we needed and, as a fellow gardener, was interested in this irrigation plan. Unfortunately, they didn’t have enough of the connectors, but she special ordered them, and they arrived on Monday. That was all well and good, though, because I didn’t have enough t-joints and forgot to grab a collar to connect two PVC sections together. In total, these were all the items we bought:

  • 7 10-foot 1/2-inch PVC pipes. This is the basic Schedule C PVC.
  • 8 t-joints (slip-on)
  • 10 shutoff valves – Purchased on Amazon in a 10-pack. We only need 8 of them, but it was cheaper to buy in bulk.
  • 7 1/2-inch x 1/4-inch nylon barbed hose fitting – These are the pieces that had to be special ordered. These allow us to connect the 1/2-inch PVC pipe to the 1/4-inch irrigation tubing. The barbed ends allow the tubing to connect without the need for a hose clamp.
  • 7 1/2-inch x 1/2-inch connectors – One end is threaded; the other has a slip fitting. Because the barbed hose fitting is threaded on the 1/2-inch end, this piece is what allows the PVC pipe to connect to the barbed hose fitting.
  • 1 4-way connector – This piece has a slip fitting on all four ends.
  • 1 collar – This piece connects two full-length PVC pipes to each other where no joint is located.
  • 2 hose adaptors – These allow us to connect our garden hoses to the system.
  • 200-foot roll of 1/4-inch irrigation tube. This is flexible and doesn’t have holes in it. The holes will be drilled with a 1/16-inch drill bit on my drill press. We may need more of this.
  • Stoppers for the irrigation tube. These will go into the ends of the tubing after it’s been routed through a garden bed. Doing so will create the pressure that forces the water through the holes in the tubing.
  • We may also need some staples or clips to hold the tubing and pipe against the ground.

In total, we spent around $150 for everything, coming in quite a bit lower than the $200 it would have cost to buy a kit.

Building the System

Once you acquire all the components, putting the irrigation system together is as easy as building a K’Nex or Lego set. I laid out the pieces in the garden where I wanted them to go. If the sections of PVC needed to be shortened, I took measurements and cut them on my miter saw. After that, I attached the sections with the appropriate joints. I’m not using cement in this project because I want to be able to take this apart in the fall. It shouldn’t be an issue since the water pressure will be pretty low compared to a house’s plumbing system. The majority of the joints are made with pieces that only need to be slipped together rather than threaded. But for any pieces that were threaded, I used Teflon thread tape to ensure a sealed joint.

With all the pieces laid out and cut to length, it was easy to assemble everything. The structure for every section went like this: Main PVC Section + Joint (4-Way/T) + Small PVC Section + Shutoff Valve + Small PVC Section + Barbed Hose Fitting.

For the irrigation line, I’m drilling a hole every 6 inches, and at the time of writing this, I’ve drilled holes in roughly 5 feet of it. I don’t want to drill any more holes until I know how long each section needs to be.

Here’s the final product. We haven’t tested it yet or attached the irrigation tube to the system. I will write a follow-up post that goes over how well the system works.

Irrigation System, Garden
Irrigation System

Create a website or blog at WordPress.com

Up ↑