
The first in a new series called, Drawing the Seed Catalogs. We obviously have a lot of seed catalogs kicking around, what better way to put them to use? And the best part? Being able to find muses to draw without using my phone. 😁
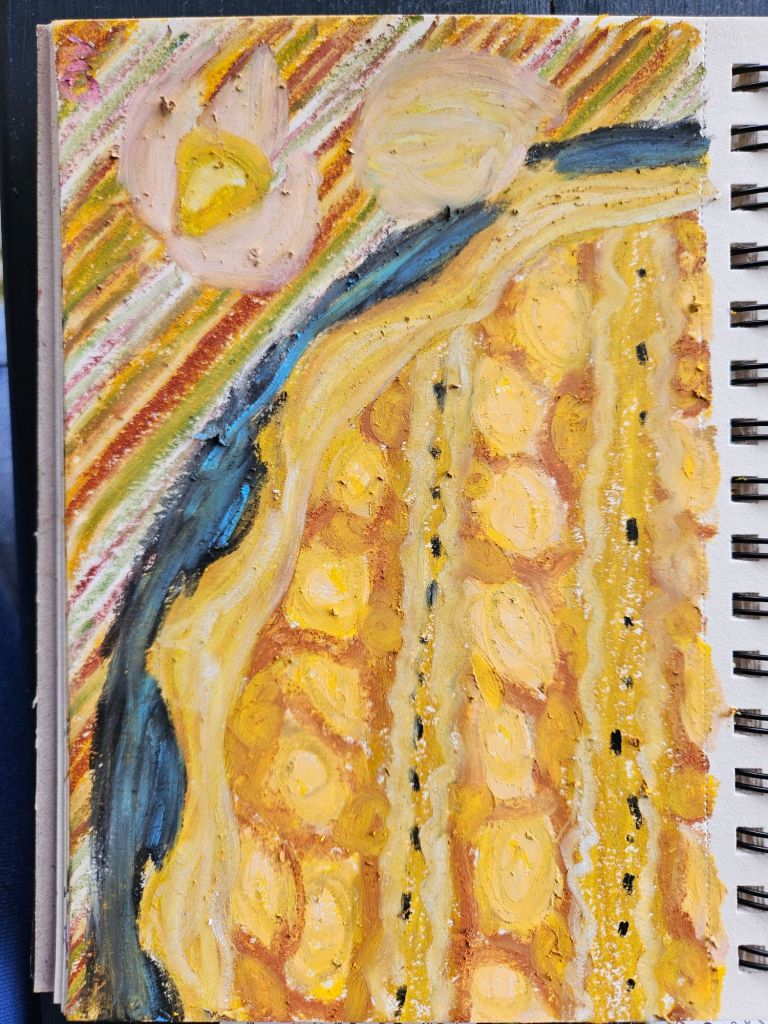
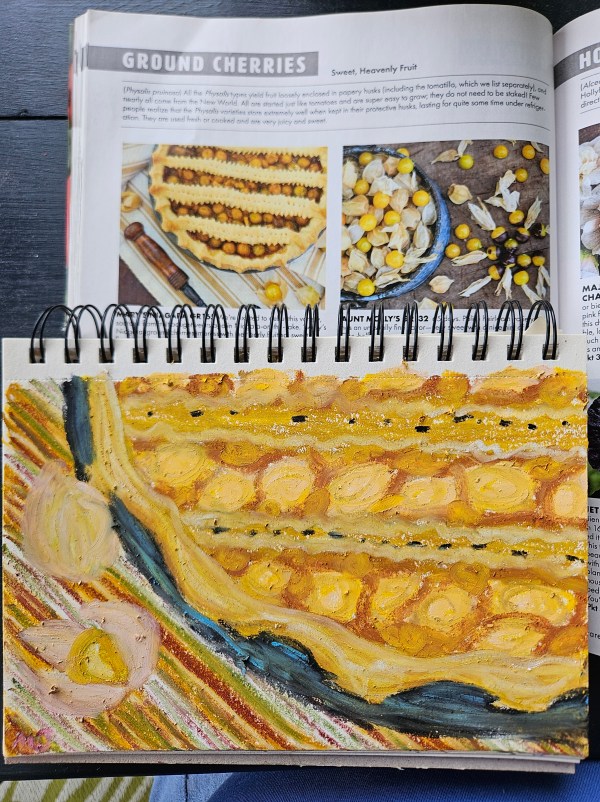
The first in a new series called, Drawing the Seed Catalogs. We obviously have a lot of seed catalogs kicking around, what better way to put them to use? And the best part? Being able to find muses to draw without using my phone. 😁
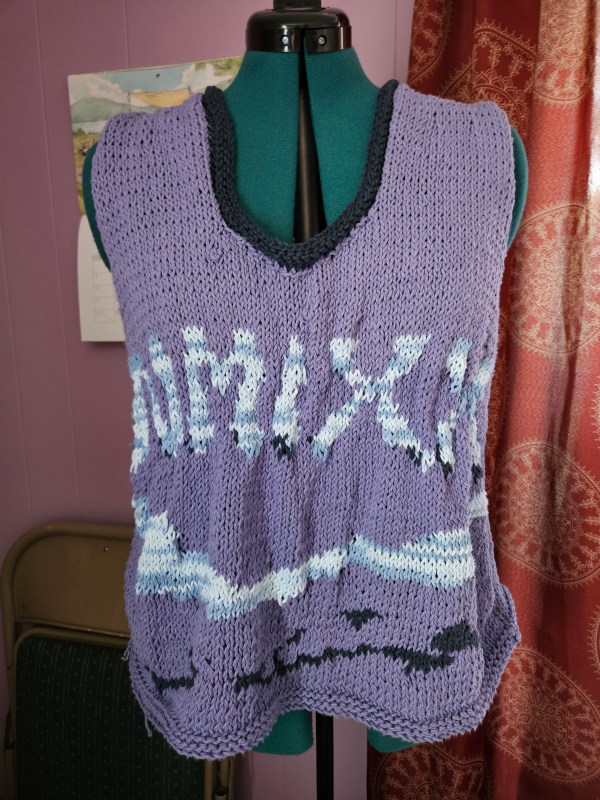
Nmixx is a relatively new K-pop band, debuting in 2022 under the label JYP Entertainment. Comprised of six members – Lily, Haewon, Bae, Sullyoon, Jiwoo, and Kyujin, they are young but immensely talented. Nmixx had a rocky start, similar to Stray Kids, who share the same label, being panned as noisy and chaotic. As time passed, Nmixx developed its sound to a polished mix-pop with killer vocals. In 2026, they are finally getting the respect they deserve, and I am thrilled to see it!
They first came on my radar in 2023, thanks to their song ‘Love Me Like This’, but I didn’t become a fan, or NSWER as their fandom is called, until 2024 with their Fe304 album series.
Fe304: BREAK released in January 2024, with songs such as Dash, Run for Roses, and Soñar to help me get through the chaos of moving. Fe304: STICK OUT, released in August 2024, was the soundtrack of our trip up to Erie. Fe304: FORWARD hit just as we broke ground on the garden in 2025, and this album, some days, carried me through running that tiller in the mud and stubborn grass shag. From High Horse to Slingshot, this album changed something in me, lifting Nmixx to my favorite girl group (sorry, Aespa). Nmixx scratches a creative chaos in my mind that fills me with joy.
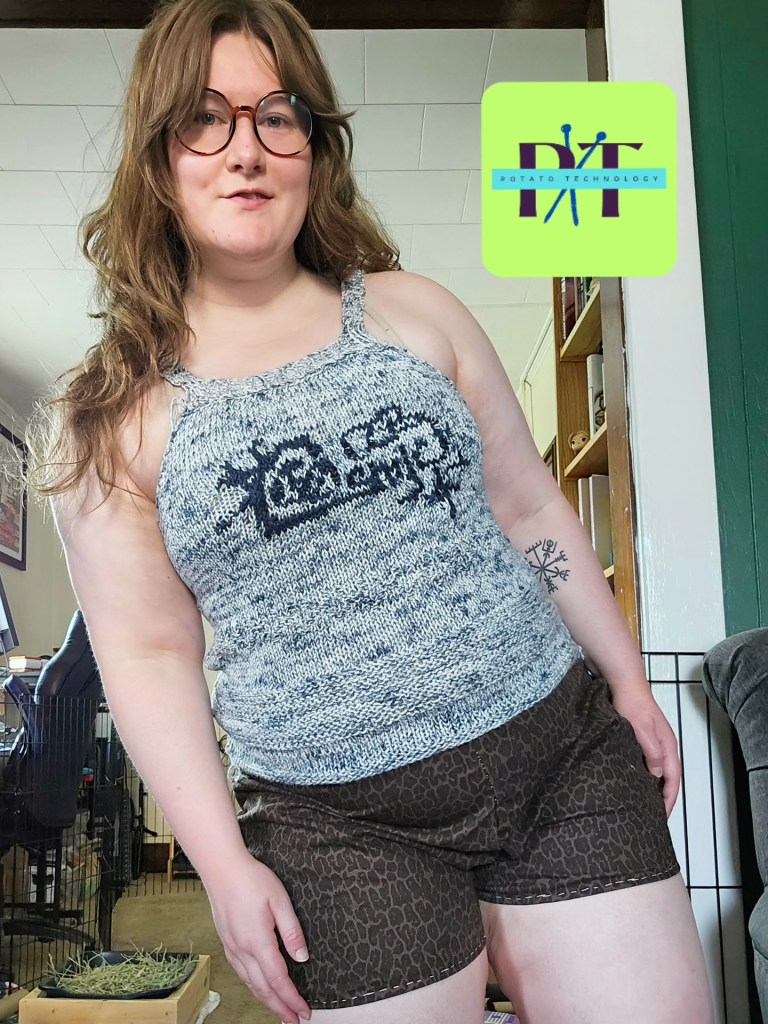
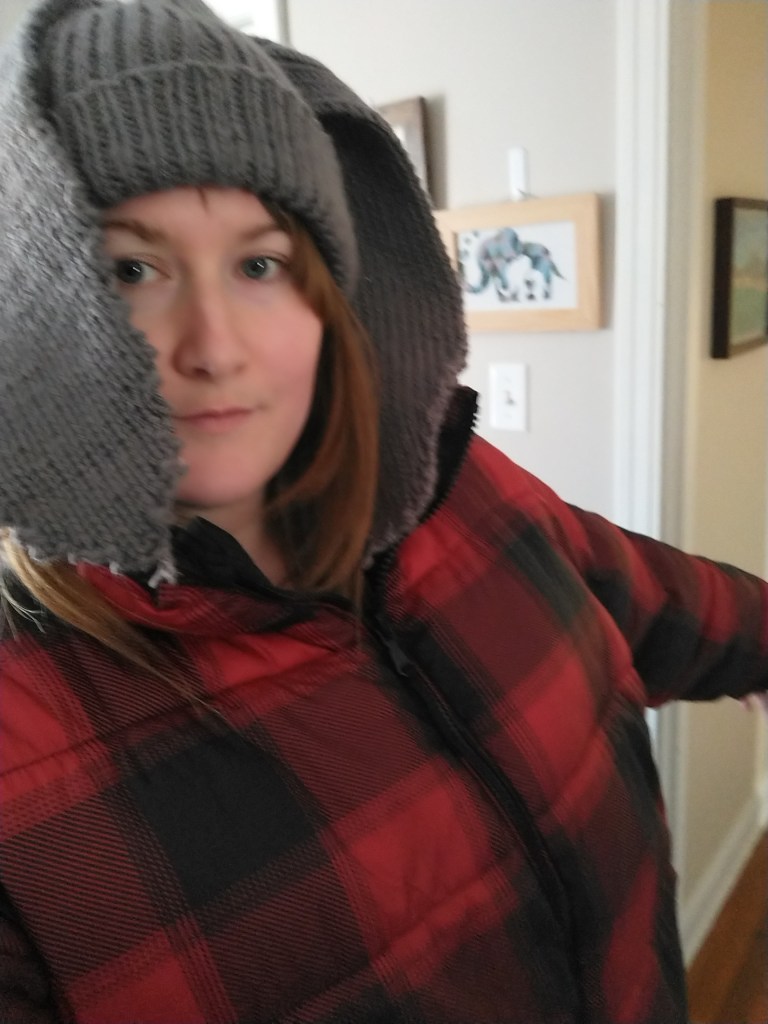
Bring a fan, I thought it would be cool to get some merch, which became quite difficult in 2025. With Nmixx being in their third year, there was a lack of offerings in the US, and those pesky tariffs from the head idiot in charge. So, I decided to get creative like I did with my Cosmic Tank.
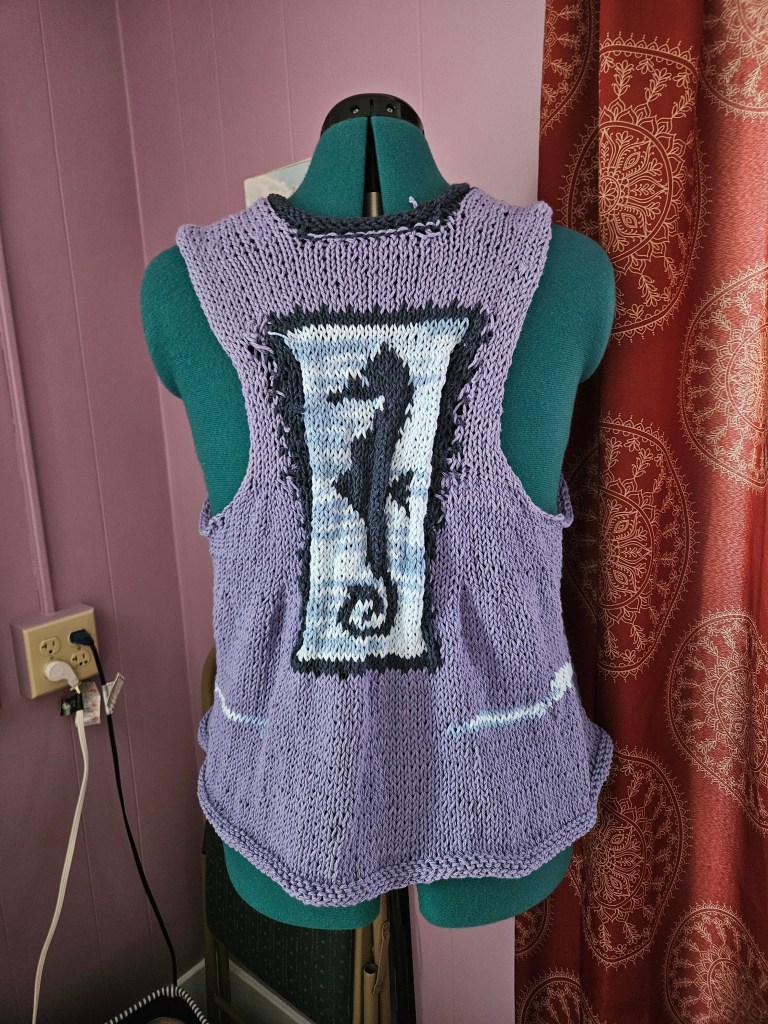
Nmixx’s lore is based on water imagery; there is a whale on their lightstick, sea creatures, boats, and a water drop font. The font was my jumping off point. I went to Michael’s and picked up water-inspired colors – a cool purple, deep blue, and a variegated blue and white to mimic light dancing on the ocean. Three songs from the album Fe304:Forward caught my attention – Ocean, High Horse, and Know About Me, which features the girls going on an under-the-sea journey on this boat spaceship. The color palette of the album is similar to the colors I chose to knit with. I knew that for the color work, I wanted to evoke waves, incorporate ocean imagery, and feature the water drop font.
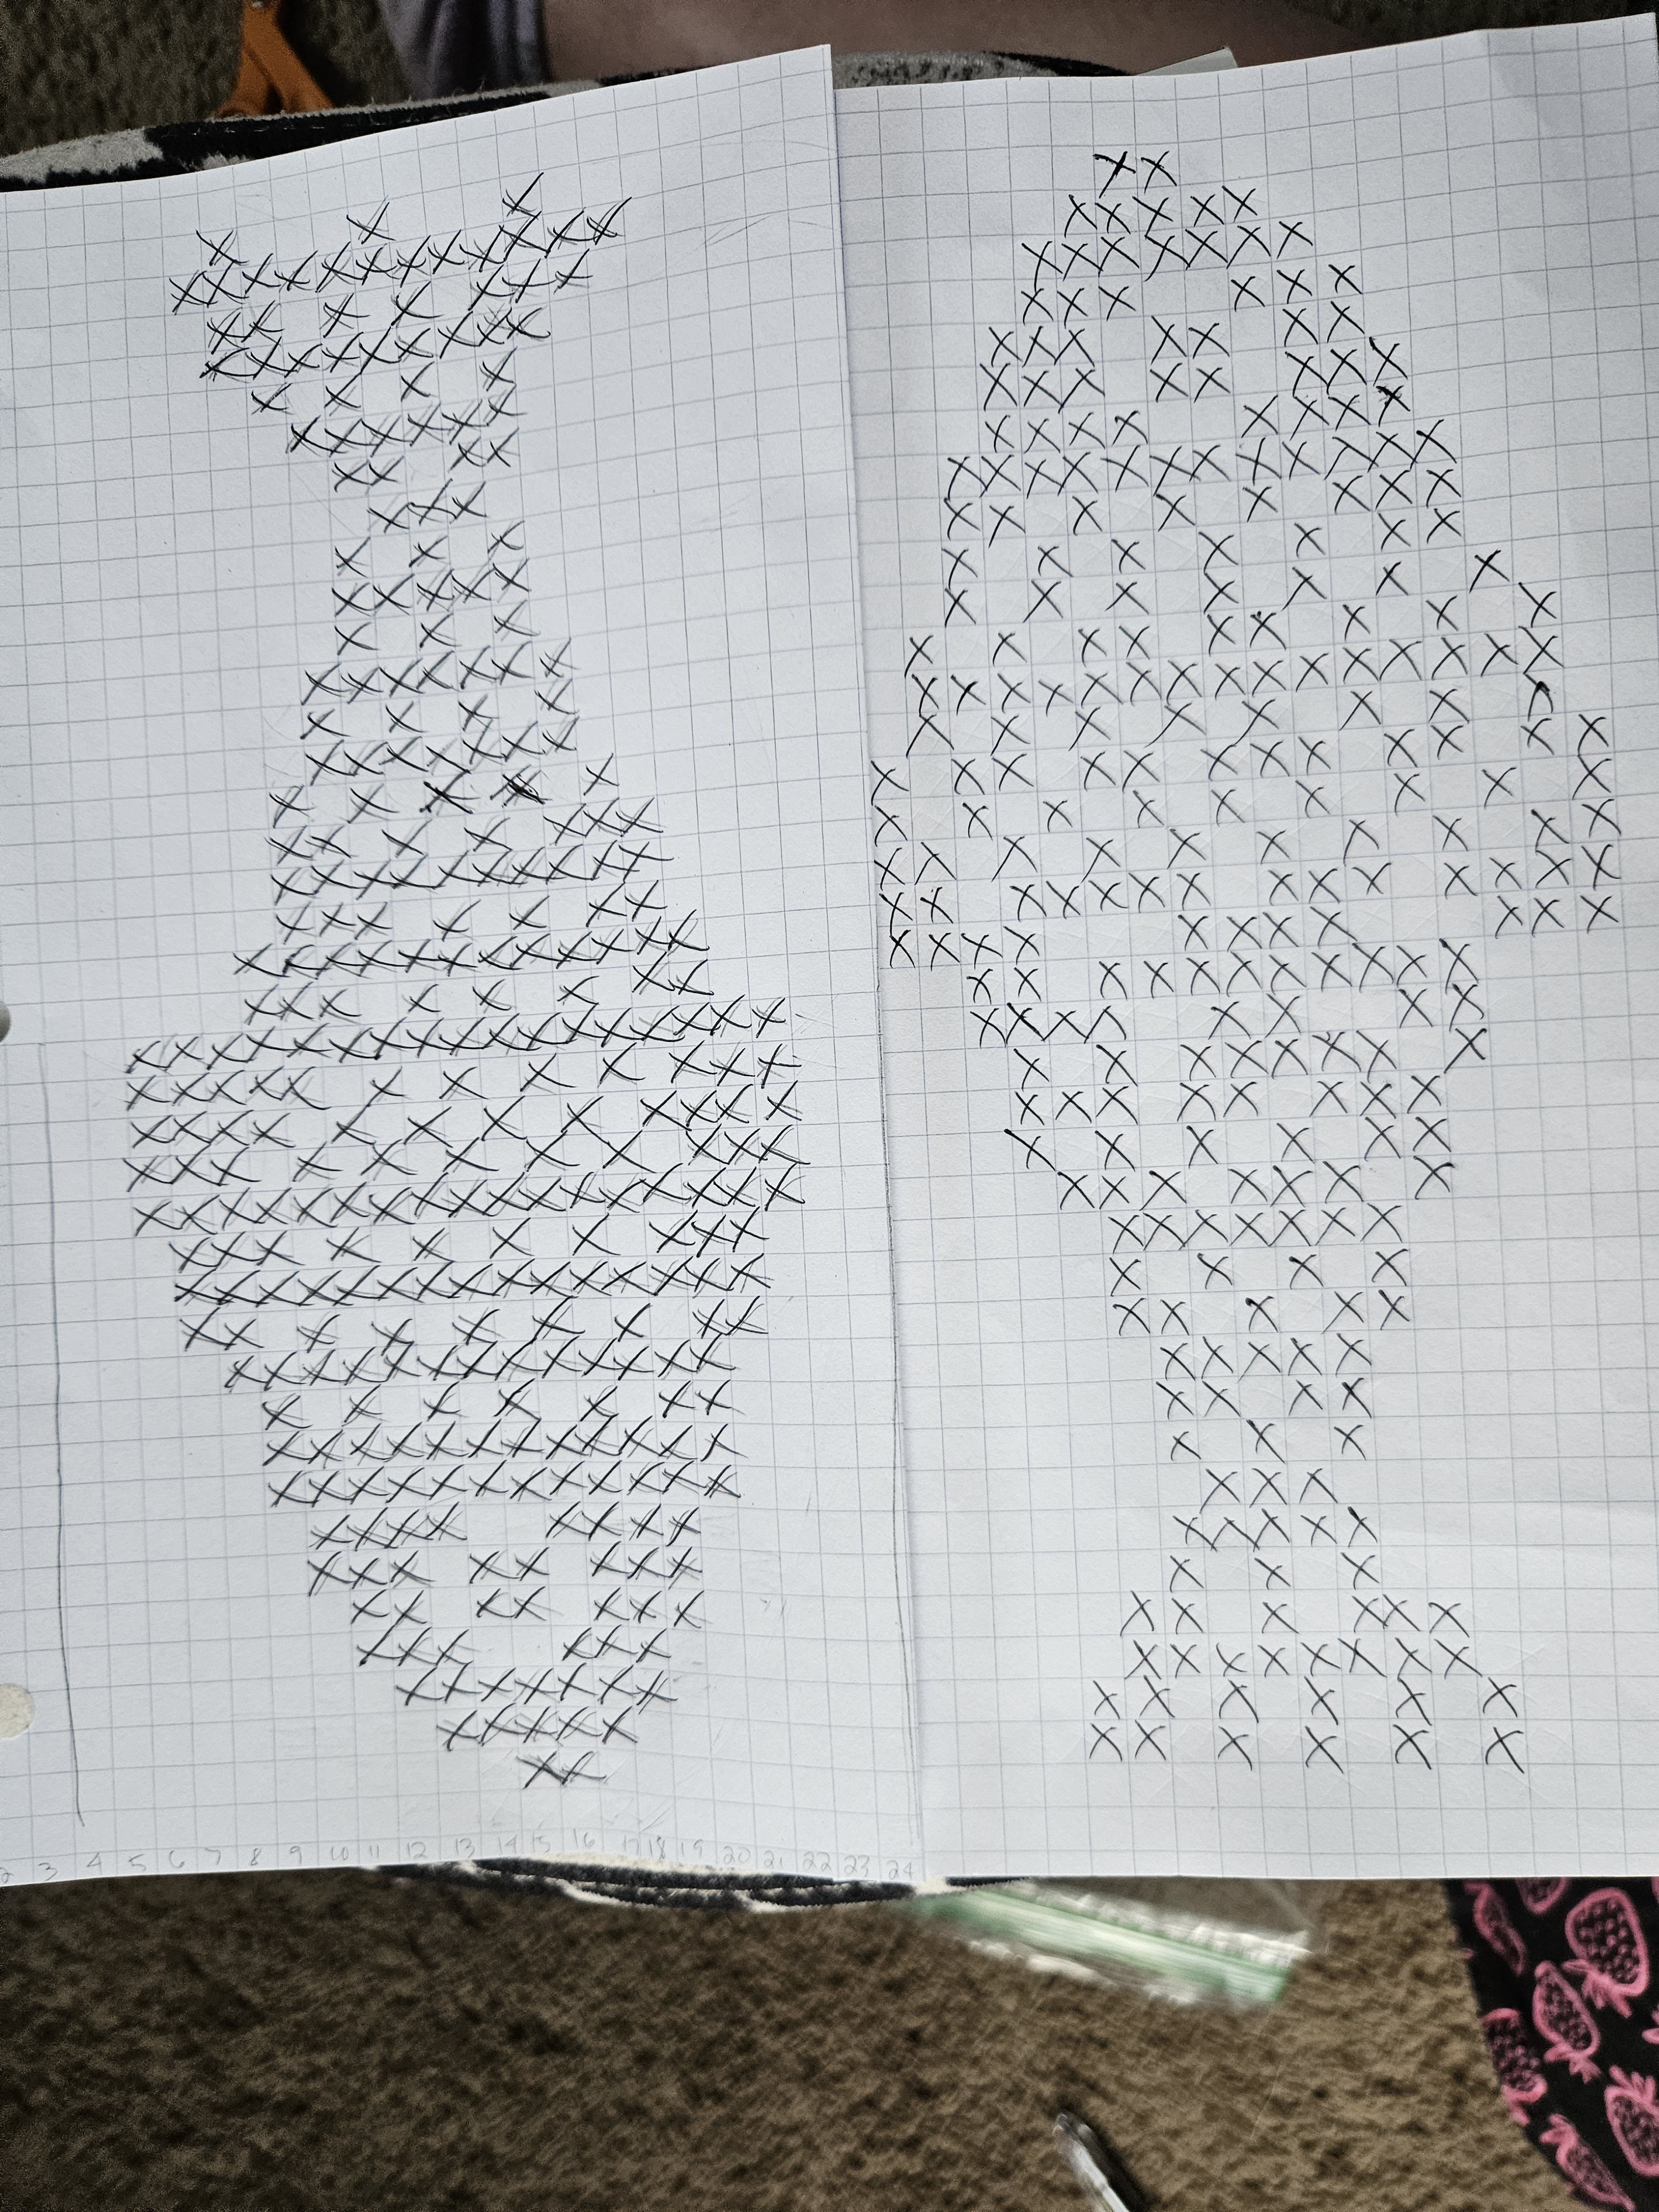
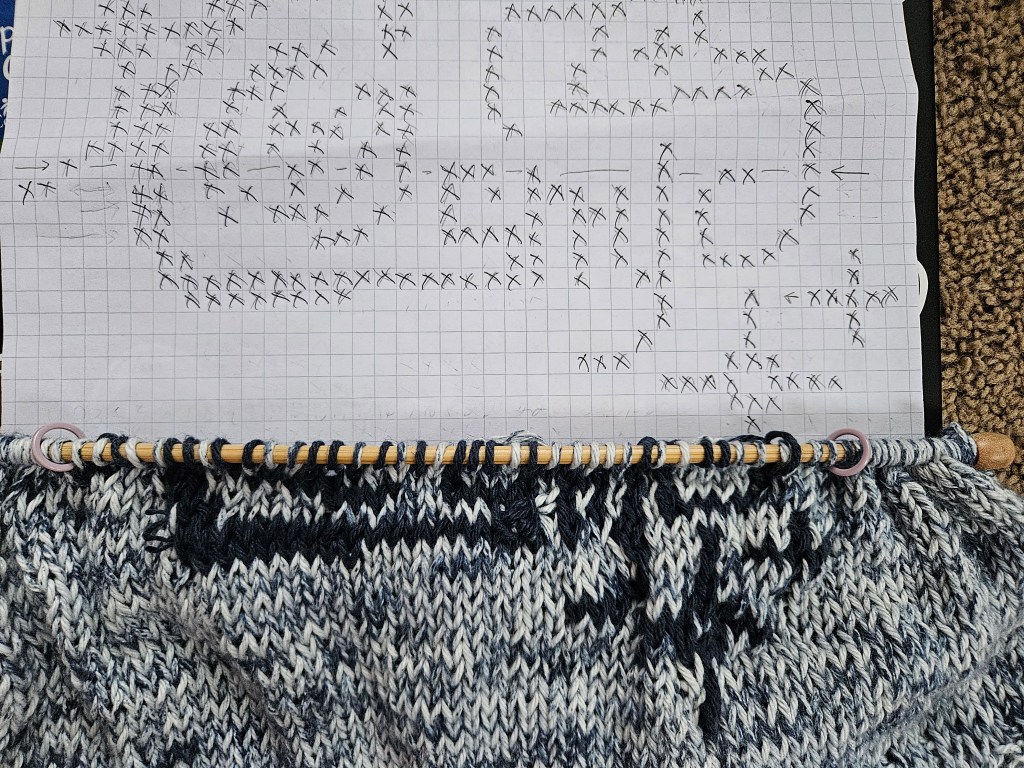
I chose to freehand a chart for the font using graph paper and an image I pulled from the internet from Nmixx promotional posts. The waves were more, see what I felt as I knit, the seahorse came from pure Pinterest roulette. The original chart was a cross-stitch seahorse that I adapted to knitting, on graph paper, later adding a stamp border to help the floats stay anchored. No pun intended. This was my first project using three colors at a time, and wow, it was brutal. On the front, I wanted the blues to create highlights and shadows, like a water drop would have. This led to some crazy tension issues and wild floats on the back.
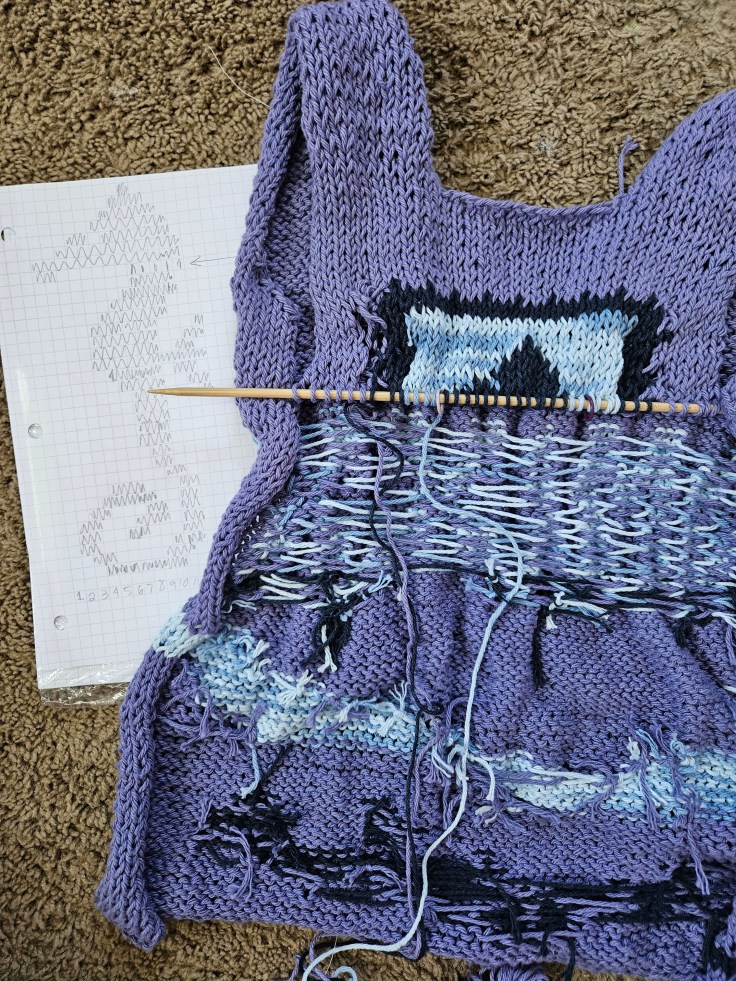
Another issue I ran into was scale, particularly with the font. To achieve the bubbly curves, I made my scale rather large, stretching across two pieces of graph paper, and maybe this is just inexperience, or possibly I made my chart too complex, but I noticed myself ad-libbing stitches instead of following the chart due to all the mistakes I made. It turned out just fine, but it was not executed exactly how I wanted it to be. I’m pleased with the waves on the bottom and how they wrap around the tank. The back, I am lukewarm towards. I like the placement of the seahorse, for “High Horse” and the stamp for the journey they embark on, but the racer back is a little messy, since I was freehanding this pattern. But hey, the only way to get better is to practice.
Compared to my Red Velvet project, I felt confident that I could execute something to bring me joy and capture the spirit of the Fe304: Forward album. I love how this piece is one of a kind. No one else has this t-shirt or artwork, it’s a nerdy piece of knitwear for my special interest – kpop. ☺️
With this being my third merch project, I’m excited to see what speaks to me next. I’ve considered a Stray Kids Karma project and an Aespa Armageddon logo etched into a sweater. That one is going to be a big project, the logo is so intricate that when I attempted to sketch the chart last year, it was spread across four sheets pf graph paper. Maybe an Ateez project? Who knows. I do know that making your own art, and combining it with something you are passionate about, is a fantastic experience. Your passion becomes this physical object you can show off, and hopefully, bring a little sunshine to the world around you.


Okay, as a millennial, I can’t hear the word pivot without thinking of this scene from Friends. But, silliness aside, Ross was correct; you have to pivot and pivot well. The longer I sew, the more agitated I get when I make foolish cutting or measuring mistakes in my garments. Like my shortalls from last year, I tried them on over the weekend because it is feeling warm and springlike here, and I was shocked by how poorly I fit the shorts. The top portion of the shorts fits excellently, but not the shorts. No one wants weird bunching when it comes to shorts, and that was exactly the problem!
At first, I went through the stages of grief – denial, anger, bargaining, depression, and finally acceptance that no matter how delusional I chose to be, these shortalls are uncomfortable. I would not wear them. This made me feel so many regrets. The pink overalls I drafted completely from scratch, using a special fabric featuring corgis and bread from a Japanese fabric brand called Kokka Fabric, sourced from my local fabric shop, Firecracker Fabrics. The second pair was cobbled together as a challenge of fabric and repurposing. The fabric was 1 yard of 59″ cotton twill from Mood Fabrics, and the pockets were sourced from a pair of shorts in my closet. I refused to scrap these. But what could I do to fix these? With all the patterns at play, adding in a new fabric sounded scary. Cutting these into bags or future quilting projects was throwing in the towel too soon for me.

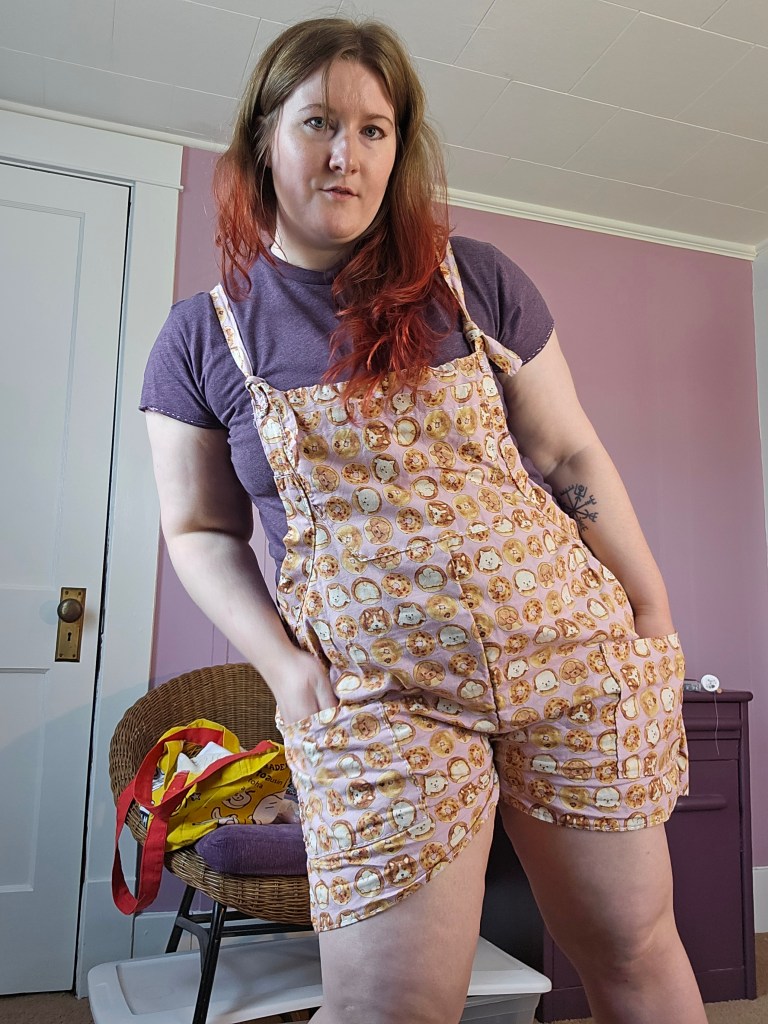
My solution came to me one night, as I was washing my face; I didn’t have to make a drastic change. I had to address the problem – the way I cut the curve of the pants. I could remove the section that divided the fabric into legs, and transform the shortalls into pinafore dresses with a few cuts and stitches! It was a success! The shorts are now a skirt, by cutting away the curved line and sewing a straight seam on the back and front of the skirt. I also made a quick swap to the back bib of the brown floral pair, adjusting the square bib to the triangle shape of the pink ones. This adjusted the fit of the dress in an excellent way. The purpose of the triangle, I believe, from the fit change on my garment is to eliminate gapping between your shirt and the back bib, so the fit follows the line of your body.
Now, sewing is not the only place to pivot, obviously. Problem-solving is a fundamental part of the creative process. Projects rarely work out the way you want, from knitting to cooking to building a piece of furniture. In this fast fashion, consume and donate, culture poisoning my country’s culture, we are losing the art of problem-solving. This has been exacerbated by the rise of AI and ChatGPT. Why think at all? Why imagine, ponder, or research? Why try if you aren’t going to get “expert” results? That is what the rise of optimization culture is creating: the fear of trying. But you have to try to become an expert. AI is not an expert; it is a thief, stealing the knowledge of humans who have spent years and decades striving to know, unafraid to try and fail. It’s literally the scientific method. So if you are an impressionable person, who is growing up in this current era, don’t give up your creative ability for AI to do it for you. You will lose crucial thinking and creative skills if you don’t exercise your mind and problem-solve on your own. Just do it.

I’ve been sewing for five and a half years, and yes, it took me close to that amount of time to learn these helpful tips. The skill of taking a needle and thread to fasten pieces of fabric together is one of the most complex technologies I’ve ever learned, and yeah, some of the more obvious things can go over your head because there is so much to learn. Even with half a decade of sewing experience, I am still a rookie. Here are four things I have learned about sewing recently that have changed my sewing experience from a laborious struggle to a relaxing craft I want to do.
I knew I needed to change out my sewing machine needle consistently (which I usually forget to do), but did you know you should change out your hand needles often? Nope, I did not. I recently began changing my needles after each large project or after two small projects, and wow, the difference in hand fatigue is mind-blowing! My issue with sewing by hand has been the wear and tear on my hands, particularly some on my finger joints, which felt exhausted after hours of pushing the needle through the fabric – apparently that’s not how it is supposed to be. The needle should glide; cheap needles or needles that are dulled from use will not do this. I feel like a silly goose.
Now that I know and have experienced the difference between fresh needles and started purchasing DMC needles from my local fabric shop, I am sewing more. Most importantly, my hands are happy, my stitches are small and straighter – it’s like night and day. The needle glides into the fabric and through to the other side with minimal pressure, my thread is not getting tangled, and I am sewing with more efficiency. If you sew, go change your needles.
Did you know you should oil and sharpen your fabric shears? I did not. It’s such a simple concept, though. Own thing, use thing, repair thing, use thing more. Repeat. What’s silly is that, in our disposable culture, I thought fabric scissors had a lifespan and had to be replaced once they dulled from wear. But regular maintenance, like a car, keeps them around and working well.
I keep my scissors crisp by cutting aluminum foil from time to time. I oil my shears with a towel, very carefully. Please don’t cut yourself like I did the first time.
Kill the doubt, I don’t want it, kill the fear, I don’t want it
Kill the rule, I don’t want it, kill the end, I don’t want itLet me show you that, show you that, mm-mm
Know about me…Let me show you that, show you that, mm-mm
Know about me (know about me, that’s that)– Nmixx, Fe:304 Forward
Researching fabric is important, but when you are first getting started, you feel overwhelmed and like you’ll never be able to cram all this knowledge into your head. There are a lot of fabric types! With two main families – woven and knit that separate into a myriad of options that will make your head spin. But truly, what will make your head spin more is not buying the proper fabric for the project at hand, with one caveat being in the beginning. When you are truly beginning, you just gotta see what is cheap or available because you are going to mess up – don’t use the good or expensive stuff to keep yourself from heartbreak.
I’ve started researching any fabric I am looking at to know if this textile will be applicable for the idea I have in my head, and pivot based on the information I glean. I thought it would be time-consuming, but it’s not. It saves money and fabric from being wasted in the chaos of choosing an incompatible fabric for your garment plan. You don’t want a stretch when you need a structured fabric. When you need opaqueness, a sheer fabric would throw a wrench in your plans. Fabrics, like people, have their own character, attributes, and talents. It’s more of a matchmaking process than just adding to the cart.
Ask a human. Ask a reputable website. Don’t ask ChatGPT. OpenAI is a little busy now with its Department of War contract, but don’t worry, they “promise” not to do mass surveillance or help create automatic weapons.
I learned this final tip from Abby Cox and Nicole Rudolph during a TikTok Sewing Tutorial Reaction video. Sewing hand posture will determine your sewing experience. Whether you can sew for hours or for half an hour before you need a break. I used to sew with a hand-straining posture that created wrist, hand, and finger discomfort. Pulling the needle to the side, horizontally, reduces strain compared to pulling upward. It uses a light wrist flicking motion. Similarly, holding the fabric to the side with your wrist loosely bent will keep your hands relaxed and reduce hand strain. I have applied this new hand posture to my sewing, and it was a game-changer. I’m not surprised that I was doing it wrong. I am self-taught, but dang, the ability to sew a pair of pants by hand without hand strain was incredible!
I hope these sewing tips help you as much as they helped me. I wish you happy sewing!
Have you noticed I am not sewing as much as I used to? As Marie Kondo instructs, if it doesn’t bring you joy, let it go. That’s been my relationship with sewing, honestly, since 2024. Sewing and I had hit a rough patch in our relationship. No longer in the euphoric beginning, nor going deeper and bonding through the big sewing wins. We were burned out in the grind of sewing, striving to be better but lacking the proper knowledge to do so. Therefore, we’ve been on a break – off and on since 2025, and it’s been good.
It’s given me time to reflect on what I want to pursue, sewing, specializing, and what I feel like I should make because of the internet. It’s given me time to ponder what drives me to make my own clothes. When I began sewing, I was intrigued by historical styles, and then I drifted into more feminine items like dresses, blouses, and skirts. Shorts and pants were made and quickly cut up for scrap because they were such enigmas for my mind to understand. On this break, I’ve given myself room to figure out what I like to wear, which is key to sewing your own clothes. You can chase all the trendy patterns and styles, but if you don’t want to wear them, then you have a very expensive wardrobe of your own sweat equity that is useless to you. My desire was to break this cycle.
Going into 2023, I wasn’t sure what to make anymore or what I wanted to sew, but I felt this compulsion to keep going because I was so committed to this new hobby. A hobby I wanted to become my future career. It’s been in the midst of the slowdown that my artistic point of view has recalibrated. I like pants (trousers), overalls (dungarees), denim (dungarees), comfortable silhouettes like that of Lucy & Yak, and that is what I want to make.
This has only intensified since the Trad Wife trend co-opted the flouncy dresses, giving me the ick at the thought of associating with something I have always strived to avoid. Growing up in communities dominated by the Reformed Presbyterian church (a denomination I do not belong to and never shall) and Christian Nationalism spreading its snakey tendrils throughout the Christian bubble – I want nothing to do with the Trad Wife and all it represents.
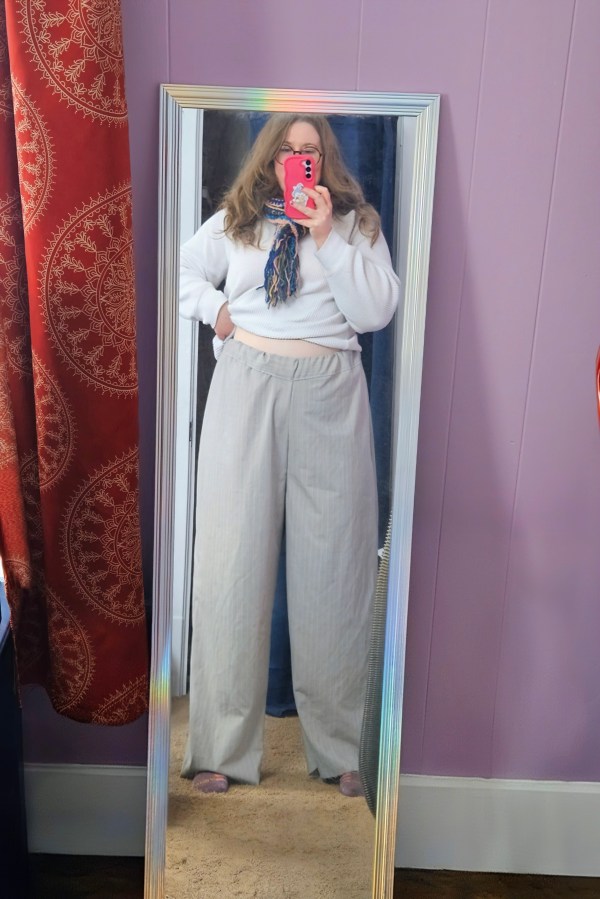
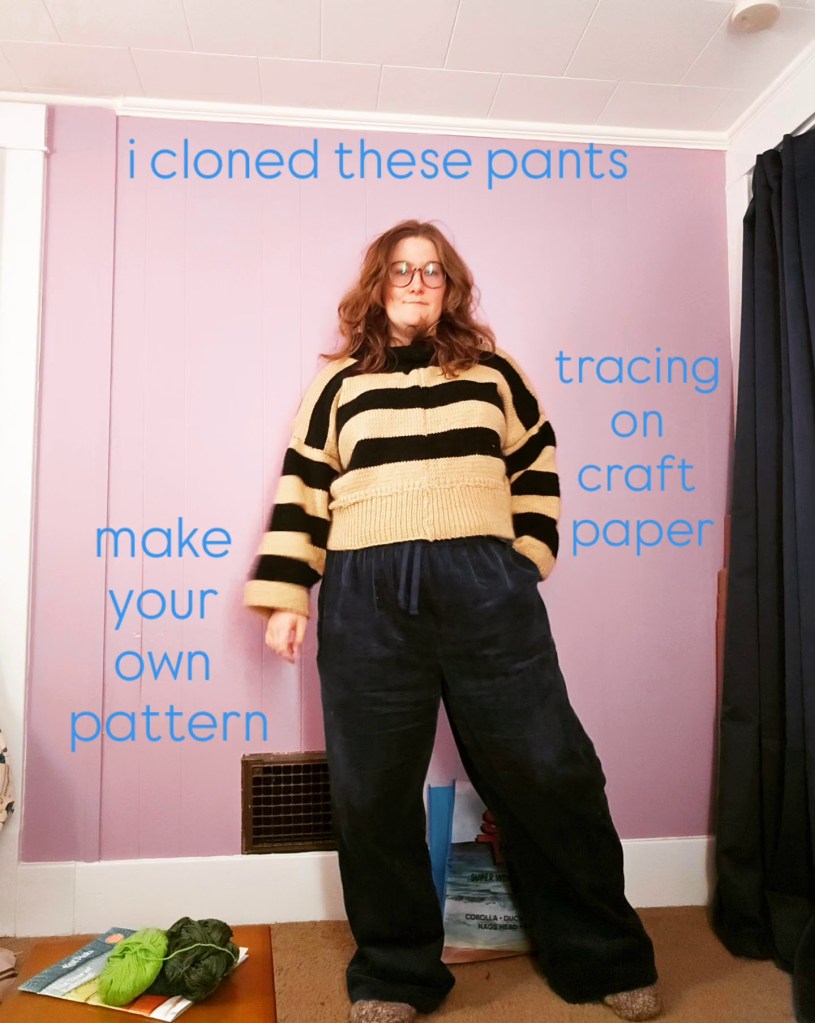
That brings us to the present day, March 2026. After 2 years of sitting in my fabric stash, I finally started to cut the trouser fabric I bought to make my own pants in 2024. Too intimidated by my own past failure, I let it hide in my crafting closet, all of 2025, for fear of failing again. I did fail at pants in September 2025 with another fabric, so it was not unfounded fear. But what is the point of living in fear, especially for something so small? Would I learn that I am not very good at sewing? Sure, and who cares?! Is crafting a competition? No. It’s about making incremental steps towards success through practice.
For my birthday, Kyle gave me two garments from Lucy & Yak, something I had dreamed of since 2019. A pair of denim dungarees and a pair of corduroy pants. And you know what I thought of looking at them folded? What a lovely thing to take a pattern from. Use brown craft paper or wrapping paper, and feel free. I traced methodically, marking the seam allowance, and back from the front pattern piece. I carefully laid out my pattern, mirroring the right and left pieces for the front and back. Then, over two weeks, I slowly sewed these pants together by hand with a fresh sewing needle, which makes all the difference. Don’t be cheap like I used to be; buy new needles regularly to save your hands. Sew with courage, because this might be the time it all clicks. What if you never let yourself succeed? That would be more terrible than failing again at doing the hard thing.
I wish you happy sewing and good-fitting pants that make you smile every time you wear them.


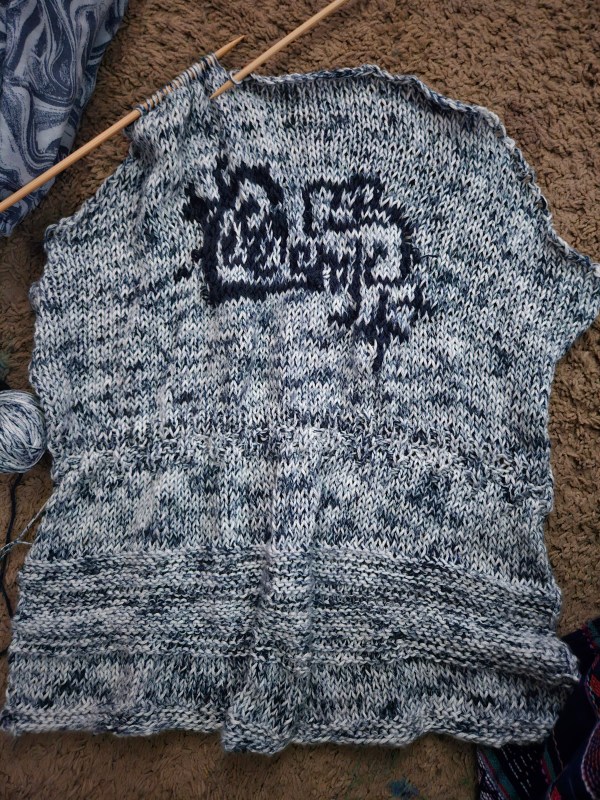
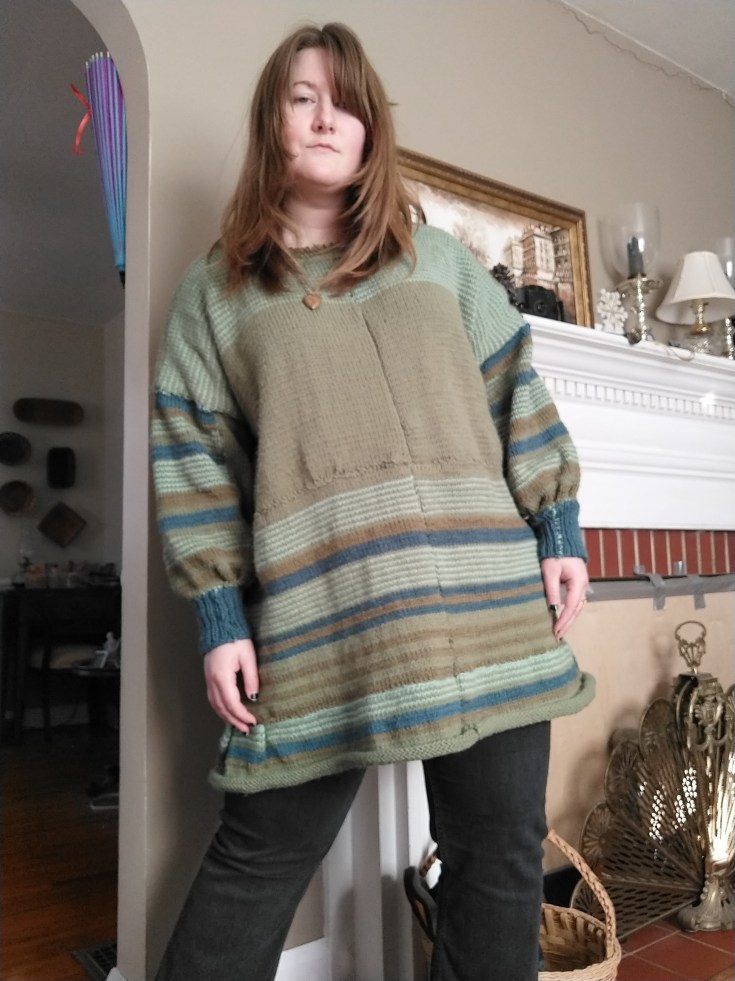
In 2025, sardines and other tinned fish became more than just food; they appeared on beaded bags, shirts, and prints. They also made their way to the fiber arts community, which inspired me to make a fish print sweater for Kyle, who enjoys fishing IRL and in video games. I just like the video game version.
When planning a garment with a colorwork motif, I always consider scale, placement, and repetition. To do this, I use what I learned in art class many years ago – the seven fundamentals of art. So I consider line, shape, color, value, form, texture, and scale. In the catch-of-the-day sweater, it was important to make the fish wearable and to ensure good form and function. How do I make the fish on this sweater make sense? I decided to hang freshly caught fish on the sweater to help with the scale of the art. I placed them in the center, on the front, only to keep the perspective of this in focus. I thought placing more fish would become overwhelming to the eye and become unwearable.
Adding more fish would have required adjusting the scale and the color, meaning I would have simplified the sweater down to two yarn colors only, with sections of fair isle colorwork, which is a smaller, more concentrated technique. But I like the color contrast of using two colors, representing two types of fish with slightly different scale patterns. How big is too big? How do you represent a fish, with their scales and texture? For this, I went to Pinterest to find cross-stitch or knitting colorwork charts for inspiration. I believe I settled on a cross-stitch pattern because it had the detailed lines and scale I was looking for. I wanted the fish to look realistic, although it could be in an imagined world like Animal Crossing New Horizons or Stardew Valley. Whimsical? I think that is the best way to sum it up.

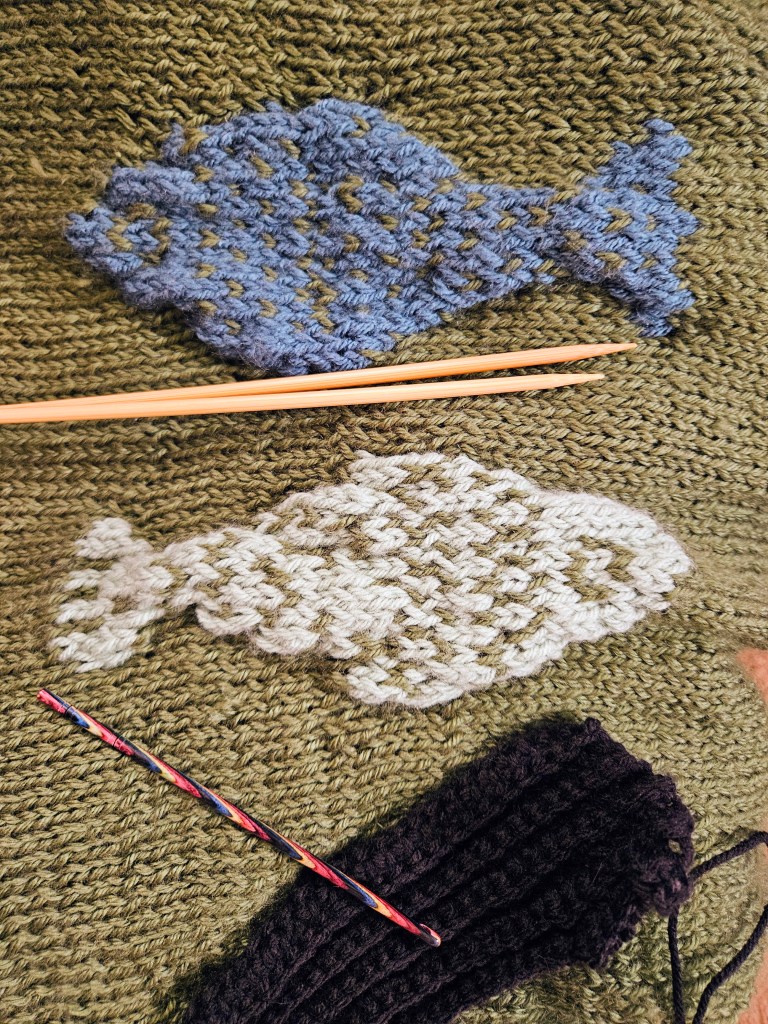
To make my pattern, I used the cross stitch reference and transferred it to graph paper by hand, tweaking some areas to make the inspiration my own. I did this in the same application for my Red Velvet Cosmic Knit Tank project. Next, I needed to determine the scale of the fish within the sweater pattern. It’s important to plan out how many stitches you need to complete the colorwork section across your rows and keep it centered. To do this, subtract the number of stitches in your colorwork pattern from the number of stitches in your row. Divide the sum by two and adjust to keep the stitches on either side equal, to keep the pattern centered. It is also important to note how tall the color work pattern is compared to the garment you are knitting, to allow enough room above and below that the graphic motif makes sense and doesn’t look misplaced on the garment. I think I literally held my pattern up to Kyle’s chest to figure it out.
For this sweater, I went in a different yarn direction to try something new. I chose a wool and acrylic blend from Knit Picks called Mighty Stitch. It was underwhelming. The yarn, while soft, pills something fierce. It is also a slim worsted weight, which was exaggerated by the large needle size I used – US 10 or 6 mm. This created a breathable, airy sweater, but dang, did it throw off my pattern and design. Eventually, I had to face my fate – I was running out of yarn, and my panel was too narrow. Not exactly the outcome you want after spending a week on the front panel with the intricate fish design. I would rather start over than frog the color work, always.
I had some decisions to make. I originally purchased the Mighty Stitch on sale, but when I ran out of yarn, it was not on sale, and I wasn’t interested in doubling the price of this already too expensive project that was in the process of failing. So like Miss Frizzle recommends, I got ready to “Take chances, make mistakes, get messy!” I went to my closet of yarn and fabric and began to dig through the stash for something else I could introduce into the design. I found a warm-toned gray and neutral black yarn from Big Twist that was also worsted weight. Because the Mighty Stitch is a washable yarn, I felt comfortable combining the two yarns. I had already introduced acrylic yarn to the project through the mint and teal fish, using scrap Big Twist for those sections. Always check your fiber content, though, to avoid incompatible fibers that will make the project hard to care for over time.
The original design was changing from color palette to overall concept. This sweater would need to have color blocking sections now, to stretch the main green color. I decided to not only change up the design, but to change up my technique, opting for crochet on the sleeves to make the sleeves go faster. Knitting is a slow craft, and for some reason, knitted garments for Kyle have this curse of going horribly wrong and also knitting up slowly because of the hiccups. I wanted him to be able to wear this sweater for the bulk of the winter season of 2025-2026, and I was knitting this in August-October, so I took a shortcut. But in my defense, the texture of the sleeves, ironically, looks like fish scales to me. Especially with the gray and black colors!
The second change I made was adding width to the sides of the front panel to make the sweater a drop shoulder. I then knit the back panel wider from the start, and added a section of gray on the middle to upper back panel. It adds a nice contrast to the overall composition of the sweater, while making the sleeves feel cohesive.
The shoulders gave me such grief in this project! I’m used to making sweaters for myself and my female form. The bust makes the shoulders rest differently than I realized, and this came back to bite me. For a man’s sweater, the back needs to be longer. Especially the shoulder section on the back of the sweater is going to ride up the back, and be too long in the front. This happened, and I was bamboozled on how to fix it. Enter short row shaping and the principles of perspective and scale.
I learned that I needed to add short rows, meaning only working a section across a row to add length to a specific portion of the back panel, the back middle. To do this, you work back and forth on the section, evenually go back to working across the entire row. In addition, I made the back collar and back ribbing longer to compensate. These simple changes made the sweater appear the same length back and front, draping across the shoulders pleasantly, even if one side was technically longer. It doesn’t matter because of the role of perspective. Magic!
I learned a tremendous amount of knowledge from the Catch of the Day sweater, and I am grateful it all came together in the end to make a sweater that Kyle enjoys wearing. I have saved my patterns to attempt this again in the future with better yarn and proper dimensions to make the pattern fit well from the start, instead of scrambling to adjust at the end.
This is a new term for me, but it is genius. Craftivism is activism through crafting. It is using your art and everyday things to show what you believe and to speak out against injustice. And to use an internet term, this has completely “changed my brain chemistry” to think of using my knitting to say what I believe, just like art.
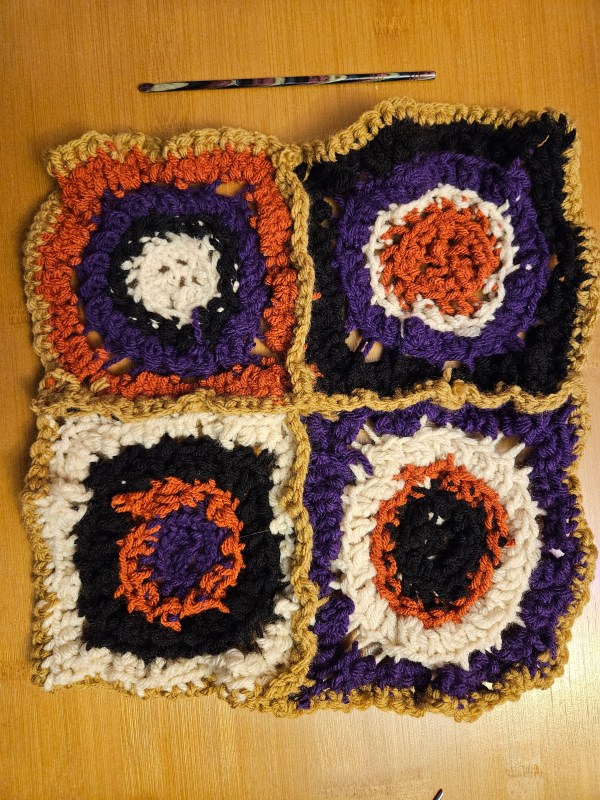
What made this a tangible thing for me to get started in community was the Welcome Blanket collection at my local yarn shop. Together, sections of knit and crochet squares would be collected and seamed into blankets, like receiving blankets, to welcome immigrants to the United States. With all the ICE-y conditions out there, it’s swimming against the current in a way that aligns with my beliefs and what we are called to do as Christians – love your neighbor and take care of immigrants. Not to worship power, money, and excuse racism like some so-called “Christians” in my country are doing. Seeing my crochet square stitched together with other like minded indivduals’ fiber art was powerful. It reminded me of how we are stronger together and how doing small things, as a community, makes a difference. I also enjoyed reflecting on my own immigrant heritage and sharing my story of how my family came to the US and why immigration is necessary.
As an American who is not Indigenous, every part of my family tree came from somewhere else. Some of my family came from Germany, I believe, in the early 1900s, since my great-grandmother, who was born in 1912 in the US, spoke German as her first language at home. Some of my family from Ireland left County Cork’s farmland during the potato famine to escape certain death from the genocide of starvation by Great Britain. Some of my family from County Armagh immigrated in the late 1800s to the US, went back to Ireland in the early 1900s, and came back again to the US during the Troubles. The rest of my family came from Canada in the 1960s. If we are not members of Indigenous nations, then we are all here because of immigration. To act like immigration is dangerous, un-American, and unwelcome is not American to me. We all came from somewhere else. Let’s love our neighbors and support them in this new chapter of their lives, which came about because of a very difficult decision.
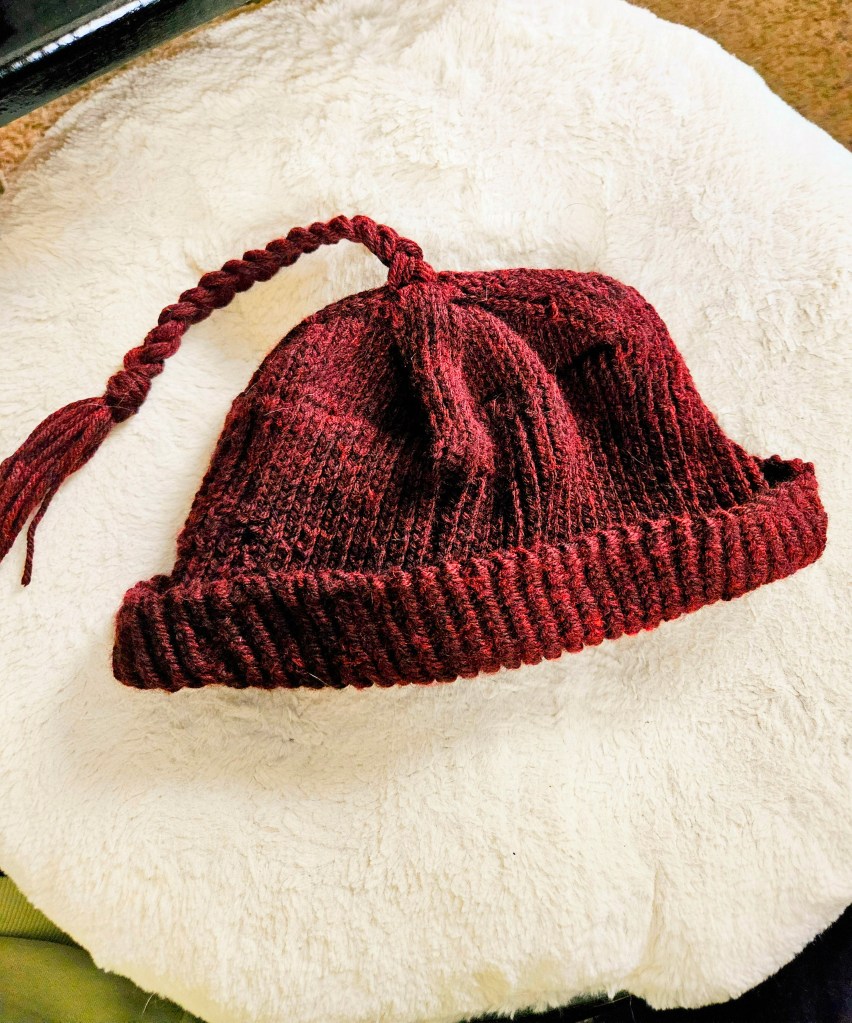
The second opportunity that brought Craftivism back on my radar was the Melt the Ice hat. This hat was used from protest by Norwegians in the 1940s during the Nazi occupation of Norway. Minnesotans, many of whom are descended from Norwegian immigrants, but now are a rich community of immigrants from all over the world, brought the hat pattern back to raise money for the Immigrant Rapid Response fund, which provides assistance for immediate needs – food, rent, etc. This fundraiser raised $650,000 with a $5 pattern during the Melt the Ice MAL in February 2026. If you are not aware of what has been going on in Minneapolis, there has been violence, there has been death, there has been kidnapping, and unlawful occupation of a city by federal forces in the name of corruption and power. Making the hat felt like there was a healthy place to channel my grief and anger over what is happening while bringing community together – Craftivism is powerful.
Have you ever heard of Craftivism? Would you participate in it?
In 2025, one of my goals was to try my hand at crafting my own K-Pop Merch. Some bands are easy to find Merch for, and others, well, you are left to your own ingenuity. The bands I selected to try for this are NCT 127 and NMIXX, which I have tried and failed to find band tees for that I liked. For this project, I used two different techniques – embroidery and stranded colorwork knitting.
My first idea was to pick up a blank T-shirt from the craft section and get to work. The shirt I chose was a Gildan tee from Walmart, which I DO NOT recommend. This shirt is so freaking thin. Horrible quality compared to the blanks I have found at Michael’s, Dollar General, or even Hobby Lobby. But as I was dubious of my embroidery skills, I went ahead with the Walmart shirt as practice. That was the right call, because dang, embroidery is not as straightforward as it looks.
For this project, you will need: an embroidery hoop, embroidery floss bundles, a marker or pen to sketch your design on your shirt, and backing like embroidery interfacing or a fabric scrap that I used (because I forgot that the embroidery needed a backing).
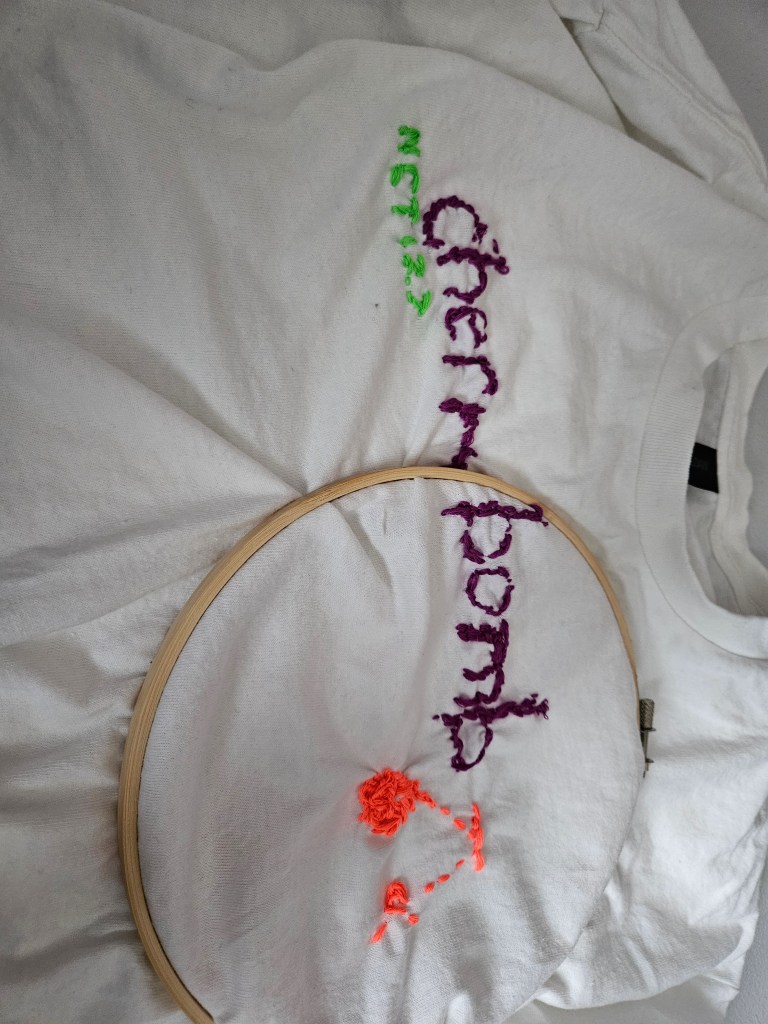

For the design, I chose something simple. The song, the band, and a little imagery. I love their early album Cherrybomb (2017), but the song is almost 10 years old now, and it’s kinda hard to find any NCT Merch with it at this point. Seemed like the perfect option for a first try. I wasn’t expecting my stitches to be so tight; I felt like I was fighting myself across the whole piece. This was because I forgot about the backing for stability, and all this embroidery on this poor quality shirt, yeah, it wasn’t great. Afterwards, I added a backing to the embroidery with a scrap piece of another t-shirt.
Is it my best work? No. But is it a start for making better projects in the future? Yes! And I wear it anyway in the garden and as a sleep shirt.
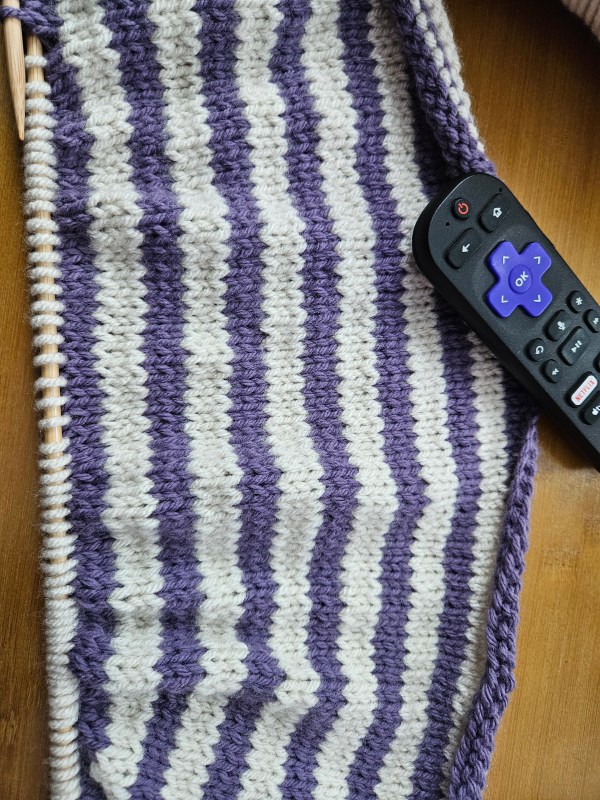
My desire for Red Velvet Merch was entirely motivated by the confusing announcement in April 2025 that members Yeri and Wendy did not renew their contracts with SM Entertainment, but Red Velvet was not disbanding. They have become one of my top girl groups after their release of Cosmic in 2024, so it seemed only appropriate to use the album Cosmic as my muse for a cotton knit tank with stranded colorwork. It’s a bit easier to find Red Velvet Merch on sites like Teepublic, from which I have bought a shirt. This project was more about expressing my love for this album, and I hope that Cosmic will not be their last release as a group.
You will need: a pencil, pen, graph paper, and stitch markers. (Along with your basic knitting supplies – needles, yarn, scissors, tapestry needle)
To start, I searched Pinterest for album artwork and a logo. I found a lot of options to use as a compass for the project, but decided the simplest option would be best. I opted for one color to keep the floats simple. To make my colorwork charts, I always use graph paper and a pencil to be able to adjust the marks that I transfer from the image. Once I am happy with my design, I trace over it in pen and use a pencil to cross out the lines of the pattern as I complete the project to mark my progress. To understand the dimensions of the image as I worked, I also marked the “canvas” with stitch markers. It is also important to note your garment construction and how that relates to your chart. I made this tank knitting bottom up, so I began working on my colorwork from the bottom of the chart.
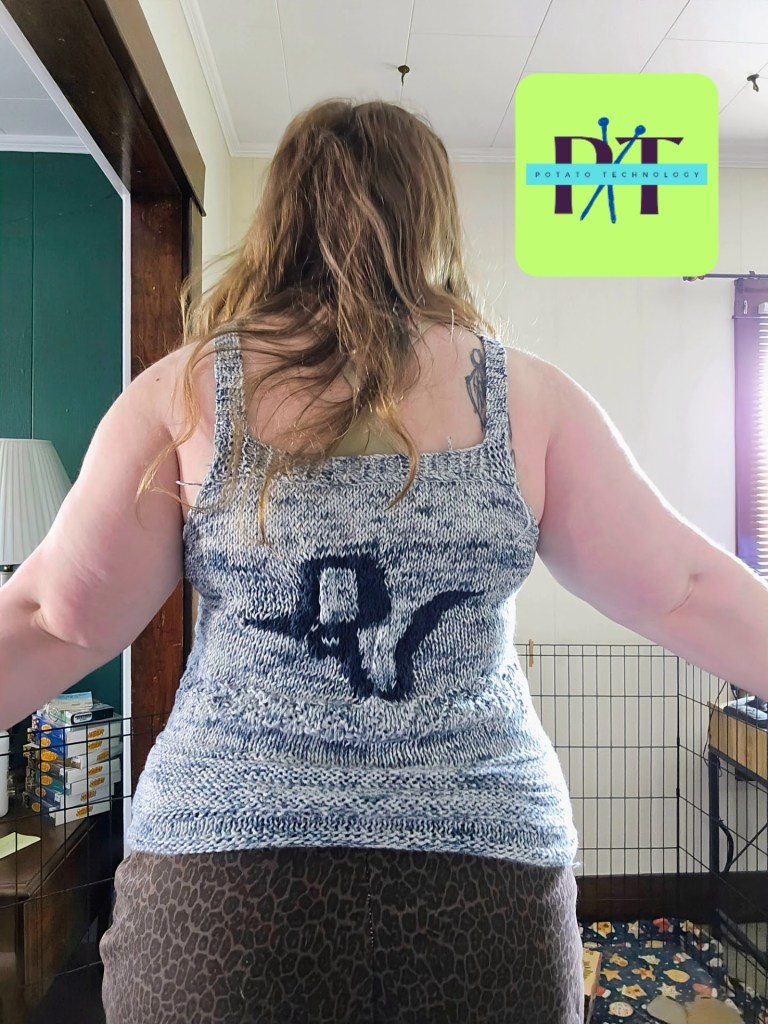
I am thrilled with how this project turned out! As my first stranded colorwork project with this complex of a design, it was far easier than I thought to complete. You just have to plan out your image and be patient with your floats. Try not to hold too tightly and remember that blocking will help the tension relax.
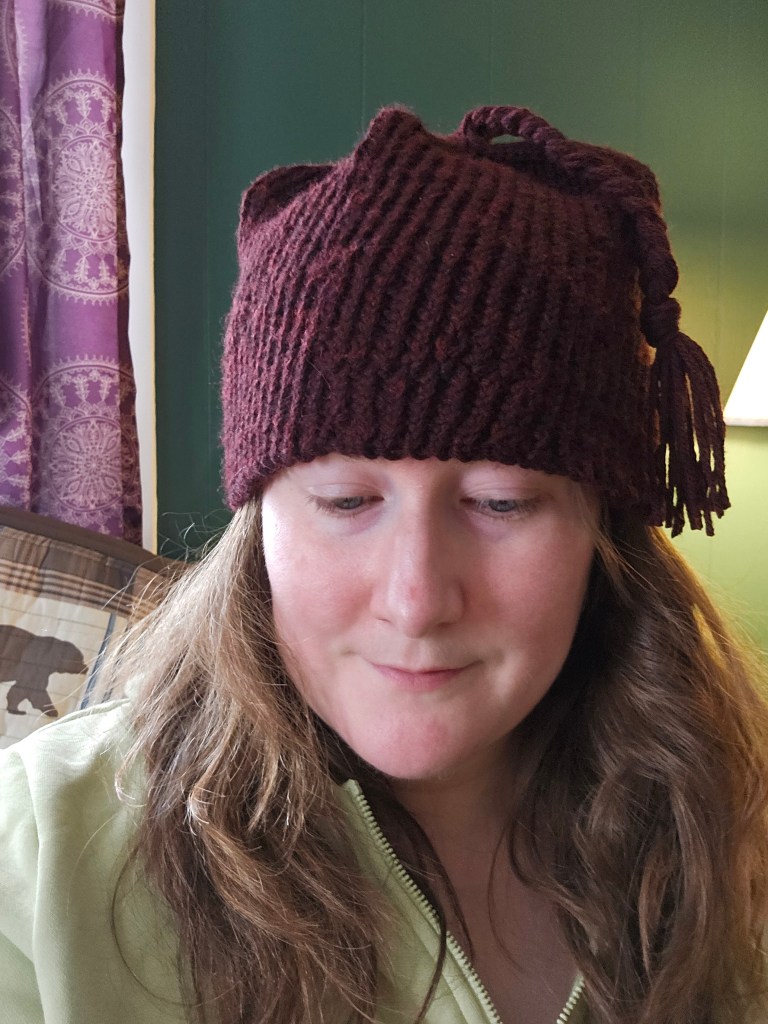
I’ve shared several animal ear projects on the blog before, the Cat Ear Beanie, and my Loverboy re-creation Bunny Hat, but now, without further ado, may I present the Bat Ear Beanie! This was made with less than 100 grams of local spun wool I found at my farmer’s market, held double with less than 100 grams of Knit Picks Snuggle Puff yarn in Neptune. I decided to crochet this hat instead of knitting, as I did with previous projects, to have a bit more freedom in the creation. Crochet reminds me of sculpture or papier-mache. You can always add onto the stitches in ways that the tension of knit stitches does not allow, and for that, the bat ear project seemed like a great place to practice my crochet technique once again.
The hat was crocheted in the round – so much easier than knitting in the round, in my opinion, with double crochet stitches, and was knit like a normal hat. I don’t have an exact pattern for it, but you can easily make it to your measurements. The yarn I used, one strand Snuggle Puff, a heavy worsted, and one strand local wool, a DK weight, resulted in an Aran/Bulky-weight yarn. Because of this, I used a 5.5 mm hook to create my stitches. I chained the number of stitches I needed based on my head measurement and double crocheted around and around until the hat was long enough to cover my ears and most of my head, then I began my decreases. I wanted a gradual curve shape for the crown of this hat. Go slow, and remember, you can always frog and try again if the shape is not what you want. After the hat was complete, I plotted my bat ears.
What makes an animal hat special to me is the scale and placement. What I learned with my cat ear beanie was that you can make the ears too wide and too big, leading to a sloppy effect. With the bunny hat, I learned you can put them too close together, not allowing the ears to drape properly. The effect can change the entire character of the piece, so place your ears with care and think about how you want to wear it on your head so that the animal cuteness is achieved. For this hat, I was inspired by the hat Felix from Stray Kids wears at the beginning of the Creed music video from 2025.
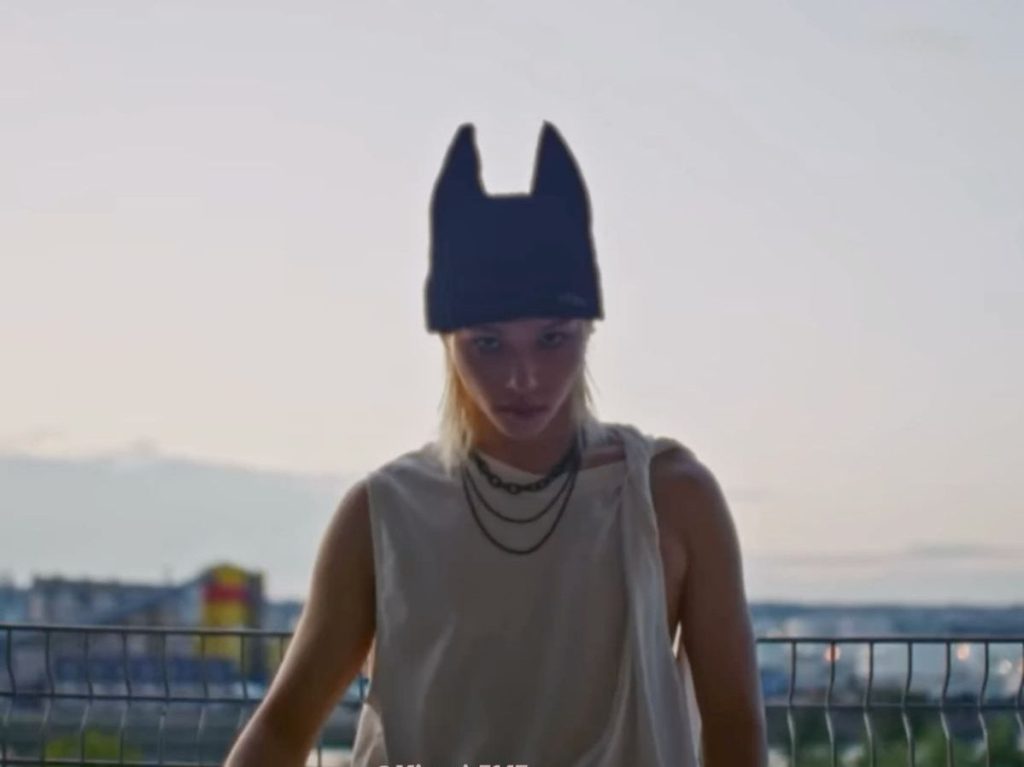
I began my bat ears by picking up stitches on the outside of the hat. I also crocheted these in a round, to give these good structure. By crocheting these in a round, to keep the tension even across the ears, so that they would stay upward like a bat. I used single crochet stitches and tapered the ears accordingly, simply weaving in the end to the inside of the hat, with a tapestry needle.
Why did I choose a bat? To raise awareness for bats. Did you know that bats are not a nuisance, but an essential part of the ecosystem? But due to misunderstanding the nocturnal animal, mainly I would say due to vampire lore, they are seen as dangerous. Yes, they can carry rabies like many wild animals, but this is not a reason for the animal to go extinct. Their habitats are under threat, and they deserve the space to thrive. They eat pests, contribute to the pollination process, and help spread seeds.
When my go-to yarn, Big Twist, was temporarily discontinued in 2025, I felt adrift in a sea of unfamiliar yarns with unfamiliar prices. Which raised an interesting question: what will be my new tried and yarn? I thought I would share this journey with short reviews of the yarn I explored in search of a new favorite.
What am I looking for in a yarn? Big Twist was my favorite for a few key reasons – affordability, quality, color range, and ease of accessibility. Big Twist had a large selection of colors in a worsted weight that did not split easily or snag in knotted tangles. The skeins contained 380 yards, selling for 4.49 USD, which made sweater projects affordable. It was easy to source in person. Now I am not looking for in-person yarn purchases like I used to. It’s just not possible at this time.
Wool, worsted weight, has a large color range, and can also be purchased in a superwash variety. This yarn is a Knit Picks, made from Peruvian Highland Wool is sold for 4.99 USD per 110-yard skein. I like how sticky this yarn is. When it is stitched up, it stays in place and has great stitch definition. It’s not too itchy. I am sensitive to wool, and I find this yarn to be fine. I also used the superwash for a hat, so that could be where the extra scratchy feeling came from. I think this is a great yarn for budget wool, and for beginners, the best part is that it arrives in a skein, not a hank that you have to unwind. Yes, I would buy this again. I just purchased this for an upcoming rabbit-related project.

Silky and soft. This yarn had great sheen for an 80% acrylic, 20% wool fiber. It was labeled as worsted, but I found it to be too thin compared to my other worsted yarns, which created some issues in my project. This Knit Picks yarn is 7.99 USD for 208 yards. When I purchased this yarn, it was on sale, but still more than I am used to paying for acrylic. Due to the thinness of the yarn, I failed to meet the gauge. I found myself using a lot more than I thought I would. The most disappointing thing was the way it slides out of knots, which was a problem for the colorwork and color blocking sections. The yarn also doesn’t respond well to my husband’s beard. I found this out because I knit him a sweater, and the top was falling apart where it caught on his beard. Would I buy again? No. I don’t trust it not to pull out of the weave, and I felt let down by the price for the experience.

I found these oversized yarn skeins at Michael’s, and I was thrilled. Lion Brand is a fantastic budget yarn that I used before on a previous sweater project. At 1020 yards for 11.99 USD, this yarn has been a game-changer for experimentation. I can try new projects, have room to mess up, or be able to make gifts, blankets, etc, on a budget. It does not split. I can knit or crochet easily, and it meets the gauge. My only negative critiques are the color range and the composition of the fiber. I wish there were more colors; the range is small compared to Knit Picks or Big Twist. I also wish acrylic were not made from plastic. I wish this were wool, and was kinder to the environment. Yes, I will buy this again. It is the best budget acrylic yarn I have found that is easy to purchase and would be a great beginner yarn to learn with.
Before Big Twist fully came back in Fall 2025, I thought Loops and Threads may be Michael’s brand expression of Big Twist, after they acquired Joann’s IP and the yarn vendor contracts, so I gave it a shot, and I have some mixed feelings. The color range is large, which I like. Some of the shades are lovely, and some are a bit garish. Some of the yarn dyeing is odd. Some of the texture of the acrylic fiber is also odd. It can be a bit limp, almost too soft. I love the mushroom and curry color ways. The black yarn I purchased, however, smelled like a cheap pleather purse- a bit fishy and a bit like burnt hair. I still can’t get the smell out of the yarn with airing out, Febreeze, and laundering. Maybe it was the chemical dye? For this reason, I have some pause. But you can’t beat the 3.99 USD price and 354 yards per skein. Let the creativity reign! Yes, I will buy again.

Palette Fingering Weight yarn from Knit Picks is a 100% Peruvian Highland wool yarn that has become my go-to winter accessory yarn. With its lightweight ply, I combine it with other yarns to create marled and warm hats, mittens, and socks. The hat to the left is three strands of Palette held together on US 7 needles. The hat to the right is made with two strands of worsted-weight acrylic (Big Twist) and one strand of Palette. It’s a non-superwash and has a lovely squish to the skeins. This yarn is already skeined up, no Hanks to unravel, and contains 231 yards for 5.49 USD per ball of yarn. I will rebuy. I actually panicked on New Year’s Eve, that I had drained my whole stash, to find they were at the bottom of a tote bag.

I have worked with two Caron Cake varieties in 2025 – Blossom Cakes and Big Cakes. The Blossom Cakes are a blend of 61% cotton and 31% acrylic fibers. They are variegated, worsted-weight cakes of 481 yards that sell for 14.99 USD per cake. They tend to do a BOGO sale at Michael’s, so I get them on sale, or else I would be less enthused about this item. The Big Cakes are also worsted-weight acrylic yarn, which is self-striping. I love the quality of the yarn, but the striping is a bit tricky. I am currently using them for blankets, but I did consider separating the sections of color to make something different. The Big Cakes contain 603 yards, which are sold for 14.99 USD. On a sale, you can make a blanket for a great price. For this reason, I will try the cakes again, with the proper project. They are complicated, and without a plan, they feel like a waste of money. With a good plan, they are a great resource.


I found more options than I expected last year, and this led me to actually be happy that I had to find a new option for my tried-and-true yarn. Moving forward, I don’t have a sole favorite; instead, I feel like a nuanced palette of tastes is the better way to describe it. If you are a new knitter or curious about trying some of these yarns, I hope my thoughts helped. These are all my opinions, and all the yarn was purchased with my own money.
