This week’s update will be a bit shorter than usual, largely because there wasn’t a lot that happened with our garden. We didn’t start any new seeds, but we did transplant one of our starts, saw more seeds germinate, and bought materials for an upcoming project that sort of has to do with our garden.
Transplanting a Pepper Start
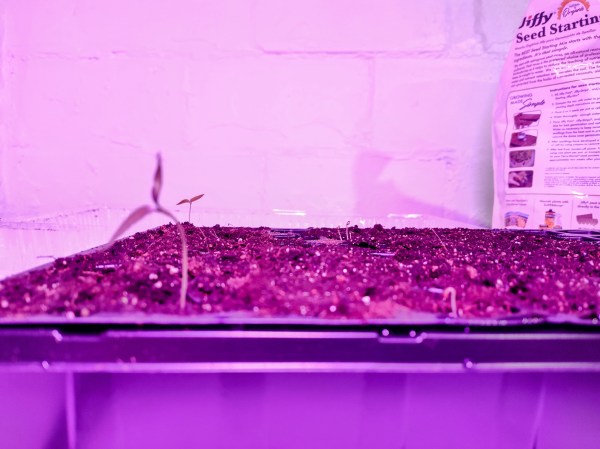
The first start you transplant into a larger pot is a momentous occasion each year. It signifies that the seeds have successfully germinated and your plants are growing closer to being ready to be moved outside and into the ground. For us, the first start that needed to be transplanted is the first Cal Wonder bell pepper seed that germinated. Since it germinated on March 22, the plant has grown to about 4 inches tall and has developed its third set of leaves. That’s the point when most recommend transplanting pepper plants. Luke from the MI Gardener YouTube channel published a video where he talked about the importance of not crowding a pepper plant’s roots, and if that means transplanting a plant to a larger pot multiple times, that’s okay. We decided to go with the 5-inch tall peat pots so that the plants only have to be transplanted once between germination and going in the ground. It also happened to be the size we had on hand.
When I transplanted the start, I mixed in some Garden-Tone, which is an organic well-balanced fertilizer that promotes root development and leaf growth. After wetting the soil, I was extra careful to not disturb the root system when removing the start from its cell. The day after transplanting, I cut the bottom off a Gatorade bottle so that it could be placed over the plant and act as a greenhouse since the start no longer fit under the dome of the seed-starting trays. We’ll keep you posted on the plant’s progress after being transplanted.
More Germination
Last week, I wrote that we started a lot of seeds, including all our tomatoes, husk tomatoes, and cantaloupes. In the week since we started them, every variety of seed has successfully germinated. This doesn’t mean that every cell has germinated, but that at least 1 cell of every seed has germinated. This is a huge step because these vegetables are going to be a large section of our garden. Some of the tomatoes and the cantaloupes have even had to be thinned already.
Buying Materials for Our Screened-In Porch Project
Over the next two weeks, we’re going to be taking on screening in our back porch. We have a nice-sized back porch that we love sitting on. It’s also where we have our grill. The downside to it is that wasps, yellow jackets, and other bugs love it as well and can make sitting out there kind of miserable. It is also open on all 3 sides, so rain gets blown in. We’re addressing all that by screening it in with a set of French doors. The back will have screens that run from the ceiling to the floor, while the sides will have screens that run from the ceiling to the railing, which is waist high. Below the screens, the sides will be closed so that rain can’t be blown in. You may be wondering what this has to do with gardening. Great question.
When we bought the lumber for this project, we bought extra to use as a trellis for our long beans to climb and to build some planter boxes. In the end, we hope to see the trellis incorporated into the porch. We’ll share pictures of the project when it’s done.
Up Next
This week, we’re planning to pick up the rest of the materials we need for the screened-in porch project and to start our beans and cucumbers inside. Outside, the soil is finally starting to warm up, and it’s dried out nicely. That means we should be able to direct sow some of our seeds. We’ve been very patient with them because the soil hasn’t been warm enough to this point. How are your seeds going? We’d love to hear from you. Happy gardening!
In this week’s garden update, we continued our journey of tilling all the garden beds we need. We admitted defeat with some of the pepper seeds and decided to re-sow a few of them. We also started two new seeds inside and celebrated that two of our eggplant cells have already germinated.
Continuing to Create Garden Beds
After a few discussions and planning sessions, we determined how many garden beds we need and where they are going. Essentially, we are turning about half of the second lot we have into a garden, which will be divided among six beds, plus one for wildflowers that will attract pollinators. Heading into this past week, we had three started, but none were completely ready to go. At the end of this week, we have four started and two ready to go with rows tilled.
Our process for tilling the beds looks like this:
One initial till that removes the bulk of the grass followed by raking to scrape the grass away from the soil.
A second perpendicular till that goes across the original one. This tilling is deeper than the first one and helps to clean up any strips of grass that were missed on the first pass. The bed gets raked after this pass as well.
Apply a layer of gypsum.
A third tilling that works the gypsum into the soil and establishes the rows we’ll plant in.
We may do a light fourth tilling right before planting to work in any soil amendments we use.
It’s been interesting to see how the soil and bed change after each pass. The first two passes leave the bed moist and muddy. But within 30 minutes, the top layer of soil begins to dry. Then, after the third pass, it starts to look like a garden with loose, workable soil between walking paths.
We’ve developed a good system for creating the beds when we’re both available to work on them. I’ll go around and create the border for the new bed. Magz follows that up with the first pass, and I’ll rake behind her. She’ll also do the second pass that runs perpendicular to the first one. I’ll then rake it off again, add the gypsum, and handle establishing the rows. It’s been a very productive system.
Eggplant Germination
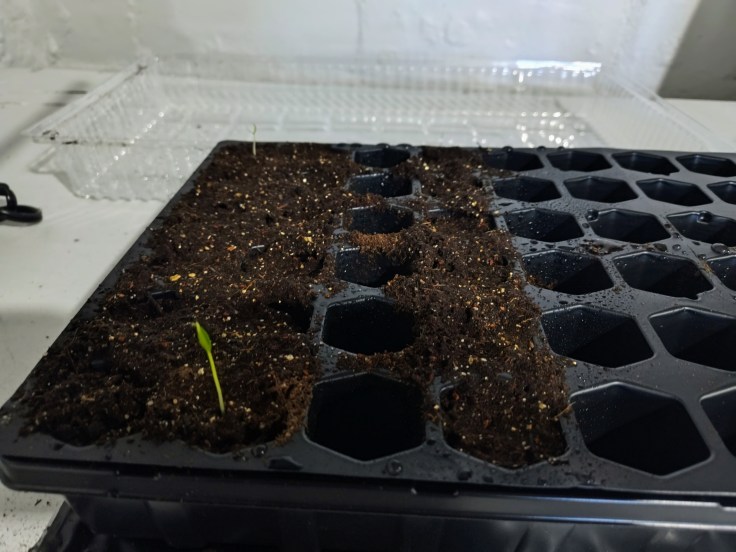
In last week’s update, I wrote that we started our eggplant seeds on Saturday, March 22. These were supposed to take 10-15 days to germinate but ultimately sprouted in seven days with the first seedlings breaking through the soil on the 29th. That is a big change from the experience we’ve had with our pepper seeds, but more on that in the next section.
A look at our germinated pepper and eggplant seeds
The eggplant variety we’re growing is Ping Tung from Baker Creek. They are an Asian variety named for the location in Taiwan where they originate. They are a thinner eggplant than the bell-shaped varieties that most are familiar with and can grow up to 14 inches long.
Re-Sowing Seeds & Starting New Ones
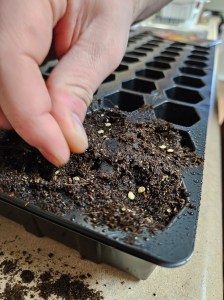
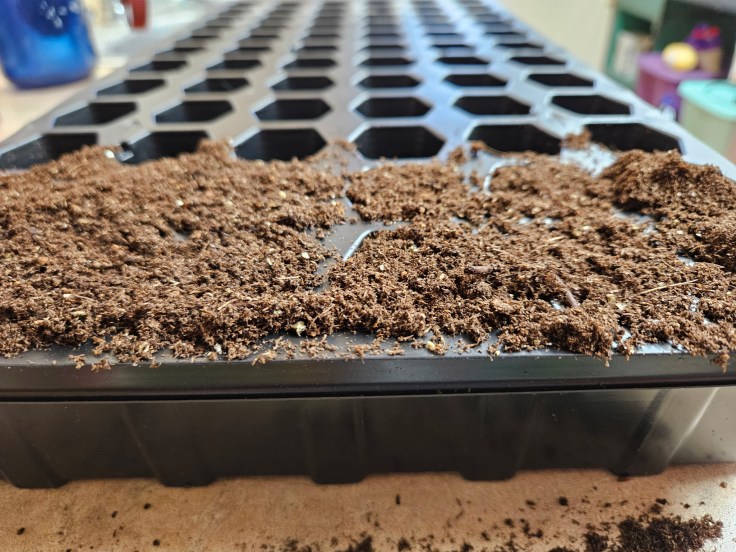
I alluded to this in the previous section, but we’ve had some difficulty with our pepper seeds. Of the 12 cells we started, only two have germinated after three weeks: one sweet bell pepper and one Scotch Bonnet. We haven’t had any of the Hungarian wax peppers germinate. Yesterday, we made the decision to re-sow the cells that hadn’t germinated yet – five sweet peppers, two Scotch Bonnet seeds, and three Hungarian wax seeds. I’m not entirely sure what caused these seeds to fail, but I think it was inadequate moisture. I intended to pre-moisten the seed starting mix before starting the seeds but forgot to. I also used a spray bottle to water the seeds, but I don’t think I was giving them enough water at a time. That changed when I started the eggplant seeds. Instead of using the spray bottle, I started pouring water on the cells and letting it drain through the soil. It meant I only needed to water the seeds every few days rather than daily. We’ll see how the pepper seeds do with this change in the watering process.
That day, we also started two new seeds. One is the Ishikura bunching onion, which is a Japanese scallion-style onion that grows like a green onion rather than a long day onion. This onion doesn’t develop a bulb below the soil, but instead, the tops can be cut and will re-grow. We started 18 cells of these and will sow additional cells in the upcoming weeks. We love spring onions and want to have fresh ones all growing season.
The second seed we started is a dahlia. In addition to growing vegetables, we are growing quite a few flowers this year, mostly perennials that attract pollinators like butterflies and honeybees. We have very little experience growing flowers, especially from seed, but we’re excited to see how it goes.
Up Next
The goal this week will be to create rows in garden beds three and four. If we’re able to get started on the final two beds, that’d be great. It could also be overly optimistic, though. We also want to direct sow some seeds in our garden beds. Some of the greens and flowers can be started this early.
In this week’s garden update, we have a lot to go over. We have updates regarding our seedlings, began creating our garden beds, realized what our soil is like, and began addressing a water runoff problem. Finally, which seed did we start? Let’s dive in.
Houston, We Have Liftoff! (Or Germination)
It was touch-and-go for a bit, but our first seeds have started to germinate. On March 8, we started 12 cells of pepper seeds – 6 sweet peppers, 3 Scotch Bonnets, and 3 Hungarian Wax. The seeds were supposed to take 10-15 days to germinate, so as we got to the 2-week mark, we started getting a bit nervous that they weren’t going to germinate. However, when I checked the starting tray on Saturday (March 22) morning, one of the sweet peppers seeds had germinated. Wonderful!
Pepper Germination
Then, later that day, I went down to check the tray again and one of the hot peppers had sprouted! The next morning, I set up our grow light and configured the settings so the light stays on for 12 hours, so the plants should begin to take off. The first seeds to germinate each year is such a monumental occasion. It feels like it takes the concept of a garden and turns it into a reality.
Starting to Till the Garden Beds
In last week’s update, I shared that we received our rototiller and were waiting to begin the tilling process. Last Wednesday afternoon, we got it in the ground, and it was more difficult than I anticipated. I believe I have used a tiller before but can’t remember with 100% certainty, and if I have used one, it was only to turn over soil that had already been used for gardening. I’ve never established a garden from scratch. And if you haven’t used one, lugging a 30-pound machine around and preventing it from bouncing is a workout.
Our lawn has very thick grass and the ground below it is soft, almost like a peat bog with compacted soil. There is basically no top soil, so if there’s any moisture in the ground, it’s essentially soft, muddy clay. Your feet sink into, and the soil sticks to your shoes. It was a bit disheartening to realize the soil’s composition, but not unexpected given that loamy clay soil is common in this part of Pennsylvania.
First Garden Bed
We began by roughly determining where we want our beds to be, and on the first pass, we focused on removing the grass. That was largely successful, and after raking, we could see the soil. The second pass was deeper and started to turn the soil over, which is when we noticed that we need to address the moisture/drainage issue of the soil. Clay soil is wonderful because it’s full of nutrients and minerals, but not so great because it doesn’t allow excess moisture to drain. Over time, this will be resolved through the addition of organic compost, natural soil breakup from plant roots, and cover crops in the fall and winter.
Immediately, though, we have to address the issue before planting this season, which we’re going to do with gypsum. Many of the Google search results I found pointed us in the direction of gypsum, which is a naturally occurring mineral that breaks up soil and improves drainage. Thankfully, it’s also cheap at $10 for a 40-pound bag. Our plan is to spread it on top of our garden beds and till it into the soil a few inches. In the meantime, though, we’re already starting to see the soil dry out. Within 15 minutes of removing the grass, the top layer of soil starts to dry out, which is a remarkable improvement.
Diverting Downspout Runoff
Compounding the issue of our loamy clay soil and thick lawn is that one of the downspouts on our garage directs water into the part of the yard where our garden is going. Our garage roof isn’t big, but the amount of water draining off it is enough to exacerbate an existing problem. One option is to divert the downspout to have the water exit in a different location, but it would still make our drainage problem worse. Instead, we decided to use a rain barrel as a catchment device. On Saturday, we bought a 55-gallon blue plastic barrel from Rural King that was previously used for food, so once we thoroughly clean it, it’ll be safe for watering our garden. We have discussed having a rain barrel, but the plan was expedited as a result of the downspout and drainage problems. We still need to buy a spigot and filter, plus we need to figure out a platform, but we’re on the right track. We’ll provide more updates once we install the rain barrel.
Starting Eggplant Seeds
Saturday was also the day we started our second type of seeds: eggplants. Like the sweet peppers, we started 6 cells of these with 3 seeds in each cell. These will take 10-14 days to germinate, similar to the peppers.
Up Next
We won’t be starting any more seeds indoors until April, but if we get our garden beds prepped in time, we will be planting mustard greens outside. On Friday, Magz also tilled a bed at the back of our property, which we’re going to use for wildflowers that will benefit pollinators like butterflies and honeybees. That area of our property doesn’t get the best sunlight (partial) and is close to a drainage ditch, so we don’t want to grow vegetables there. We’ll be ready to plant those flower seeds as soon as the weather is consistently warm enough and the soil is where want it.
We’ll also continue to prep our garden beds with the tiller and gypsum. In the meantime, do you have any experience with a rain barrel or other catchment system? How about poorly draining soil? We’d love to hear how you’ve navigated it and apply any tips you have. Happy Gardening!
Throughout this year, I am going to publish a weekly blog post with updates from our garden. It will include progress pictures and anything we learned over the past week and will serve as a general update since a lot can change in a week’s time when gardening. I wanted to wait until we started our first seeds, and guess what? We did!
Peppers Have Been Started
I don’t believe that each year’s garden has started until your hands first touch soil in the spring. Buying seeds and purchasing supplies is wonderful, but it’s all still part of the planning process. Getting your hands dirty for the first time moves everything from a concept to a reality. And that’s the step we took Saturday evening.
Seed Starting
Earlier in the day on Saturday, we made a trip to the nearest Lowes to pick up a downspout extension and grabbed a couple of bags of seed starting mix, another seed starting tray and flat of cells, and gardening gloves. Brief side story: Neither of us could remember if we needed extra seed starting cells. I would have bet a dollar that we had enough to get us started for the year and only bought the new cells as extra. Boy, am I glad we got them. When we came home, I checked our gardening tote, and the starting tray that I thought had cells in it was empty. It’s funny how taking a two-year absence from gardening and moving can make you forget stuff.
That evening, we unpacked our heat mats and glow light, set up the table we’re using, and ran an extension cord from the nearest outlet. First up on our seed-starting schedule is peppers. (Technically, our mustard greens should already be in the ground, but because they will be directly sown, we have to wait until the ground is tilled). We found our 3 varieties of peppers (California Wonder bells, Scotch Bonnets, and Hungarian Waxes, which I discussed in this post), grabbed our seed-starting mix, and filled a spray bottle with water.
Starting pepper seeds
We decided to grow 3 cells each of Scott Bonnets and Hungarian Wax peppers and 6 cells of the California Wonders. With 2 seeds in each cell, we’re confident we’ll get strong seedlings to transplant later in the spring. Determining how many cells of each variety to start is always a fun process. You want enough to guarantee good germination but not so many that you feel overwhelmed if all of them succeed. Hot peppers are particularly difficult for us because we don’t eat a lot of them and will mostly use the Scotch Bonnets for jerk marinade. We went with 3 cells with the goal of transplanting 2 of them, and if all 3 succeed, we’ll give the third plant away. For the California Wonder bell peppers, we’ll probably transplant as many as we can.
What’s Next?
Next week, we will be starting our eggplant seeds. I’ve been using the seed starting spreadsheet that I created to organize everything and started another page to track the dates and expected germination times for each seed. That will allow us to know if a seed is taking longer than expected to germinate.
We’re also going to be buying our rototiller sometime over the next week. We’re big fans of no-till gardening, but our yard is currently all grass, so we have to break ground. We were originally going to buy an electric tiller since they are cheaper than gas models and we won’t need to use it much after the first year. However, after realizing how expensive 100-foot heavy-gauge extension cords are, we have pivoted to a gas model. We’re still narrowing down the exact one, but I’ll write a blog post about it and how we reached that decision when we get it. I’ll also write a follow-up post reviewing the tiller once we use it. Spring weather is finally starting to arrive after a harsh winter, and we couldn’t be more excited.
Growing up, I spent many spring Saturdays taking trips with my mom, dad, or grandparents to the greenhouses and garden centers in our area. We would walk around the tables that were full of flats holding vegetable starts and flower transplants. That was how my family typically began each year’s garden. It was wonderful to take in the greenhouse smells of damp soil, fertilizer, and new plants. You’d run your fingers over the leaves and quickly learn to identify the differences between peppers, tomatoes, and cucumbers.
Seedlings in a greenhouse (Photo by Zoe Richardson on Unsplash)
Fast-forward to today and seeds seem to be all the rage. There are dozens of seed companies I hadn’t heard of until about a decade ago selling heirloom varieties of seeds that I didn’t know existed until recently. I’m not sure if that’s simply the result of the internet raising awareness for seed loss and advertising for these companies or because people in my circle didn’t talk about heirlooms. Either way, it does seem as though there has been a shift in attitude and approach toward starting a garden.
That raises the question: Which is better between seeds and starts? Based on my previous posts about seeds and catalogs, you can guess which camp I’m in, but that doesn’t mean there aren’t merits for buying transplants from your local greenhouse. Let’s dive into the advantages and disadvantages of both and help you make a decision on which is best for you.
Cost
There is a wide range of costs when choosing how to start your garden. The cheapest we found seeds in our catalogs was $1.95, which was a broccoli packet from Pinetree Gardens.
Fun fact: That price is actually lower than our local Wal-Mart sells Burpee seeds for. Another reminder to buy directly from the seed company if you can. There typically isn’t much difference in price, you’ll find a larger variety, and you’re guaranteed that the seeds were recently packed.
On average, the lowest price in our catalogs was $1.99 per packet. That was the case for most vegetables. The highest price was $15.00 for a packet of pumpkin seeds from NE Seed. Calculate the per-seed price and you’ll get a range of less than $.01 for some beet and carrot varieties up to $1.00 per seed for heirloom cantaloupe and tomato varieties.
Let’s compare that to the price of starts. I’m not 100 percent sure what starts cost at greenhouses in our area since it’s still too early, but a quick search online showed tomato plants in the $3-4 range from Home Depot. That price is comparable to a packet of seeds. However, when you consider that a start produces one mature plant in the best-case scenario, seeds are far more economical. I know that more than one seed is generally used when starting them, but it’s still cheaper to purchase seeds.
Seeds 1, Starts 0
Variety
When you are shopping for starts, you’ll likely find the most popular varieties for your region at a greenhouse. These tend to be successful, are adapted to your area, and are relatively easy to grow. Some examples you’ll find in Pennsylvania are Amish paste and Brandywine tomatoes, Straight 8 cucumbers, and California Wonder bell peppers. Most greenhouses will have these varieties available as starts. You may find some more “exotic” varieties, such as habanero peppers or a non-red variety of tomato, but greenhouses will stock the varieties that sell. 3-4 varieties per vegetable are typically the upper end of what you’ll find.
When you buy seeds, there are many varieties to consider. Even displays in stores like Lowes will have up to 10 varieties per vegetable. For tomatoes, you’ll find several varieties of cherry, beefsteak, and paste tomatoes. For cucumbers, you’ll typically find a few different pickling and slicing varieties. Just today, the display in Lowes had ornamental corn seeds, something I’ve never seen in a store before. You have a lot of options to find the seed that best fits your needs. Then, when you expand to purchasing seeds online or from catalogs, you’ll have dozens of varieties to pick from for each vegetable, including organic and heirloom.
Seed Starting
That many choices can be both positive and negative. If you want the chance to buy heirloom varieties that you’re unlikely to find starts for, it’s a positive. But if you’re just starting out and can become overwhelmed by how many options there are, it’s a negative. Ultimately, I think having more options is a good thing, so I’m going to give this one to seeds as well, but there’s an argument for starts.
Seeds 2, Starts 0
Necessary Equipment
When you buy starts, you don’t really need anything else assuming you have a garden or container. You’ll also need soil, fertilizer, and tools for transplanting and watering. Those are all items that you’ll also need for seeds, though, so I don’t count them for the purposes of this post. So, like I said, once you buy the starts, you have everything you need.
Seeds, meanwhile, need a bit of equipment. You’ll have to have seed-starting cells and a starting mix of soil or compressed and dehydrated soil pods that expand when water is added. This is where the seeds will go. In some cases, you’ll need multiple cell sizes for different plants and to transplant them as needed when growing. Those cells need a tray and potentially a dome to sit in. The cells are placed on top of the tray, which provides a place for water to drain, and under the dome, which holds in moisture, creating a greenhouse effect.
You then need a heat mat and grow light to help with germination. The heat mat is used at the beginning to heat the soil so the seeds can germinate, while the grow light helps the young plants grow through photosynthesis. Neither item has to be expensive: You can get a 10″ x 20″ heat mat for $12 and a grow light for $14, both on Amazon. Finally, you’ll need a surface to set everything on, an extension cord and power supply, and the room for all the seed-starting supplies for several months. None of the items are expensive, but more is needed to start seeds than transplanting starts. In this case, starts require far less equipment.
Seeds 2, Starts 1
How Easy Is It?
Which one is more complicated? This category is an easy win for starts. With them, you purchase them, bring them home, and when the soil and weather are right, plant them in your garden. Once they’re in the ground, it’s the same as starting from seed. You do need to be careful when picking your starts, but most of the hard work has already been done when you buy the start.
Seeds, meanwhile, can be complicated. You have to track a lot of information, including how long each seed takes to germinate, how resistant to frost each is, and whether a seed can be directly sown or needs to be started indoors. This information helps you know when the seeds should be started. With that information, you then need to go through the process of actually starting the seeds. You have to prep your starting cells, choose the proper starting mix, and sow the seeds at the proper depth. After the seeds have germinated, the seedlings will need to be thinned so that plants aren’t competing for nutrients in the same space. A lot of the seedlings will also need to be transplanted into a larger cell before eventually being moved into your garden. It is quite a bit of work and typically requires daily monitoring. As you can tell, starts are much easier.
Seeds 2, Starts 2
Time Commitment
This is connected to how easy each is, but I wanted to touch on how much of a time commitment they are. We’ll go over starts first. The most time-consuming part of transplanting starts is going to the greenhouse and buying them. Traveling to the greenhouse and walking around all the tables is a time commitment, but it is nothing compared to seed-starting.
Starting seeds can take months when you factor in the time it takes to look through catalogs and wait for the seeds to arrive. Peppers are a perfect example of how long seed-starting can take. Because they take a long time to grow, need hot weather to mature, and won’t survive a frost, they should be started up to 10 weeks before the last frost. Around here, that date is May 15, so they can be started now. That is a major time investment and requires a lot of planning.
Starts will win this category, but to be honest, a time aspect of transplants that I’m not a fan of is how long you have to wait to buy them. A pepper start shouldn’t be purchased until after the last frost, and waiting that long makes me nervous. What if the greenhouse doesn’t have the variety you want?
Seeds 2, Starts 3
Control
This category is a bit weird, but I like knowing everything I can about the plants I’m growing. With starts, you don’t have control over how they were started as seeds. That means not having knowledge of the starting mix that was used or if the plant was transplanted before, and if it was, did it experience any root shock? If you’re interested in seed-saving, has the plant been isolated to avoid cross-pollination? That level of control may not be important to some, but I value it.
I like the peace of mind that comes with knowing that our starting mix has proper drainage, that the seedlings are always in the proper cells, and that the strongest plants are kept when thinning them out. I also like being able to transplant the young plants into the garden after a hardening-off process and when they’re smaller than you find at a greenhouse. When plants are younger, there is a reduced risk of root shock when transplanting. Therefore, I’m giving this category to seeds.
Seeds 3, Starts 3
Do What Is Best for You
I have to admit, I was surprised by how this post progressed. I fully anticipated at the start that this would be an easy win for seeds and that I’d be looking for ways to make it more even. Instead, it ended in a draw based on the number of categories each won. I still give seeds the edge because I place more value on the categories they won, though. I think cost, variety, and the peace of mind that comes with seeing the process through from sowing to harvesting are more important than how easy it is to buy starts.
Choosing between seeds and starts is a personal preference. If you’re just starting out and unsure if you want to invest in seed-starting equipment, transplants are a great option. However, if you want to grow heirloom varieties and are confident you’ll want to garden on an annual basis, seeds are the best bet. You can also buy a combination of seeds and starts. My dad has done that for years. Do you have a preference between seeds and starts? I’d love to hear from you.
Tomatoes, Beets, Beans Up from the ground, watch them grow Decision Fatigue
The above poem was a bit of an homage to James May who ended each episode of his Amazon series Our Man in Japan with a Haiku. I’m not overly good at them but find them a joy to write. The point of that Haiku, and this post, is to discuss the difficult decision of choosing what seeds to buy and grow.
So Many Seeds!
In our previous gardening post, I covered the seed catalogs that we requested and reviewed the ones we ordered from – 7 of them. In total, we ordered 82 seed packets and got an additional 3 for free from Baker Creek. A rough estimate shows that the companies we ordered from are offering more than 5,800 seed varieties this year. So, we ordered less than 2 percent of the seeds we looked at. It’s a lot, and toward the end, all of the seeds sound the same.
Where to Start
The first thing Magz and I did when thinking about seeds was to figure out what types of vegetables we were interested in. We knew we wanted to grow tomatoes, cucumbers, sweet peppers, beets, potatoes, and carrots. We also have experience growing beans, corn, melons, peas, and pumpkins and wanted to give them another go. In the past, we grew all of these in containers and want the chance to grow them in a more traditional, in-ground garden.
There are also a lot of new seeds we’re going to try:
This winter, we’ve remembered how much we enjoy eating broccoli and want to have it fresh throughout the summer.
Aldi sells an avocado tomatillo green salsa that we’ve been buying for years and are going to try growing tomatillos.
Similarly, ground cherries sound very tasty and, like tomatillos, are husk tomatoes.
We love to cook Asian food and want to give different greens and cabbages a try. These include mustard greens, bok choy, and bunching onions.
At the last minute, I noticed that Baker Creek sells Scotch Bonnet pepper seeds. Scotch Bonnet peppers are used in Caribbean jerk marinade and are tough to find in our local grocery stores. We’re going to grow those to give us an authentic flavor.
Similar to Asian greens and cabbage, we’re going to give radishes and turnips a try. We have a great climate for these and both are healthy. Also, I think Animal Crossing (Stalk Market) and Stardew Valley may have influenced our decision.
Finally, we get to squash. We have been eating a lot of green and yellow zucchini this winter, and both grow very well in our region (6A). We also like eggplant and are going to give a couple of winter squash varieties a go. These are similar to pumpkins but are technically squash.
Choosing What Varieties to Grow
Once you determine what vegetables you want to grow, you have to decide what varieties to grow. I’ll go over some of the decisions for each vegetable/plant as well as what seeds we purchased. I didn’t include radishes, turnips, Asian greens, or cabbages in this list because I’m not familiar enough with growing them to discuss the decisions you need to make when picking seeds.
Beans
Decisions to Make:
Bush vs. Pole: This refers to how the bean plant grows. Bush plants have a bushy growing habit, staying compact and growing their beans in bunches. Pole beans, also known as runners, require trellising or another type of support that the plant’s vines will climb. Some varieties can climb 8-10 feet. Historically, Native Americans would grow their beans at the base of corn plants because the bean’s vines would climb the corn stalks.
Snap vs. Shelling: Snap beans are typically eaten fresh or stored via canning, freezing, or pickling. Green beans are snap beans. Shelling beans are also called drying beans and are left on the vine for the pods to dry. Once dried, they are shelled, the beans are removed, and stored. Black beans, pinto beans, and navy beans are all of the drying variety. They need to be rehydrated before cooking and consuming.
There is also edamame or soybeans. These grow similar to bush beans; however, you shouldn’t eat the shells.
What We Picked:
Provider Green Beans – A variety that’s been around for five decades and is a staple in American gardens. We got ours from Pinetree Gardens.
Red Swan Snap Bean – Another bush variety with a red pod and green beans inside. These came from Baker Creek but were bred by Robert Lobitz.
Jamapa Dry Bean – A style of black bean used as a side dish with tacos or in Frijoles Negros. This seed is similar to the popular Black Turtle Beans but originates from Veracruz, Mexico. We got our seeds from Southern Exposure Seed Exchange.
Kebarika Dry Bean – Another bush variety, this bean comes from Kenya. Produces a purple and white speckled bean. Can also be consumed fresh if picked in time. These also came from Southern Exposure.
Chinese Red Noodle Long Bean – A Chinese heirloom that produces pods around 18 inches long. The plant has to be trellised as the vines can reach 8-10 feet. Bought from Baker Creek.
Beets
Decisions to Make:
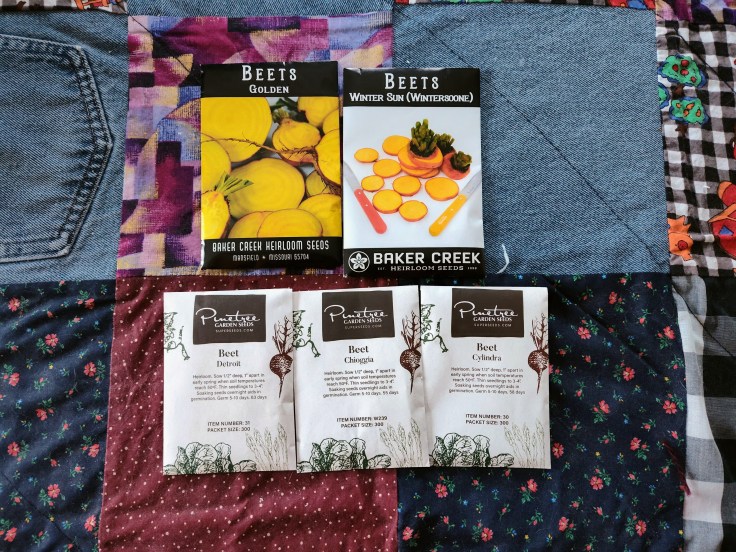
Color: Red beets are the most common in the United States. They’re consumed fresh, cooked, and canned/pickled. Golden beets are typically more mild than red beets. White beets can either be albino versions of red beets or sugar beets, which are used to make beet sugar. Finally, there is a specialty beet called Chioggia, or candy striped. The root has alternating white and red stripes and is beautiful when sliced.
What We Picked:
Chioggia – As mentioned above, this variety is also known as the candy-striped beet. It’s an Italian heirloom variety that dates back to the 1840s. We got our seeds from Pinetree Gardens.
Cylindra – This variety has more of a carrot shape than the traditional globe shape of most beets. Their roots can reach 6-8 inches deep. A Danish heirloom that dates back to the late 19th century. Ours also came from Pinetree Gardens.
Detroit Red – The Detroit Red is the most popular beet grown in the United States and is considered the standard for home gardeners. It can be eaten fresh, canned, and frozen. Once again, ours came from Pinetree Gardens.
Golden – Similar to the Detroit Red but won’t stain your hands, clothing, counter, or cutting board. We bought ours from Baker Creek.
Wintersonne – Also known as Winter Sun, this variety is a Swiss heirloom. It’s sweet and earthy but extra crunchy. This seed also came from Baker Creek.
Broccoli
Decisions to Make:
Broccoli: I’m unsure if this deserves a more specific name, but by broccoli, I’m referring to the plant that produces green heads.
Broccoli Raab: Spicier than regular broccoli and doesn’t form heads. Matures much quicker.
What We Picked:
Calabrese – The Calabrese broccoli has a relatively compact plant and produces a 3-6 inch main head with multiple smaller side heads. It originates from Italy and arrived in America in the 1800s. Our seeds were purchased from Pinetree Gardens.
Carrots
Decisions to Make:
Orange vs. Specialty Colors: We typically think of carrots as orange because that’s what’s in our grocery stores, and it’s what Bugs Bunny ate (side note: rabbits shouldn’t have a lot of carrots as they’re high in sugar). However, the first carrots were actually purple. If you’re looking for the traditional carrot, you can’t go wrong with orange, but if you’re interested in experimenting, growing purple, red, or yellow carrots can be a lot of fun. Non-orange carrots even have different nutritional benefits.
Early vs. Main Season: Early season and main season correspond to how long it takes the carrot to reach maturity. Early-season carrots can take between 50 and 70 days to mature, grow fast, and tend to be shorter. These are great carrots for Northern gardens and in containers. Main-season carrots can take anywhere from 55 days all the way up to 100 days. These tend to have deep roots and store better. Grow some of both types and succession garden to have carrots all season.
What We Picked:
Black Nebula – A deep purple main-season carrot that takes 70 days to mature. The roots grow to 6-8 inches in length and the color is so rich that it can be used as a dye. We bought ours from Pinetree Gardens.
Bollin – An orange main-season carrot that takes 75 days to mature. Its roots also grow to 6-8 inches in length and have great storage properties. It matures about 20 days sooner than similar varieties. These seeds came from High Mowing Seeds.
Dragon – A beautifully colorful carrot that is reddish-purple on the outside but orange inside. It takes 85 days to mature and grows 7-inch roots. These came from Pinetree Gardens.
Little Finger – An early-season carrot that only grows to about 3 1/2 inches long and matures in 60 days. We’re planting it because it can be grown in succession and can be planted close together. These also came from Pinetree Gardens.
Uzbek Golden – The Uzbek Golden carrot hails from Central Asia and is an important ingredient in making plov, one of the most famous dishes in the region. It’s golden in color and has a consistent shape that doesn’t taper like most carrots. Our seeds came from Baker Creek.
Corn
Decisions to Make:
Sweet vs. Popcorn vs. Milling: Most home gardeners will grow sweet corn, but there are also popcorn and milling/flint varieties. Sweet corn is eaten fresh or preserved, popcorn is dried and popped, and milling corn is dried and ground for cornmeal or flour. There are also some ornamental varieties that are dried and used as decorations during the fall. Within the family of sweet corn, there are bi-color, yellow, and white kernels as well as different levels of sweetness. Traditional sweet corn is sweet but not overpowering, but we’ve since developed hybrid varieties that are super sweet.
Stalk Height: This may seem like a weird category, but it is important depending on your garden’s location. Previously, we had some success with growing a shorter, 4-5 foot variety in containers. The roots took and the stalks grew, but they didn’t reach maximum height and the ears didn’t fill out as much as we would have liked. If you have a well-established garden with loose soil that is rich in nitrogen, you can grow corn with stalks greater than 7 feet tall. How much wind your garden receives also plays a role in how tall you want your stalks to be. If your area isn’t windy or you have a wind barrier such as sunflowers, a solid fence, or a building, you can have taller stalks than a garden with no protection.
Kernel Color: Most sweet corn varieties fall into one of three categories: yellow, white, and bi-color (yellow & white); however, some heirloom varieties will have dark, blue/black kernels. Flint, popcorn, and ornamental varieties can be a wide range of colors, including blue, red, purple, orange, black, and brown. Heirloom varieties are incredibly colorful.
What We Picked:
Hopi Blue – A flint/flour variety that is one of the oldest grown in North America. Early versions of it date back 800 years in Northern Arizona. The Hopis used it to make ceremonial bread. It has tall 9-foot stalks and grows 8-10 inch ears. We bought ours from Fedco, who pays Indigenous royalties on it.
Black Iroquois, Mexican Sweet – This is the heirloom sweet variety referenced above in the kernel color section. The kernels are white for most of the growing process and turn black/blue late in the milk stage. It’s a shorter plant at 5 1/2 feet. The seed dates back to the 1860s in Upstate New York and likely originates from the Iroquois Black Puckers. Our seeds came from Southern Exposure.
Butter and Sugar – A classic bi-color sweet corn, Butter and Sugar is one of the most popular seeds available. The stalks are 5-6 feet tall and the ears are 8 inches long. We bought ours from NE Seed.
Cucumbers
Decisions to Make:
Bush vs. Vine: As discussed with beans, this has to do with the growing habit. Bush cucumber plants stay relatively contained and compact. They can grow a couple of feet tall and may need a stake for support but don’t sprawl. Vining cucumbers, on the other hand, do. Their vines can spread 7 feet out from the hill and take over entire sections of your garden. Bush plants tend to have smaller fruit than vining plants.
Pickling vs. Slicing: This decision is pretty straightforward: Do you want your cucumbers to mostly be for fresh eating (slicing) or pickling. Pickling cukes tend to be crunchier than slicing cukes, but both types can be eaten fresh and pickled. To be safe, you should grow both and eat a lot of cucumbers.
Specialty Cucumbers: These are cucumbers that either aren’t green in color, don’t have a traditional cucumber shape, or don’t taste like most cucumbers. I recommend growing these in addition to a pickling or slicing cucumber but not as a replacement.
What We Picked:
Boston Pickling – An heirloom variety that dates back to the late 19th century. Grows on a vine and remains crunchy when pickled. Small enough to be pickled whole but can still be sliced into spears or chips. Ours came from Southern Exposure.
Tendergreen – A slicing cucumber that is nearly a century old, Tendergreen grows on a vine. It can be harvested young for pickling or left to mature to be a slicer. It’s a burpless variety that doesn’t have the aftertaste of other cucumbers that some find off-putting. Our seeds came from NE Seed.
Richmond Green Apple – A specialty that’s an heirloom from Australia. Harvested when it’s the size of a lemon and is green with white stripes like a watermelon. The texture is crispy like an apple. We’re very excited to grow this variety. Our seeds come from Baker Creek.
Melons
Decisions to Make:
Picking a Type to Grow: There are a lot of fruits within the melon family, including cantaloupes, muskmelons, honeydew, watermelons, and varieties popular around the world that I’m uncertain how to categorize. As a side note, most of the fruit we call cantaloupes in the United States aren’t actually cantaloupes. They’re muskmelons. Muskmelon refers to the larger family of fruit, while cantaloupe refers to a single variety. Within each type of melon are a seemingly-endless number of seed varieties to pick from.
Will it Grow Where You Live?: Most melons require hot temperatures and the right climate to fully mature. That’s why the majority of the watermelons we see in grocery stores are grown in Florida. The state’s climate and sandy soil make for a perfect environment. However, that doesn’t mean you can’t have success in other locations. Just take note of the temperature and soil requirements of a seed before purchasing. If you live in a Northern climate, you can also give the seeds a head start by starting them indoors.
What We Picked:
Ali Baba Watermelon – This heirloom comes from the Middle East, with these seeds originally being sent from an Iraqi man over two decades ago. This seed produces fruit in the 12-30 pound range with a light green rind. They store exceptionally well and grow in a variety of conditions. Said to be one of the best-tasting watermelons. This seed came from Baker Creek.
Noir des Carmes Cantaloupe – This is a true cantaloupe that dates back to before 1787 and was named for the Carmelite monks in France. Grows 2-3 pound fruits that transform greenish-black to orange and yellow when ripe. Bred to successfully grow in Northern climates. These seeds are organic and come from Southern Exposure.
Tigger Melon – This melon doesn’t fit into a pre-existing category. It has a creamy white flesh with a fiery red and orange skin. Much smaller than other melons at only 1 pound but has high yields. It’s an Armenian heirloom that grows in mountainous valleys along the Tigris River. Our seeds were purchased from Baker Creek.
Kajari Melon – Another melon that doesn’t really fit into a category, although it does have green flesh like honeydew. This Indian heirloom comes from the Punjab region and produces an abundance of 2-pound fruits that have orange and green-striped skin. These too come from Baker Creek.
Peas
Decisions to Make:
Shell vs. Snow vs. Snap: Shelling peas should be removed from the shell prior to eating them. The shells aren’t toxic but fibrous and difficult to consume and digest. Snow peas are pods that are harvested while the peas are immature, so the pods remain flat. Snap peas have fully mature peas inside an edible pod.
What We Picked:
Avalanche Snow Pea – These pods are 4-5 inches long on 3 to 3 1/2 foot plants. A very prolific variety that doesn’t require trellising. Our seeds come from High Mowing.
Peppers
Decisions to Make:
Sweet vs. Hot: Do you like sweet or hot peppers? Sweet peppers are self-explanatory, but there are many levels of heat with hot peppers. At the low end are jalapenos that are used in salsas, eaten fresh, or stuffed, while at the upper end is Pepper X, the hottest pepper in the world. Personally, I like spicy food but want flavor, so I typically top out with habaneros or scotch bonnets. Keep in mind that peppers love hot weather, and the longer they can stay on the vine in hot weather, the sweeter or hotter they become.
Shape of the Pepper: Sweet peppers tend to have the classic “bell” shape, but there are sweet peppers that have the shape of hot peppers.
Color: Sweet bell peppers can come in a variety of colors with the most popular being green, yellow, orange, and red. There are also some exotic colors like purple, brown, and white. All bell peppers start green and mature into their final color the longer they’re on the vine. So, green bell peppers are more bitter than red ones. Even bell peppers that are bred to stay green when mature will eventually turn red if left on the plant for too long. Hot peppers also come in many colors. Jalapenos are green, wax peppers are yellow, and habaneros can be many colors.
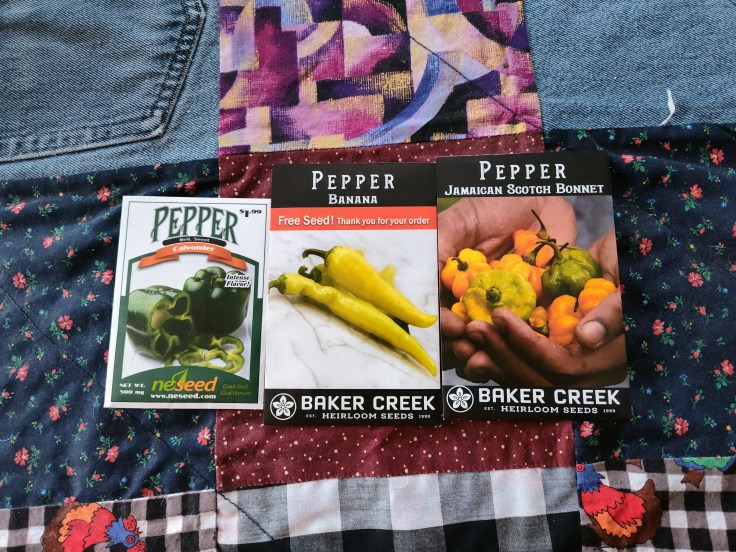
What We Picked:
California Wonder – A classic red bell pepper that has been bred to have strong disease resistance. Great when eaten fresh but also large enough to be stuffed. Our seeds were purchased from NE Seed.
Jamaican Scotch Bonnet – Scotch bonnet peppers and seeds are not easy to find where we live. They’re a vital ingredient in Caribbean cooking, including Jamaican jerk marinade. While habaneros are often used as a substitute, they’re not authentic to the culture and cuisine. We found our seeds at Baker Creek and are from a Jamaican farmer.
Banana – This seed was one of the free packets from Baker Creek. I love banana peppers, so we’ll definitely grow this seed. This variety of banana pepper is a sweet Hungarian wax with a pale green color that will develop into a red-orange if left on the plant. Despite its name, the Hungarian wax pepper originated in North America and was introduced to Central Europe in the 1500s.
Potatoes
Decisions to Make:
Early vs. Mid vs. Late Season: This refers to how long it takes for the potatoes to grow and when they’ll be ready for harvesting. Early-season potatoes can take between 65 and 80 days, mid-season potatoes between 80 and 90, and late-season potatoes more than 90 days. Early potatoes are great for fresh eating, midseasons have some storage properties but are generally a quality all-around potato, and late potatoes do well in long-term storage and can last through winter.
Color: Just like the potatoes you can buy in-store, you can buy seed potatoes for red-skin and yellow-skin potatoes. There are also purple-skinned potatoes, blue-skinned potatoes, and even potatoes with colorful flesh. Colorful potatoes are fun to grow, but the flavor isn’t different from white or yellow potatoes. They make for some interesting roasted potatoes or fries, but the color does leach out when placed in water.
What We Picked:
Dark Red Noland – These are our early potatoes for this year’s garden. They are a red-skinned potato with white flesh and were bred to grow well in Northern climates. They were developed by the North Dakota Agricultural College in 1957. Our seed potatoes were purchased from High Mowing.
Huckleberry Gold – A mid-season potato with a purple skin and yellow flesh, these potatoes are similar to Yukon Golds but are more resistant to tuber malfunctions and hollow heart. These seed potatoes were also bought from High Mowing.
Red Pontiac – We bought these to be our late-season potatoes. They have a red skin and white flesh and have a history of producing large yields. They store very well and will keep long into winter. They were first introduced in 1945 and are named after Chief Pontiac, an Odawa tribe war chief from the 18th century. These seed potatoes were bought from Fedco and a portion of the money is given to a Wabanaki project in Maine via Indigenous royalties.
Squash
Decisions to Make:
Summer vs. Winter: The most important decision to make when choosing squash seeds is summer vs. winter squash. Summer squash are green and yellow zucchini (yellow zucchini is often called yellow squash) and patty pans. I would also put eggplant in this category even though they aren’t technically squash. Winter squash varieties include acorn, butternut, buttercup, spaghetti, kabocha, and hubbard. Summer and winter refer to the time of the season when they’re harvested. Summer squash grow quickly (40-60 days) and are harvested before they’re fully mature, so their skin is still soft and edible. Winter squash, however, grow slower and fully ripen on the vine (80-100+ days). They develop a tough skin that is inedible but allows for the squash to store through winter in the right conditions. Pumpkins are also a type of winter squash.
Use: Summer squash is used fresh and can be consumed raw. We typically use green and yellow zucchini Asian stir-fries or rice bowls, but a lot of people will marinade and grill them or batter and fry them. Zucchini bread is also very popular and eggplant is made into eggplant parmesan. Meanwhile, winter squashes typically have to be roasted to be soft enough to eat.
What We Picked:
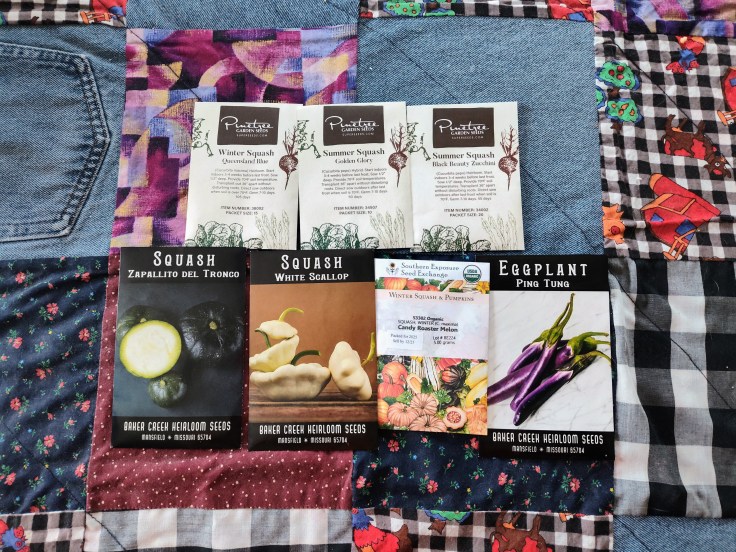
Ping Tung Eggplant – These eggplants are from Taiwan and have a long, cylindrical shape rather than the bell shape of most eggplants. This variety is an heirloom that was first introduced to the U.S. in the mid-1900s. Our seeds came from Baker Creek.
Zapallito Del Tronco – A green squash that has the shape of a small pumpkin (roughly 2-4 inches in diameter), this squash is also referred to as an avocado squash due to its creamy texture. It’s an Argentinian heirloom. These seeds also came from Baker Creek.
Candy Roaster Melon Winter Squash – Truly an American heirloom, this melon/squash was grown by the Cherokee people in Western North Carolina, and they shared the seeds with the Europeans who settled in the area. According to West Virginia University, there are 40 known varieties of this squash and 4 different shapes they can have. Our variety is pink and orange with some blue and green and has a pumpkin shape. The seed comes from Southern Exposure and is part of Slow Food USA’s Ark of Taste.
Queensland Blue Winter Squash – A flattened round squash that can grow up to 20 pounds. A native of Australia that dates back to the 1880s, this seed arrived in the U.S. in the 1930s. The skin is a lovely blue color, but the flesh remains orange like a pumpkin. These seeds came from Pinetree Gardens.
Golden Glory – A classic, straight variety of yellow zucchini. It grows fast at 50 days and produces lots of fruits 7-8 inches long. Our seeds came from Pinetree Gardens.
Black Beauty Zucchini – Iconic zucchini shape and color with dark green skin and firm flesh. An heirloom variety that dates back to the 1920s, Black Beauty grows fast at 55 days with 5-6 inch fruits. Our seeds came from Pinetree Gardens.
White Scallop – A scallop-shaped squash that grows fast at 50 days. A very old Native American heirloom with Europeans first depicting it as far back as the 1590s. An abundant crop that will produce a lot of fruit and has an excellent flavor profile. These seeds came from Baker Creek.
Seminole Pumpkin – An heirloom pumpkin variety that dates back to the 1500s and was grown by the Seminole tribe in Florida. Grows extremely well in hot, humid conditions and will produce 6-8 inch fruits that can store up to 1 year at room temperature. Our seeds are organic and were purchased from Southern Exposure.
Tomatoes
Decisions to Make:
What do you want to grow tomatoes for?: This question will determine what seeds you’ll want to grow. If you want to make sauce or tomato paste, you’ll want paste tomatoes. These tomatoes have fewer seeds and less water content than other tomatoes, producing a less watery sauce. If you want tomatoes for fresh eating, either as a snack or on salads, a cherry, grape, or pear tomato is your best option. These tomatoes are bite-sized and don’t need to be cut and grow abundantly. If you want a tomato that can be sliced for sandwiches, cut up for salads, or stuffed and grilled, you’ll want a larger, beefsteak tomato.
Determinate vs. Indeterminate: Determinate tomato plants have been bred to only grow to a certain height and often produce all of their fruits at one time. Often, paste tomatoes are determinates because you want as much fruit at one time as possible for sauce purposes. These plants usually don’t require support and only a stake instead of a cage when they do. Indeterminates, however, can grow very tall and need a cage or other support system to hold them up. Which style you choose will often depend on how much room you have to grow them in. If you’re growing in containers, you’ll want determinate varieties, but if you have an in-ground garden, you can grow either type.
Color: Do you like the traditional bright red tomato color do you want a rainbow of colors? Not many people are aware that they can buy yellow, orange, purple, blue, purple, and even green tomatoes. Growing a variety of colors can make for a beautiful garden.
What We Picked:
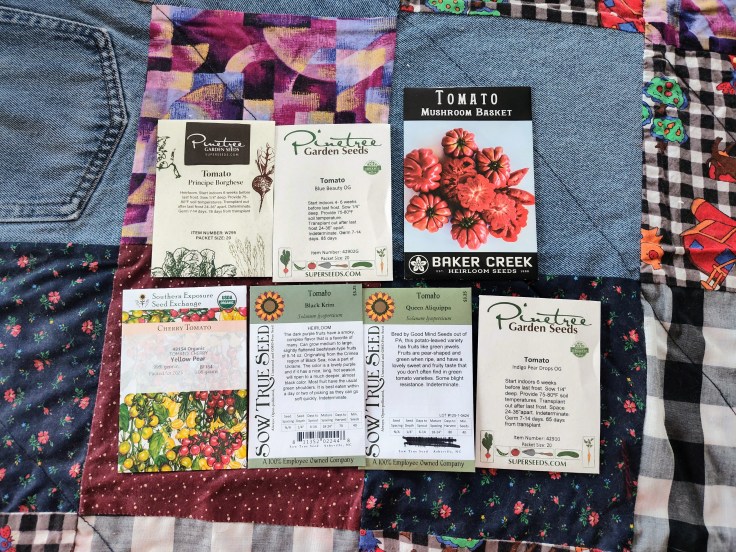
Yellow Pear – An heirloom variety that dates back to before the 18th century. An indeterminate variety that produces a lot of fruit and is resistant to heat. Our seeds are organic and were purchased from Southern Exposure.
Black Krim – An heirloom slicing tomato that originated in the Crimea region of Ukraine along the Black Sea. It’s an indeterminate variety that produces an abundance of dark purple, nearly black fruit that darken as they ripen. These seeds come from Sow True Seeds.
Queen Aliquippa – Another heirloom variety, this time from Pennsylvania. It was named after Queen Aliquippa, a leader of the Seneca tribe in the 1700s. This variety stays green even when ripe. An indeterminate variety that produces pear-shaped fruits. These seeds were also purchased from Sow True Seeds.
Indigo Pear Drop – A pear-shaped tomato with lots of orange fruit that ripen to have purple shoulders. An indeterminate variety from Pinetree Gardens.
Principe Borghese – An Italian heirloom that can be used for pastes and sauces or left out for sun-dried tomatoes. This variety dates back to the early 20th century in Southern Italy. Our seeds come from Pinetree Gardens.
Blue Beauty – A moderately-sized slicing tomato that ripens from red to dark purple. These were developed in the 1960s at Oregon State University. An indeterminate variety. These too came from Pinetree Gardens.
Mushroom Basket – The only beefsteak-style tomato that we bought, the Mushroom Basket tomato originally came from Russia and was bred in the late 1800s. The Mushroom Basket has fewer seeds than most beefsteak tomatoes. Grows fast at 75 days. Indeterminate variety. These seeds came from Baker Creek.
Have you ever grown any of these seeds? If so, did you have success? We’d love to hear about the seeds you’re growing this year and what your favorites are.
A difficult decision when planning our garden for this year was which seed companies to purchase from. There are so many of them. Companies like Burpee, Ferry-Morse, Gurney’s, and Livingston have been around for over 100 years and have displays in Wal-Mart, Tractor Supply, Agway, and many other stores. They’re the companies that my dad and grandparents bought from and still do a very good job.
There are also many smaller companies that have popped up in the past 50 years that are focused on offering organic and non-GMO seeds. Some of the more well-known ones are Fedco, Territorial, and Baker Creek. These companies also usually focus on seed-saving and heirloom varieties. These companies tend to have a more local following but have grown in popularity thanks to YouTube gardening videos and blogs. With so many options, who do you choose?
Requesting Catalogs
When we gardened in the past, we ordered from Territorial, Fedco, and Baker Creek and bought Burpee, Livingston, and Ferry-Morse in person. We had successes and failures with all of them and don’t have an issue with any of the companies. Once we decided to grow a garden this year, we started casually talking about what we wanted to grow and what a garden could look like. Things didn’t get serious until November when I remembered that we needed to request catalogs. Maggie and I are both visual people who prefer the older system of looking at physical catalogs. I began by searching for companies that send free seed catalogs.
Side note: I’m never looking to take advantage of these companies. We won’t request catalogs from companies next year that we didn’t purchase seeds from this year. At the same time, though, we don’t want to pay for a catalog unless we’re certain to purchase from the company. I like when companies are willing to print and send their catalogs for free.
A Google search led me to a Farmer’s Almanac page that listed over 40 companies with free catalogs. Some of the listings were outdated, while other companies focused solely on flowers and trees. After filtering it down, we had a list of 10 companies:
Baker Creek
Fedco
High Mowing Seeds
NE Seed
Pinetree Gardens
Rohrer
Sow True Seeds
Territorial
Southern Exposure
Seed Savers Exchange
I requested a catalog from each and waited. If you’ve requested seed catalogs in the past, you’ll know that the time period between American Thanksgiving and New Year’s Day is amazing because that’s when the majority of catalogs arrive. The first to arrive this year was Fedco, which was in our mailbox in late November, and the last was Territorial, which arrived after New Year’s Day. It got to the point where we were receiving catalogs that I forgot I requested.
The Joy of Seed Catalogs
Flipping through seed catalogs is one of the most enjoyable experiences of gardening. Maggie and I love the joy of having something on the television for background noise (nothing too engaging), each grabbing a catalog and a pen, and marking off seeds we’re interested in. I recommend using a pen to initialize any seeds you’re interested in. It’s a great way to not forget the ones you see, which is easy to do when looking at multiple catalogs or browsing a website.
When looking at multiple seed catalogs, you’ll find a lot of the same varieties. Almost every company sells California Wonder Bell Peppers, Amish Paste Tomatoes, and Provider Bush Beans. Those are all common and productive seeds that have been around for decades. Companies sell them because they have high success rates and good disease/pest resistance. What you’ll learn is that different companies have different niches. For example, High Mowing Seeds, which is based in Vermont, sells only organic seeds. Meanwhile, Baker Creek only sells heirloom varieties. Also, the company’s location plays a part in its offerings. Fedco and Pinetree Gardens, both based in Maine, sell a lot of root crops and cool weather vegetables (lettuce, spinach, turnips, greens), while Sow True Seeds (North Carolina) and Southern Exposure (Virginia) sell a lot of okra, melons, and southern peas.
Then there is the catalog’s design. Seed catalogs are great because each is unique. Does the company focus on the growing information, such as germination time, thinning distance, sowing depth, etc. or does it tell a story with each seed? Does each seed have an image of the grown vegetable? Does the company include all seeds in its catalog or do you need to visit their website to see everything? Do they include educational information like seed starting charts, isolation distances, or plant disease information? Finally, do they sell gardening tools, starting equipment, and soil amendments?
Who Didn’t We Buy From?
There were only two catalogs from this year’s group that we were underwhelmed by. Territorial out of Oregon had most of the same offerings as the other companies but at a higher cost. The other was Rohrer from Pennsylvania, which wasn’t expensive but also didn’t wow us. Seed Savers Exchange has a beautiful catalog and their main goal is to save seeds from going extinct. However, we didn’t buy from them because they were a bit pricey and we could find the same varieties from other companies.
What Were Our Favorites?
We bought from all the other companies listed in the bulleted list above. I’ll go over what we liked about each company and their catalog.
Baker Creek
Baker Creek offers two catalogs: a free one that is 164 pages and a 532-page version that is $14.95. We got the free version and found that it had plenty of seeds. Plus, you can look at their entire offering on their website. Their catalog is beautiful. The pictures are crisp and vibrant, the descriptions are detailed, and they offer varieties that other companies don’t. Two minor improvements could be having more growing information, such as germination time, sowing depth, etc., and how they have the seeds organized.
Their catalog is alphabetized, which is great, but some of the seeds are categorized in ways that make it hard to find things. One example is melons vs. watermelons. Both have their own sections in the catalog, while other companies keep them together. We bought a lot of seeds from Baker Creek. Their prices are reasonable, shipping was free and fast, and they include a free seed packet for every 5 or so you buy. We bought 28 seeds and got 3 free packets.
Fedco
Fedco’s catalog is one of the most interesting because it’s black and white. It looks like a 19th-century Sears and Roebuck catalog and is 175 pages, which I love. There aren’t photographed images, but instead, they use beautiful illustrations to show the plants and vegetables. Some illustrations are straightforward, while others feature fantasy or humor elements, such as wings on a Speckled Swan gourd or a T-Rex biting the leaf off Dinosaur Kale. I’m always tempted to grab colored pencils and color the pictures. Plus, they provide pictures of the vegetables on their website.
Fedco provides a wonderful explanation of each seed. They include information on the seed’s history, a description of the vegetable’s physical attributes, growing tips, disease resistance, and the seed’s breeder/keeper. This is important because some give royalties back to Indigenous tribes or to black farmers if the seed originated in Africa or is a part of black foodways. Fedco’s catalog is organized well and offers a lot of seeds. Our favorites are their potatoes and corn.
High Mowing Organic Seeds
Prior to this year, I hadn’t heard of High Mowing Organic Seeds, and I wasn’t sure if we were going to purchase from them. We love organic farming, but organic seeds can be expensive, so I was unsure if it’d be possible. As mentioned above, High Mowing is a 100 percent organic seed company based in Vermont. When the catalog arrived, I was blown away. It was 117 pages and included images for every variety, which is almost unheard of. The majority of companies have images for most seeds, but you need to visit their site to see the rest. High Mowing, though, includes clear images for every seed. The best part is that they use a common background for each vegetable. For example, all the beets are photographed against the same background, which helps to see the similarities and differences between the varieties.
The information they provide is helpful and succinct. Each vegetable has an introduction that describes soil needs, disease/pests, and transplanting information. Each variety includes the growing time, if the seed is a hybrid or is open-pollinated, if it’s an heirloom variety, and a brief description of the visual and flavor profiles. They then include a chart with the cost and quantity of each variety. It makes comparison shopping easy.
NE Seed
NE Seed is another company I hadn’t heard of prior to reading the Farmer’s Almanac page. The company is based in Connecticut and mostly sells to commercial growers, so their quantities can be massive if you’re a home gardener. However, they do sell a lot of seed packets, and their prices are amazing. Still, I wasn’t sure if we would order from them because I didn’t think it’d make sense to only order 1 or 2 seed packets from a company if we had to pay for shipping.
Their catalog is nice and easy to navigate. It’s smaller at 87 pages, but they include images for most seeds. They also organize their seeds alphabetically by vegetable and further separate them by variety. For example, in their corn section, they have bicolor, yellow, white, open-pollinated, popcorn, and ornamental. They also have a large Italian Gourmet Collection that features Italian heirloom seeds. These seeds are a bit more expensive than their regular seeds, but most companies don’t offer those varieties.
Pinetree Gardens
Pinetree Gardens is another company I hadn’t heard of before this year. Like Fedco, they’re based in Maine. For some reason, we seem to really like Maine seed companies. Pinetree is a small company that’s been around since 1979. I get the impression that it’s a family-owned company that cares about its employees, customers, and products. The catalog is 130 pages and is everything you want: quality images of every seed, good organization, simple descriptions with enough information, and clear icons for pollinators, organic, sun requirements, etc. They also offer a lot of growing supplies, teas, and bulk herbs. We were impressed and bought a lot from them. The seeds took a bit to ship, which was fine given the company’s size. They communicated with us the entire time and included personal touches in their emails.
Sow True Seeds
Another seed company we were unfamiliar with (there’s a theme here) is Sow True Seeds based in Asheville, North Carolina. Sow True is an employee-owned company that has been around since 2009. They’re devoted to only selling non-GMO seeds, offering educational opportunities, and giving back to the communities that helped to save seeds throughout history. Located in the South, they offer seed varieties that are vital to Southern cuisine and culture, including collards, okra, southern peas, and beans. They also sell varieties with interesting histories, including the Queen Aliquippa tomato, which was named for a Native American leader of the Seneca tribe who spent much of her life in Western Pennsylvania. That sold us on the company.
Their catalog is beautiful. It is shaped more like a book than a typical catalog. It is 103 pages and has lovely artwork on the cover, similar to the artwork found on some of their seed packets. The catalog is perfectly organized – everything is alphabetized and each seed type has a chart with information about planting depth, germination time, and spacing. There are descriptions of each seed and they’re clear about the number of seeds you get in each packet, which isn’t always the case. There is even a section in the middle with a planting guide for all seed types, a companion planting chart, and a seed starting guide. The only negative I have for their catalog is that they don’t include images for all seeds.
Southern Exposure Seed Exchange
Finally, the last catalog we ordered from: Southern Exposure Seed Exchange (SESE). SESE is another wonderful seed company dedicated to preservation, education, and community improvement. They do a lot of work to help the hungry and partner with a program called Plant a Row to provide for those with food insecurities in their area. That is something important to Maggie and me. SESE’s catalog is 92 pages and has the classic newspaper page feel. Maybe I’m weird, but I like the texture of flat (unglossy) pages. Their catalog is full of seeds important to Southern foodways, and they include origin and breeder information.
Southern Exposure’s catalog is also visually stunning with lovely artwork on the cover that depicts faeries and elves (maybe gnomes) stacking stones for an exterior wall of a house. The faeries have butterfly wings on their backs, and there is a massive watermelon in front being cut with a two-person crosscut saw. It’s pretty enough that we may end up framing it. They also have lovely seed packets with colorful illustrations of the fruit on a simple white background.
We Could Never Only Choose 1 Company
Maggie and I knew that we were never only going to buy from one seed company. Going into this process, we were interested in multiple companies because we wanted to buy a wide variety of seeds that couldn’t all be purchased at one company. After looking through the catalogs, we fell in love with the companies’ missions, which we wanted to support. We are pleased with the companies we purchased from. We’re also confident that we’ll continue to purchase from them moving forward.
If you’re unsure about who to purchase seeds from, I recommend determining how many choices you want to have. If you only want to grow a few plants and have the most success you can, the seed displays in Tractor Supply or a feed store are great options. They typically carry the most popular varieties with a lengthy track record of success. However, if you want to look at as many varieties as possible or are interested in heirloom varieties, I recommend requesting a few of the catalogs in this post. You’ll be able to read about the varieties, compare them, and take notes all in one place.
Do you have a favorite seed company or any experience with the ones in this post? We’d love to hear from you. Happy growing.