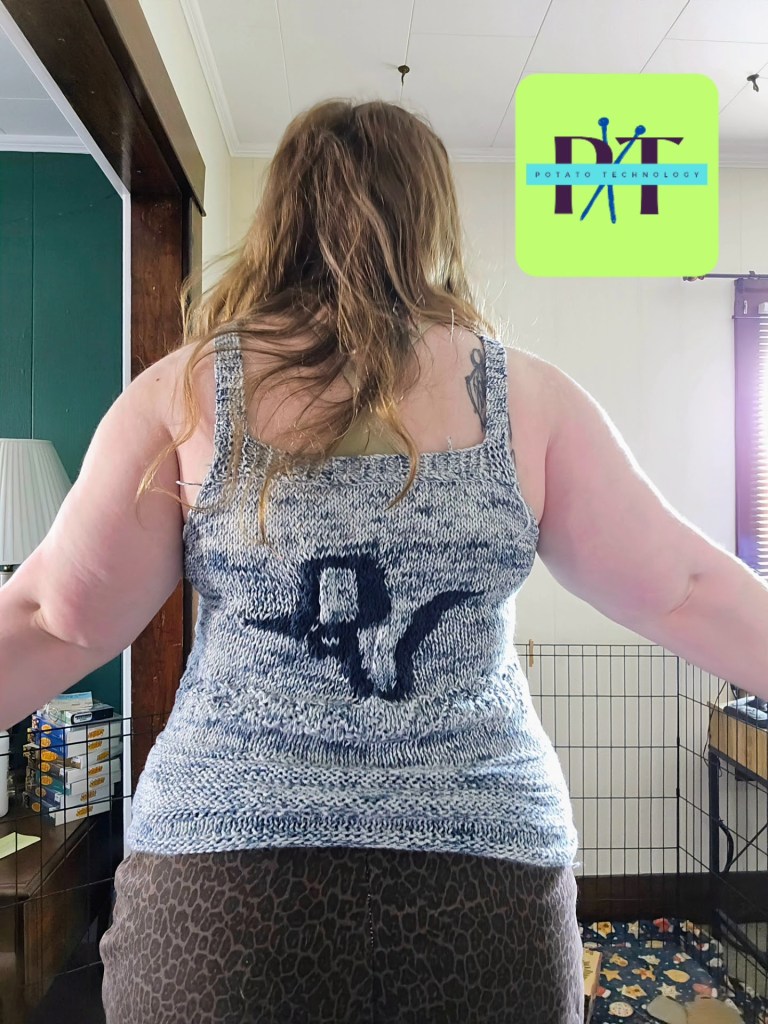
This is a follow-up to my recent post, ‘Will I Wear a Knit T-shirt?’, where I examined the fibers and wearability of a knit t-shirt and discussed whether this summer knit project could be a suitable option. Since then, I finished and got to wear a new piece of knitwear – my first knit tank top. I wore it in July, in full humidity with highs in the upper 80s to low 90s Fahrenheit. My experience surprised me – I said before that my knit t-shirts are wonderfully comfortable, but have a temperature and humidity limit for me, but the tank top surprised me!
I think it was the high pima cotton content in the Knit Picks Comfy – a 75% Pima Cotton and 25% Acrylic mixture that uplifted the breathability for me. I was melting in the hot sun, but the air flow and temperature regulation were spectacular! This tank had delicate straps but did not have a lacy stitch or open weave. It was constructed with regular knit and purl stitches, with sections that had double layers of yarn due to two sections of colorwork graphics on the front and back.
With Pima Cotton, Silk, Bamboo, or Linen as the primary fiber, or a blend of these natural fibers, I believe knit tanks are just as breathable as woven fabric, and for sure more breathable than moisture-wicking tech fabrics, which are polyester. No, I wouldn’t work out in this top, but there is something to say for a garment that is comfy and breathable for those long summer days. It was a simple stitch-up up only calling for two hanks of 100-gram worsted-weight yarn, about 240 yards, with the addition of 1/3 or 40 yards of the accent yarn, another cotton-acrylic worsted-weight blend from Loops and Threads. You can make a tank like this for 30 USD or less, and this is a size large. So if you have a small amount of yarn, you can do a lot with it!
Do you think a knit tank would be an item you would wear?
I asked myself this question last summer with genuine uncertainty. Knitting is such a cold-weather medium that a knit made to be breathable and light for warm weather seemed, well, a bit like an impractical fashion piece. I think this is an important question to ask of ourselves before we jump on a trend. Whether it is to buy a knit t-shirt or to handknit (which means you are dedicating weeks of work to a project), having the right expectation matters. Trying on a knit t-shirt beforehand helped me visualize what I was in for. Knitwear for all seasons is currently having a moment even in ready-to-wear, which makes this a great time to go try on a piece before committing to a big project.
Wearing my Grandma’s cotton knit t-shirts, although they were two sizes too small, helped me visualize knit as a process to make a fabric instead of a woolly winter garment. That’s what makes knitting and crochet extraordinary skills; they are versatile. The fiber maketh the project. The stitch maketh the airflow. Lacey, open weave? Fantastic for hot and humid days. Not so much for a pair of mittens.
To remedy this, I think fiber acquaintance is a fantastic way to learn whether a knit t-shirt is right for you. When I began knitting in 2012, I knew there was wool yarn and acrylic yarn. That was it. However, there is actually a rainbow of fiber waiting to be discovered, and the lineup sure has expanded in the last 13 years!
Cotton
Linen
Bamboo
Hemp
Pineapple
Lyocell
Rayon
Yak
Alpaca
Camel
Mohair
Cashmere
Silk
Did you know that wool has two unique properties? It helps you regulate temperature and is naturally antibacterial/antimicrobial; therefore, it inhibits bacterial growth naturally on the fiber and prevents odors, which is why it is such a great sock material! Although I wouldn’t recommend wool for summer tops, it is a remarkable fiber. There are two fibers, though, that are breathable and naturally don’t let bacteria and microbes hang around – it’s linen and silk! For fiber education and the chance to feel these materials, I recommend finding a friendly local yarn shop and talking to the experts.
Finally, I do have one possible hiccup with my current selection of hand-knit t-shirts. I can’t wear them in 85 degrees Fahrenheit weather and above with humidity, but I do believe a knit tank would fix this problem, and a lacey stitch technique in future projects will solve this. I don’t like sweating a lot in my handknits, and because I was learning with my first few tees, the knitted cotton fabric is a bit bulky. That’s my error. You know what is so cool about knitting, though? You can unravel the finished garments and try again, so I can rework these finished garments in the future. Anyway, I hope you will consider the knit t-shirt as a warm weather staple in your wardrobe, it’s a lovely way to use crochet and knitting all year round!
As a yarn enthusiast, sometimes I have many skeins of different yarn that I don’t know what to do with. This happens when I buy sale yarn, find unexpected yarn secondhand, or buy too much of one color for a project. Purchasing the right yardage is definitely a learning process!
So, how can you make your yarn stash go further and use up those skeins you don’t know what to do with? An easy fix I’ve found is to get really scrappy, lean into stripes, experiment with colorwork, and my new favorite – blending yarn by holding two strands of different yarn, even variegated yarn, to make something fresh and inspiring! This has helped me need to destash, donate, or feel weighed down by my yarn inventory.
Once you have a color story, what do you stitch up? There are the tried and true tanks, tote bags, and scrappy cardigans, but what about something outside the box?
Baskets
Small Storage Bags with Zipper
Shorts
Sailor Collar
Overalls
Mini Skirts
Koozies
Tapestry
I get stuck in the idea of knitting as wearables, but it can be used to make so many things, and at the end of the project, you’ll have something truly unique from your own hands!
One of the most satisfying ways I have found to use up random yarn is colorwork. Hints of color with scrap that add a touch of whimsy? Sign me up!
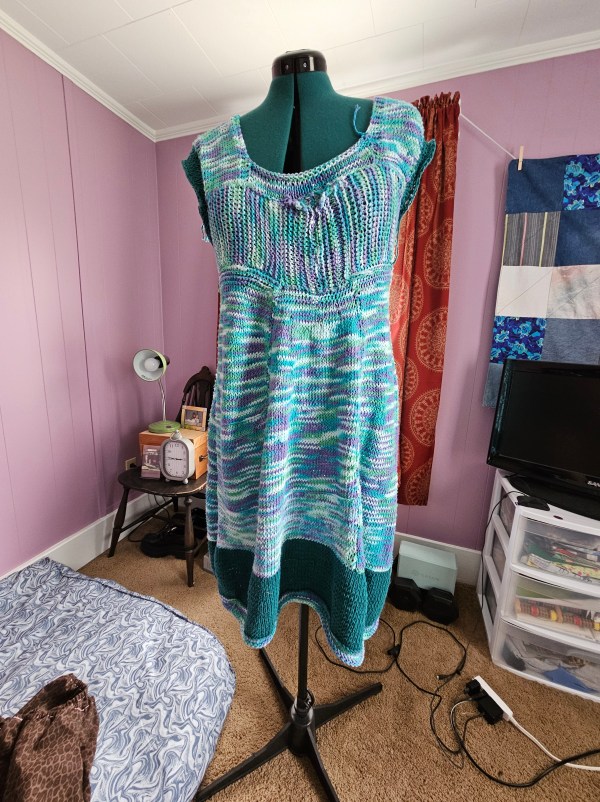
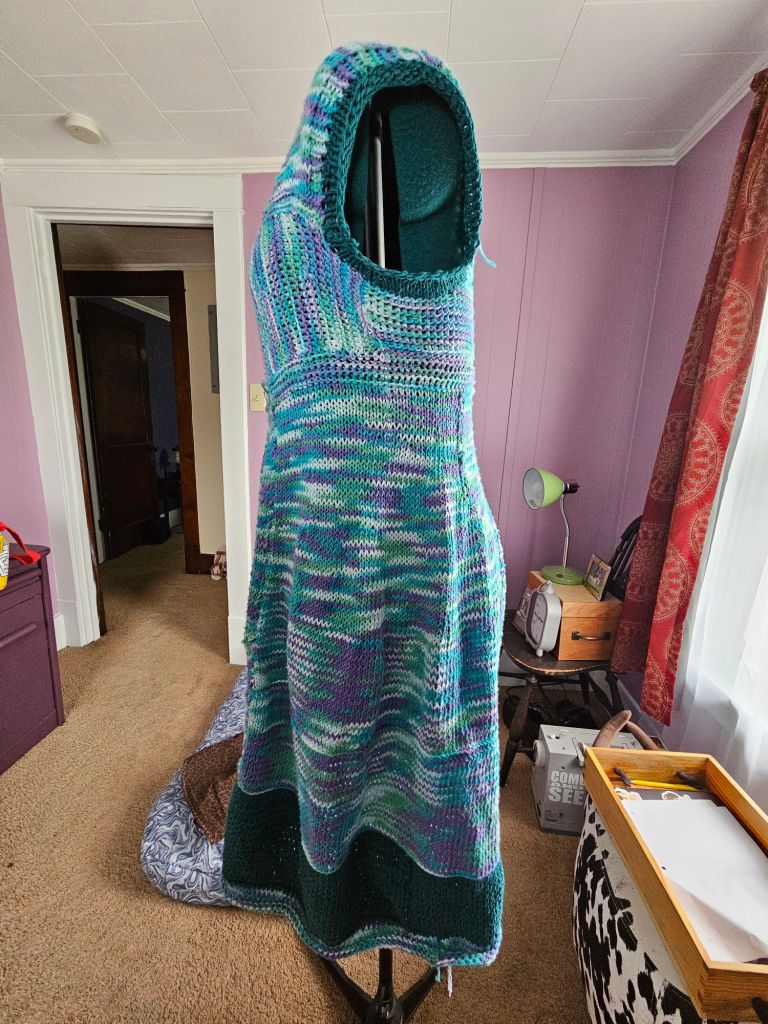
Knitting a dress, how hard can it be right? It was actually pretty managable garment as an intermediate knitter. I would not recommend unless you have made a sweater before but would definitely recommend knitting a dress if you want a soft and stretchy garment that hugs you!
Inspiration
I have made plenty of dresses over the past 5 years, but they have all been cut and sewn from fabric. Knitting kicks it up a notch, asking you to assemble the dress, but make the fabric to boot. I thought it would be silly to try until I discovered some lovely crochet designers on You Tube who make with imagination!
I was inspired by Mama Gwen of TL Yarn Crafts to give designing a knit dress a try. She makes such beautiful dresses all from self-drafted patterns in knit and crochet. Along with Dana from Blondie Knots. Her Coachella scrap two piece outfit helped me have the boost of confidence to try something new.
Materials
Last summer at Joann, before the shenanigans began, I purchased 14 Big Twist Cotton 50g skeins on a sale with the intention of knitting a top. Many months later, this yarn was sitting in my stash with my mind uncertain if the punchy color changing yarn was my cup of tea for a cotton knit top. But a dress? Yes, that could work. Did I have enough yarn though? I’d have to make it so because there was no more being sold.
Because of the circumstances, I decided this dress would be my goodbye to Big Twist.
Design
I knew from sewing, my design would need to be a dress that was either tubular or empire waist to suit my body shape. I decided to knit this on US 7 needles, straight needles. Sometimes I would shift to circular, but this was not knit in the round. With the combination of yarn minders, a measuring tape and patience this dress came together!
To start I knew I wanted the bodice to be the anchor I worked out from so I cast on stitches to work horizontally. From the bodice, I then added one strap to plan the width and placement of the top. I was uncertain how much yardage the skirt would consume, therefore I paused to determine sleeves later.
My plan for the skirt was to knit a section by casting on the bottom of the bodice, adding stitches to increase width until I finished a skein. Repeat and fill out the row by picking up stitches to join the sections vertically into a tube. I continued on, and on until weeks later I had a skirt but panicked that I was not going to achieve my desired length and second sleeve!
I decided to pull a teal yarn from my Landscape Painting with Yarn project. This hue pulled the cool tones into harmony in a pleasing way. I used two skeins of this teal color and then finished with the original Water Lily tonal yarn. I finished the second sleeve and tried on the piece with relative ease. There was one fit issue – plunging neckline. But it was a lovely, cozy knit from scratch dress!
The final touches to this project were addressing the neckline and the sleeves which were set too deep. I cast on to the neckline to fill in the gap and provided structure to the straps with several rows of decreases to give the dress a cap sleeve befitting my vision.
Final Thoughts
I am definitely making more dresses with knit! It’s far more pleasant than sewing if you want a comfy yet elegant style. You have both control of the drape and the fabric design. It’s your world, as Bob Ross would say.
This project was more than a goodbye to Big Twist, it was a new chapter for me. I began this journey 5 years ago to learn how to make and now I feel empowered by knowing I can make my own clothes, not just with fabric but with skeins of yarn and needles. It has been a wonderful journey of discovery!
If you want to knit a dress, I’d say go for it! If you’re a beginner, make one but not as your first project – you will be overwhelmed by the sheer amount of time this project took. It was weeks of work that as a beginner, would have scared me. In time I know you can do it though! ❤
Do you ever get stuck in start mode when beginning a new thing?
Like you’re wandering through a maze of ideas. Maybe it’s the planning stage, too many ideas, not enough organization? It’s weird. I feel such a rush when I have multiple WIPs on my needles. The satisfaction of binding off stitches and slipping that garment onto my body makes every week of work worth it!
The void though, between new idea and casting on a new project, is a shape shifting process. The indecision sets in.
What yarn should I use?
Do I have a color palette
Stockinette or a new stitch?
Texture?
Colorwork?
Do I have an inspriation garment in mind?
Have I thought about how I want to garment to fit?
How much positive or negative ease should I plan for?
The next phase is choosing needles, selecting the amount of yardage, and gauge swatching the stitches to inches ratio to calculate the size of the garment.
It feels as important to start with the correct amount of stitches as it does to pour a concrete foundation evenly. I think this is why I get stuck in neutral instead of shifting into gear – when you get a creative idea sometimes the final design outcome is a little fuzzy.
So how do I get out of it and move forward with my design? I sketch, even simply shading the colors together in simple patterns helps me see if the image in my head will fit the realized garment. I also start working with the room to frog the yarn and begin again.
That is my favorite thing about fiber art, you can tear out and begin again without ruining your materials. Even though the first stitches feel like concrete the process is flexible.
Do you get stuck in planning? How do you move your mind forward? Thanks for spending time with me today. You are amazing and I hope you know that you are loved. Until next time. ❤
I was gifted a set of skeins. This yarn lot was made from peruvian wool, bulky weight in shades of slate gray, purple, and navy. It was some yardage but not enough to know what to use it for. 500-600 yards always trip me up. It’s close enough to be a garment so my mind wanders down that path, but too much to be an accessory, unless its a really extra, truly special accessory. I used to knit big scarves like that. I think maybe I got burnt out? Or maybe the scarf as a project feels like I am staying stagnant, not trying hard enough to make? I’m uncertain why I see it from a view point of melancholy.
Around the same time I was also passed down other bulky weight yarn, a green and red acrylic, a bright blue of wool-acrylic blend, and an olive green much chunkier fiber of many balls of yarn. More than I knew what to with. They were all random, similar im weight, and sort of related in color story. Aside from the red, the red was too bold.
Have you ever seen those absolutely scrappy sweaters? Those ones, usually worn by someone in Copenhagen or another chic city where the handknit garment is exquisitely random? A varied and unplanned web of yarn scraps, carefully made into a uniform pullover or cardigan. I love them. I pin them to boards. I save the posts. They fill the void of completeness of most projects, whether fabric or yarn, because they gobble up the bits left over, like a quilt, to rid the maker of left over yarn without wasting it.
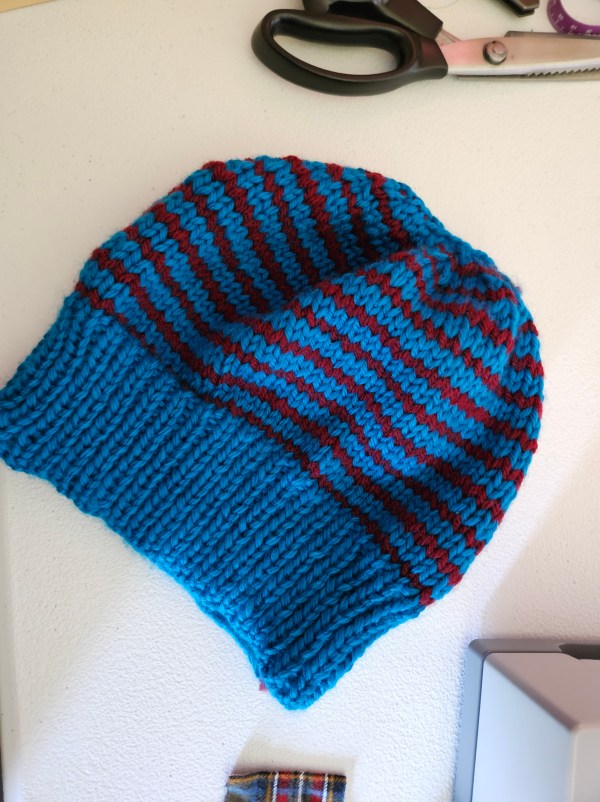
Do you ever pick up a knit object and the fiber feels buttery soft? That’s exactly how this cerulean blue yarn feels to the touch. It is a bulky weight yarn blend of super wash Australian wool and acrylic fibers. It’s a yarn that I believe has been discontinued by Knit Picks but I hope they bring it back because no project has been a joy to knit up like this one. It glided across my needles! It’s one of the reasons I chose to knit this fiber into a hat that would be soft and warm on my head. It’s cozy. Another reason was because this skein of yarn was a destash from my mom, there was only one skein so I decided to make it the focus of one small project.
I’m not very good at using one solid color throughout my projects so I paired this was a Brava bulky in red also from Knit Picks to add visual interest to the hat. I think it looks like a hot air balloon from an illustrated book. An imagination filled tale, like how the heffalumps and woosels turn into hot air balloons during Winnie the Pooh’s trippy dream during the flood. I love how bright the contrast is between the delicate red lines and the vivid water-like blue. It has a bit of the Apres-ski vibe with the vivid color story of the late 80s and early 90s.
I made this knit hat on size 10 bamboo straight needles in two pieces that I seamed together. I made the decision to construct this hat using two pieces because I had not made a hat in over a year and felt a bit rusty. I also wanted control of the taper of the crown, without needing to also refamiliarize myself with circulars or double-pointed needles. I made this hat in August 2024 and I was coming off the big move into the storage unit for two weeks and then into the new house. To be honest, I was feeling a bit creatively stir crazy from the busy summer. I’ve learned a lot since I made this from my dabbling with sock knitting and could confidently make this now with a different construction, but as a quick beginner project or knitting warm up when you’re feeling rusty it’s an easy to make project. I believe I made this over one weekend, potentially one day? I can’t remember how focused I was.
You will need a tape measure or a knit hat that fits you the way you would like your hat to fit for reference. Cast on stitches according to your head size for one half of your head. Knit ribbed stitches for 3 inches and then switch to stockinette for the rest of the hat. Switch yarn at the end of rows and don’t decrease too quickly. I’ve made this mistake before. You will need the width across your crown to join at the top and you can decrease quickly at the end so be filled with care as you taper and don’t hesitate to frog and try again for the right fit. Adding a safety line where you plan to unravel your project to, is a huge life saver! Mirror your second side and stitch the two halves together with a tapestry needle. An easy knitting project that is useful and can help you practice skills like purling, ribbing, yarn over decreases, crown shaping, and yarn tension.
Back in the spring, I had this grand idea that I would learn how to crochet. I had a friend who crocheted next door, I had recently found TL Yarn Crafts on YouTube. Toni made it look so fun. I was enamored by what I saw others creating with crochet hooks. Crochet rose in mainstream popularity again through 2020 and beyond in 2024.
My Impression of Crochet
The internet is chock full of crochet plushies, dresses, sweaters, bags – you name it you can crochet it. I didn’t see this kind of creativity from my corner of the knitting internet. I had this impression that knitters were serious and crocheters were mavericks. So the hook was calling to me.
I bought a crochet hook and spent a few weeks watching videos, perusing a book my neighbor lent me, and getting the hook into some loops. It’s a weird transition from knitting. I apparatus from two is a change. There is a posture, one hand, and yarn holding. There is a new way to keep yarn tension, and there are a lot of new stitches. There was more emphasis on turning your work than the orientation of the wrong side and right side. Single crochet and double crochet were not a one-for-one of knit and purl. That surprised me.
Granny squares were a bit more involved than I expected. It’s an art form that deserves respect. I definitely respect it. It kept me back, I had the tightest tension and felt like I had never done yarn crafting before. I was shocked, shouldn’t this be a piece of cake? I’ve been knitting off and on since 2012. Yeah, it’s not that simple.
Fluff Around and Find Out
To be honest, the way that I learn best is to just go for it, and doing these basic crochet stitches on a project that was a rectangle, all while it looked like a tattered mess was discouraging. I wanted to make one of the little plushies or shapes that seemed to be a sculpture that only crochet could create. But I was seriously not getting it. So I paused and thought about it. Is there any way to apply this creative point of you, the sculpting of yarn that only crochet can, but try it with knitting needles?
This might seem weird to consider if you don’t knit or crochet but the processes seem vastly different to me. There’s a strategy to knitting. You have to do things in stages, like knitting a section and transferring stitches to a stitch minder or picking up stitches that were bound off or are just part of a knit edge. While crocheting builds on itself and is an amorphous thing that is truly sculpting and adding as you go.
So I decided, what if I made something with the sculpting element of crochet but with knitting steps. I decided on a star as you can see above that was crafted out of multiple knit sections that were stitched together. This pattern has a lot of little steps but I think it was effective.
Repeat four times until five are made. Then using a tapestry needle, join the five points together at the center so that you have the base for a star, then join the sides of the diamonds together so that you have a flat star. Repeat the whole process one more time so that you have two flat stars and then sew them together with the tapestry needle.
So we pivot to the bag decoration trend of 2024. This is a combination I’d say of Kpop, Xiaohongshu style trends, and the Japanese Ita bag becoming popular in the West. If you would like to learn more about Ita bags, I would highly recommend Addy’s video on YouTube. And these little stars in the original green and its pink starfish cousin have made excellent DIY plushie keychains.
Finished Product Used as a Keychain
Final Thoughts
I think creativity is about experimentation and learning as you go. I think sometimes it is important to do it the normal way and other times it is more satisfying to try a new method, a new medium, and make something you may not have thought you could. I still have incredible respect for crochet and I also think knitting has more potential than I thought. I have also learned that if a key chain or other small trinkets are not specifically branded I should try making them before I buy. It’s a great way to use up materials in my stash, level up my skills, and keep my consumption down and my wallet happier.
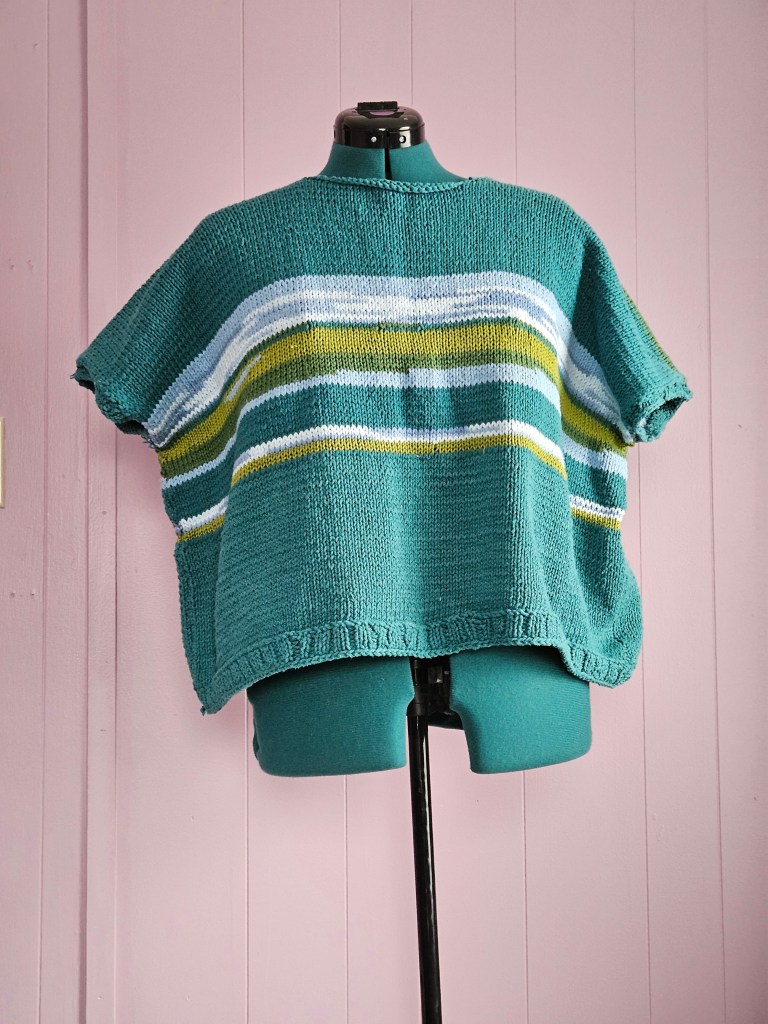
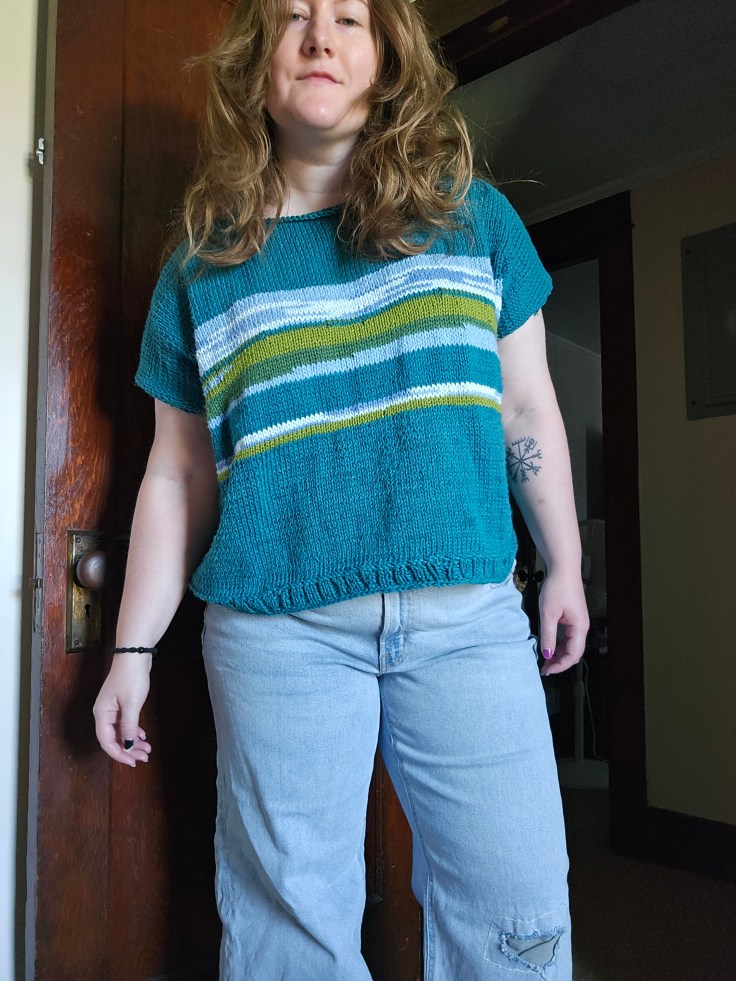
This year I’ve been looking for ways to use my stash as completely as possible and use up what I have to make new fibers and new projects. One way I accomplished this was through color palette knitting and through the stripe hype sweater. But another project idea I had this summer was to try minimal colorwork knitting by “painting” with yarn through a mix of new cotton yarn I purchased and yarn extras my mom passed onto me. This helped stretch the teal cotton yarn I bought, underestimating how much I needed to make a t-shirt. It was an opportunity to make a “graphic print” t-shirt out of yarn, something I didn’t have in my wardrobe, but sounded like a fun piece to wear.
These are the yarns I decided to use for the landscape painting section of the garment. Cotton yarn that was originally purchased by my mom to create handknit dishcloths in a color selection of blue, green, and pooling gray-to-white-to-blue, a lime green cotton-bamboo yarn, and the teal cotton I purchased. The pooling yarn was perfect for the clouds. Each side of the garment is unique because of this pooling yarn like a real sky. The plain blue was used for water, the dark green for a marshy grown-up bank, and the lime green for sunkissed meadows of grass. The teal was used for a distant tree line that was framed by the clouds.
I opted to make this oversized with a short sleeve opening, somewhere between a vest and a t-shirt because I haven’t decided how I want to wear this. As a t-shirt of course but do I want this to be a layering piece in the cooler months of the year? Or do I want to make detachable sleeves? That is something I am still milling over in my mind. I did split the back of the piece in a moment of indecision, where I thought it would be cute to make it a short-sleeved button cardigan. I may do this in the future. I opted to keep the t-shirt structure for simplicity and the ability to wear it more quickly. I was impatient to wear it.
I love projects that utilize things I already own and use techniques I haven’t tried before. Since this project I’ve begun to learn proper colorwork knitting, it’s been fun. Thank goodness for YouTube and knitting books to make the complicated things, like learning how to switch colors, feel approachable!
How have you been expressing your creativity this week? Do you like getting crafty? Are you a knitter and have you tried colorwork knitting before?
In middle school, I had a black off-the-shoulder sweater with a wide fold-over collar and a coordinating skirt in gray and black stripe. It was the first skirt outfit I tried wearing over pants, a trend that has come back in popularity over the past few years along with the 2000s style. All of this has made me nostalgic for my old sweater, but not interested in buying one like it because I don’t love the new take on 2000s fashion with our current-day fabrics and fast fashion construction. It’s just all off-kilter from the original subject material.
So, I had an idea. What if I tried making one with the yarn in my stash? I had several skeins of this navy tweed from Big Twist that I didn’t buy with a specific purpose, and it took up space. It seemed like a fun color I could coordinate like I did with the Houndstooth Denim dress worn as a maxi skirt. It was an ambitious make.
I’ve only been making sweaters for a few years and had no experience designing a pattern with no collar or shoulder seams. There was a lot to think about. How could I incorporate the big fold-over collar? How do you add sleeves with the new style lines? How do you keep it on the shoulder enough so it doesn’t fall down? As with most of my makes, I dove head first into the project ready to fail if that meant I learned something!
The first obstacle I found was not having enough yarn, shocking right? I was surprised I had multiple skeins of this blue, but it wasn’t enough to get the longer length, so I had a choice to buy more or get creative in this stashbusting project? I decided using what I had was more important than keeping the original vision so I chose this gray yarn I also had in my stash from the Bunny Hat project. It brought an interesting contrast to the tweed and I actually loved the color blocking once it was done.
The arm holes were such a challenge. As I was knitting this piece top down, I first knit the ribbed collar and then reduced down for the body section, leaving enough of the collar on the edge to insert an armhole after I was done with both the front and then back. All was seamed together and for a first try, I’d say it was a success. The geometry definitely worked. I had a free range of motion. It was a win!
What was not a win was my over-calculation when it came to fit. I forgot to accommodate the size needle I was using, a US size 8, which knits up with a larger gauge. I had been using US size 7 more recently and I sized like I would have for this gauge. My second mistake was not accounting for the stretchiness of this yarn. It is an acrylic and nylon blend that gets roomy with wear leading to a sweater that simply didn’t fit.
After the move, several months after this project was done, I tried this on again and realized that I had toned up more than I thought carrying all those boxes because the sweater slips right off my shoulders and off my hips too. It’s a total size failure! Now I’m not sure what to do with it. I’ve already taken in the collar back in April, I don’t think I can take it in again and it is constructed well so frogging this project is not going to be easy. It’s a shame because I think I had a good design here.
I think my only option is to potentially re-home it and make another one following the tutorial that I shared on Instagram which was my first time doing that. I felt such imposter syndrome! To my surprise, it was met positively even though it was not created for circular needles. It showed me that sharing my craft and creating tutorials is becoming a calling, free tutorials, and free knitting and sewing tips because I just want people to do this too.