I asked myself this question last summer with genuine uncertainty. Knitting is such a cold-weather medium that a knit made to be breathable and light for warm weather seemed, well, a bit like an impractical fashion piece. I think this is an important question to ask of ourselves before we jump on a trend. Whether it is to buy a knit t-shirt or to handknit (which means you are dedicating weeks of work to a project), having the right expectation matters. Trying on a knit t-shirt beforehand helped me visualize what I was in for. Knitwear for all seasons is currently having a moment even in ready-to-wear, which makes this a great time to go try on a piece before committing to a big project.
Wearing my Grandma’s cotton knit t-shirts, although they were two sizes too small, helped me visualize knit as a process to make a fabric instead of a woolly winter garment. That’s what makes knitting and crochet extraordinary skills; they are versatile. The fiber maketh the project. The stitch maketh the airflow. Lacey, open weave? Fantastic for hot and humid days. Not so much for a pair of mittens.
To remedy this, I think fiber acquaintance is a fantastic way to learn whether a knit t-shirt is right for you. When I began knitting in 2012, I knew there was wool yarn and acrylic yarn. That was it. However, there is actually a rainbow of fiber waiting to be discovered, and the lineup sure has expanded in the last 13 years!
Cotton
Linen
Bamboo
Hemp
Pineapple
Lyocell
Rayon
Yak
Alpaca
Camel
Mohair
Cashmere
Silk
Did you know that wool has two unique properties? It helps you regulate temperature and is naturally antibacterial/antimicrobial; therefore, it inhibits bacterial growth naturally on the fiber and prevents odors, which is why it is such a great sock material! Although I wouldn’t recommend wool for summer tops, it is a remarkable fiber. There are two fibers, though, that are breathable and naturally don’t let bacteria and microbes hang around – it’s linen and silk! For fiber education and the chance to feel these materials, I recommend finding a friendly local yarn shop and talking to the experts.
Finally, I do have one possible hiccup with my current selection of hand-knit t-shirts. I can’t wear them in 85 degrees Fahrenheit weather and above with humidity, but I do believe a knit tank would fix this problem, and a lacey stitch technique in future projects will solve this. I don’t like sweating a lot in my handknits, and because I was learning with my first few tees, the knitted cotton fabric is a bit bulky. That’s my error. You know what is so cool about knitting, though? You can unravel the finished garments and try again, so I can rework these finished garments in the future. Anyway, I hope you will consider the knit t-shirt as a warm weather staple in your wardrobe, it’s a lovely way to use crochet and knitting all year round!
What do we do when an item of clothing doesn’t fit? Rehoming is always a good idea, but here is another one – upcycling. What if you could transform that garment into another garment you will wear? Here’s an easy upcycle using one pair of jeans.
The Process
To begin, I cut off the legs of the denim above the knee. This was important. To hem the denim to the same length, including the excess fabric needed to fold over for a waistband, the leg section needed to be longer than what was cropped.
I carefully cut open the side seams, avoiding both the pocket and the rivets. The belt loops were set aside for later.
I then cut the leg pieces to the proper width, adjusting the fit with try ons, before sewing. The top of the section was hemmed for a waistband and the bottom hemmed with the rest of the short.
I sewed this very carefully with my machine. I did break a needle but, it happens just use caution and wear glasses to protect those eyeballs. Always know where your fingers are too when using a sewing machine.
Next I repaired the worn denim around the belt loops and attached the cut off belt loops to a new section and tada: you have a new pair of shorts for summer!
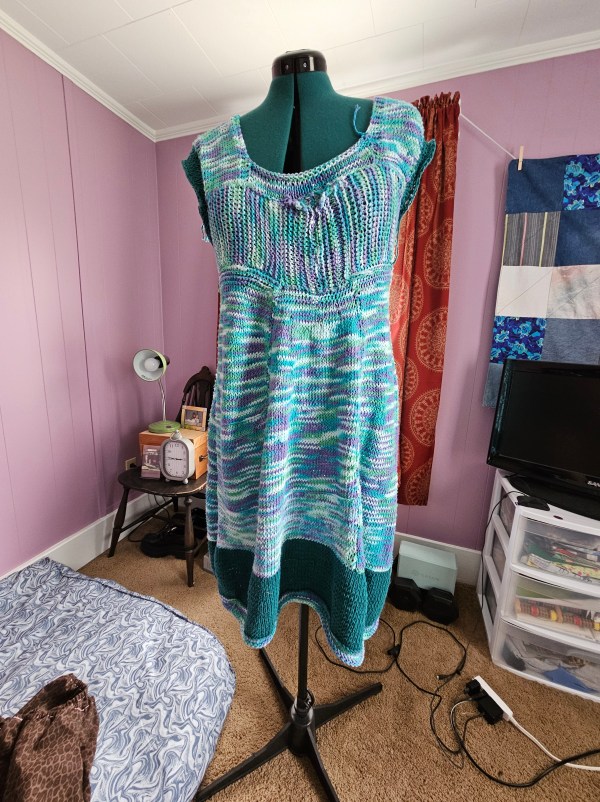
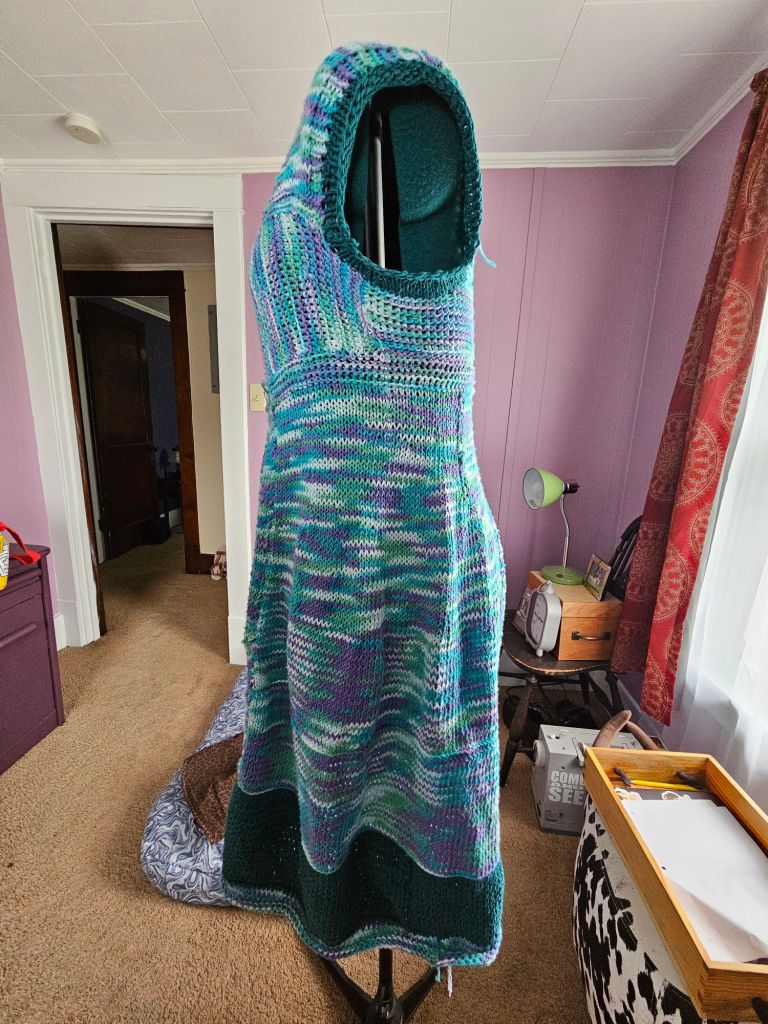
Knitting a dress, how hard can it be right? It was actually pretty managable garment as an intermediate knitter. I would not recommend unless you have made a sweater before but would definitely recommend knitting a dress if you want a soft and stretchy garment that hugs you!
Inspiration
I have made plenty of dresses over the past 5 years, but they have all been cut and sewn from fabric. Knitting kicks it up a notch, asking you to assemble the dress, but make the fabric to boot. I thought it would be silly to try until I discovered some lovely crochet designers on You Tube who make with imagination!
I was inspired by Mama Gwen of TL Yarn Crafts to give designing a knit dress a try. She makes such beautiful dresses all from self-drafted patterns in knit and crochet. Along with Dana from Blondie Knots. Her Coachella scrap two piece outfit helped me have the boost of confidence to try something new.
Materials
Last summer at Joann, before the shenanigans began, I purchased 14 Big Twist Cotton 50g skeins on a sale with the intention of knitting a top. Many months later, this yarn was sitting in my stash with my mind uncertain if the punchy color changing yarn was my cup of tea for a cotton knit top. But a dress? Yes, that could work. Did I have enough yarn though? I’d have to make it so because there was no more being sold.
Because of the circumstances, I decided this dress would be my goodbye to Big Twist.
Design
I knew from sewing, my design would need to be a dress that was either tubular or empire waist to suit my body shape. I decided to knit this on US 7 needles, straight needles. Sometimes I would shift to circular, but this was not knit in the round. With the combination of yarn minders, a measuring tape and patience this dress came together!
To start I knew I wanted the bodice to be the anchor I worked out from so I cast on stitches to work horizontally. From the bodice, I then added one strap to plan the width and placement of the top. I was uncertain how much yardage the skirt would consume, therefore I paused to determine sleeves later.
My plan for the skirt was to knit a section by casting on the bottom of the bodice, adding stitches to increase width until I finished a skein. Repeat and fill out the row by picking up stitches to join the sections vertically into a tube. I continued on, and on until weeks later I had a skirt but panicked that I was not going to achieve my desired length and second sleeve!
I decided to pull a teal yarn from my Landscape Painting with Yarn project. This hue pulled the cool tones into harmony in a pleasing way. I used two skeins of this teal color and then finished with the original Water Lily tonal yarn. I finished the second sleeve and tried on the piece with relative ease. There was one fit issue – plunging neckline. But it was a lovely, cozy knit from scratch dress!
The final touches to this project were addressing the neckline and the sleeves which were set too deep. I cast on to the neckline to fill in the gap and provided structure to the straps with several rows of decreases to give the dress a cap sleeve befitting my vision.
Final Thoughts
I am definitely making more dresses with knit! It’s far more pleasant than sewing if you want a comfy yet elegant style. You have both control of the drape and the fabric design. It’s your world, as Bob Ross would say.
This project was more than a goodbye to Big Twist, it was a new chapter for me. I began this journey 5 years ago to learn how to make and now I feel empowered by knowing I can make my own clothes, not just with fabric but with skeins of yarn and needles. It has been a wonderful journey of discovery!
If you want to knit a dress, I’d say go for it! If you’re a beginner, make one but not as your first project – you will be overwhelmed by the sheer amount of time this project took. It was weeks of work that as a beginner, would have scared me. In time I know you can do it though! ❤
Do you ever look at an item you want to buy and think, how hard can that be to make? Well, that’s exactly how we got here.
Floor Culture
I’ve been moving my sewing room around, I took down my sewing table and moved to the floor. Which I know sounds extreme, but seriously, sitting on the floor is underated. My back and hips don’t get tight and my posture is improving. In the West, I think we have been foolish to move away from sitting on the floor and should acknowledge how wise other cultures are to sit on the floor for health and posture.
I have a wicker chair that is good for sitting in when I want a break from the floor, but what I was missing was an in between piece of furniture that I could move depending on my needs. I settled on a floor cushion that could be used as a seat, a workspace, folded up in a cushion or rolled into the corner for yoga to add more stretch breaks to my life.
Quick Fix
But here’s the catch, I decided I needed this piece of furniture on a whim and that’s what I am trying to remove from my purchasing decisions – less impulse purchases. I want to become less of a consumer and use what I have, so I thought could I make what I want? Similar cushions for sale online were 100-400 USD and with the tarriffs looming, I was feeling a bit nervous to buy something.
But then I remembered my Mom made a pouf, she knit the cover. I’d watched Morgan Donner make things from her scrap and fashion a mattress from braided fabric. I had also begun saving my fabric scraps and sorting them into bags that were taking over my crafting closet. I just had to settle on the cover fabric and design.
Design and Materials
A large rectangle seemed like the ticket with corners I could sew crisply and easily stuff at the end. There was this one extra wide cut of fabric I bought from Joann’s last summer which caught my eye. It’s a fabric I bought because I enjoyed the design but didn’t want to wear it. It looks a bit like denim and had a lovely swirl pattern that I thought, would compliment the lavender paint of the room. With the fabric sorted, it was time to tackle the pattern and stuffing!
I measured the fabric into two large rectangles and four slimmer sections to form the sides. These I sewed inside out to leave only one end open to stuff. I sewed this by hand over the course of a day, I’d say in total the sewing portion of this project was the easiest part. What lay ahead next was tricky, blister inducing and stressful.
Stuffing and Scraps
I had bags upon bags of scrap fabric in varying sized pieces ready to be repurposed into stuffing, but the thing with fabric cabbage is that it’s not uniform. Which means there will be a lot of cuts to make. This I foolishly chose to do with my old fabric scissors, instead of using my rotary cutter and mat. I wish I had. The repetitive cutting motion wore a blister on my thumb and aggrevated an old injury on my finger joint.
My hands were tired, weak, and wrecked by the end of day one. Worse the cushion was 1/3 full. Not what I was expecting! How could it take that much stuffing?! With my bags of fabric scraps depleted, I moved on to new sources of cushion comfort. Such as yarn that I was given secondhand, which I had no creative plan for. This yarn was a super bulky, acrylic yarn, about 300 yards left, and perfectly fluffy for stuffing. I cut this into pieces and carried on auditing my stash.
I repurposed some old clotbes into stuffing, a blanket Mia’s little bunny chompers had chewed into swiss cheese, and more leftover yarn floating around my sewing room. Yet, I still lacked the floof I was after so I broke down and browsed the interweb. I knew polyfill was an option, but it’s also polyester and the point of this was to repurpose and use up things, not go to Walmart for polyfill, which happened to stretch very little. When I made a bolster pillow for our couch out of an old sheet, I went through 5+ bags of it. Whuch made me wonder, are there alternatives to polyfill on the market? There are! I found a small business, selling cotton filling that shipped. This got me to comfortable fluff, I still need a bit more but I’m going to revisit it later.
Voila! A piece of furniture made (mostly) from what I had in my house that used up some trash in the process. I am pleased. 😁
In the summer of 2024, I returned to an old fiber friend, wool, and introduced a new natural fiber – alpaca. When I began knitting in the early 2010s, I bounced between wool and acrylic fibers, not really looking at fiber content and instead looking at the pretty colors and my stitches so I didn’t drop one. Oh, how times have changed! When you love something you begin to obsess, dig, and it becomes a fiber woven into your identity. That’s where I found myself as a knitter for 10 years. I am constantly thinking about fiber content when planning a new project because it’s more than just the make that matters; it is how the garment is worn and washed for many years to come.
Wool
I think we have deep scent memories just like how wool fiber remembers the shape it is blocked into with water and pins. The scent of wool is woven deep into my memories of traveling to Ireland as a child in 2001. It is the fiber my Grandma wore most of the year. She was always cold, even in summer. Wool has always seemed a bit scratchy to me. It triggers my neurodivergent aversion to certain sensations. It was not a fiber I would choose to wear a whole sweater out of, although small accessories I could handle. Coats were fine too, until they weren’t.
After my grandparents passed away, within 6 months of each other I suddenly had things they used to own. Clothing being one of those things, a lot of those clothing items contained wool. I couldn’t stand the fiber being near me. I’d get a head, a migraine really. I’d feel stuffed up and allergic, at least I thought. From 2020-2024 I avoided the fiber. Begging my mom not to knit me anything in wool. I rounded up the wool items and put them in quarantine in a box in my house, the “allergy” being such a wave of anguish to my body. Looking back on it, I can see it was an expression of grief and stress. That smell of wool, it felt like a ghost lingering in the shadows of my mind not a normal fiber. Grief makes things so weird!
Acrylic
Under this belief of a wool allergy, I pivoted solely to cotton, bamboo, linen, and acrylic. If you are looking for a cheap and cheerful fiber acrylic is your yarn. It’s everywhere in the big box stores and that’s exactly what I did. I experimented with Red Heart, Big Twist, and Caron. They come in value packs and the worsted weight is an excellent fiber weight to use when learning how to create complicated garments such as wearables like sweaters that involve sleeves, shoulder shaping, and necklines. I’ve made a lot of mistakes along the way, it’s part of the learning process, yet using these affordable and easy-to-source yarn options took the trepidation out of the creating process.
Acrylic is seen as the “low-brow” yarn for a lot of the knitting community. It’s looked down upon for not being a natural fiber. Take organic and insert natural fiber and it is the same sort of elitism. But honestly, aside from how it’s made, acrylic being a polyester fiber, I don’t get the hate. It’s washable. These garments I was able to block in the dryer. As a knitter who was new to blocking this process taught me how and why blocking matters without the high stakes of felting, shrinking, or destroying my hard work during the wool sweater blocking process. It’s an approachable fiber for beginners.
Fiber Curiosity
Acrylic was my bread and butter, but after a while, we all crave some variety. For winter sweaters the other fibers – cotton, linen, and bamboo aren’t going to cut it. This is where some field trips came in! I’ve mentioned Keystone Safari before on the blog, it’s a wildlife preserve and education center in my region and they have sheep, alpacas, yaks, camels, and llamas. All of which I feed and pet without any allergies! This is where I began to question my “allergy” to wool. How could I spend time around these fibers, in their natural state where there would be more allergens like hay and not have a reaction (when I’m actually allergic to hay and grass)? It didn’t add up.
So in 2024, I began to run experiments. In the yarn shops, I’d pick up wool and alpaca-specific skeins and feel them in search of the truth! At my mom’s house, I’d ask her to see her skeins of wool and I’d do the same, even sticking them in my face, demanding they show me an allergic reaction. Nothing happened. Nothing. Could it be, that was I ready to find my true knitting form? A natural fiber artist, possibly a spinner, with a vast knowledge of wool, alpaca, mohair, and more? Yes, it was time.
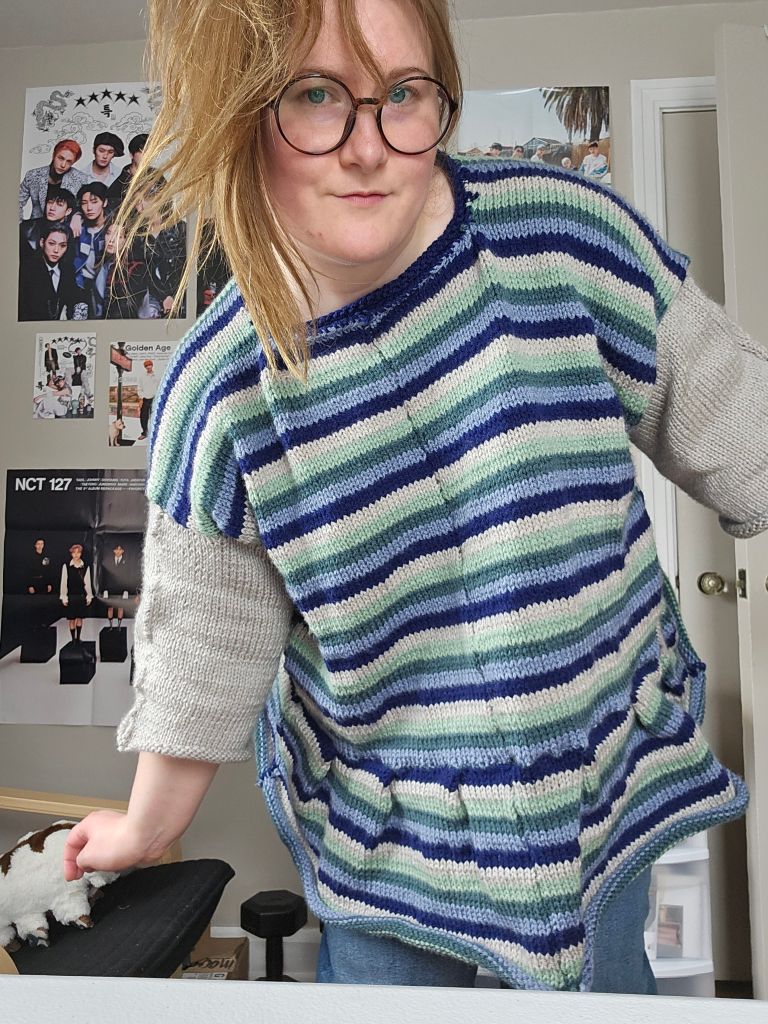
Magic of Scrap Yarn Cardigan
So how does felting come into play in this story? It doesn’t sound like a story of woe, but it is. I was quite inexperienced with wool and how one cares for wool, that lack of experience came back to bite me with this lovely cardigan. I made this cardigan from wool extra skeins from my mom. Some of those skeins I put right up into my face to see if the wool would make me allergic. But this cardigan was not just a project of wool, it was a project made of extra wool skeins, wool-acrylic blend skeins, and acrylic skeins. Those fibers require different strategies to care for them properly.
This was my first mistake. I mixed fibers willy-nilly without thinking about each one has unique advantages and disadvantages. Wool is naturally anti-bacterial and requires very little cleaning. You can spot clean and refresh in the air or the snow. But you can’t throw it in the washer, and if you wash you must be gentle to the fibers with delicate movements and gentle water temperature, or else it will felt. Acrylic on the other hand is very durable. You can wash it in the washing machine without worrying about the possibility of felting the fiber. Acrylic fibers do not felt. It does not have anti-bacterial properties though so you clean it. Can you see where this is going? I screwed up the washing portion of this project.
I washed it in the washing machine without thinking and the cardigan shrank. Next, I tried to stretch the cardigan as it dried, while it was wet. Not gently, although the washer had already set the stage for stressed wool fibers. The cardigan no longer fit my person. To remedy this I thought I would hand wash delicately and attempt to re-block the cardigan. This was the nail in the coffin. This fatal mistake transformed the project from a knit cardigan to a felted mess. It was too far gone, like a burnt cooking disaster. There was no coming back from this, the damage was done.
I began to panic. How would I continue using wool and alpaca? I was currently knitting wool socks, um how was I going to wash those? Was I screwed? I was convinced I could never hand wash again without feeling sick to my stomach. I had to find a new solution. Steam. Steam was the answer. I have an iron, an iron with steam. Could I use this instead of purchasing a garment steamer? The answer amazingly was that simple! I steam my wool and alpaca projects now and the steam helps them bloom, they almost block from the steam along. It’s incredible. Just a little steam and the fibers refresh, safely! It’s transformed how I care for my knitwear. Sometimes these creative misfires lead us to places we may not have tried without the failure as a catalyst to try something new. I feel equipped to work with natural fibers, confident that if I spend months on a project I can care for said item for years to come. Have you tried streaming your wool garments before?
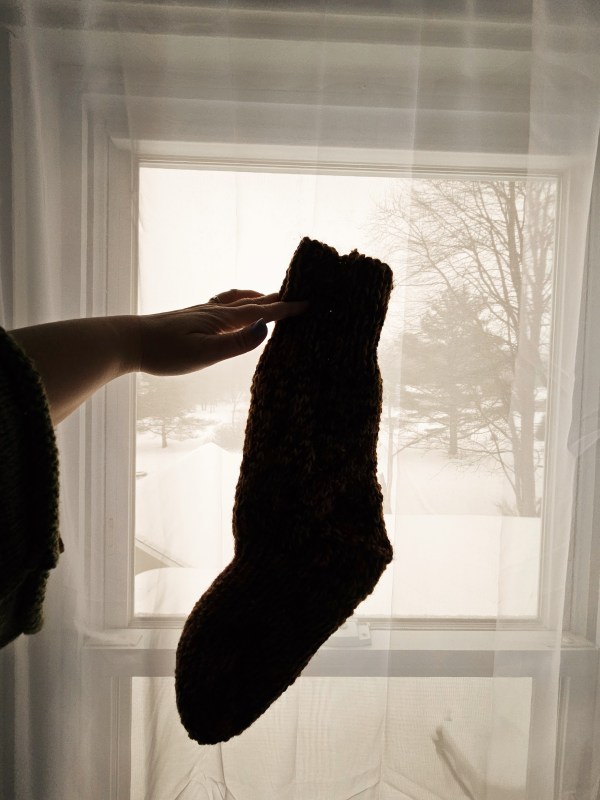
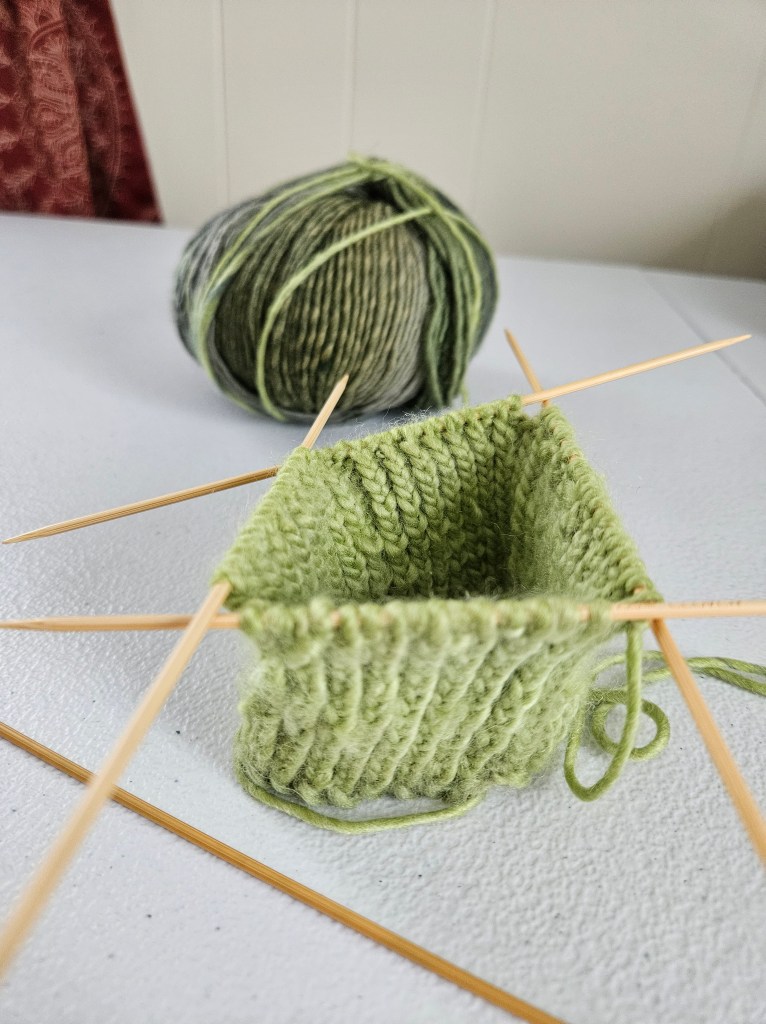
Several months ago, I started a new side quest in knitting – making socks. It’s a windy and treacherous climb, fraught with new equipment and an entirely new approach from a garment like a sweater. At the beginning it’s like casting on a mitten or a small hat, yet as time goes on you realize you are somewhere between a knitter and a sculptor, looking for the heel shape in your amphorous block of yarn. It is the most challenging garment I’ve made, culminating in going over the waterfall, at least that’s what turning the heel felt like at times.
What makes this ubiquitous garment so hard to learn? It’s a project of multi-tasking, like dribbling a basketball and moving at the same time. You are not only knitting a pattern – a sock, but you are also learning it on a new court – double pointed needles or with a magic loop configuration on circular knitting needles. There is also the third option, the one I leaned on when I was baffled by hitting gauge on my project and fed up with ripping out my progress over and over, knit flat tube socks that are sewn together to form the tubular shape.
My first two completed sets of socks were made this way, with straight needles to help me process all I was learning from these new techniques. It was the confidence boost I needed to keep going and finish the sock. I get overwhelmed in new projects when nothing is familiar but taking one part, flat knitting, and keeping that as the control part of the experiment let me knit and see how it should look and feel when the socks are completed. To better understand what I was working towards on double pointed needles or circular needles. Flat knitting also gave me the chance to try something I’ve never done before as a knitter, I cast on two socks at a time on my needles. It was incredibly satisfying to finish each sock at the same time!
Attempt on DPNsFinshed tube socks pair knit at the same time on one set of straight needles
With this new found confidence I carried on and cast back onto the straight needles, making a brown pair of socks from recycled acrylic that wash and wear well. These green socks above are a blend that is mostly wool with a hint of acrylic in the yarn and they are hand wash or steam only for me. I wash them gently with either shampoo or conditioner in the sink, carefully to prevent felting. For my next project I wanted to explore fiber content, so I cast on a sock with three strands – two fingering weight wool and one acrylic. I chose this composition to test wear and washability, to make these a sock I could worry less about washing yet would insulate my foot, this was during a month long stretch of cold weather, dipping into the negatives fahrenheit so my mind was on cold weather. I decided to make these chunky socks into a sock I would use to insulate my L.L.Bean duck boots which are waterproof but are canvas, not insulated at all. They are a boot I want to wear for cold weather and snow, but they make my feet cold even with two pairs of socks.
As I got to the heel portion, I knit these socks cuff down, I made a last second decision and transfered my project to my round needles, joining the row into a round a stitches. With my heel turning reference book in hand I began turning that heel! It wasn’t as bad as I thought it would be! I don’t think I executed it perfectly, but I conquered a fear. Now, the tough part of the process is that my handwork for circular knitting is subpar. I hold my stitches too tight and the tension hurts my fingers the longer I knit on a project. The only way to improve this is to keep practicing, yet I don’t want to practice. The second sock is cast on but I have yet to make progress on project because I am dreading the circular process and those tight stitches that come from inexperience.
Is this sock the best fitting sock I’ve ever made? Yes! Is it better than store bought ones? A 1000% yes, and I’m a novice so they are going to get better with practice. It’s an art form we wear everyday without thought, but it is truly a sculpture of yarn. Next time you put on a sock, have a moment of appreciation for the geometry, the symmetry, and the sculpture adorning your foot.
In 2024, I was inspired to start making pants. I had attempted making pants before and they were successful but I struggled to make them feel like more than just a pair of lounge pants. Part of this was caused by not choosing a good bottom-weight fabric, and instead opting for a lightweight summer cotton that draped beautifully but didn’t give me that tailored look. I also tried an ill-fated scuba fabric in 2023 that crashed and burned because my thread tension was off. Enter this checkerboard denim print I purchased at Hobby Lobby. It was denim but lighter, not too heavy to be a problem for my sewing machine. But how would I find the right pattern?
I had a pants pattern in my stash for menswear trousers, that I considered using on this project. It’s a solid pattern and would make a straight-fit pair of jeans, maybe not the style I was going for though. I considered buying a new pattern, but then I fretted that the pattern would fit me weirdly or might not fit at all. The current style in 2024 still featured that tapered-in waist on pants that favor an hourglass figure, not my rectangle athletic build, so should I risk it? A big reason I chose to make pants in the first place was that I was sick of shopping and trying on pants that made me feel weird about my body. The men’s section was my go-to for their up-and-down pattern cutting, compared to the extreme tapering and high waist silhouette of women’s pants. Even low rise was stuck in mid-rise inseam, not the true low waist inseam I was accustomed to in the 2000s and early 2010s that helped me find good-fitting jeans because they favored my shape not the post-bbl world of fashion. I digress, my point is that buying a pattern someone else drafted felt like a risk because the fit is such a personalized thing.
My solution was to take a pair of pants in my wardrobe that I liked the fit of and to trace that pair of pants to gauge the shape. I did this with a pair of jeans that were high waist but had a nice loose fit through the hip and leg for the K-pop-inspired baggy jeans style I was interested in making with this 1990s Vans checker board print. This worked swimmingly! So much so that I traced the jeans onto a piece of brown craft paper for a quick pattern to reach for on future projects.
I chose to record this project, start to finish in video from instead of video to have a memory of how I did this to learn for myself and remember what I did but to also inspire others to try this. Pants are intimidating, especially from a paper or PDF pattern. The written instructions and diagrams have puzzled me in past projects but truly, pants are simple once you see how its done. I wanted to help others feel that freedom to create because at least in my American fashion market, fast fashion has destroyed the craftsmanship of pants and standardized sizing. I referenced this in a previous post, Shaping Up where I had to confront the dressing room terror of things not fitting and seeking to not be defined by my jeans size, when trends and pattern cutting shape shift sizes, but to take control of it on my end and get healthier in 2023.
This pants project was one of the most challenging and rewarding projects of 2024. I faced my fear of sewing denim, inserting pockets, and fastenings. I chose to not attempt a fly into I had more pants sewing experience, instead I planned to make what I knew I could achieve under my skill set. I opted for a side closer with a drawstring to have an adjustable fit since the denim had zero stretch. The denim containing no stretch was a feature I sought because I believed it would be easier to work with as it was my first project of this kind, and I wanted a crisp tailoring from the woven fabric. A key thing to note is that the jeans I used for my template also are non-stretch denim. For an accurate this is paramount or else the project will not work. Either you will cut your project too large or too small. It is also essential to leave a seam allowance on your pattern pieces. When self-drafting it is your responsibility to take charge of the seam allowances and plan ahead.
I messed this up with the crotch line and had to make a quick fix. My fix was a diamond gusset. Popular in women’s leggings, this diamond gusset shape piece allows for greater mobility while maintaining the strength of the seams.
The second challenge I faced was the problem of a narrow bolt and an all-over pattern. This fabric was quite narrow and because I was cautious with my seam allowance, I cut my pieces large. This meant that I was not cutting from the longest side, but the most wide. The pattern pieces were cut out missing length on the leg. My solution was to add on to the bottom and pattern match. It’s easier to match than people say, it just takes patience and intentional sewing. I’m pleased with how seamlessly I got my pieces to match up.
The pockets were a challenge. How do you place them? How do you insert them with strength so the pockets can be used without pulling the pants down or ripping? I chose to place them angled on the sides, aligned with my hips so that they would be practical and not create weird bunching at the front of the pants. No wonky crotch fit here!
Would you make your own pants? I hope I inspired you to get creative and go for it if you are sewing-inclined. Thanks, reader, for joining me once again on this quest to grow my fashion design skills. Have a wonderful day!
Recently, I shared a Knit Star Plush Keychain Pattern, but that wasn’t the only keychain I’ve been working on. Behold, a knit bunny keychain made from repurposed fabric! This keychain was inspired by my Skzoo Quokka plush keychain which I have styled on my purse and belt loop. I was tempted to buy more as this trend has been all over my feed this year, but that’s unrealistic. So I thought, in Jeremy Clarkson fashion, how hard could it be?
This key chain was made by repurposing a pair of underwear, that was weirdly made without any stretch. They had no purpose but to be trashed, which I didn’t want to do because they were brand new and I liked the pattern and color story. So I wondered, could I translate this to a plushie and I could make this plushie into a keychain without buying any materials beyond the keychain hardware? The answer is yes!
I used a pen to draw pattern pieces onto the underwear by designating the fabric into four ear-pieces, two head-pieces, and a rectangle piece that would be used to connect the keychain hardware. The rest of the fabric was cut into small cut pieces that would be used as the stuffing. This worked like a dream!
I chose to sew this item by hand because of the small nature of the project. The pieces were too small and delicate to sew by machine with any semblance of control or care. It was a quick make and took one day to complete. I sewed 90% of the ears, turned them right side out, stuffed them, and then set the ears aside. Next, I repeated this process with the circle for the head and stuffed it. When I was certain that all the stuffing was divided between the three pieces adequately, I sewed closed the ears and head. Next, I attached the ears to the head. Finally, I sewed the rectangle and threaded it through the loop of the keychain before attaching it to the bunny plushie. I opted for an abstract look so I did not decorate the bunny plush with a face, therefore if it spins around it doesn’t matter what side is facing out.
Overall, this was a quick and thrifty project with the hardware coming in a pack of two for $2.99. I used the other clip on the knit star plush project. This type of plushie could be made with any scrap fabric you have and could be adapted into other animals. It would be an easy DIY gift too!
Do you ever spend time learning a skill just to forget it when you need to use it? That’s me. That’s how I sew stretch fabric on my machine. I just jump in and completely forget that I need to first properly adjust the tension and stitch type or else mayhem ensues. Mayhem like my machine having a nice little snack on my fabric.
Sometimes the machine gets extra bold and drags the hem under into the bobbin’s domain, jamming the machine. This is what I am talking about:
In the moment of panic, when I realize the fabric is stuck down in the machine a few thoughts dance through my mind.
Why didn’t you sew this by hand?!
You did it, you finally broke the machine you maniac!!
It’s ripped to shreds, isn’t it? The whole project might be gone in a moment.
This machine hates me. How do other people sew so effortlessly??
But it’s not the machine’s fault and it’s not the fabric that caused this, and it’s not even my fault. It’s morally neutral, it’s an accident and a learning experience to grow from!
As I was writing this, I caught myself crafting sentences to describe the situation with very negative and demeaning language towards myself for making a simple mistake. (A mistake that once I freed the fabric from the machine, I corrected and carried on to make the finished garment. The tight thread tension actually made a happy accident, a lettuce edge hem.)
It is not something that I should hold with such severity against myself that I internally tell myself I am an idiot, a lousy sewist, or useless.
Because how would I respond to hearing someone say that to another person? I would be disappointed in the speaker and make them stop.
How would I respond if I spoke with such aggression to another person? I would be ashamed.
I am learning through these sewing setbacks to temper the internal monologue and be a more gentle and loving person towards myself, to maintain better mental health, and establish the practice in my mind so that I can be a source of gentleness and kindness to others.
How do you speak towards yourself and others when they make a mistake?
In the spring and summer of this year, I was on a self-imposed low buy to sew through my stash in order to use up fabric that had been hanging out in my stash for a few years and have less to move to the new place.
One of those fabrics was this lovely vintage blue that evokes blueberries to me with the dainty floral print. I had made a previous garment with it and had less than 1.5 yards left in my stash. This was a fabric I brought with me to my mom’s while we waited for closing so I set another challenge in front of myself – make something that would use as much of the fabric as possible and make something that would teach me a new skill. It also needed to serve a real purpose in my wardrobe not just something that I “could” make. Something I liked.
I landed on this sundress design with a button front placket, embroidery floss buttonholes, and tapered panels to give the dress an easy flounce. I made the panels similar to skirt panels with a bell shape and gathered them to fit, hiding the gather with the straps. It was a fun little project that taught me how to utilize my stash.