This was my most ambitious project yet and I’m happy to say it’s done! And on schedule too because the deadline in my head was by the end of 2023. I didn’t think I would get there, especially with other projects, but it happened!
It’s funkier than I first designed, and it’s also a dress now which is fun and unique to my wardrobe. I don’t have any sweater tunics or dresses like this. I’m excited to play around with styling this piece as winter is yet to come. It’s still autumn technically which makes me want to jump for joy because I’ll be able to enjoy this piece all season long instead of partially or not at all like some of my former projects.
The clearance section of a fabric store may be my biggest design inspiration. It is in the bolts of discounted fabrics from seasons past that you can find some real gems in my opinion. My brain gets a break from the items deemed trendy or seasonal for a moment to look for something new and at a reasonable price to justify taking a chance on something new. That is how I took a chance on this two-sided scuba fabric that is hot pink and light pink. Not really my cup of tea! But it was 2 USD per yard and honestly a fascinating texture and weight. It was worth the leap to try something new, so I did!
Now, do I always have a garment idea in mind when I pick out these cuts? Nope. Should I? Probably. But some magic can happen as they hang out in my fabric stash like inspiration finding its way to me, which is quite fun.
For this cut, in particular, I was a scuba newbie. The weight was hefty with a bit of stretch, so it needed to be a garment that could handle the heavier textile. The two-sided nature provided two color palettes in one. I considered a jacket, a coat dress maybe? The thing that was working against my creative brain was the Barbie movie. I did not want to make a Barbie cosplay, simply because Barbie was not my favorite toy. I was an American Girl Doll and a Fashion Polly girl through and through. Making a Barbie-inspired garment would not be authentically me nor would it be something I would wear because, did I mention I don’t really wear pink? Yeah, I don’t love pink, especially hot pink, so why did I buy hot pink fabric fabric? I think I like pushing myself to a place of adventure with the clothes I make. I don’t want to make boring clothes if my skills will allow me to do so. No matter what I did with this fabric it was not going to be boring.
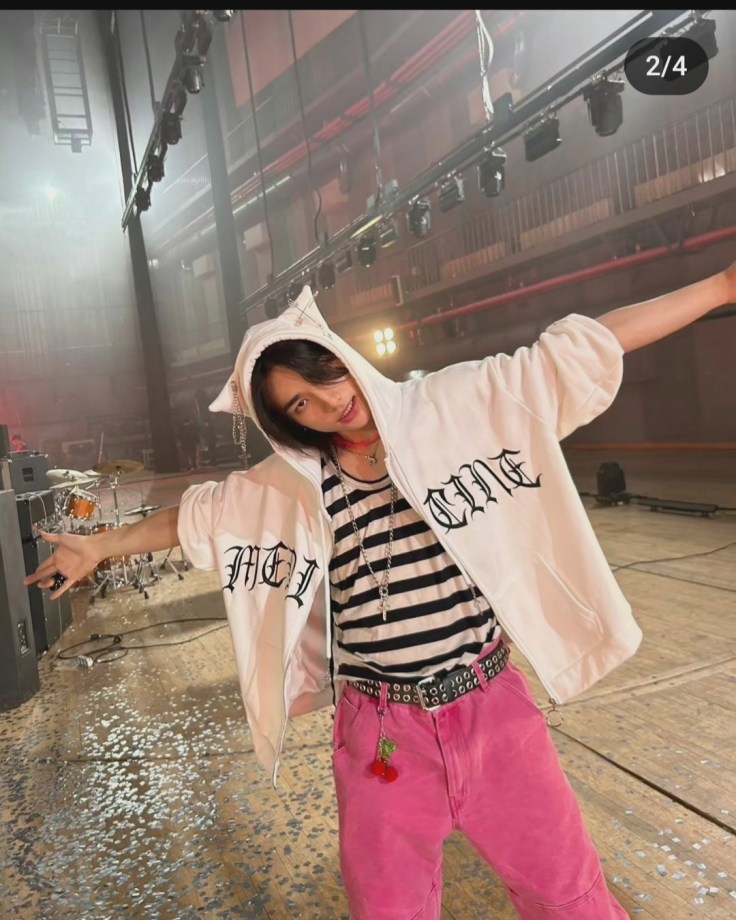
One day I saw this photo of Hyunjin on Instagram and it hit me, why does this pink scuba fabric half to be made into a feminine Barbie cosplay? Hot pink looks fantastic in a masculine silhouette. Making a neutral garment, like a pair of pants could be just the thing I need to make this fabric feel accessible to me and my own personal style. A pink dress felt too on the nose for me to get any wear out of and that is a big thing for me. I don’t want to make things I am not going to wear just for the heck of it. Maybe one day if I have a way to sell things that aren’t my personal style but right now that would be a poor use of resources and excess clutter my closet doesn’t need.
I knew I wouldn’t be able to make a hot pink pair of jeans like Hyunjin is wearing, I simply don’t have a jeans pattern in my stash, but I do have a menswear trouser pattern. I chose to use that instead of free-handing a jeans pattern so this garment would have the best chance of success. Jeans have an incredible amount of details that make them distinct and classic. The pants I drafted were going to be far more simple as these would be my first attempt at sewing my own trousers. It was a big moment!
I altered the menswear trouser pattern I had for a better fit by raising the rise for a higher-waisted fit. I did this to fit my waist better and to give more room to my hips. I was nervous these were not going to fit me right because I was grading the pattern to my own design so I cut a generous seam allowance around each piece. (A little too generous I will find out later.) This fabric cut like butter and did not make a mess, which was a huge victory after my Jack Sparrow Inspired Coat corduroy left a layer of fluff on my floor that I still find remnants of today.
To match the crotch lines better, I tried something new from my previous shorts projects and sewed the front and back seams first and then I worked the inseams, working my way out the outside leg seams last. I don’t know if this is the proper technique for sewing trousers but it worked well for this project. I tried them on and the pants fit well, a little wonky at the front because I left too much seam allowance, but they looked like actual pants that an actual person would wear. It was around this point that I realized I needed to do more than just sew two leg tubes together, these trousers would need pockets, fastening, and belt loops to be a properly finished garment.
I recently learned how to make button holes which I shared in My First Buttondown Shirt and with this newfound knowledge I decided to go in a Spicy direction, literally like the Aespa Spicy M/V, I was going y2k! What was cooler than popstar fashion when I was a kid? Nothing. I wanted these to feel like Destiny’s Child or a backup dancer for Proto Zoa would wear.
I decided the best way to accomplish this would be to make cargo pockets for a funky twist and place them higher like you would normal pockets, to hide the weird fit around the front of the pants. These pockets I designed to be usable, big enough for my phone, and secure, with proper button closures. This was my first attempt at cargo pockets and belt loops and I have to say, they were not as scary to make as I thought, especially with the use of my heavy-duty sewing machine.
Final Thoughts
So as far as my first pair of proper pants, not just lounge pants, I am supremely pleased with how they fit. I can see the flare leg starting at the knee. I like how they fall around my hips. I like the length and the rise of the waistline. The pockets were stronger than I anticipated and the belt loops were functional, which came in handy because these pants were a bit big and continued to stretch as I wore them. Styling them was a bit of a challenge, as I realized I didn’t own much in my existing wardrobe that paired well in color and proportion to the silhouette of these pants. Shoes were also a challenge, I opted for a pair of Converse high tops since I believe they go with almost anything.
This is where things got interesting. I wanted to show my mom and my excitement bested my judgment. I unwisely decided to wear these pants out and about for a day of running errands in Wexford. This was my first mistake. My second mistake came from my unwise decision to cut the pieces with an extra seam allowance that made the front of the pants fit weird. The waistband was a bit big which I thought I could remedy with a belt. It did work for a bit until the fabric began to stretch, and stretch it did! The belt stopped working which was awkward, as every few minutes I had to adjust the belt.
My third mistake was not inserting a zipper to take the waistband in, which I should have planned for. I got excited and sewed the seams before I remembered the zipper. This scuba fabric showed every hole, whether pin or needle, therefore seam ripping and inserting the zipper worried me because the fabric was weaker in those spots. I was concerned the pants would rip (foreshadowing) so I left the pants as is to depend on that belt for structure. The side was the only place to put the zipper because the front was fitting so weirdly I did not want a zipper shining a big spotlight on that error.
Herein lies my final boss of mistakes, the fabric versus my thread tension. It was a mele. With thick fabric, I raise the thread tension because it helps the needle sew through the thicker fabric. Being unfamiliar with scuba I didn’t know how the scuba would respond. The scuba did not like the high tension nor did it like being sewn. I was able to get the pants, the pockets, the waistband, buttons, and belt loops on, but there were times I could barely get a needle through. The tension came back to bite me in the butt as my wear test went on. By the end of the day, I was incredibly thankful we headed home early. The thread on structural seams, like the main ones in the front, back, and sides had begun to rip through the fabric. The seams were on their last leg.
I’ve never had this happen with a project before! I was incredibly frustrated as this project took days to sew. My fingers were scratched up from the pins and the needle accidentally stabbed me as I hand sewed the buttons. There was no way to fix them, they were toast.
And so ends the journey of the pink pants. They had a good day out. A one-time adventure. They were good pants that deserved better. In my short time with them, they taught me a lot. Thank you pink pants and random scuba fabric. I will never purchase scuba again!
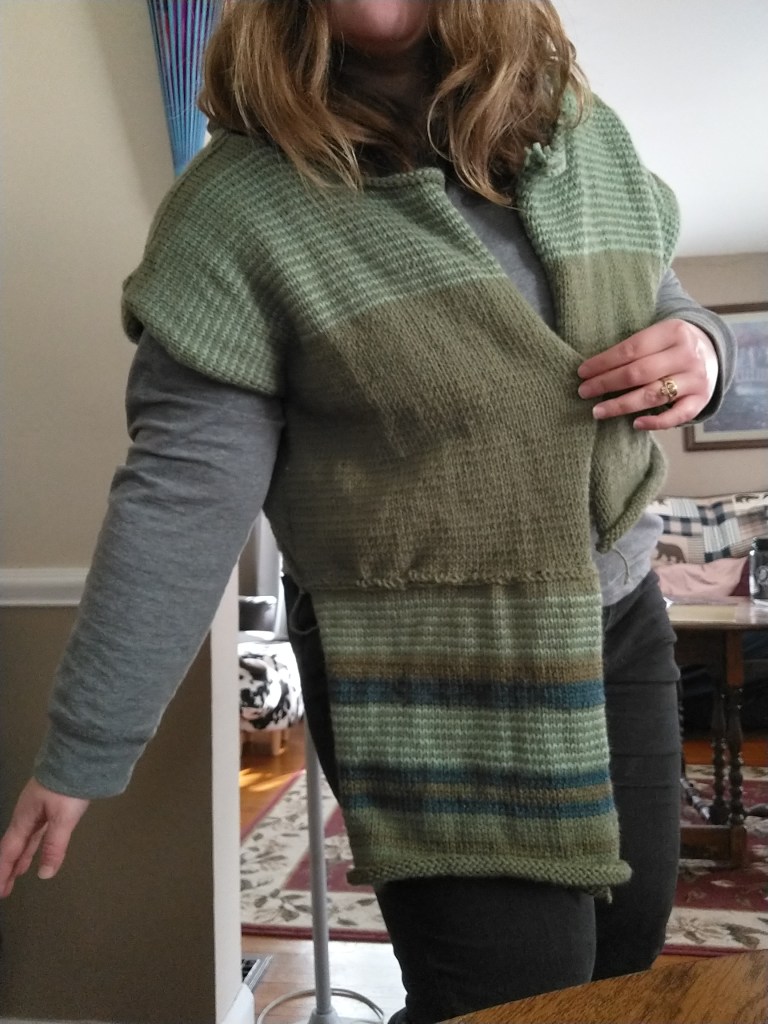
I’m currently working on a big knitwear design project. Probably the most ambitious project that I have taken on yet in my time designing knitwear and fabricating sweaters. It is a sweater coat with varying stripes that I have knit in sections over the past few months. I’m currently three months into this project, and per my working style, I’ve worked on smaller projects alongside this big project to keep me stimulated and my motivation high.
This was my progress at the end of September. I had the entire bodice done and sewn together at the shoulder seams, back seam, and under the arms until the point of the sleeve opening. Because I sew, this process of knitting makes more sense to my creative brain than the knitting in the round process. If this type of knitting drives you nuts, it’s only going to get worse so I warned you. 🙂
September Progress
October Progress
In October, I honestly futzed around with the hood and collar and that was about it. I knit one other body panel so two out of four were done and drafted collar and hood patterns, over and over again. I initially expected to make more progress in October and to have just the sleeves left going into November. That didn’t happen.
It was that dang collar and hood section, that kept me in this place of indecision and design frustration. I initially made a collar with a normal stitch, not a ribbed which looks a bit cleaner. I think I was concerned about the collar looking cohesive and was afraid that a solid collar in rib instead of a knit-purl stitch with a stripe would look less cohesive. It looked odd actually. The stripe was good, but the flat collar which began to roll on the end looked ineffectual for a collar. After I sewed it in I carefully cut the collar away which was discouraging from a progress perspective, until I realized the stitched of the collar remained (because I was afraid of snipping the wrong yarn and destroying the shoulders) and the neck opening had this lovely fit and structure now. The shoulders were slightly gathered up to the neck opening and the fit was fantastic now! It just needed a new collar.
I had an idea – what if instead of a collar I went straight to a hood. I had been watching a lot of Gilmore Girls throughout October, seasons four and five to be exact which spanned the years of 2003-2005, peak 2000s fashion. And you know what was popular during this time? The duster! I had an idea, what if the hood was just one piece of this puzzle, what if I made it longer, much longer, added a hood, a rib trim around all the edges with a button closure! A funky duster the likes of Sookie, the Olsen twins, Lindsay Lohan, and even Lorelai herself would have worn during this time.
I knew I wanted to keep the stripe theme going, something that looked labor-intensive and expensive, like a bohemian duster or sweater coat that would be featured in an Anthropologie campaign. I wanted the hood to carry on that stripe motif to make it feel integral to the garment, not an add-on.
Last October, I learned how to draft hood shapes for several outerwear pieces that I crafted for my loved ones as a part of my Potato Technology’s Autumn/Winter 2022 Collection so I am pretty comfortable with the shape and sizing scale for a hood on an outerwear garment. The thing I underestimated though was how tricky it would be to form the hood as I went, as you do with knitting, instead of cutting the hood shape out of fabric. This kicked my butt. I spent a weekend making one half of a hood out of yarn and it was so cursed. When I took it off the needles it didn’t look like the hoods I had created out of fabric and thread. It was lumpy, too short, and not going to work for what I needed.
Once again, I got my scissors out cut the bind off loose, and proceeded to wind the yarn back into a ball. That is when I decided I had to move on to a new section of the project, for my own sanity. Because I still didn’t know how the hood became misshapen in the fabrication process. None of it made sense. Going straight back into making a new hood when I didn’t know how to solve the problem would be a waste of time and resources. I only have one set of size 7 needles, there was no need to tie them up in another likely failed attempt.
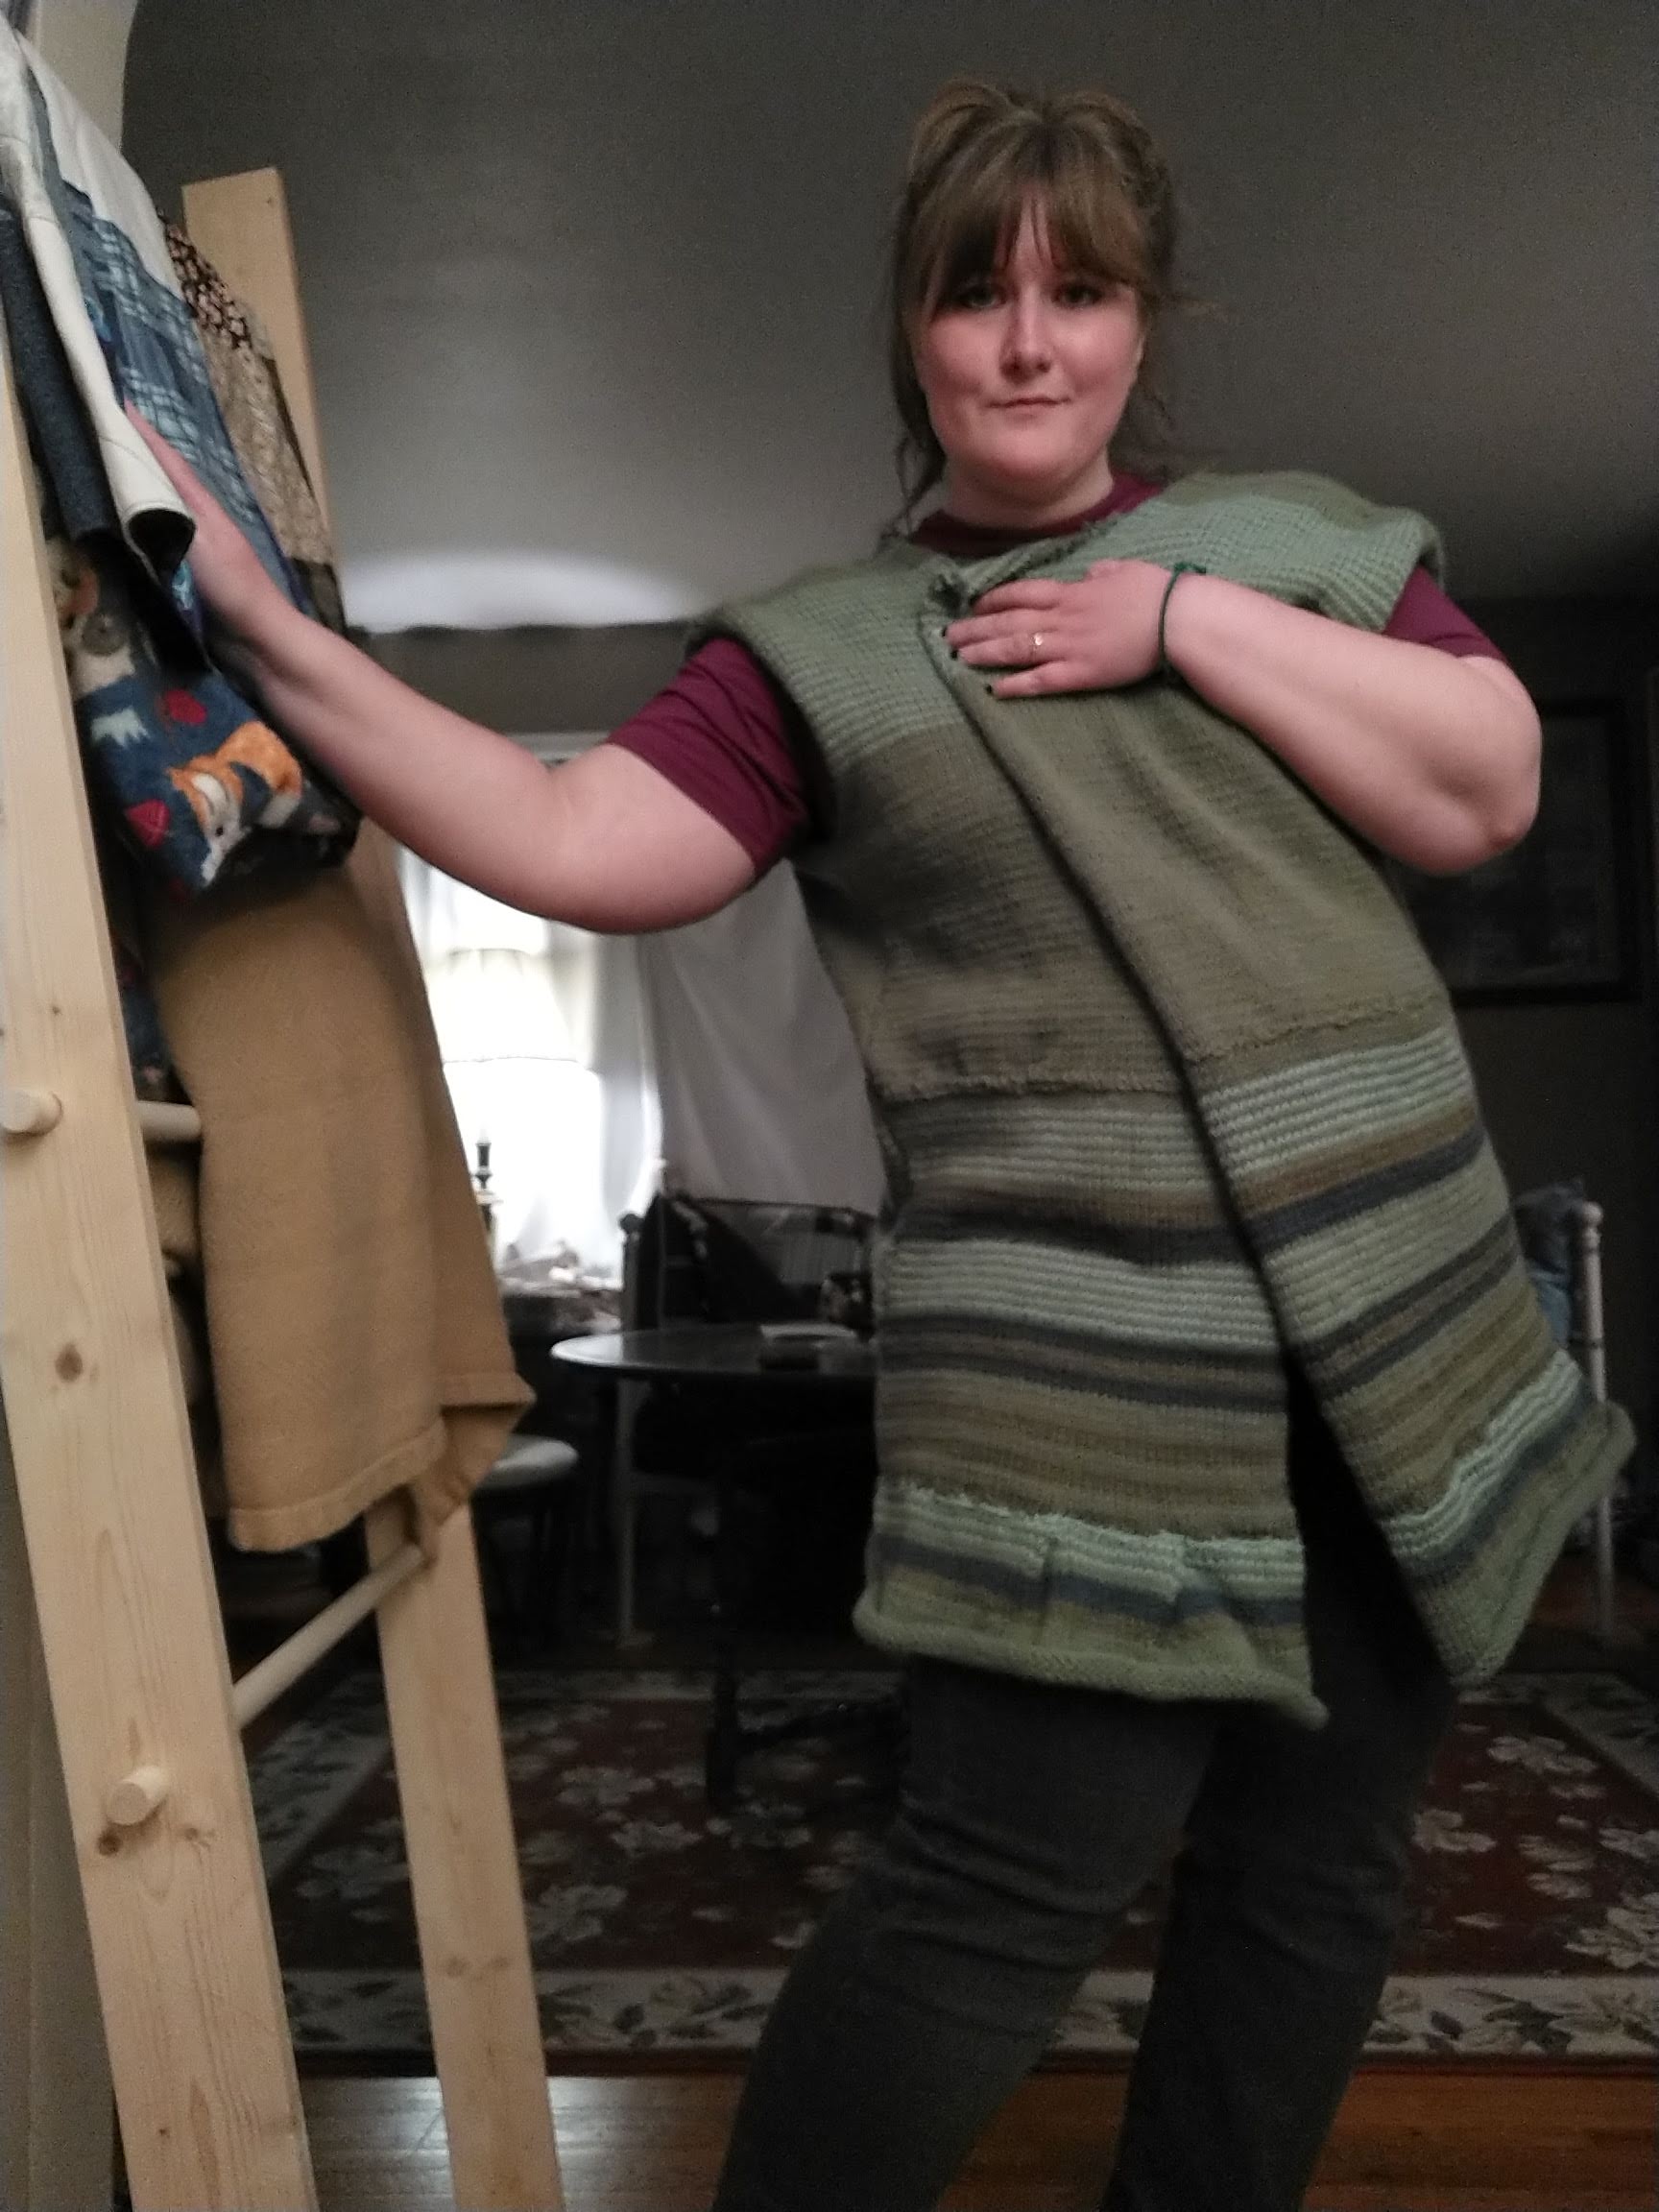
I pivoted to the the length of the duster. To make the bottom have more structure I decided to knit this section in two pieces.
November’s Progress (11/16)
This was a good move. I made the first half 30 stitches wider than the previous body panels to create some drape around the hips and the results are cute. The sweater has this sophisticated little flare that accentuates the waist – I was not expecting that! 🙂
With this step in the right direction, I got to work and powered through the last two body panels and the second flare panel at the bottom. It was a lot of work but only took two weeks to complete with focus, stretching, and snacks.
I have a tendency to let the garment lead me. I like to see how the fabric or yarn responds to the vision I have in my head and adjust the design accordingly to the way the project is coming together. The flared panels at the bottom of the sweater inspired me to pivot again, to step back from the hood and long duster to a sweater coat cardigan that could be buttoned into a sweater dress if I would be inclined to wear it as such.
That’s where it stands now. I began drafting a sleeve and designing the color work I had planned for the stripes before I continued any further because I could change my mind and add more length. The hood is out through, it’s just not the vibe.
When will this project be done? I sure hope by the end of 2023, but we shall see.
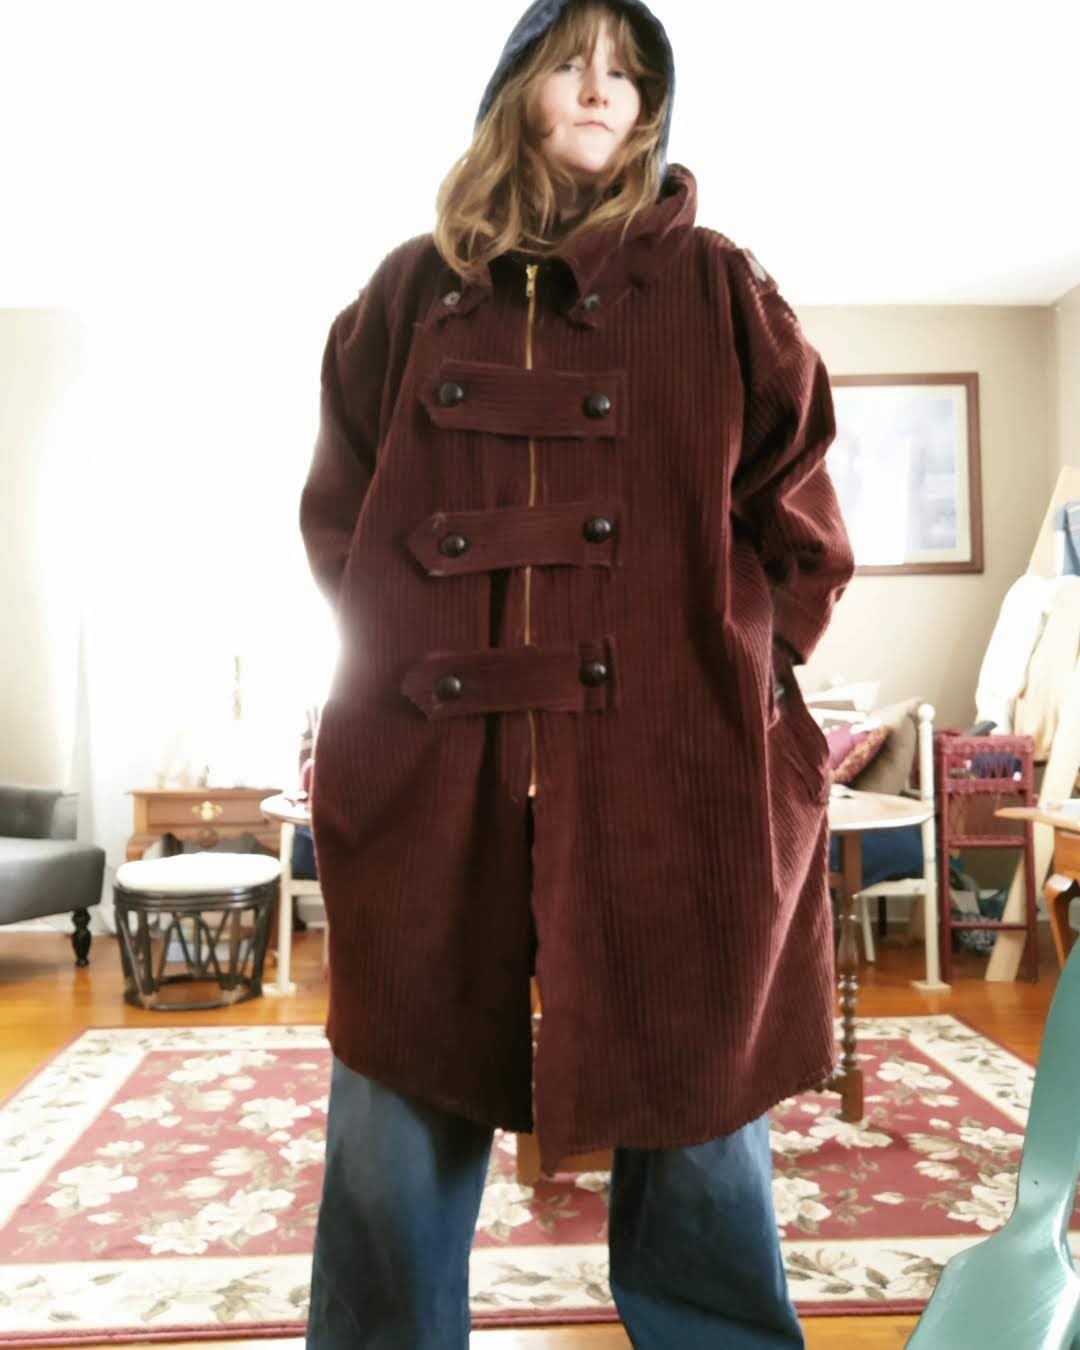
After a wear test this past weekend I realized my Jack Sparrow-inspired coat needed a few more touches to truly pop. Including accessories which will be coming soon. As for the coat, it was missing that polish, you know? So I took the belt and chopped it into five rectangles to make the button tabs and the pocket flaps. I also added more buttons! Two more styles, actually. I added leather-inspired buttons for the chest tabs and a tortoiseshell set to the lapels and the pockets. The pockets have closing buttons for security which was desperately needed because I was close to losing my phone on Saturday due to those gaping pockets. For only having the yardage from the belt to work with this turned out well. Is it a complete project? Time will tell. 🙂
I alluded to my love of pirate-inspired looks in Piratecore, Lorelai Gilmore & Sportswear Influences but to be honest, I’ve been chasing after the pirate fashion feels since watching The Pirates of the Caribbean as a kid. The movies came out at a formative time for me, I was a tween and then a teen as the first three movies premiered ( I don’t count the fourth or fifth movies as part of the franchise for many reasons, quality being one, anyway) which is a time when you begin to discover inspirations and your individual style. I remember having a Pirates of the Caribbean locket charm bracelet from Claire’s that I wore often with boots for that pirate mood. It had a skull and crossbones and a cringe picture of Will Turner, my middle school fave inside. That was the beginning of this pirate journey.
In high school, I dabbled with the skulls and skeletons, including a Flogging Molly pirate graphic tee, but I had yet to find anything that truly captured the costuming of the movie. In college, I got a bit closer with a pair of over-the-knee Vince Camuto boots that had pirate cuffs and studs down the back. Now that I know how to sew, it’s time to get serious about this, right?
As an adult, I admire the costuming of Jack Sparrow and Elizabeth Swann more than Will Turner. Particularly the costumes from the third movie, At World’s End. This poster I’ve had this since middle school and it still inspires me today, I actually used it for the basis of my coat and plan to recreate a coat dress like Elizabeth Swann wears along with an accurate Jack Sparrow cosplay at some point in the future.
At this point in time, I knew that would require in-depth research of both the historical garment and the costumes created for the movie. I would also be taking on a greater cost by sourcing specific materials like linen or duck canvas for this project along with historical patterns and additional fastenings, stiffeners, and not a lot of expertise to fall back on if something went wrong. So I decided to do a modern interpretation. Something that would have a pirate essence but would not look costume-like.
I settled on this chocolate-brown corduroy that acquired from Joann’s clearance over a year ago. With four yards to work with, I knew I could make a long and oversized coat that would be lighter in weight but could accommodate a bulky sweater or hoodie underneath. I knew I also wanted a simple fastening and toyed with the idea of a belt, which I made, and a zipper, which I prefer as the primary closure.
To figure out what silhouette I wanted, I referenced the outerwear of several Ateez music videos, including Don’t Stop which puts a modern spin on the pirate aesthetic. Kim Hongjoong was my modern inspiration for the cut of this coat, down to the epaulette details on the shoulder. I wanted the coat to be boxy and cape-like, like a modern-day pirate captain. A future goal is to acquire an Ateez compass patch to sew on the arm and complete the Hongjoong reference.
Last night, I decided to be productive. I gathered my scissors and descended on my fabric stash. To the cuts of fabric, I’d left for the first hint of 30 degrees, to make a tweed coat and plaid trousers. Oh how excited I was to have a tweed fabric that was free from wool, and on clearance no less. What a thrill!
For months, I browsed Pinterest through the forest of street-style pins to the flowing river of coat inspiration. I studied the silhouette, the collar, and the button placement. Oh yes, I was going to do this right. I referenced pattern against pattern, for the right feel. The right lapel.
For moral support, I played a fellow chaos sewist in the background, Stephanie Canada, and laid my fabric on the floor. I determined my cut lines and set them to work, as Stephanie set to work on her #grimgrinninggarb I set my scissors to work carving out the back coat panel.
With a smile, I draped it against my frame to see that the arm holes were placed correctly. The opening for the neck, cut as a slim yoke, compared to the wandering necklines of my past attempts.
Next the sleeves were ready to take shape, a careful gusset planned for the armpit. “What mobility I will have,” I thought, “sweaters, hoodies, flannels – none will be too bulky for this!”
But then the summit appeared in the distance. The jacket front and collar! It was time for the big hurrah, the moment I studied and planned for. I smoothed the yardage to the floor with care to ensure the edges were plumb. With a careful swoop, the arm holes were placed. I steadied myself for the neck opening and lapel.
I stood, I pondered, I cut. A neckline sloping down, reaching outward towards the heart. A lapel. Large enough to fold over and sit regal down the coat. With satisfaction brimming, I carried on to the collar. Easy peasy right? After such a feat! I referenced my pattern one more time and cut it. I placed. I saw what I have wanted to see for years now. A coat with collar, notch, and lapel to follow.
Alright! This is going to work. This is my dream coat. A piece of outerwear ready for Friday Night Dinner. It was sharp. It was, just one. But two? Where’s the second piece?
With horror, I realized my mistake. I laid the second piece to see that I once again forgot to mirror the pattern. It was perfectly cut, backward. The lovely lapel was inside out. I had two lefts and no right.
And I had no more yardage left, on a clearance find remnant. Game over.
No tweed coat. No coat project at all. It was over. Fin.
Sewing humbles me every time. I know one of these days all my practice and failures are going to produce something made with care and wisdom. But dang, I feel so dumb!
If you are feeling discouraged today, remember, that we’re all in this together. 🫶 Hopefully we can all find a way to laugh through our mistakes and keep looking toward what the future holds. We got this! 😁
One of my favorite memories from childhood is carving pumpkins into jack-o-lanterns with my Papa. Together we would plan out our pumpkin design, and like the pals we were, we would set to work! Papa would carefully place the gourd on newspaper and we would ponder the sides, choosing the perfect canvas upon which to carve. Then with Mom and Grandma in toe, we would gather around the kitchen table to begin our masterpiece. The very same table I sit at now as I write this.
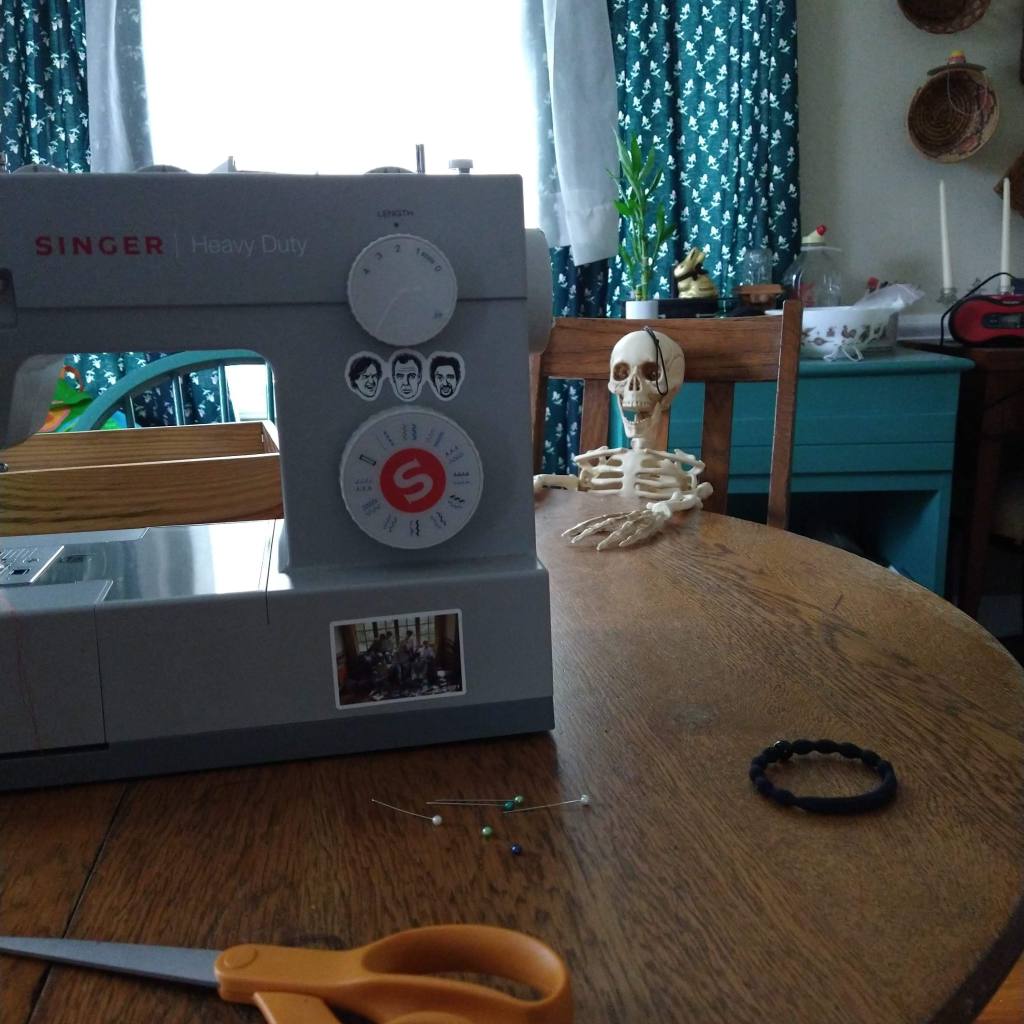
The kitchen table with my sewing assistant, Bones.
Papa would handle the knife and I with a spoon in hand was in charge of scooping out the seeds and pumpkin flesh. Like an assembly line, Papa would cut a small piece from the top, which was attached to the stem making a lid. With my mind-filled young curiosity, my hands would dig into the pumpkin, into the cold cavern of seeds and orange squishy goodness, wondering if would it be as fun as last year? Would it be as squishy? I still love squishing my hands between the seeds and the pulp. My Mom and Grandma sorted the seeds from the mess, rinsing and soaking the seeds to later roast in the oven. The memory of this process still lingers in my mind at the taste of salted pumpkin seeds. It was something I looked forward to, a hallmark of October.
Each year the pumpkin face was different, spooky and goofy, the way we liked our Halloween festivities which consisted of carving this pumpkin and the neighborhood trick-or-treat. The pumpkin carving happened a few days before trick or treat. I remember getting excited when the night came because I knew that meant I could dress up and wander the neighborhood with my friend a few days later, collecting candy as we went. When I saw this fabric at Joann’s it tugged at my heartstrings of those memories of childhood. The faces of these pumpkins look just like the way we would craft our jack-o-lantern. It was nothing too fancy, we were far from experts, but the expression carved from a kitchen knife had a certain charisma that I loved.
Not only did the pattern call to me, but the fabric was incredibly cozy, being made from a heavier flannel. I had to buy it. In true me fashion, I cut one side of the pants upside down, so my trademark pattern-matching mishap carries on into my fall-winter sewing escapades. I think at this point I should just embrace it. I’m not sure if we will carve a jack-o-lantern this year but here is our proud pumpkin friend from 2019. Happy Halloween!
I love finding a good deal on fabric, and this one was a remnant – score! I got 2 yards of this heavy-weight knit jersey in pinstripe for either 6 USD or 8 USD. My original plan in the store was to try my hand at making a hoodie. Then I pivoted to a flowy jersey dress for winter. I cut the pieces out and began to drape on a form to see what this idea was going to turn into. I liked the drape but I was concerned it was too boxy for my frame, hitting mid-thigh.
In shaping the sleeve, I noticed this fabric although a jersey more kin to athleisure portrayed the weight and image of a suiting pinstripe of the classic menswear blazer. Especially if I straightened out the curve in the shoulder. And that got me thinking, should I go for a jacket?
I drafted some lapels for a collar and cut open the front of the dress. It was going well, looked like an interesting coat silhouette. But the fabric’s drape from the knit jersey began to betray the design. It was droopy instead of structured, like a cardigan? So I went back to the drawing board.
Today I decided to trim the bottom off, and then I trimmed a bit more because I cut it wrong. With the lapel collar pinned and one sleeve sewn in, I tried it on and reflected on the length. The long cardigan shape now a cropped hip-skimming garment, stopped and pondered. It needed something.
I looked through the pieces, discarded on the table from my cuts, and began to play with options.
If I was going to make a blazer I would need a button placket on either side for the buttons and button holes to be anchored securely. The lapels needed mitigation from the awkward state of their current appearance. I began to place the collar in different postures along the neckline opening and down the front.
I hemmed the bottom and sewed in a possible placket onto the opening of the jacket. As I re-situated the collar, I realized I could make this a blouse with the placket and drape the collar to change the posture of the garment from a structured piece to a more flowy and relaxed garment more in line with the fabric’s character without losing menswear blazer inspired look.
With this in mind, I attached the second sleeve and sewed up the front, connecting left to right with the bridge of that placket piece. By using the stripes in a contrasting way, the centerpiece and collar flow together like a false scarf sewn into the top. It retained the elevated chic attitude I was looking for in a blazer but with the comfort of the cardigan. I think I will get a lot of wear out of this piece. I tend to gravitate towards dark and cool-toned colors in the fall and winter.
As Chanel declared the little black dress as a wardrobe staple of any woman’s closet, I believe a little black top that you can dress up and dress down is just as important because 100 years later, sportswear separates are the gold standard building blocks for our wardrobe. What is one of your favorite colors to wear? Do you have a staple piece in your wardrobe? I tend to gravitate towards dark and cool colors in the fall and winter.
This is a project purely inspired by Stray Kids and their Los Angeles shows from their 2023 Maniac Tour. I was fangirling hard for these hats, and so are a lot of people because even with a high price tag the hats have been sold out. I really wanted one that would emulate the joy that these hats create in my heart and so I decided to try making one. Now, I’m recreating what I can see in the image and because I am not using a pattern, I have no idea if my dimensions are correct at all. That part actually makes me feel better about recreating the Loverboy Bunny hat because I will have to put my own spin on it!
The Inspiration
Adorable, right? Their stylist killed it. I love how cartoonish the hat is yet at the same time it feels wearable and is warm. A casual staple for a maximalist. The middle photo is from the Maniac M/V which I forgot Seungmin wore this hat in the video. I probably have been wanting this hat for a year and a half without realizing it because I was obsessed with the fashion of the Maniac video in 2022.
The Process
This was not an easy thing to figure out. I referenced photos of Stray Kids members on stage and the actual photos on Loverboy’s site. I made the mistake of including the Amazon knockoff as a reference because the ears are far skinnier. I used the knockoff ears as a guide for my first attempt and finished two ears before realizing they were too narrow. Therefore I cut the knot and frogged my way back to a ball of yarn. Three attempts later I determined the correct ear width. Yes, four attempts. At times this project felt cursed!
I decided to rib knit the ears for two reasons, it was accurate to the original and I would not have to double layer the ears because the tension of the knit would help the ears to lay flat instead of rolling and losing the bunny ear effect. I wanted the ears to have a lightness to them so that they would move with me and even blow in the wind behind me like Lee Know. I have wanted to be a Leebit through this project, maybe that’s why this project was so chaotic.
The hat itself was a different story! This was the easiest process I’ve ever had with the hat and it by far took the least amount of time and fits me quite well. I made note of how wide the pattern was to be able to replicate this style of the hat again in future projects. Possibly another Loverboy hat.
Wrap Up
Overall I’m thrilled with how this turned out! It’s exactly what I was imagining and I am so happy when I wear it. Bunnies are a favorite animal of mine, especially lop-eared rabbits. I like the chaos of the ears and how they drape from the hat crown. I think I will get a lot of wear out of this. I’m looking forward to the cool weather to continue to style this into a look. Because of the reference, it also feels like a piece of merch from the band. I still regret not finding a way to see the Maniac world tour but it just wasn’t the time to go. The Oddinary comeback was my first experience and it remains a favorite for me.
If you have a crazy idea, go for it. You may just make something or make a memory that you will absolutely love. Now I’m going to try to make a mooncake for the first time. Until we meet again.
Two years ago, I made a longer cardigan using a complicated “Flying Goose Stitch” which I mentioned in Knitting Tests My Patience, it was a fun yet incredibly frustrating project to undertake as my first try for a cardigan. I thought the complex stitch pattern that involved a sequence of twelve rows that tested my ability to focus and count.
Credit to knitpurlstitches.com for sharing the pattern on Pinterest.
It’s funny looking at this finished project in 2023, compared to 2021, I actually like and I’m proud of how it turned out but that might be because the stitch photographs well. I remember the fit of this project being off, in the arms and shoulders because I didn’t know how to attach the pieces properly. This sweater took 4 months of tedious knitting. I remember listening to audio books while knitting it including Pride and Prejudice by Jane Austen, Holier Than Thou by Jackie Hill Perry and various writings of C.S. Lewis. I remember not being able to focus if I watched something in the background. I’m happy to report my 2023 project is going much better! I’m about 1 month in of focused work on the project and I have all the shoulder pieces finished and sewn together with a bottom panel designed and attached.
I am not using a pattern for this project but I am making it up as I go along. I’m taking notes as I go to draft a pattern by process and for easier replication of the shoulder pieces. The shoulders are fitting fantastically! This current project is far more comfortable than my 2021 attempt. This new project is a blend of four colors of yarn. The stripes of the bottom section will be carried on in the sleeves. My plan is to make striped, colorful sleeves and a hood or dramatic collar. There will be a ribbed bottom edge added at the end to mitigate the rolling of the hem. I debated on making this a sweater dress after learning those are apparently trending for Fall 2023 but chose to continue with the cardigan plan as I think I will get more wear out of this.
I may even add more length if it feels right. There have been countless moments through this project that have made me question my design sensibilities. This cardigan has been hovering the line between a design I think is cool and straight up ugly. There were many times during the striped panel design phase that I thought, “I’ve ruined it” but I am happy to say now that I personally like the mix of colors and think it balances the upper portion into a innovative sweater design. I was inspired by the quirky knitwear of Gilmore Girls and that peak early 2000’s style. I like that it is colorful and that the stitch is simple. That was my biggest takeaway from the Flying Geese project was to keep the stitch pattern simple for efficiency. That has payed off! My morale is higher. The stripes actually help me keep pace. I’m learning to knit quickly, yet with care to keep my stitches even. I can also knit while watching something in the background. A lot of things actually.
Long-form YouTube video essays
Look Books of fashion
Sports!
Japanese Vocabulary
Skz Code with subtitles
Music Videos
NCT 127: The Lost Boys with subtitles
Favorites like Gilmore Girls and Impractical Jokers
The possibilities are truly endless thanks to that muscle memory! Thank goodness because I can get super bored with these projects. Speaking of my pace, I’ve been truly pleased by my progress this week. I completed a shoulder panel and designed the striped panel within 3 days so around 25 hours of work. That is blazing compared to my old pace. It’s wonderful to see that practicing and failure will lead to growth in some fashion. My hope is to finish this by the end of October, will I make my goal? I’ll let you know. 🙂