This week’s update will be a bit shorter than usual, largely because there wasn’t a lot that happened with our garden. We didn’t start any new seeds, but we did transplant one of our starts, saw more seeds germinate, and bought materials for an upcoming project that sort of has to do with our garden.
Transplanting a Pepper Start
The first start you transplant into a larger pot is a momentous occasion each year. It signifies that the seeds have successfully germinated and your plants are growing closer to being ready to be moved outside and into the ground. For us, the first start that needed to be transplanted is the first Cal Wonder bell pepper seed that germinated. Since it germinated on March 22, the plant has grown to about 4 inches tall and has developed its third set of leaves. That’s the point when most recommend transplanting pepper plants. Luke from the MI Gardener YouTube channel published a video where he talked about the importance of not crowding a pepper plant’s roots, and if that means transplanting a plant to a larger pot multiple times, that’s okay. We decided to go with the 5-inch tall peat pots so that the plants only have to be transplanted once between germination and going in the ground. It also happened to be the size we had on hand.
When I transplanted the start, I mixed in some Garden-Tone, which is an organic well-balanced fertilizer that promotes root development and leaf growth. After wetting the soil, I was extra careful to not disturb the root system when removing the start from its cell. The day after transplanting, I cut the bottom off a Gatorade bottle so that it could be placed over the plant and act as a greenhouse since the start no longer fit under the dome of the seed-starting trays. We’ll keep you posted on the plant’s progress after being transplanted.
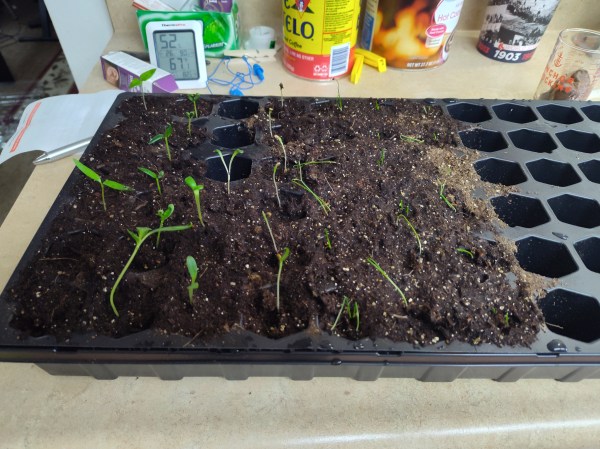
More Germination
Last week, I wrote that we started a lot of seeds, including all our tomatoes, husk tomatoes, and cantaloupes. In the week since we started them, every variety of seed has successfully germinated. This doesn’t mean that every cell has germinated, but that at least 1 cell of every seed has germinated. This is a huge step because these vegetables are going to be a large section of our garden. Some of the tomatoes and the cantaloupes have even had to be thinned already.
Buying Materials for Our Screened-In Porch Project
Over the next two weeks, we’re going to be taking on screening in our back porch. We have a nice-sized back porch that we love sitting on. It’s also where we have our grill. The downside to it is that wasps, yellow jackets, and other bugs love it as well and can make sitting out there kind of miserable. It is also open on all 3 sides, so rain gets blown in. We’re addressing all that by screening it in with a set of French doors. The back will have screens that run from the ceiling to the floor, while the sides will have screens that run from the ceiling to the railing, which is waist high. Below the screens, the sides will be closed so that rain can’t be blown in. You may be wondering what this has to do with gardening. Great question.
When we bought the lumber for this project, we bought extra to use as a trellis for our long beans to climb and to build some planter boxes. In the end, we hope to see the trellis incorporated into the porch. We’ll share pictures of the project when it’s done.
Up Next
This week, we’re planning to pick up the rest of the materials we need for the screened-in porch project and to start our beans and cucumbers inside. Outside, the soil is finally starting to warm up, and it’s dried out nicely. That means we should be able to direct sow some of our seeds. We’ve been very patient with them because the soil hasn’t been warm enough to this point. How are your seeds going? We’d love to hear from you. Happy gardening!
I hate to say it, but I forgot to start this week’s update until Sunday night. Typically, I will start these on Saturday evening, but as I sit here watching the Boston Red Sox lead the St. Louis Cardinals 18-3 on Sunday Night Baseball, I am much later than usual. So, I apologize if this update ends up being shorter than normal, but I was unwilling to push the update back a day or two or not publish one at all this week. To those who read my gardening content: I can’t thank you enough. Writing here has been a relaxing break from work and helps remind me of why I like writing. I don’t want to postpone it any longer: Here’s this week’s update.
Much Germination
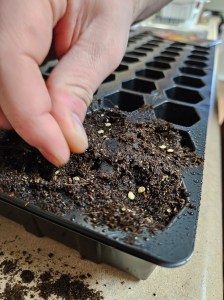
In last week’s update, I discussed the difficulties we were experiencing with getting seeds to successfully germinate. This was largely concentrated to our peppers, where we only had two of our 12 pepper cells germinate. I’m proud to report that after we altered the watering process and re-sowed the seeds, we’ve had much better germination. All six of our bell pepper cells, two of the Scotch Bonnet cells, and one of the Hungarian wax cells have sprouted. The bell pepper seeds have been successful enough that earlier today, we thinned the cells so that only one plant per cell will grow.
Germinated peppers, dahlias, eggplants, and onions
We also had successful germination with all three dahlia cells, all six eggplant cells, and all 21 bunching onion cells. We feel so blessed that we’ve been able to turn the poor germination rate around and have successfully started many other seeds.
We also started some new seeds earlier today:
3 cantaloupe cells
3 ground cherry cells
3 tomatillo cells
6 broccoli cells
And all of our tomato seeds (6 principe borghese, 3 Queen Aliquippa, 3 indigo pear, 3 blue beauty, 3 yellow pear, 3 black krim, and 3 mushroom basket)
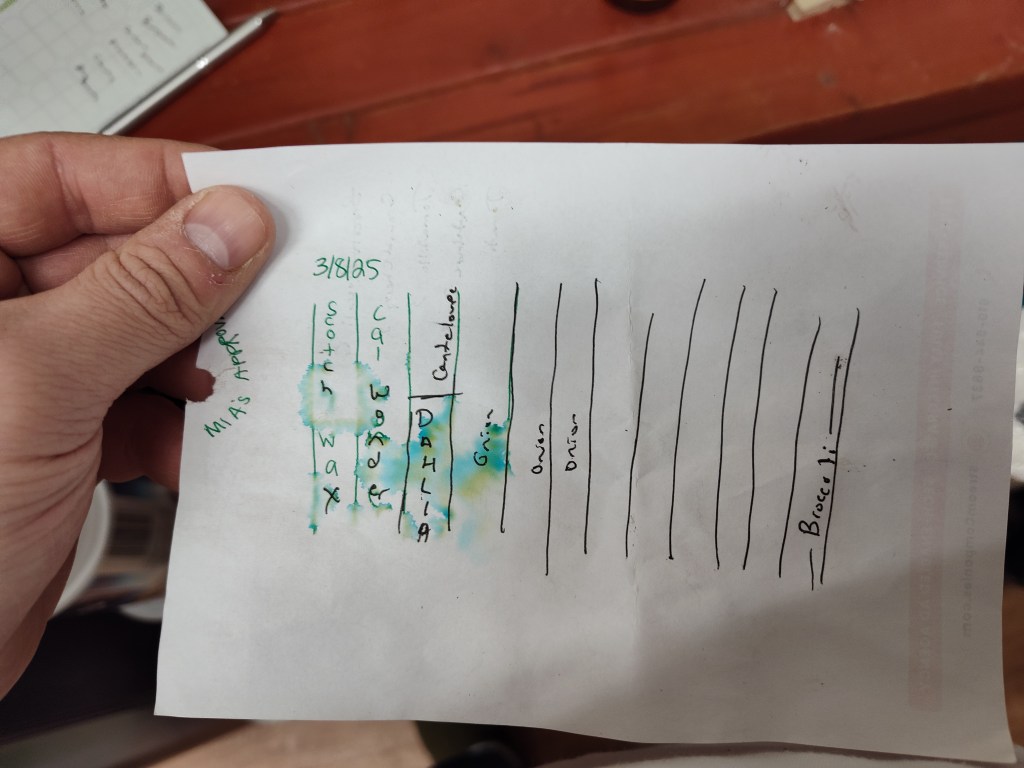
We’ve been very careful to track what we’re planting in each cell. We use a piece of paper with a hand-drawn chart on it for the one tray, and our other tray came with a cardboard chart. I’m also tracking these on a spreadsheet in case the physical copies get destroy or the ink smudges.
Seed Tray ChartSeed Tray Chart
Cleaning Out Our Garden Tote
This weekend, we spent some time in our garage (also my woodworking shop) cleaning it out. I recently finished a guitar stand project, and when I’m wrapping up a project, I tend to make a huge mess and not worry about cleaning up as I go. That leads to a lot of sawdust, tools, and scraps being spewed everywhere. I needed to clean everything up from that project and reorganize everything so that the spring and summer things are at the front, with the winter items moved to the back. In doing so, I uncovered our tote of gardening supplies, which was pretty cool.
I didn’t forget that we have this tote, but I did forget some of the stuff in it. There were a lot of supplies that we used when we had our container garden in 2022, including soil amendments, organic fertilizers, and hand tools. Some things weren’t worth using anymore, such as the open bags of seed-starting mix and peat moss, but the amendments were still good. I actually repurposed the peat moss and starting mix by pouring it on our garden beds. We’re also able to use the larger seed pots by transferring our pepper plants into them when the time is right. It was fun remembering everything we had bought for that garden three years ago. It helped me to realize how far we’ve come in three short years and how thankful I am to be able to garden again, especially with some of the same items.
So Much Rain…
In last week’s update, I said that a goal for the week was to get gypsum into garden beds 3 and 4 and do the final tilling. I was able to do that on Monday before a large weather system entered the area and brought a lot of rain. I estimate that we received somewhere between 2 and 2.5 inches total from Monday afternoon through Saturday. It made our garden beds nice and muddy, so we can see that we’re still having some drainage problems, but it’s a work in progress. Also, it’s been a very wet spring that has arrived on the back of a snowy winter, so the ground was already pretty wet. As the ground dries out this week, the goal is to get back into the garden and till the final two beds and perhaps even get some seeds in the ground. We also need to get the parts we need for the rain barrel, which will help with some of the moisture problems.
Up Next
The weather forecast is much better this week, so hopefully, the garden beds and yard can finally dry out. If that happens, we’ll likely try to start beds 5 and 6. If that happens, it’ll be great, but if not, that’s okay too. We’re in a great place at this time and need to be patient. In the meantime, we’re going to be screening in our back porch in a few weeks and need to get it prepped by taking measurements, cleaning everything, and making sure we have our supplies list figured out so that we can get everything we need. When we pick up the supplies for that project, we’re also going to get some materials to build some planter boxes and a trellis or two.
Picking out a tiller for your garden is a big deal, and there are many factors to consider to ensure you’re getting one that best fits your needs, including size, power method, and price. We recently bought one for our garden and want to share our experiences with picking out the perfect model. We only plan to use ours when initially starting garden beds or turning over soil in flower beds. After that, we’re going to be as no-till as possible, so we didn’t want to pay a bunch of money for something that will only be lightly used after the first year. With that being said, what all went into our decision?
Gas Over Electric
We initially thought that we were going to buy an electric tiller. They’re cost-effective ($150-$200 range), and the reviews for many of them are strong, with people even saying they’ve used them to break ground on gardens. Electric tools have come a long way from the mediocre weed eaters and mowers of the 1990s. Modern tools are durable, powerful, and often do 80% of the work that gas models do. We also liked that an electric tiller would be quiet. So, why didn’t we buy an electric one?
The cost of an electric tiller may be cheap, but 100-foot 10-gauge extension cords are not, which is the length we need for our yard. That would have added at least $100 to the price of the tiller, bringing the total cost closer to that of a gas model. We also started to realize how big of an area we will be tilling and were less sure that an electric model could endure that level of abuse. At that point, we started to consider gas models.
In our price range of $200-300, we knew we’d be looking at a small gas model, perhaps one with a narrower working width than an electric tiller. But because it is gas-powered rather than electric, we had more confidence in its ability to run nearly nonstop for hours without issue. Additionally, if there is an issue with the engine, I can likely fix it. The final item that pushed us over the edge is the cost of electricity vs. gasoline. Our town has pretty affordable electricity, but running an electric power tool all-out for many hours would raise our electric bill. Meanwhile, gas is in the $3.50 range here, and most of the tillers we were considering had fuel capacities of less than 1/2 gallon, so for a little over $3, we could run it nearly all day.
As an aside, we never considered a battery-powered one. We have a few outdoor tools that are battery-powered, including a chainsaw and a lawn mower. Both work great, but I’m aware of the battery life on those and how long they take to charge when completely drained. Being hindered by that was not something we were interested in.
2-Cycle vs 4-Cycle Gas Tiller
We next needed to decide between a 2-cycle (or stroke) and a 4-cycle gas tiller. Both are great and have their advantages and disadvantages. Two-cycle engines are more powerful for their size and have a simpler design. They last a long time and are easy to maintain and work on. However, they are loud, use more fuel, and require pre-mixed gas and oil, which is an extra step.
Four-cycle engines, however, are quieter (think lawn mower vs. chainsaw), easier to operate, and more fuel-efficient. I’m someone who loves the sound of chainsaws every now and then, and I grew up around 2-stroke dirt bikes and 4-wheelers, so I get the attraction to the sound. But we live in town and don’t want to anger our neighbors. Another benefit to the 4-cycle engine is that it is slightly heavier than its 2-cycle cousin, which should, in theory, make tilling the soil a bit easier.
Which Models Did We Look At?
We looked at quite a few tillers, all in the $200-$300 range. I’ll break them down by manufacturer and discuss the individual models.
Earthquake
MC33 10″ 33cc 2-cycle – The same working width as the two that follow but only has a 33cc 2-cycle engine. This is designed for light-duty work like weeding and only weighs 33 pounds. This was available from Amazon for $199 and Lowes for $239.
MC43 10″ 43cc 2-cycle – A 10″ working width with adjustable tines and a powerful 2-cycle engine and weighing 38 pounds. It was available at two stores: Tractor Supply and Amazon, both for $249.
MC440 10″ 40cc 4-cycle – Like the above model, this one has a 10″ working width with adjustable tines but has a 4-cycle engine. This model weighs 37 pounds and is the one we purchased. It was available at Tractor Supply for $299, Family Farm & Home for $299 (on sale for $259), and Amazon for $265. As you know, we bought ours from Amazon.
Badger 21″ 160cc 4-cycle – This one is substantially larger than the other models we considered. It’s a true tiller while the others are technically cultivators. It has a 21″ working width and weighs a whopping 107 pounds! It would have been heavy to move and difficult to lift but would have required no effort to force the tines into the soil. It was only available at Menards for $449, but it was on sale at the time for $299.
Champion
12″ 43cc 2-cycle – Similar to the Earthquake MC43, this model has a powerful 43cc 2-cycle engine but a wider working width than most at 12″. It’s light at 33 pounds and is designed to be operated in small spaces. This was available from Tractor Supply for $297, Home Depot for $299, and Amazon for $299.
Troy-Bilt
TB225 9″ 25cc 2-cycle – This is a very light (23 pounds) model that is designed for weeding existing garden beds or turning the soil over before planting. It was available at Tractor Supply for $230.
TBC304 12″ 30cc 4-cycle – Much more substantial than the 2-cycle model, this machine weighs 38 pounds and is built for a bit heavier work. It was available from Home Depot for $279.
Toro
10″ 43cc 2-cycle – I’m 99 percent sure this is the same model as the Earthquake MC43. They look nearly identical in engine and frame design with the only difference between the manufacturer stickers. This was available at Family Farm & Home for $229 (on sale for $199), at Lowes for $248, and at Tractor Supply for $256.
Predator
9″ 43cc 2-cycle – This is Harbor Freight’s in-house brand of outdoor power equipment but is built similarly to the Toro model above. It weighs 32 pounds and has a narrower working width than some of the other models on this list. It’s only available at Harbor Freight and is $220, so cheaper than the Toro. As an aside, a lot of people are wary of Harbor Freight’s tools, but I’ve generally had positive experiences with them. So far, we have a battery-powered chainsaw and a host of electric woodworking tools and haven’t had any issues with them. If this had a 4-cycle engine instead of a 2-cycle one, we probably would have bought it.
Why We Picked the Earthquake MC440
In the end, we picked the Earthquake MC440 10″ 40cc 4-cycle cultivator from Amazon, as mentioned above. We landed on this model because it met all the criteria we had and was easy to purchase. We were certain we wanted a 4-cycle engine over a 2-cycle for noise and ease of use. We also wanted one with adjustable tines that could go as wide as possible. We later learned about models with wheels that have to be removed before tilling and didn’t want one of those. Finally, we were looking for the heaviest one we could find in our price range. The more a cultivator weighs, the less force you have to apply to keep the tines in the ground.
Recognizing that we were probably going to push it to its upper limits, we wanted a model that would be durable and reliable. Granted, because these aren’t tools you can “test drive,” you have to rely on reviews and how they appear to be assembled. The Earthquake models all had great reviews, especially the MC440. There were many reviews where the person said they used it to dig garden beds into lawns, which, to be fair, isn’t what it’s designed to do.
We’ve now had our cultivator/tiller for close to a month and have used it to establish five garden beds with two more in the works. To say it’s met our expectations would be an understatement. In the next week or so, I will write a full review of the machine. Is there a cultivator or tiller that you use for your garden? I’d love to hear in the comments. Happy Gardening!
In this week’s garden update, we continued our journey of tilling all the garden beds we need. We admitted defeat with some of the pepper seeds and decided to re-sow a few of them. We also started two new seeds inside and celebrated that two of our eggplant cells have already germinated.
Continuing to Create Garden Beds
After a few discussions and planning sessions, we determined how many garden beds we need and where they are going. Essentially, we are turning about half of the second lot we have into a garden, which will be divided among six beds, plus one for wildflowers that will attract pollinators. Heading into this past week, we had three started, but none were completely ready to go. At the end of this week, we have four started and two ready to go with rows tilled.
Our process for tilling the beds looks like this:
One initial till that removes the bulk of the grass followed by raking to scrape the grass away from the soil.
A second perpendicular till that goes across the original one. This tilling is deeper than the first one and helps to clean up any strips of grass that were missed on the first pass. The bed gets raked after this pass as well.
Apply a layer of gypsum.
A third tilling that works the gypsum into the soil and establishes the rows we’ll plant in.
We may do a light fourth tilling right before planting to work in any soil amendments we use.
It’s been interesting to see how the soil and bed change after each pass. The first two passes leave the bed moist and muddy. But within 30 minutes, the top layer of soil begins to dry. Then, after the third pass, it starts to look like a garden with loose, workable soil between walking paths.
We’ve developed a good system for creating the beds when we’re both available to work on them. I’ll go around and create the border for the new bed. Magz follows that up with the first pass, and I’ll rake behind her. She’ll also do the second pass that runs perpendicular to the first one. I’ll then rake it off again, add the gypsum, and handle establishing the rows. It’s been a very productive system.
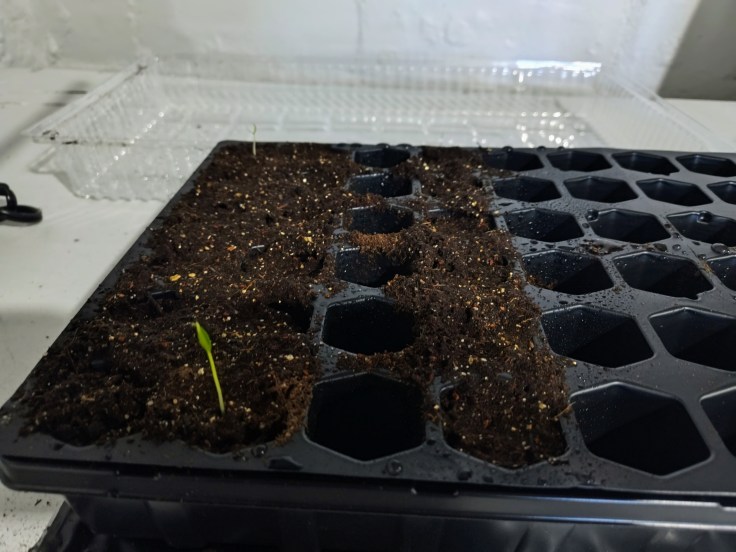
Eggplant Germination
In last week’s update, I wrote that we started our eggplant seeds on Saturday, March 22. These were supposed to take 10-15 days to germinate but ultimately sprouted in seven days with the first seedlings breaking through the soil on the 29th. That is a big change from the experience we’ve had with our pepper seeds, but more on that in the next section.
A look at our germinated pepper and eggplant seeds
The eggplant variety we’re growing is Ping Tung from Baker Creek. They are an Asian variety named for the location in Taiwan where they originate. They are a thinner eggplant than the bell-shaped varieties that most are familiar with and can grow up to 14 inches long.
Re-Sowing Seeds & Starting New Ones
I alluded to this in the previous section, but we’ve had some difficulty with our pepper seeds. Of the 12 cells we started, only two have germinated after three weeks: one sweet bell pepper and one Scotch Bonnet. We haven’t had any of the Hungarian wax peppers germinate. Yesterday, we made the decision to re-sow the cells that hadn’t germinated yet – five sweet peppers, two Scotch Bonnet seeds, and three Hungarian wax seeds. I’m not entirely sure what caused these seeds to fail, but I think it was inadequate moisture. I intended to pre-moisten the seed starting mix before starting the seeds but forgot to. I also used a spray bottle to water the seeds, but I don’t think I was giving them enough water at a time. That changed when I started the eggplant seeds. Instead of using the spray bottle, I started pouring water on the cells and letting it drain through the soil. It meant I only needed to water the seeds every few days rather than daily. We’ll see how the pepper seeds do with this change in the watering process.
That day, we also started two new seeds. One is the Ishikura bunching onion, which is a Japanese scallion-style onion that grows like a green onion rather than a long day onion. This onion doesn’t develop a bulb below the soil, but instead, the tops can be cut and will re-grow. We started 18 cells of these and will sow additional cells in the upcoming weeks. We love spring onions and want to have fresh ones all growing season.
The second seed we started is a dahlia. In addition to growing vegetables, we are growing quite a few flowers this year, mostly perennials that attract pollinators like butterflies and honeybees. We have very little experience growing flowers, especially from seed, but we’re excited to see how it goes.
Up Next
The goal this week will be to create rows in garden beds three and four. If we’re able to get started on the final two beds, that’d be great. It could also be overly optimistic, though. We also want to direct sow some seeds in our garden beds. Some of the greens and flowers can be started this early.
In this week’s garden update, we have a lot to go over. We have updates regarding our seedlings, began creating our garden beds, realized what our soil is like, and began addressing a water runoff problem. Finally, which seed did we start? Let’s dive in.
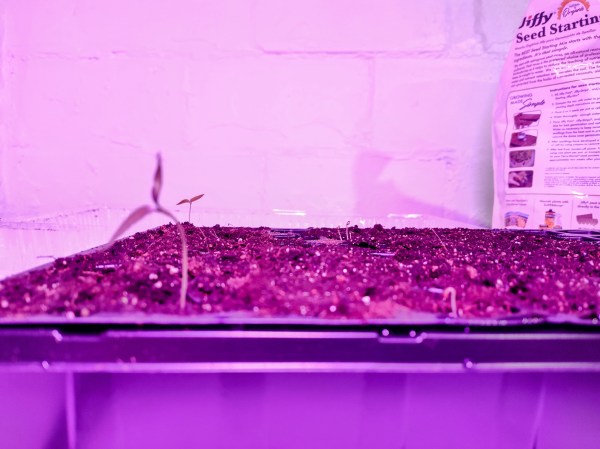
Houston, We Have Liftoff! (Or Germination)
It was touch-and-go for a bit, but our first seeds have started to germinate. On March 8, we started 12 cells of pepper seeds – 6 sweet peppers, 3 Scotch Bonnets, and 3 Hungarian Wax. The seeds were supposed to take 10-15 days to germinate, so as we got to the 2-week mark, we started getting a bit nervous that they weren’t going to germinate. However, when I checked the starting tray on Saturday (March 22) morning, one of the sweet peppers seeds had germinated. Wonderful!
Pepper Germination
Then, later that day, I went down to check the tray again and one of the hot peppers had sprouted! The next morning, I set up our grow light and configured the settings so the light stays on for 12 hours, so the plants should begin to take off. The first seeds to germinate each year is such a monumental occasion. It feels like it takes the concept of a garden and turns it into a reality.
Starting to Till the Garden Beds
In last week’s update, I shared that we received our rototiller and were waiting to begin the tilling process. Last Wednesday afternoon, we got it in the ground, and it was more difficult than I anticipated. I believe I have used a tiller before but can’t remember with 100% certainty, and if I have used one, it was only to turn over soil that had already been used for gardening. I’ve never established a garden from scratch. And if you haven’t used one, lugging a 30-pound machine around and preventing it from bouncing is a workout.
Our lawn has very thick grass and the ground below it is soft, almost like a peat bog with compacted soil. There is basically no top soil, so if there’s any moisture in the ground, it’s essentially soft, muddy clay. Your feet sink into, and the soil sticks to your shoes. It was a bit disheartening to realize the soil’s composition, but not unexpected given that loamy clay soil is common in this part of Pennsylvania.
First Garden Bed
We began by roughly determining where we want our beds to be, and on the first pass, we focused on removing the grass. That was largely successful, and after raking, we could see the soil. The second pass was deeper and started to turn the soil over, which is when we noticed that we need to address the moisture/drainage issue of the soil. Clay soil is wonderful because it’s full of nutrients and minerals, but not so great because it doesn’t allow excess moisture to drain. Over time, this will be resolved through the addition of organic compost, natural soil breakup from plant roots, and cover crops in the fall and winter.
Immediately, though, we have to address the issue before planting this season, which we’re going to do with gypsum. Many of the Google search results I found pointed us in the direction of gypsum, which is a naturally occurring mineral that breaks up soil and improves drainage. Thankfully, it’s also cheap at $10 for a 40-pound bag. Our plan is to spread it on top of our garden beds and till it into the soil a few inches. In the meantime, though, we’re already starting to see the soil dry out. Within 15 minutes of removing the grass, the top layer of soil starts to dry out, which is a remarkable improvement.
Diverting Downspout Runoff
Compounding the issue of our loamy clay soil and thick lawn is that one of the downspouts on our garage directs water into the part of the yard where our garden is going. Our garage roof isn’t big, but the amount of water draining off it is enough to exacerbate an existing problem. One option is to divert the downspout to have the water exit in a different location, but it would still make our drainage problem worse. Instead, we decided to use a rain barrel as a catchment device. On Saturday, we bought a 55-gallon blue plastic barrel from Rural King that was previously used for food, so once we thoroughly clean it, it’ll be safe for watering our garden. We have discussed having a rain barrel, but the plan was expedited as a result of the downspout and drainage problems. We still need to buy a spigot and filter, plus we need to figure out a platform, but we’re on the right track. We’ll provide more updates once we install the rain barrel.
Starting Eggplant Seeds
Saturday was also the day we started our second type of seeds: eggplants. Like the sweet peppers, we started 6 cells of these with 3 seeds in each cell. These will take 10-14 days to germinate, similar to the peppers.
Up Next
We won’t be starting any more seeds indoors until April, but if we get our garden beds prepped in time, we will be planting mustard greens outside. On Friday, Magz also tilled a bed at the back of our property, which we’re going to use for wildflowers that will benefit pollinators like butterflies and honeybees. That area of our property doesn’t get the best sunlight (partial) and is close to a drainage ditch, so we don’t want to grow vegetables there. We’ll be ready to plant those flower seeds as soon as the weather is consistently warm enough and the soil is where want it.
We’ll also continue to prep our garden beds with the tiller and gypsum. In the meantime, do you have any experience with a rain barrel or other catchment system? How about poorly draining soil? We’d love to hear how you’ve navigated it and apply any tips you have. Happy Gardening!
Nearly everyone you talk to expresses a desire to shop locally and support small businesses rather than buying things from Amazon and Wal-Mart. Magz and I are no different. We enjoy buying things in person and from a store in our town and try to use Amazon Prime if we strike out elsewhere. An issue we’ve been encountering is that our local stores rarely have what we need in stock, and nowhere has this been more of a reality than with garden supplies.
Our Local Stores
We live in a small town of about 8,000 people. The population has stayed almost the same since 1990. We are surrounded by towns with even smaller populations – 3,500, 800, 1,900, and 2,000. To get to a town with more than 15,000 people, you need to drive about 30 minutes. Our town isn’t void of stores, though. We have an Ace Hardware, a Tractor Supply, an Agway Feed Store, and a small Wal-Mart that doesn’t have a grocery section. Those stores all carry some gardening supplies, but because we are in the center of many small towns, as well as three colleges within a 10-mile radius, these stores have to cater to a large area and a wide array of shoppers.
Photo by Tem Rysh on Unsplash
Ace Hardware has a small selection of seed-starting items, a great selection of hand tools, and a small offering of engine-driven equipment, with most of the in-stock items being fairly pricey STIHL products. Tractor Supply has more power tools, including affordable options, but our local store wasn’t going to have any in stock until April. We could have ordered the tiller we bought at a higher price and shipped it to our local store for free or paid to have it shipped to our house. Either way, it was going to be more expensive than what we got from Amazon.
Agway has a lot of gardening items but few tools. It’s a great store for buying top soil and mulch in bulk, soil implements like diatomaceous earth and fertilizers, and seed-starting cells, but our local store doesn’t carry any tools. Finally, we get to Wal-Mart. We generally don’t like our Wal-Mart. Because it’s a small store without a grocery section, it is limited in the items it carries, and to maximize the number of aisles, there is a less-than-average amount of walkway space between aisles. They have a gardening section with some seed-starting stuff, but ours doesn’t carry cultivators or tillers nor does it keep soil additives in stock. You can buy everything online through Wal-Mart, but that’s no better than purchasing from Amazon.
Moving outside of our town, you need to drive about 30 minutes to shop at a Lowe’s or Home Depot. When we were at Lowe’s a couple of weeks ago, we were pleased with the gardening section they had but didn’t see any gas-powered tillers. We also recently learned that some Tractor Supply stores have a garden center. The ones closest to us don’t have garden centers, but there are a few within 45 minutes that do. In the future, we’ll check one out and see how much more it carries compared to our local store. There’s another feed store about 20 minutes north of us that we want to visit this year to see if they have a better selection than our local Agway.
What to Do When You Want to Shop Local But Can’t
This was a dilemma we found ourselves in. Since we started planning this year’s garden, we’ve looked for local options when making purchases. We did end up buying our starting tray, starting mix, and gloves at our closest Lowe’s. That wasn’t in our town, but it was in person and regional. The frustration has come when looking for larger tools, such as a tiller or cultivator. The tiller we bought, an Earthquake model with a 43 cc, 4-cycle engine, is sold at a lot of stores, including Tractor Supply, Ace Hardware, and Wal-Mart, but none of the stores in our town had them in stock. Menards actually had the best sale, but the closest store is about 50 minutes away, and we were unsure if we’d be able to get there before the sale expired. The only other place we looked into was Family Farm & Home, with the closest location about 45 minutes away. We love the drive, but there was no way to check the store’s stock without doing so in person, and driving that far only to learn it wasn’t in stock seemed like a bad gamble.
It’s a very frustrating spot to be in: wanting to shop locally and in person but being unable to. You don’t want to give in to online shopping for everything, even when it’s cheaper and you’re already paying for an Amazon Prime membership, but we have found ourselves with no alternatives recently. Sure, we could have paid $100 to have a tiller shipped to us from another store or waited for it to be shipped to the local store. We also could have driven to Menards or Family Farm & Home, but at that point, we’re not shopping locally. Family Farm & Home is in a different county, while Menards is in another state. In all these situations, we’d either be paying more money, waiting longer, or taking a chance on it not being in stock. Amazon was simply the best option, and I think that’s okay.
We should be allowed to give ourselves a pass when Amazon is the best option. We also shouldn’t be forced to feel bad because we don’t want to overspend, drive long distances, or buy an inferior product. I think we should look for a local option first, but if the stores in your town won’t carry what you need, it’s not your fault. We ended up buying the tiller that best fits our needs and budget, and we’re happy with it, which is the most important thing.
I try not to complain about things in my writing and won’t make a habit of this, but I’ve been processing these thoughts for quite a while now, and it’s not just with gardening supplies. Do you struggle with the pressure of buying locally or the guilt of shopping online? If so, I hope you can get some reprieve from it and feel confident when you make the best decision for your needs. Happy gardening!
This week’s garden update will be brief, as we haven’t started any more seeds and are in a holding pattern as we wait for the ground to dry out. All of the snow has melted and has been followed by some rain, so our soil is quite saturated.
In last week’s update, I mentioned that we may be starting eggplant seeds this week, but after consulting the seeding starting spreadsheet, we realized that this weekend was a bit too early. We’ll actually be starting them this week, likely Thursday. Instead, the big thing that happened this week was that we bought our rototiller.
Which Tiller Did We Buy?
Buying a tiller or cultivator is a big decision; much bigger than I thought it would be. In the future, I’ll likely write a standalone article that discusses what went into the decision we made, but for now, we bought this tiller:
It is an Earthquake 40 cc 4-cycle tiller (technically, it’s a mini cultivator) that can till up to a 10-inch wide path at one time. Two of the tines can be removed to till a narrower path, and it has a working depth of 8 inches. We bought ours from Amazon, although it is also available at Tractor Supply, Lowe’s, and Ace Hardware. We wanted to buy locally, but the Tractor Supply in our town didn’t have it in stock, Ace was far more expensive than Amazon, and the closest Lowe’s to us is about 30 minutes away. Meanwhile, Amazon was able to deliver it the next day.
It arrived on Thursday afternoon, and it only took about half an hour to put together. Afterward, I had to give it a go and see how it worked. The engine fired right away, and we did a quick trial run in the mulch bed by our back porch and in our yard. It worked extremely well in the mulch bed, which was expected, and did pretty well in the yard, which has never been tilled. We weren’t expecting it to have much success in the yard since the ground was very wet and we hadn’t set the depth on the tiller yet. We’re very excited to have a tiller and can’t wait to get our garden laid out. The plan is to till the garden later this month, but if it dries out before then, we’ll likely start sooner.
What’s Next?
As mentioned in the intro, we were originally planning to start our eggplant seeds this weekend but realized it was too early. Instead, that will happen this week. Those will be the only other seeds we’ll be starting in March. Everything else will be started in April or May. Happy gardening!
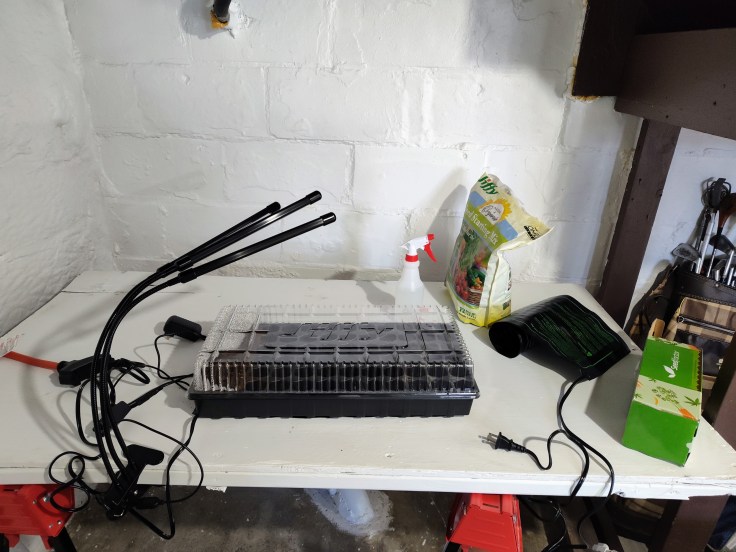
After writing about starting our first seeds for the season, I thought it’d be helpful to discuss our seed-starting setup. Although everyone will have a unique set of equipment, the basic items will generally be the same for everyone. The equipment I discuss below is what Magz and I bought, but you’ll want to determine what best fits your needs. That can be based on how much you want to invest in seed starting at this time, how many seeds you want to start, and how large your seed-starting space is.
Necessary Equipment
Regardless of how big or small of a garden you’re planning, these are the essentials you’ll need.
Heat Mat
Although many people will first think of a grow light when buying seed-starting supplies, a heat mat is equally as important. A heat mat warms the soil to the appropriate temperature for seeds to germinate. They are great because they maintain a temperature of about 70-75 degrees Fahrenheit. They are also waterproof and can be wiped clean, so you don’t have to worry about getting wet soil on them.
Our seed starting equipment for the 2025 garden.
They’re very easy to operate since the ones we have don’t have a temperature controller. Rather, you simply set them and forget them. Once you plug them in, they stay on 24/7 until you begin seeing your plants poking through the soil. We bought ours on Amazon in Feb. 2022. They are 10 inches by 20 inches, came in a 2-pack, and cost $27.99 at the time. They’re actually cheaper now than they were in 2022 at $23.99. Here is a link to them.
Grow Light
The grow light works hand-in-hand with the heat mat. You don’t need to turn on your grow light when you first start your seeds. That’s because its purpose is to help the plants grow through photosynthesis, and until the seeds germinate and poke through the soil, the grow light has no job. Instead, you wait for germination and see green through the brown soil. At that point, you can begin using the grow light, which you want to mimic the sun by not having it on 24/7. Ours is set to be on 12 hours and off 12 hours. The grow light will be used until you transplant the plants into your garden. Like the heat mats, our grow light also came from Amazon. It was $25.99 when we bought it in Feb. 2022. The exact light we got is no longer sold; however, here is one very similar and is only $23.99. There are different styles of grow lights, but I prefer the ones that clip on tables to the ones that hang. Hanging ones are great because their light is spread across a larger area, but you have to have the right setup to hang them. Meanwhile, the clip-on ones can be attached nearly anywhere and you can angle the lights to fit your needs.
Dome & Tray
You’ll almost always find these sold together as a set. The tray holds your seed-starting cells and will prevent excess water from running onto the table or surface you’re growing them on. The dome, or lid, works like a greenhouse and keeps moisture inside. This is essential during the germination process as the seeds need consistent moisture. The dome can only be used until the plants reach a height where they are pushing up against it. You’ll also want to be careful when using the lid. Keeping the lid on can lead to mildew or mold problems if your soil is too wet. Mini greenhouses are the perfect environment for mold to grow because the soil is warm and wet, and until the grow light is turned on, there are no UV rays to kill said mildew and mold. So, just be sure to monitor your cells each day. The underside of the lid should have condensation on it and the soil should be damp but not soaking wet. If you notice that the soil isn’t drying out within a few days of watering, adjust the lid a bit to allow some airflow. That will dry it out. Seed trays and domes are very easy to find. Your big box stores like Lowe’s and Home Depot will have them, and you can also find them at feed or farm stores, such as Tractor Supply and Agway. They’re very affordable. Here’s one from Tractor Supply for $12.69 that holds 72 cells and includes the compacted soil pellets, so a seed-starting mix isn’t even needed.
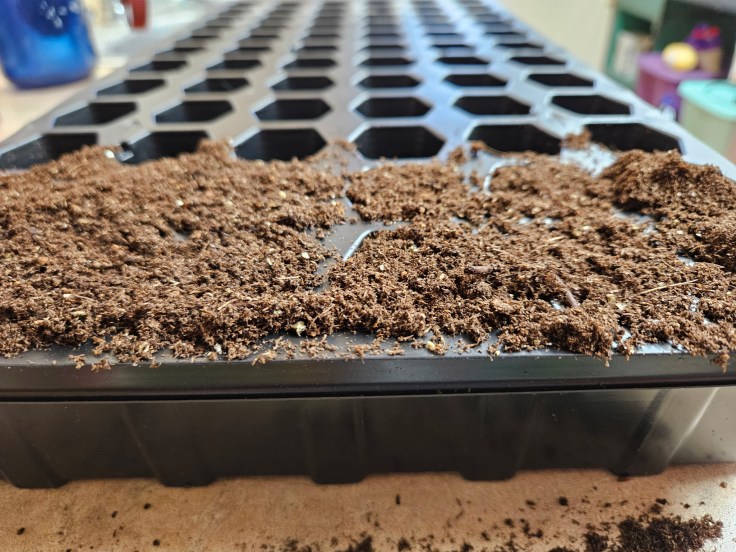
Seed-Starting Mix
It’s important to have the right soil mix when starting seeds. It may be tempting to use soil from outside or regular garden soil when starting seeds, but you should resist that temptation. MI Gardener explains it very well in a YouTube video, but the gist is that outside soil and compost will have microorganisms, bacteria, fungus, and bugs in them that can lead to damping off and other diseases in your seedlings. Not to mention, you probably don’t want bugs in your house. Instead, you should use a dedicated seed-starting mix that has things like peat moss, vermiculite, perlite, and coconut coir in it. These give the starting mix a light and airy texture that allows seeds to germinate and grow while also draining well. We look for organic bags of starting mix. Is it necessary? Probably not, but starting mix is so affordable that there isn’t a good reason not to. We bought two bags of Jiffy organic starting mix at Lowe’s. Each was $7.28 for 12 quarts of soil. We’ve used several different starting mixes in our gardens and haven’t found one to be better than the others.
Water Source
This is pretty self-explanatory, but you’ll need a vessel for watering your seeds. In the past, we used small cups to pour the water. This year, we changed to spray bottles and have enjoyed it more. We find the bottles to be better because they don’t spill or flood the seed cells. You don’t want to overwater your seeds, so spraying is a more controlled method. We bought a 2-pack on Amazon that is currently $7.56. Any spray bottle is work, though.
Surface to Set Everything
I’m including this because it can be easy to forget, but you’ll need a good place to set all your supplies. This can be a table, counter, desk, or shelf, but keep in mind that you’ll need to have everything out for several months and there will be UV lights that can be a bit annoying after a while. In the past, we have used a dining table and a collapsible hard plastic table that is nice because it can easily be cleaned. This year, we switched it up and are using a piece of plywood that was left in our basement by the previous owners and a set of sawhorses. It’s working well because the sawhorses keep the seed trays at a nice height and the plywood was free, so it’s not a big deal if it gets dirty. I’d recommend using something you already have. I don’t think you need to buy something new for this purpose.
What Is in Your Seed-Starting Kit?
In addition to everything I discussed in this post, you’ll need to determine the best way to get power to your equipment. That’s going to be unique to your situation. We bought a 50-foot 12-gauge extension cord and a 3-prong adaptor to make sure we had enough length to reach the closest outlet. Keep in mind that the heat mats and grow lights can draw a decent amount of power, so go overboard when using an extension cord just to be safe.
What do you use to start seeds? Is there any overlap with the items we use? We’d love to hear from you and see if we can improve our kit for next year’s garden. Happy gardening.
Throughout this year, I am going to publish a weekly blog post with updates from our garden. It will include progress pictures and anything we learned over the past week and will serve as a general update since a lot can change in a week’s time when gardening. I wanted to wait until we started our first seeds, and guess what? We did!
Peppers Have Been Started
I don’t believe that each year’s garden has started until your hands first touch soil in the spring. Buying seeds and purchasing supplies is wonderful, but it’s all still part of the planning process. Getting your hands dirty for the first time moves everything from a concept to a reality. And that’s the step we took Saturday evening.
Seed Starting
Earlier in the day on Saturday, we made a trip to the nearest Lowes to pick up a downspout extension and grabbed a couple of bags of seed starting mix, another seed starting tray and flat of cells, and gardening gloves. Brief side story: Neither of us could remember if we needed extra seed starting cells. I would have bet a dollar that we had enough to get us started for the year and only bought the new cells as extra. Boy, am I glad we got them. When we came home, I checked our gardening tote, and the starting tray that I thought had cells in it was empty. It’s funny how taking a two-year absence from gardening and moving can make you forget stuff.
That evening, we unpacked our heat mats and glow light, set up the table we’re using, and ran an extension cord from the nearest outlet. First up on our seed-starting schedule is peppers. (Technically, our mustard greens should already be in the ground, but because they will be directly sown, we have to wait until the ground is tilled). We found our 3 varieties of peppers (California Wonder bells, Scotch Bonnets, and Hungarian Waxes, which I discussed in this post), grabbed our seed-starting mix, and filled a spray bottle with water.
Starting pepper seeds
We decided to grow 3 cells each of Scott Bonnets and Hungarian Wax peppers and 6 cells of the California Wonders. With 2 seeds in each cell, we’re confident we’ll get strong seedlings to transplant later in the spring. Determining how many cells of each variety to start is always a fun process. You want enough to guarantee good germination but not so many that you feel overwhelmed if all of them succeed. Hot peppers are particularly difficult for us because we don’t eat a lot of them and will mostly use the Scotch Bonnets for jerk marinade. We went with 3 cells with the goal of transplanting 2 of them, and if all 3 succeed, we’ll give the third plant away. For the California Wonder bell peppers, we’ll probably transplant as many as we can.
What’s Next?
Next week, we will be starting our eggplant seeds. I’ve been using the seed starting spreadsheet that I created to organize everything and started another page to track the dates and expected germination times for each seed. That will allow us to know if a seed is taking longer than expected to germinate.
We’re also going to be buying our rototiller sometime over the next week. We’re big fans of no-till gardening, but our yard is currently all grass, so we have to break ground. We were originally going to buy an electric tiller since they are cheaper than gas models and we won’t need to use it much after the first year. However, after realizing how expensive 100-foot heavy-gauge extension cords are, we have pivoted to a gas model. We’re still narrowing down the exact one, but I’ll write a blog post about it and how we reached that decision when we get it. I’ll also write a follow-up post reviewing the tiller once we use it. Spring weather is finally starting to arrive after a harsh winter, and we couldn’t be more excited.
Growing up, I spent many spring Saturdays taking trips with my mom, dad, or grandparents to the greenhouses and garden centers in our area. We would walk around the tables that were full of flats holding vegetable starts and flower transplants. That was how my family typically began each year’s garden. It was wonderful to take in the greenhouse smells of damp soil, fertilizer, and new plants. You’d run your fingers over the leaves and quickly learn to identify the differences between peppers, tomatoes, and cucumbers.
Seedlings in a greenhouse (Photo by Zoe Richardson on Unsplash)
Fast-forward to today and seeds seem to be all the rage. There are dozens of seed companies I hadn’t heard of until about a decade ago selling heirloom varieties of seeds that I didn’t know existed until recently. I’m not sure if that’s simply the result of the internet raising awareness for seed loss and advertising for these companies or because people in my circle didn’t talk about heirlooms. Either way, it does seem as though there has been a shift in attitude and approach toward starting a garden.
That raises the question: Which is better between seeds and starts? Based on my previous posts about seeds and catalogs, you can guess which camp I’m in, but that doesn’t mean there aren’t merits for buying transplants from your local greenhouse. Let’s dive into the advantages and disadvantages of both and help you make a decision on which is best for you.
Cost
There is a wide range of costs when choosing how to start your garden. The cheapest we found seeds in our catalogs was $1.95, which was a broccoli packet from Pinetree Gardens.
Fun fact: That price is actually lower than our local Wal-Mart sells Burpee seeds for. Another reminder to buy directly from the seed company if you can. There typically isn’t much difference in price, you’ll find a larger variety, and you’re guaranteed that the seeds were recently packed.
On average, the lowest price in our catalogs was $1.99 per packet. That was the case for most vegetables. The highest price was $15.00 for a packet of pumpkin seeds from NE Seed. Calculate the per-seed price and you’ll get a range of less than $.01 for some beet and carrot varieties up to $1.00 per seed for heirloom cantaloupe and tomato varieties.
Let’s compare that to the price of starts. I’m not 100 percent sure what starts cost at greenhouses in our area since it’s still too early, but a quick search online showed tomato plants in the $3-4 range from Home Depot. That price is comparable to a packet of seeds. However, when you consider that a start produces one mature plant in the best-case scenario, seeds are far more economical. I know that more than one seed is generally used when starting them, but it’s still cheaper to purchase seeds.
Seeds 1, Starts 0
Variety
When you are shopping for starts, you’ll likely find the most popular varieties for your region at a greenhouse. These tend to be successful, are adapted to your area, and are relatively easy to grow. Some examples you’ll find in Pennsylvania are Amish paste and Brandywine tomatoes, Straight 8 cucumbers, and California Wonder bell peppers. Most greenhouses will have these varieties available as starts. You may find some more “exotic” varieties, such as habanero peppers or a non-red variety of tomato, but greenhouses will stock the varieties that sell. 3-4 varieties per vegetable are typically the upper end of what you’ll find.
When you buy seeds, there are many varieties to consider. Even displays in stores like Lowes will have up to 10 varieties per vegetable. For tomatoes, you’ll find several varieties of cherry, beefsteak, and paste tomatoes. For cucumbers, you’ll typically find a few different pickling and slicing varieties. Just today, the display in Lowes had ornamental corn seeds, something I’ve never seen in a store before. You have a lot of options to find the seed that best fits your needs. Then, when you expand to purchasing seeds online or from catalogs, you’ll have dozens of varieties to pick from for each vegetable, including organic and heirloom.
Seed Starting
That many choices can be both positive and negative. If you want the chance to buy heirloom varieties that you’re unlikely to find starts for, it’s a positive. But if you’re just starting out and can become overwhelmed by how many options there are, it’s a negative. Ultimately, I think having more options is a good thing, so I’m going to give this one to seeds as well, but there’s an argument for starts.
Seeds 2, Starts 0
Necessary Equipment
When you buy starts, you don’t really need anything else assuming you have a garden or container. You’ll also need soil, fertilizer, and tools for transplanting and watering. Those are all items that you’ll also need for seeds, though, so I don’t count them for the purposes of this post. So, like I said, once you buy the starts, you have everything you need.
Seeds, meanwhile, need a bit of equipment. You’ll have to have seed-starting cells and a starting mix of soil or compressed and dehydrated soil pods that expand when water is added. This is where the seeds will go. In some cases, you’ll need multiple cell sizes for different plants and to transplant them as needed when growing. Those cells need a tray and potentially a dome to sit in. The cells are placed on top of the tray, which provides a place for water to drain, and under the dome, which holds in moisture, creating a greenhouse effect.
You then need a heat mat and grow light to help with germination. The heat mat is used at the beginning to heat the soil so the seeds can germinate, while the grow light helps the young plants grow through photosynthesis. Neither item has to be expensive: You can get a 10″ x 20″ heat mat for $12 and a grow light for $14, both on Amazon. Finally, you’ll need a surface to set everything on, an extension cord and power supply, and the room for all the seed-starting supplies for several months. None of the items are expensive, but more is needed to start seeds than transplanting starts. In this case, starts require far less equipment.
Seeds 2, Starts 1
How Easy Is It?
Which one is more complicated? This category is an easy win for starts. With them, you purchase them, bring them home, and when the soil and weather are right, plant them in your garden. Once they’re in the ground, it’s the same as starting from seed. You do need to be careful when picking your starts, but most of the hard work has already been done when you buy the start.
Seeds, meanwhile, can be complicated. You have to track a lot of information, including how long each seed takes to germinate, how resistant to frost each is, and whether a seed can be directly sown or needs to be started indoors. This information helps you know when the seeds should be started. With that information, you then need to go through the process of actually starting the seeds. You have to prep your starting cells, choose the proper starting mix, and sow the seeds at the proper depth. After the seeds have germinated, the seedlings will need to be thinned so that plants aren’t competing for nutrients in the same space. A lot of the seedlings will also need to be transplanted into a larger cell before eventually being moved into your garden. It is quite a bit of work and typically requires daily monitoring. As you can tell, starts are much easier.
Seeds 2, Starts 2
Time Commitment
This is connected to how easy each is, but I wanted to touch on how much of a time commitment they are. We’ll go over starts first. The most time-consuming part of transplanting starts is going to the greenhouse and buying them. Traveling to the greenhouse and walking around all the tables is a time commitment, but it is nothing compared to seed-starting.
Starting seeds can take months when you factor in the time it takes to look through catalogs and wait for the seeds to arrive. Peppers are a perfect example of how long seed-starting can take. Because they take a long time to grow, need hot weather to mature, and won’t survive a frost, they should be started up to 10 weeks before the last frost. Around here, that date is May 15, so they can be started now. That is a major time investment and requires a lot of planning.
Starts will win this category, but to be honest, a time aspect of transplants that I’m not a fan of is how long you have to wait to buy them. A pepper start shouldn’t be purchased until after the last frost, and waiting that long makes me nervous. What if the greenhouse doesn’t have the variety you want?
Seeds 2, Starts 3
Control
This category is a bit weird, but I like knowing everything I can about the plants I’m growing. With starts, you don’t have control over how they were started as seeds. That means not having knowledge of the starting mix that was used or if the plant was transplanted before, and if it was, did it experience any root shock? If you’re interested in seed-saving, has the plant been isolated to avoid cross-pollination? That level of control may not be important to some, but I value it.
I like the peace of mind that comes with knowing that our starting mix has proper drainage, that the seedlings are always in the proper cells, and that the strongest plants are kept when thinning them out. I also like being able to transplant the young plants into the garden after a hardening-off process and when they’re smaller than you find at a greenhouse. When plants are younger, there is a reduced risk of root shock when transplanting. Therefore, I’m giving this category to seeds.
Seeds 3, Starts 3
Do What Is Best for You
I have to admit, I was surprised by how this post progressed. I fully anticipated at the start that this would be an easy win for seeds and that I’d be looking for ways to make it more even. Instead, it ended in a draw based on the number of categories each won. I still give seeds the edge because I place more value on the categories they won, though. I think cost, variety, and the peace of mind that comes with seeing the process through from sowing to harvesting are more important than how easy it is to buy starts.
Choosing between seeds and starts is a personal preference. If you’re just starting out and unsure if you want to invest in seed-starting equipment, transplants are a great option. However, if you want to grow heirloom varieties and are confident you’ll want to garden on an annual basis, seeds are the best bet. You can also buy a combination of seeds and starts. My dad has done that for years. Do you have a preference between seeds and starts? I’d love to hear from you.