
After writing about starting our first seeds for the season, I thought it’d be helpful to discuss our seed-starting setup. Although everyone will have a unique set of equipment, the basic items will generally be the same for everyone. The equipment I discuss below is what Magz and I bought, but you’ll want to determine what best fits your needs. That can be based on how much you want to invest in seed starting at this time, how many seeds you want to start, and how large your seed-starting space is.
Necessary Equipment
Regardless of how big or small of a garden you’re planning, these are the essentials you’ll need.
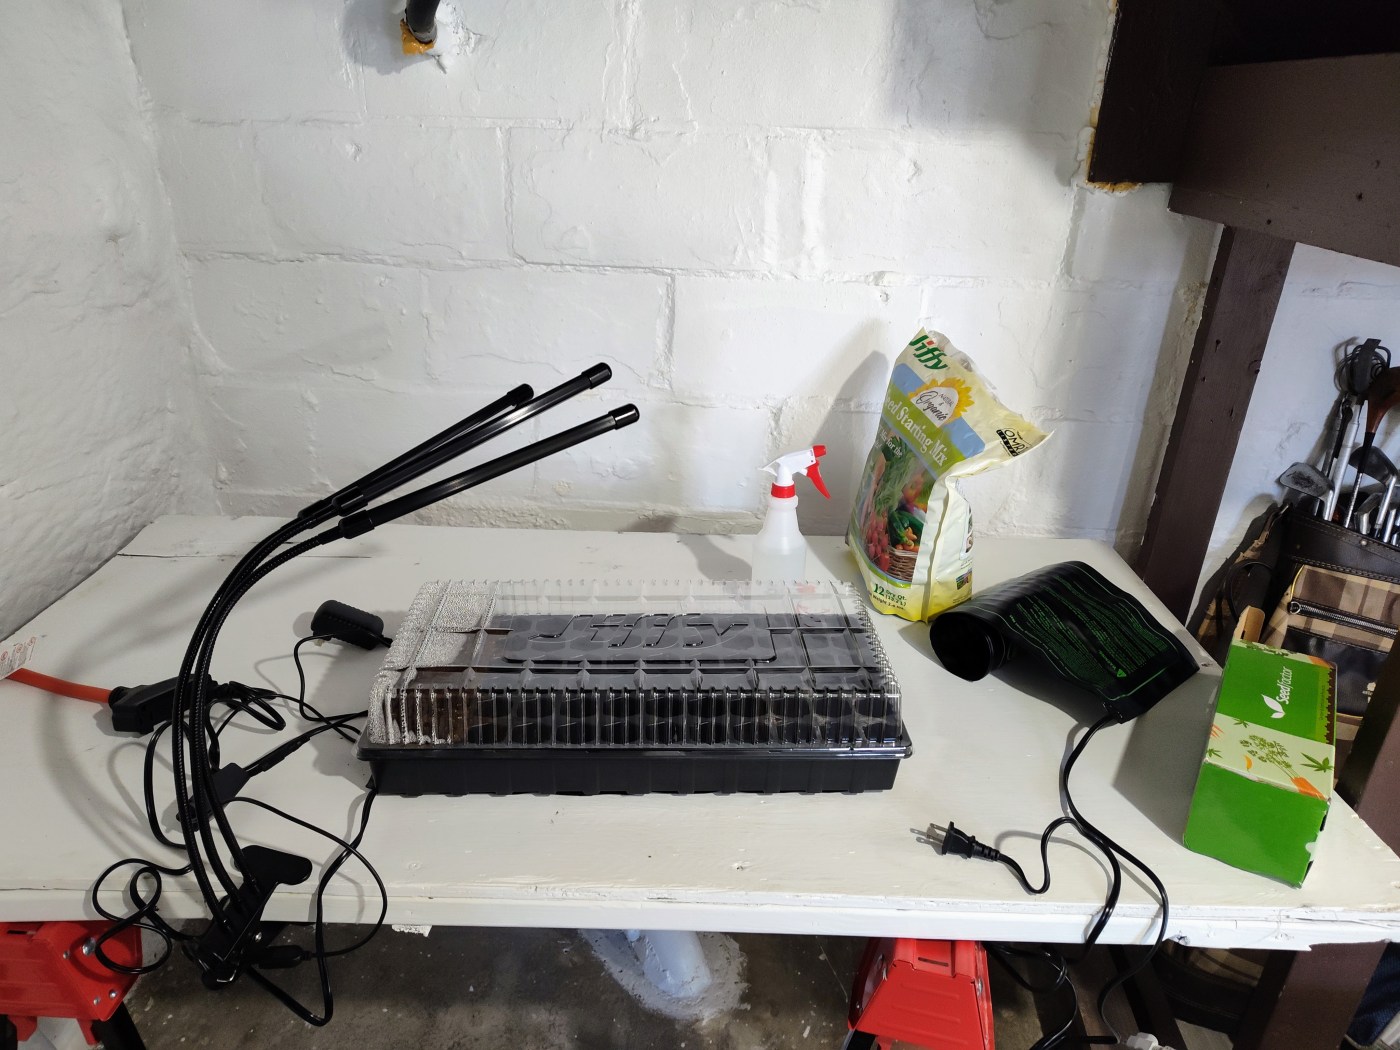
Heat Mat
Although many people will first think of a grow light when buying seed-starting supplies, a heat mat is equally as important. A heat mat warms the soil to the appropriate temperature for seeds to germinate. They are great because they maintain a temperature of about 70-75 degrees Fahrenheit. They are also waterproof and can be wiped clean, so you don’t have to worry about getting wet soil on them.

They’re very easy to operate since the ones we have don’t have a temperature controller. Rather, you simply set them and forget them. Once you plug them in, they stay on 24/7 until you begin seeing your plants poking through the soil. We bought ours on Amazon in Feb. 2022. They are 10 inches by 20 inches, came in a 2-pack, and cost $27.99 at the time. They’re actually cheaper now than they were in 2022 at $23.99. Here is a link to them.
Grow Light
The grow light works hand-in-hand with the heat mat. You don’t need to turn on your grow light when you first start your seeds. That’s because its purpose is to help the plants grow through photosynthesis, and until the seeds germinate and poke through the soil, the grow light has no job. Instead, you wait for germination and see green through the brown soil. At that point, you can begin using the grow light, which you want to mimic the sun by not having it on 24/7. Ours is set to be on 12 hours and off 12 hours. The grow light will be used until you transplant the plants into your garden. Like the heat mats, our grow light also came from Amazon. It was $25.99 when we bought it in Feb. 2022. The exact light we got is no longer sold; however, here is one very similar and is only $23.99. There are different styles of grow lights, but I prefer the ones that clip on tables to the ones that hang. Hanging ones are great because their light is spread across a larger area, but you have to have the right setup to hang them. Meanwhile, the clip-on ones can be attached nearly anywhere and you can angle the lights to fit your needs.
Dome & Tray
You’ll almost always find these sold together as a set. The tray holds your seed-starting cells and will prevent excess water from running onto the table or surface you’re growing them on. The dome, or lid, works like a greenhouse and keeps moisture inside. This is essential during the germination process as the seeds need consistent moisture. The dome can only be used until the plants reach a height where they are pushing up against it. You’ll also want to be careful when using the lid. Keeping the lid on can lead to mildew or mold problems if your soil is too wet. Mini greenhouses are the perfect environment for mold to grow because the soil is warm and wet, and until the grow light is turned on, there are no UV rays to kill said mildew and mold. So, just be sure to monitor your cells each day. The underside of the lid should have condensation on it and the soil should be damp but not soaking wet. If you notice that the soil isn’t drying out within a few days of watering, adjust the lid a bit to allow some airflow. That will dry it out. Seed trays and domes are very easy to find. Your big box stores like Lowe’s and Home Depot will have them, and you can also find them at feed or farm stores, such as Tractor Supply and Agway. They’re very affordable. Here’s one from Tractor Supply for $12.69 that holds 72 cells and includes the compacted soil pellets, so a seed-starting mix isn’t even needed.
Seed-Starting Mix
It’s important to have the right soil mix when starting seeds. It may be tempting to use soil from outside or regular garden soil when starting seeds, but you should resist that temptation. MI Gardener explains it very well in a YouTube video, but the gist is that outside soil and compost will have microorganisms, bacteria, fungus, and bugs in them that can lead to damping off and other diseases in your seedlings. Not to mention, you probably don’t want bugs in your house. Instead, you should use a dedicated seed-starting mix that has things like peat moss, vermiculite, perlite, and coconut coir in it. These give the starting mix a light and airy texture that allows seeds to germinate and grow while also draining well. We look for organic bags of starting mix. Is it necessary? Probably not, but starting mix is so affordable that there isn’t a good reason not to. We bought two bags of Jiffy organic starting mix at Lowe’s. Each was $7.28 for 12 quarts of soil. We’ve used several different starting mixes in our gardens and haven’t found one to be better than the others.
Water Source
This is pretty self-explanatory, but you’ll need a vessel for watering your seeds. In the past, we used small cups to pour the water. This year, we changed to spray bottles and have enjoyed it more. We find the bottles to be better because they don’t spill or flood the seed cells. You don’t want to overwater your seeds, so spraying is a more controlled method. We bought a 2-pack on Amazon that is currently $7.56. Any spray bottle is work, though.
Surface to Set Everything
I’m including this because it can be easy to forget, but you’ll need a good place to set all your supplies. This can be a table, counter, desk, or shelf, but keep in mind that you’ll need to have everything out for several months and there will be UV lights that can be a bit annoying after a while. In the past, we have used a dining table and a collapsible hard plastic table that is nice because it can easily be cleaned. This year, we switched it up and are using a piece of plywood that was left in our basement by the previous owners and a set of sawhorses. It’s working well because the sawhorses keep the seed trays at a nice height and the plywood was free, so it’s not a big deal if it gets dirty. I’d recommend using something you already have. I don’t think you need to buy something new for this purpose.
What Is in Your Seed-Starting Kit?
In addition to everything I discussed in this post, you’ll need to determine the best way to get power to your equipment. That’s going to be unique to your situation. We bought a 50-foot 12-gauge extension cord and a 3-prong adaptor to make sure we had enough length to reach the closest outlet. Keep in mind that the heat mats and grow lights can draw a decent amount of power, so go overboard when using an extension cord just to be safe.
What do you use to start seeds? Is there any overlap with the items we use? We’d love to hear from you and see if we can improve our kit for next year’s garden. Happy gardening.

Leave a comment