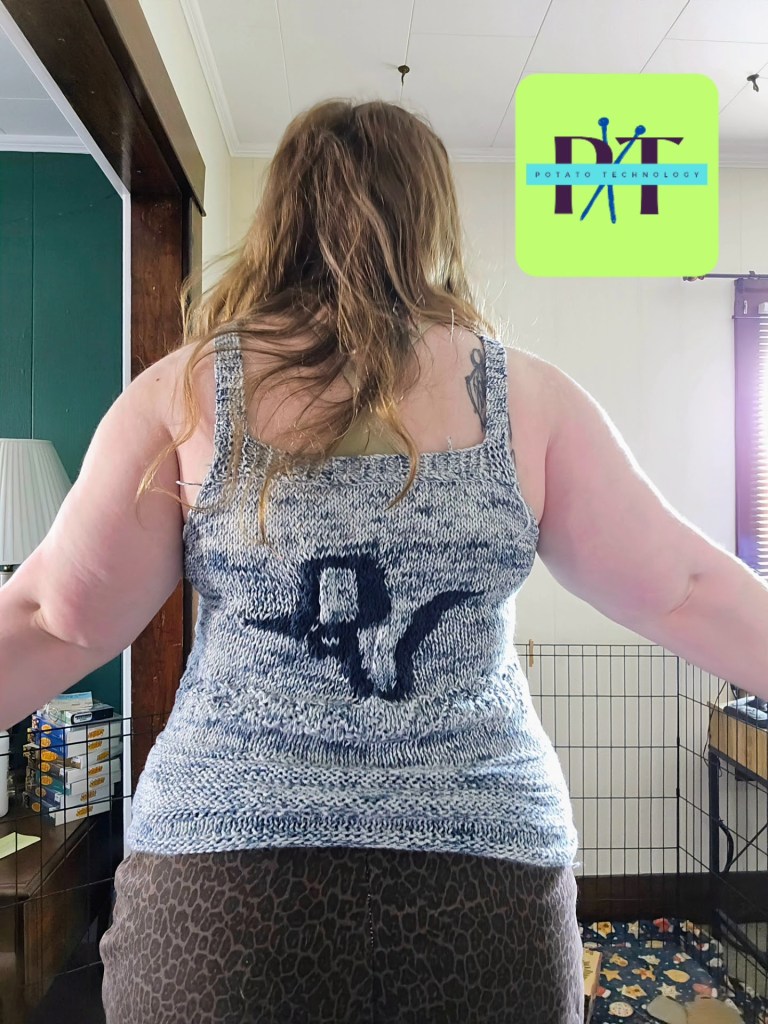
This is a follow-up to my recent post, ‘Will I Wear a Knit T-shirt?’, where I examined the fibers and wearability of a knit t-shirt and discussed whether this summer knit project could be a suitable option. Since then, I finished and got to wear a new piece of knitwear – my first knit tank top. I wore it in July, in full humidity with highs in the upper 80s to low 90s Fahrenheit. My experience surprised me – I said before that my knit t-shirts are wonderfully comfortable, but have a temperature and humidity limit for me, but the tank top surprised me!
I think it was the high pima cotton content in the Knit Picks Comfy – a 75% Pima Cotton and 25% Acrylic mixture that uplifted the breathability for me. I was melting in the hot sun, but the air flow and temperature regulation were spectacular! This tank had delicate straps but did not have a lacy stitch or open weave. It was constructed with regular knit and purl stitches, with sections that had double layers of yarn due to two sections of colorwork graphics on the front and back.
With Pima Cotton, Silk, Bamboo, or Linen as the primary fiber, or a blend of these natural fibers, I believe knit tanks are just as breathable as woven fabric, and for sure more breathable than moisture-wicking tech fabrics, which are polyester. No, I wouldn’t work out in this top, but there is something to say for a garment that is comfy and breathable for those long summer days. It was a simple stitch-up up only calling for two hanks of 100-gram worsted-weight yarn, about 240 yards, with the addition of 1/3 or 40 yards of the accent yarn, another cotton-acrylic worsted-weight blend from Loops and Threads. You can make a tank like this for 30 USD or less, and this is a size large. So if you have a small amount of yarn, you can do a lot with it!
Do you think a knit tank would be an item you would wear?
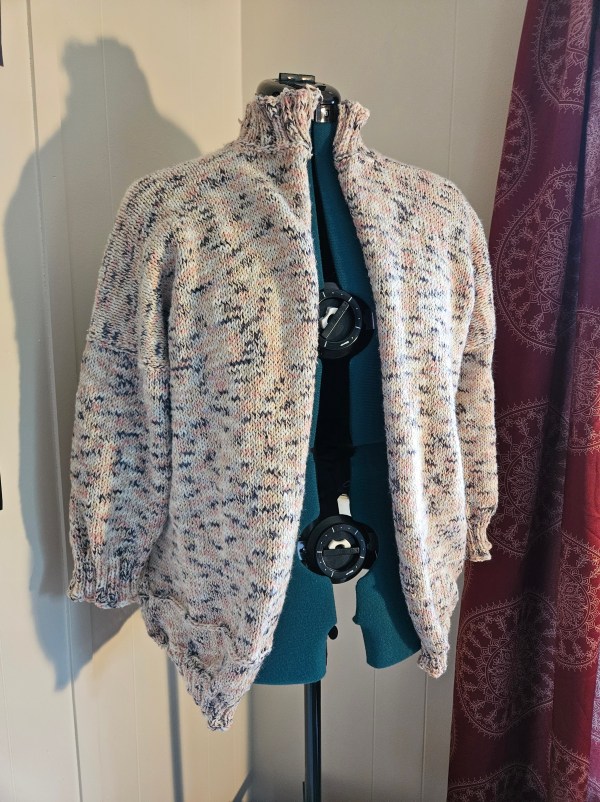
Fall knitting is here! I’ve been working on this cardigan, off and on, amid a myriad of projects since July. As the days have passed, and a slightly cooler air awakens, I am thrilled to say this piece is ready to wear! I used to struggle to finish sweater projects and I would wander along with my yarn, for three or four months, dilly-dallying on a section because I was bored. This led to a lot of plans and not a lot of garments. This is in the past though. 2024 has been the year of sweaters for me, this being my seventh finished sweater this year! And its only September so I’m excited to see what else I can do in the last quarter of the year.
Do you remember what episode of Gilmore Girls this audio clip is from?
This Comfy Cotton Blend yarn from Lion Brand is a 1 to 1 ratio of polyester and cotton and the tag labels this color blend as chai latte. As I knit it, I saw it more as a banana split blizzard color and now in the spooky cloudy light of fall, I see it as candle light with highlights and shadows. Hence the name, the Candle Light Cardigan. I opted for now to keep this as an open cardigan without a button placket. Not out of laziness, but out of my intention to wear it. This was a cardigan I made specifically for the changing seasons, as a piece I could layer over my summer dresses and tops to get a little more wear out of them on these days when it is both cool and warm as the day progresses. I have two more yarn cakes of this color way which I can use to add a button placket at a later time if I change my mind.
I received this yarn as a gift from my mom as she was de-stashing it. It has been a lovely weight to knit and I like how soft it is. My only notes for Lion Brand would be to work on the splitting. This yarn split often as I was knitting which caught on my needles and led to messy stitches. Either because my needle held on to the stitch below or the yarn split and left some of the stitch behind. It was frustrating at times but not impossible to work with. The fabric it made has a good breathability and warmth to it which I was looking for in a changing seasons layering piece. This is a self drafted pattern that I knit on US 7 straight needles.
Happy Fall everyone one! (And Happy Spring to the southern hemisphere!)
This is a weird knitting project for me because I usually can’t follow a pattern, at least it has been a few years since I tried to make anything with a pattern, and that was Butterick Retro ’44 #6374 and Butterick Retro ’44 #6485. They didn’t go super well.
This is the only picture I saved from #6485 because it was so bad. It felt like a weird Star Wars dress. But I digress, with knitting, I would like to rectify my aversion to patterns to learn new skills and appreciate the creativity, celebrate even, the creativity and talent of my fellow knitwear designers. So I was inspired by Making Cassie’s Stripe Hype Sweater knitting project and through my move, I decided to use up leftover yarn in my stash to make a sweater someone else designed. It was one of the most rewarding knits I’ve made all year!
Who Designed the Stripe Hype Sweater?
The original Stripe Hype sweater and sweater pattern was designed by Veronika Lindberg and the pattern was published on Ravelry in 2023. Now I didn’t realize there was an actual Ravelry pattern, I just gave it a go off of other people’s versions of the Stripe Hype Sweater on Instagram and YouTube, like playing a song by ear. Whoops! Sorry, Veronika! But here is the link to her pattern.
My Take on the Stripe Hype Sweater
This is one of my favorite sweaters I’ve made because it challenged me to do things I wouldn’t gravitate towards like using white on a sweater. After all, I’m pale and I’m clumsy so stains. But dang it’s a fun background for the colors of this sweater. It taught me how to balance color, to mix colors with more abandon, and to bring balance and order to my pieces. This is also a make that grew my skills as it was the first project where I tried casting back onto sections – such as the ribbed collar and the sleeves.
It was a rewarding experience and reminded me that even though I like designing my own pieces there is always something new I can learn from using a pattern and although I can find it tedious, it puts limits on my creative energy to channel it into a direction I may not have gone if not for the guidance of the pattern. Always have a teachable spirit, my grandma would say, and yeah she’s definitely right about it when it comes to knitting!
Have you heard of the Stripe Hype Sweater? Would you wear or make something like this design? What colors would you choose? Until next time, thanks for being here, dear reader. I hope you have a lovely day!
In middle school, I had a black off-the-shoulder sweater with a wide fold-over collar and a coordinating skirt in gray and black stripe. It was the first skirt outfit I tried wearing over pants, a trend that has come back in popularity over the past few years along with the 2000s style. All of this has made me nostalgic for my old sweater, but not interested in buying one like it because I don’t love the new take on 2000s fashion with our current-day fabrics and fast fashion construction. It’s just all off-kilter from the original subject material.
So, I had an idea. What if I tried making one with the yarn in my stash? I had several skeins of this navy tweed from Big Twist that I didn’t buy with a specific purpose, and it took up space. It seemed like a fun color I could coordinate like I did with the Houndstooth Denim dress worn as a maxi skirt. It was an ambitious make.
I’ve only been making sweaters for a few years and had no experience designing a pattern with no collar or shoulder seams. There was a lot to think about. How could I incorporate the big fold-over collar? How do you add sleeves with the new style lines? How do you keep it on the shoulder enough so it doesn’t fall down? As with most of my makes, I dove head first into the project ready to fail if that meant I learned something!
The first obstacle I found was not having enough yarn, shocking right? I was surprised I had multiple skeins of this blue, but it wasn’t enough to get the longer length, so I had a choice to buy more or get creative in this stashbusting project? I decided using what I had was more important than keeping the original vision so I chose this gray yarn I also had in my stash from the Bunny Hat project. It brought an interesting contrast to the tweed and I actually loved the color blocking once it was done.
The arm holes were such a challenge. As I was knitting this piece top down, I first knit the ribbed collar and then reduced down for the body section, leaving enough of the collar on the edge to insert an armhole after I was done with both the front and then back. All was seamed together and for a first try, I’d say it was a success. The geometry definitely worked. I had a free range of motion. It was a win!
What was not a win was my over-calculation when it came to fit. I forgot to accommodate the size needle I was using, a US size 8, which knits up with a larger gauge. I had been using US size 7 more recently and I sized like I would have for this gauge. My second mistake was not accounting for the stretchiness of this yarn. It is an acrylic and nylon blend that gets roomy with wear leading to a sweater that simply didn’t fit.
After the move, several months after this project was done, I tried this on again and realized that I had toned up more than I thought carrying all those boxes because the sweater slips right off my shoulders and off my hips too. It’s a total size failure! Now I’m not sure what to do with it. I’ve already taken in the collar back in April, I don’t think I can take it in again and it is constructed well so frogging this project is not going to be easy. It’s a shame because I think I had a good design here.
I think my only option is to potentially re-home it and make another one following the tutorial that I shared on Instagram which was my first time doing that. I felt such imposter syndrome! To my surprise, it was met positively even though it was not created for circular needles. It showed me that sharing my craft and creating tutorials is becoming a calling, free tutorials, and free knitting and sewing tips because I just want people to do this too.
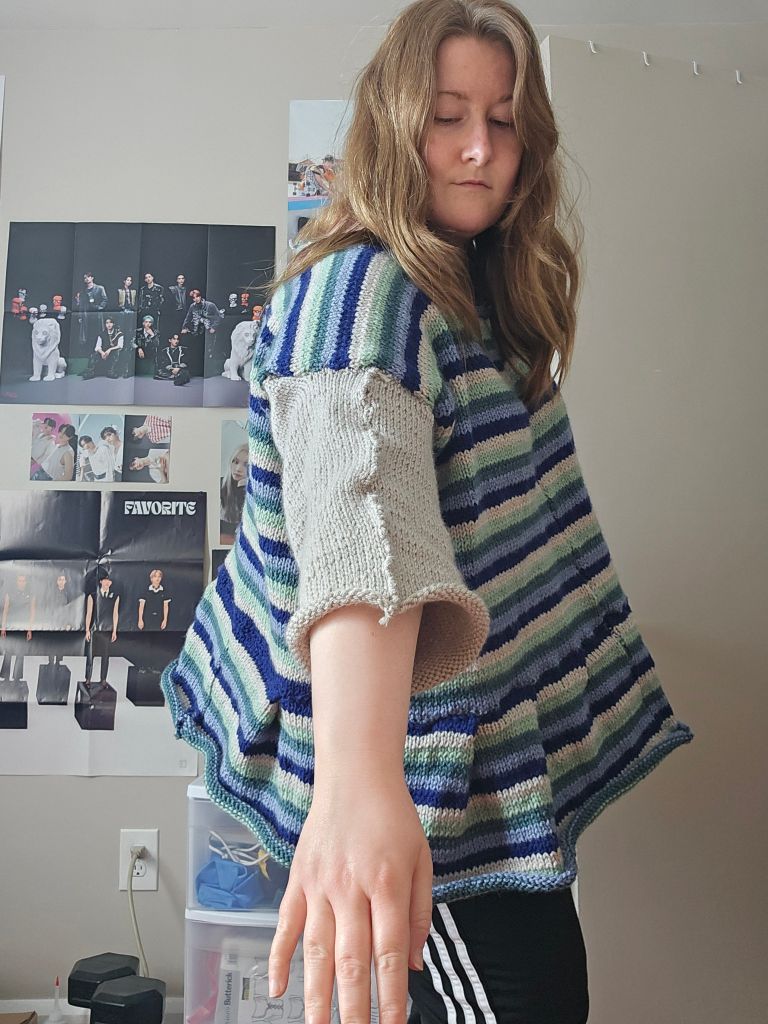
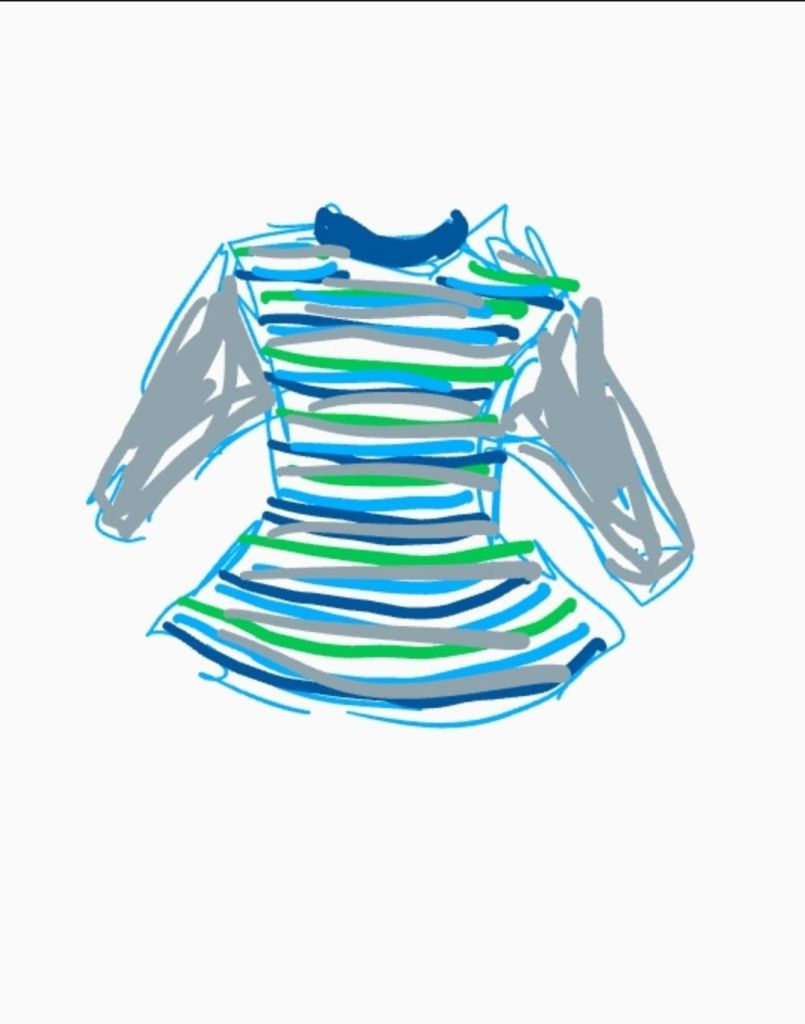
A goal I have in 2024, is to go through my yarn stash and use what I have to create unexpected pieces. A lot of my yarn has been sitting on my yarn shelf for a year so I decided to try a new approach to my design process – to create a garment from a color palette. I chose these five yarns to make a striped and joyful sweater that encapsulates the coolness of a winter landscape, yet the minty green hints at the spring yet to come.
This project was a journey! I didn’t quite know where it was going to end up. At first, my plan was to make a striped cardigan, but I worried about the sleeves. I thought the stripes would be too busy if carried on to the arms. I also had fears of playing yarn chicken. So I pivoted to an unusual piece because of how cool the bodice looked over a t-shirt. In the climate I live in there is no reason to wear an acrylic yarn vest over a t-shirt, but I couldn’t get the image of that out of my mind, so I made a “t-shirt” looking sleeve with the light gray yarn. For length and a bit of vintage flair, I added a peplum that took this piece to a place of whimsy that brings me joy.
When I look at this piece, I smile. When I wear this piece, I am filled with joy and sunshine. It is the first piece of knitwear I have designed that I think would show wonderfully on the runway and that is freaking cool! Lastly, I added a navy blue collar to the neck opening and gathered the neckline slightly so that it sat on my shoulders properly. The peplum was knit in two pieces where I continued the pattern and knit the sections wider than I needed to pleat it. Now that I’ve blocked the piece in the dryer it floats over the body and looks so effortlessly.
A new technique I used for this sweater was to knit one side at a time. I knit I believe 60 stitches across and began my striping pattern, switching colors after three rows. Next, I bound off stitches at my desired armhole position and carried on to the neckline where I again bound off stitches which made the shoulder more narrow than the rest of the garment. I then continued to knit down the back of the piece, mirroring the neckline by casting on a new row. I continued on to the armhole where I again, cast on more stitches and then followed the piece down to match the length of the front.
I did this a second time on the other side, mirroring the original. It is important to make sure you are mirroring so that the two pieces will match up knit side + knit side or else one side will be inside out – which is easier to do than you think! I ruined a previous project by doing that and had no choice but to rip it out. That’s okay! It’s all a part of the learning process!
If you’re a knitter or crocheter, I hope this project inspires you to get creative with your stash and make something out of the box. Or if you’re an artist, a maker, or just a human reading this, get creative with what you have! It is a fun journey. Thanks for taking time with me today! I hope you know that you are worthy, you are loved, and you are special to me. Until next time ❤
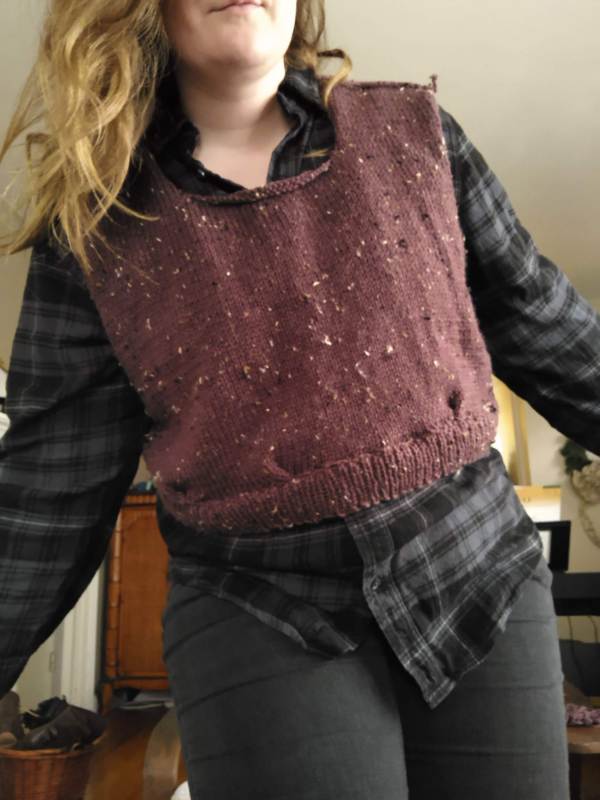
The sweater vest. It was on my radar but did not become an item I dreamed of until I saw a lookbook from Steal the Spotlight styling Friends-inspired outfits, inspired by Chandler, the sweater vest king. I continued down the rabbit hole and to Katie’s K-pop Comeback Fashion review and I was done for. K-pop fashion, Korean fashion, and the sweater vest were a layering piece I knew I was going to make. Maybe it is the color combinations or the accessories, but how these sweater vests are styled across different boyband concepts just got me. It felt fresh and fun, not preppy or stuffy.
A year later, I was ready to tackle this project. After making a few sweater projects, and learning how to pattern from garment construction, I felt like I had a good understanding of the shape needed to make the sweater. At Joann’s, I found a non-wool tweed yarn and I knew this was the yarn I wanted to start with. It looked like garments I love from Irish Aran Jumpers and was a way to bridge my heritage and this new world I was exploring through K-pop. I like the garments I design to have a story and intentionality behind them.
The New Technique
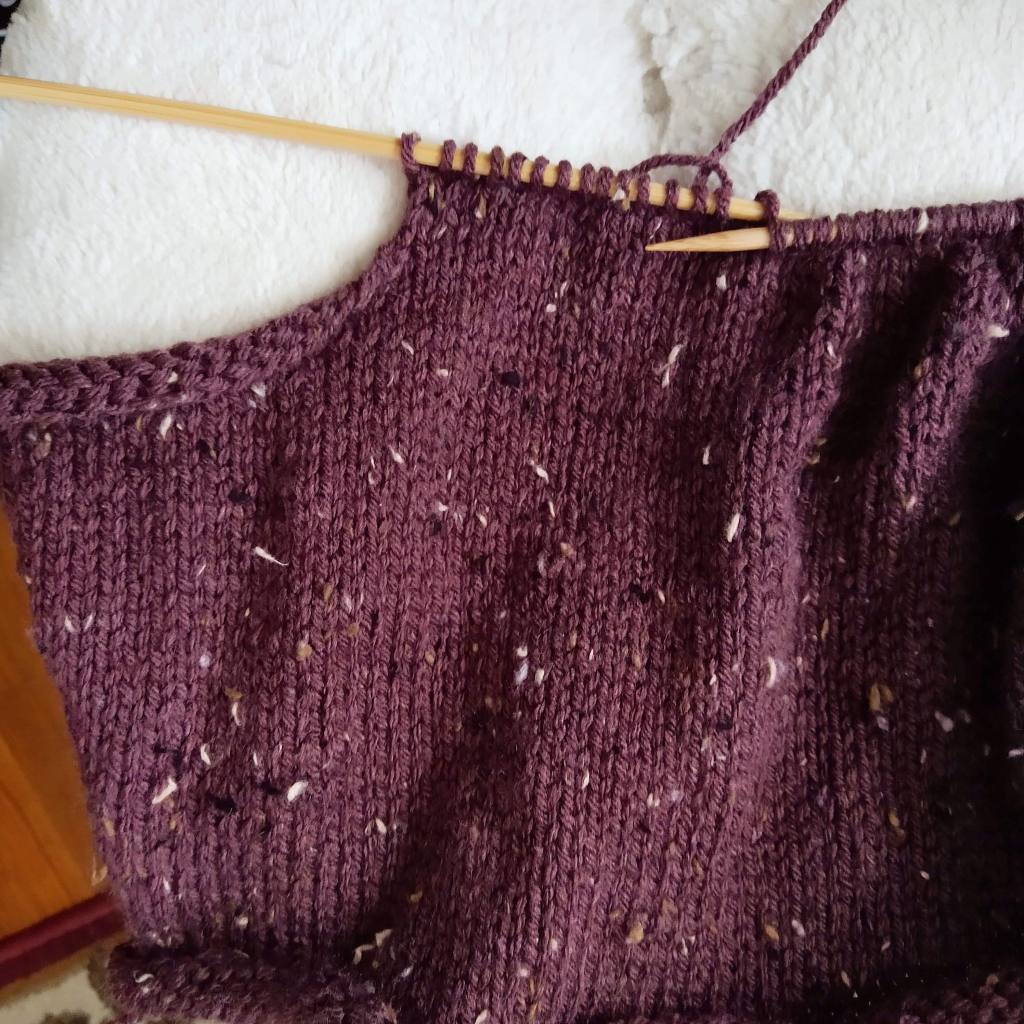
With US Size 8 needles in hand and one skein of Big Twist tweed yarn awaiting a new form, I began by casting on 65 stitches. Working my way up I did the basic knit-purl stitch and gradually binding off on either side when I reached my desired length for the armhole. I chose to make a cropped sweater vest to accentuate my waist and break up my long torso. The big moment though came when I did some research and made the decision to branch out and knit the shoulder and neckline on two sets of needles. This required knitting, casting off in the middle, and continuing to knit on a second set of needles. It worked!
Learning new techniques is always worth the time and the trial because eventually it clicks and you have something new, you didn’t think you could do, but you can!
Making two instead of four pieces on my straight needles was a time-saver! Honestly, I see why having a teachable spirit is important in all aspects of life because I thought I had a good technique before, but dang, two pieces are such a better experience. Four pieces was a mental game, and I got bored. Hence why my previous sweater projects have taken months and months, and months because I distract myself with palette cleanser projects and then avoid finishing the four-piece projects.
Afterward, I sewed the two pieces together and knit two 65-stitch pieces of ribbed trim for the bottom. I liked how rustic the sweater looked without the ribbing on the neckline and armholes. It looks like an old-fashioned piece, and a bit like armor. Which is cool.
Sweater Vest Fits of 2023
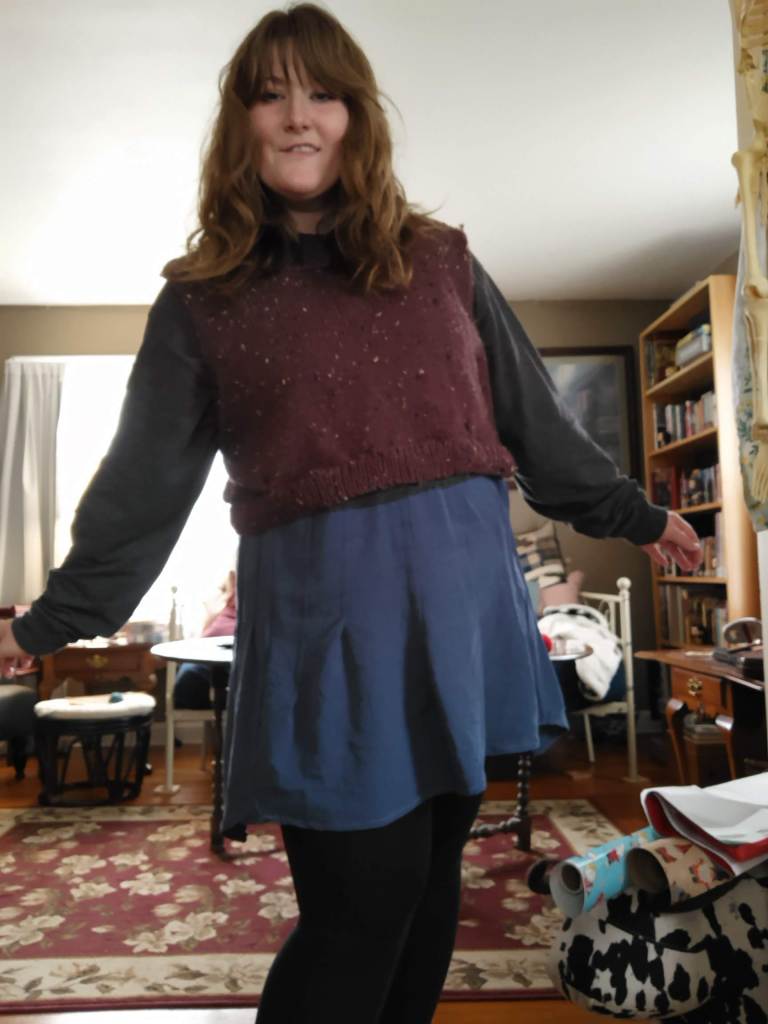
This is how I have styled the finished garment so far! I like it over my black flannel and charcoal jeans for a moody look. It styled surprisingly well over this DIY project where I added a flared skirt to a cropped graphic long-sleeve shirt. This is where I saw the armor aesthetic come through. In 2024 I look forward to playing around with it even more!
Some things I plan on either finding or making, are basic layers I can wear under this vest. Currently, I have my flannels, that random diy-tunic, and maybe some long-sleeve tees but I’m not certain if they are long enough to layer out the bottom of the vest. This is the struggle of adding a brand new item to your wardrobe – how do you integrate it and style it well without buying a bunch of new things? Yeah, I’m figuring that out and until I do it’s going to be some time before I think I can make a truly amazing outfit with this piece. But I’d rather do this responsibly and be a patient person instead of draining my bank account for instant gratification. (Age has done me well in that respect because I used to do the opposite!)
2024 Project Update:
Since finishing the garment, I have either lost weight or the vest has stretched a bit from wear and one wash. It was not sitting well on my waist anymore but ballooning out so I took it in. I took it in at the arm hole seams and gradually took in the waist at the back so the garment has a back center seam which is not the look I was going for but the fit is on point again. Lastly, I knit another section of ribbed trim to lengthen the garment to keep it from riding up, in doing so I made the ribbed trim addition of 60 or 55 stitches, I forgot to take note when I made it, to pull the waist in even more. I like the fit and plan to make another version of this garment with a smaller adjusted pattern.