Weekly Garden Update #12 – Transplanting Starts, Watering, and Starting the Last Beds

In this week’s update, we were able to finally get our vegetable starts in the beds, spent a lot of time in the garden watering and weeding, and got a start on the last two garden beds. Plus, I share a few mistakes I’ve made with our garden and my plans to remedy them.

Transplanting Starts

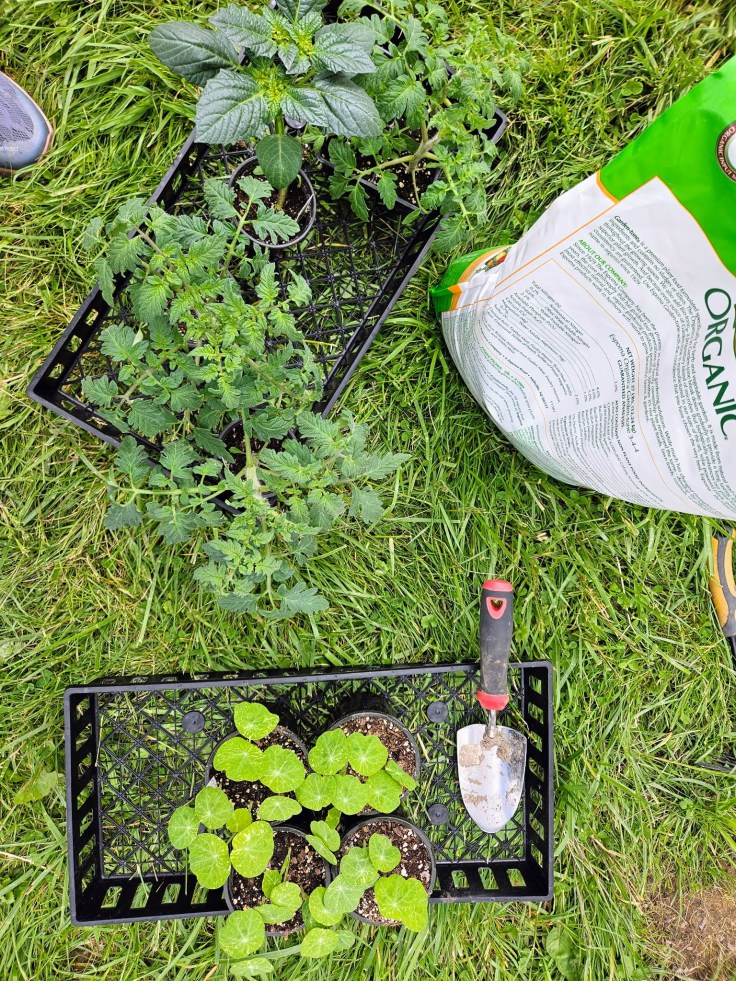
In last week’s update, I mentioned that we had transplanted a bunch of flowers we bought last weekend. Those were planted in various places throughout our yard; however, due to cool overnight temperatures (high 30s) and a ton of rain (over 3 inches in a 24-hour period), we were uncomfortable with transplanting our vegetable starts. This past weekend, we were able to get them all in the ground. That included all the plants I started from seeds as well as a few starts we bought from the greenhouse. These were Black Krim tomatoes, tomatillos, ground cherries, and spaghetti squash. These were plants that we either didn’t have seeds for or wanted more security in transplanting larger starts.

Gardening, transplants, tomatoes
Transplanting a tomato start

Transplanting these was straightforward but time-consuming. Fitting the starts into beds that already have seeds takes some planning. We want our plants to complement each other by pulling and supplying nutrients in a mutually beneficial relationship. We also want to make sure we’re giving them enough space while also planning for more starts to be transplanted in the future. This process appears to have been successful.

We were very intentional in adding the appropriate soil amendment for each plant and also tried to keep the soil loose around the plant. If you remember back to the beginning of my writing about our garden, our soil is compact clay. We don’t think it’s ever been grown in, so the grass was pretty thick with well-developed roots.

Spending Time in the Garden & Watering

With seeds and plants in the ground, we’ve been able to spend a lot of time in our garden. We’ve largely transitioned from the planning phase to the establishing phase. We’re in the garden on a daily basis, checking for progress and assessing the need for natural pesticides or weeding. We also water on a daily basis at this stage while the seeds are still germinating or the transplants are taking root, and it takes a lot of water! We really enjoy watering with cans because it’s a more hands-on experience and bought a second watering can to help.

Gardening, transplants
Nasturtium, tomatoes, tomatillos, and ground cherries

Regular watering also means we’re getting to put our rain barrel to use. Earlier in the spring, we bought a 55-gallon blue barrel and converted it into a rain barrel with water coming from our garage’s downspout. It’s difficult to believe how quickly it fills. A steady rain over a few hours will fill it from empty. It’s been nice not having to pay for the water we’re using. At the time of writing this, we have only had to fill one watering can with city water. Everything else has come from the rain barrel. I’m sure that will change throughout summer when it’s hotter and we may go a week or two without rain, but it’s still a wonderful blessing. We also plan to buy a second barrel for the other side of the garage. It’d be nice to eventually have three or four barrels around our house so we only have to use city water on rare occasions.

Starting the Final Beds

On Sunday and Monday, we got the final two beds started. On Sunday, Magz mowed down a large portion of grass and did the first pass with the tiller. On Monday, I followed up by tilling it a second time and also going back to a bed I started a few weeks ago and giving that one its first pass. With those beds started, we can see the finish line. We’re only a few tiller passes away from being done with that step in the gardening process, which feels like a huge accomplishment. It will also mean that the hardest work is done. When they’re done, the work will mostly consist of what I call maintenance: watering, weeding, and amending the soil. That will eventually lead to harvesting time.

What’s Next? Recognizing Seed Starting Mistakes

Between now and next week’s update, the plan is to continue tilling the last two beds, build a raised planter box for our long beans, and restart some seeds. The plan was always to start additional seeds once the first batch of seedlings was transplanted. We want to take advantage of the beds we have and grow as much as possible. What I didn’t plan for was the mistakes I made when starting our initial batch of seeds.

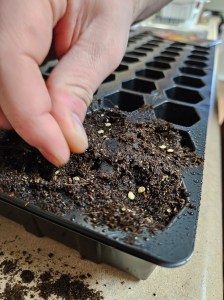
I have experience starting seeds and have had success doing so. However, before this year, it had been three years since we gardened, and I felt rusty. I turned to YouTube and blogs to refresh my memory, and I think they led me a bit astray. When putting the seed starting mix in the cells, I kept the soil loose rather than pressing it a bit, which resulted in the roots struggling to develop. I noticed a big difference between our starts and the ones we bought at the greenhouses. The greenhouse starts had roots that wrapped around the soil and allowed everything to come out in one cube. Meanwhile, our starts were loose with shallow roots. I think the soil composition had something to do with this. Other things I’m confident I messed up are how I watered the seedlings and the way I thinned them.

Moving forward, I’m going to make the following changes:

  • Tamping down the soil a bit before adding the seeds and also pressing down the soil that is added on top. In recent days, I’ve read about the importance of having contact between the soil and seed, which makes sense.
  • Pre-moistening the soil rather than relying on watering after the seeds are sown.
  • Watering from below rather than above. I went back and forth between using a spray bottle and a cup to water the seeds/starts. It became difficult to not flood the cells or potentially damage the young starts. This time, I’m going to fill the trays and allow the cells to dry out a bit in between waterings.
  • I will be thinning the starts by cutting them at the soil surface rather than plucking. I’ve learned that pulling the starts disturbs the roots of the plants you want to keep, which I saw evidence of.

I will follow up with how successful these changes are. Have you made mistakes in your garden that forced you to make changes? If so, I’d love to hear about it. I hope the mistakes I learned can help you in your garden. Happy Gardening!

Should You Buy Seeds or Young Plants to Start Your Garden?

Growing up, I spent many spring Saturdays taking trips with my mom, dad, or grandparents to the greenhouses and garden centers in our area. We would walk around the tables that were full of flats holding vegetable starts and flower transplants. That was how my family typically began each year’s garden. It was wonderful to take in the greenhouse smells of damp soil, fertilizer, and new plants. You’d run your fingers over the leaves and quickly learn to identify the differences between peppers, tomatoes, and cucumbers.

Seedlings, Greenhouse, Starts
Seedlings in a greenhouse (Photo by Zoe Richardson on Unsplash)

Fast-forward to today and seeds seem to be all the rage. There are dozens of seed companies I hadn’t heard of until about a decade ago selling heirloom varieties of seeds that I didn’t know existed until recently. I’m not sure if that’s simply the result of the internet raising awareness for seed loss and advertising for these companies or because people in my circle didn’t talk about heirlooms. Either way, it does seem as though there has been a shift in attitude and approach toward starting a garden.

That raises the question: Which is better between seeds and starts? Based on my previous posts about seeds and catalogs, you can guess which camp I’m in, but that doesn’t mean there aren’t merits for buying transplants from your local greenhouse. Let’s dive into the advantages and disadvantages of both and help you make a decision on which is best for you.

Cost

There is a wide range of costs when choosing how to start your garden. The cheapest we found seeds in our catalogs was $1.95, which was a broccoli packet from Pinetree Gardens.

Fun fact: That price is actually lower than our local Wal-Mart sells Burpee seeds for. Another reminder to buy directly from the seed company if you can. There typically isn’t much difference in price, you’ll find a larger variety, and you’re guaranteed that the seeds were recently packed.

On average, the lowest price in our catalogs was $1.99 per packet. That was the case for most vegetables. The highest price was $15.00 for a packet of pumpkin seeds from NE Seed. Calculate the per-seed price and you’ll get a range of less than $.01 for some beet and carrot varieties up to $1.00 per seed for heirloom cantaloupe and tomato varieties.

Let’s compare that to the price of starts. I’m not 100 percent sure what starts cost at greenhouses in our area since it’s still too early, but a quick search online showed tomato plants in the $3-4 range from Home Depot. That price is comparable to a packet of seeds. However, when you consider that a start produces one mature plant in the best-case scenario, seeds are far more economical. I know that more than one seed is generally used when starting them, but it’s still cheaper to purchase seeds.

Seeds 1, Starts 0

Variety

When you are shopping for starts, you’ll likely find the most popular varieties for your region at a greenhouse. These tend to be successful, are adapted to your area, and are relatively easy to grow. Some examples you’ll find in Pennsylvania are Amish paste and Brandywine tomatoes, Straight 8 cucumbers, and California Wonder bell peppers. Most greenhouses will have these varieties available as starts. You may find some more “exotic” varieties, such as habanero peppers or a non-red variety of tomato, but greenhouses will stock the varieties that sell. 3-4 varieties per vegetable are typically the upper end of what you’ll find.

When you buy seeds, there are many varieties to consider. Even displays in stores like Lowes will have up to 10 varieties per vegetable. For tomatoes, you’ll find several varieties of cherry, beefsteak, and paste tomatoes. For cucumbers, you’ll typically find a few different pickling and slicing varieties. Just today, the display in Lowes had ornamental corn seeds, something I’ve never seen in a store before. You have a lot of options to find the seed that best fits your needs. Then, when you expand to purchasing seeds online or from catalogs, you’ll have dozens of varieties to pick from for each vegetable, including organic and heirloom.

Seed starting, gardening
Seed Starting

That many choices can be both positive and negative. If you want the chance to buy heirloom varieties that you’re unlikely to find starts for, it’s a positive. But if you’re just starting out and can become overwhelmed by how many options there are, it’s a negative. Ultimately, I think having more options is a good thing, so I’m going to give this one to seeds as well, but there’s an argument for starts.

Seeds 2, Starts 0

Necessary Equipment

When you buy starts, you don’t really need anything else assuming you have a garden or container. You’ll also need soil, fertilizer, and tools for transplanting and watering. Those are all items that you’ll also need for seeds, though, so I don’t count them for the purposes of this post. So, like I said, once you buy the starts, you have everything you need.

Seeds, meanwhile, need a bit of equipment. You’ll have to have seed-starting cells and a starting mix of soil or compressed and dehydrated soil pods that expand when water is added. This is where the seeds will go. In some cases, you’ll need multiple cell sizes for different plants and to transplant them as needed when growing. Those cells need a tray and potentially a dome to sit in. The cells are placed on top of the tray, which provides a place for water to drain, and under the dome, which holds in moisture, creating a greenhouse effect.

You then need a heat mat and grow light to help with germination. The heat mat is used at the beginning to heat the soil so the seeds can germinate, while the grow light helps the young plants grow through photosynthesis. Neither item has to be expensive: You can get a 10″ x 20″ heat mat for $12 and a grow light for $14, both on Amazon. Finally, you’ll need a surface to set everything on, an extension cord and power supply, and the room for all the seed-starting supplies for several months. None of the items are expensive, but more is needed to start seeds than transplanting starts. In this case, starts require far less equipment.

Seeds 2, Starts 1

How Easy Is It?

Which one is more complicated? This category is an easy win for starts. With them, you purchase them, bring them home, and when the soil and weather are right, plant them in your garden. Once they’re in the ground, it’s the same as starting from seed. You do need to be careful when picking your starts, but most of the hard work has already been done when you buy the start.

Seeds, meanwhile, can be complicated. You have to track a lot of information, including how long each seed takes to germinate, how resistant to frost each is, and whether a seed can be directly sown or needs to be started indoors. This information helps you know when the seeds should be started. With that information, you then need to go through the process of actually starting the seeds. You have to prep your starting cells, choose the proper starting mix, and sow the seeds at the proper depth. After the seeds have germinated, the seedlings will need to be thinned so that plants aren’t competing for nutrients in the same space. A lot of the seedlings will also need to be transplanted into a larger cell before eventually being moved into your garden. It is quite a bit of work and typically requires daily monitoring. As you can tell, starts are much easier.

Seeds 2, Starts 2

Time Commitment

This is connected to how easy each is, but I wanted to touch on how much of a time commitment they are. We’ll go over starts first. The most time-consuming part of transplanting starts is going to the greenhouse and buying them. Traveling to the greenhouse and walking around all the tables is a time commitment, but it is nothing compared to seed-starting.

Starting seeds can take months when you factor in the time it takes to look through catalogs and wait for the seeds to arrive. Peppers are a perfect example of how long seed-starting can take. Because they take a long time to grow, need hot weather to mature, and won’t survive a frost, they should be started up to 10 weeks before the last frost. Around here, that date is May 15, so they can be started now. That is a major time investment and requires a lot of planning.

Starts will win this category, but to be honest, a time aspect of transplants that I’m not a fan of is how long you have to wait to buy them. A pepper start shouldn’t be purchased until after the last frost, and waiting that long makes me nervous. What if the greenhouse doesn’t have the variety you want?

Seeds 2, Starts 3

Control

This category is a bit weird, but I like knowing everything I can about the plants I’m growing. With starts, you don’t have control over how they were started as seeds. That means not having knowledge of the starting mix that was used or if the plant was transplanted before, and if it was, did it experience any root shock? If you’re interested in seed-saving, has the plant been isolated to avoid cross-pollination? That level of control may not be important to some, but I value it.

I like the peace of mind that comes with knowing that our starting mix has proper drainage, that the seedlings are always in the proper cells, and that the strongest plants are kept when thinning them out. I also like being able to transplant the young plants into the garden after a hardening-off process and when they’re smaller than you find at a greenhouse. When plants are younger, there is a reduced risk of root shock when transplanting. Therefore, I’m giving this category to seeds.

Seeds 3, Starts 3

Do What Is Best for You

I have to admit, I was surprised by how this post progressed. I fully anticipated at the start that this would be an easy win for seeds and that I’d be looking for ways to make it more even. Instead, it ended in a draw based on the number of categories each won. I still give seeds the edge because I place more value on the categories they won, though. I think cost, variety, and the peace of mind that comes with seeing the process through from sowing to harvesting are more important than how easy it is to buy starts.

Choosing between seeds and starts is a personal preference. If you’re just starting out and unsure if you want to invest in seed-starting equipment, transplants are a great option. However, if you want to grow heirloom varieties and are confident you’ll want to garden on an annual basis, seeds are the best bet. You can also buy a combination of seeds and starts. My dad has done that for years. Do you have a preference between seeds and starts? I’d love to hear from you.

Create a website or blog at WordPress.com

Up ↑