When planning an upcycle, one thing that I consider with care is how to use the entire garment in the most innovative way possible. Maybe it’s all those episodes of Project Runway guiding me?
When I began my flannel upcycling project, and planned to transform them into vests, they needed a real purpose.
I began this project last year, as the summer was winding down, with fall whispering in the trees. Fall is an unmistakable inspiration for me. I love the color palette, traditional fabrics, and the academic style that returns to fashion every autumn season.
Sleeves Find New Life
Knowing how much yardage there is hidden in those sleeves, I had an idea – a plaid skirt with alternating colored plaid skirt panels connected by a waistband.
To do this, I cut the sleeves carefully from the shoulder seam to retain as much width and length as possible. This would become the bottom of the skirt. Next, I cut the cuffs from the sleeve; this tapered end was perfectly shaped for the waistline of the skirt for a flared effect.
For the waistband, I had yet to understand elastic, and was growing tired of waist ties, so I got a bit creative! I decided to use buttons, four of them to start, and created an adjustable button closure skirt, like the hook and eye of a bra band. The buttons were actually repurposed from the buttons of the shirt. For ease of getting dressed, I sewed the skirt on all the side seams, leaving a 2.5-3 inch opening to adjust the waistband, in a way that the fabric would cross over for security.
If you are looking for an easy and cute fall upcycle for the new season, I would highly recommend this project! You can even pair the vest and skirt together for a complete outfit!
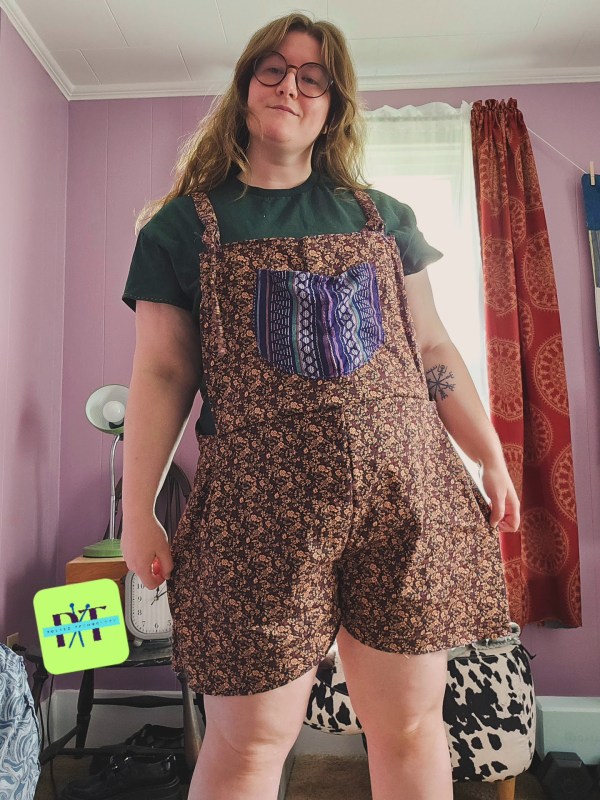
Do you ever think of something you’ve accomplished and wonder if you could do it even smaller? Well, I set a challenge for myself. A year ago, I wrote about creating a summer dress with a button-front from less than 1.5 yards of fabric. That post inspired this one, as this summer I was able to squeak out a pair of shortalls (overall shorts) from a yard of 59″ stretch twill from Mood Fabrics. This was not my first overall attempt, but I think my most ambitious because this yardage was for a pair of shorts with some abundant pockets, but I changed my mind after seeing a variety of overalls styled for spring and summer. I’ve owned this style before in denim. My favorite version I’ve purchased was a pair of vintage ’90s denim shortalls that were baggy and breathable for those swampy summer days. The more fitted versions I’ve found in stores in recent years are not my cup of tea, because for me, overalls are best when they are oversized.
When I cut these overalls out, I had just completed my draft of an overalls pattern from 2 yards of 44″ cotton twill from Kokka Fabrics, and I was itching to make more without fabric shopping, so I went for a dig in my fabric/yarn closet. It’s more of an antique clothing press, to be fair. This is where I found my gold – 1 yard of 59″ across cotton twill in a fun pattern, sturdy enough for a bottom weight garment with just enough fabric to cut the shorts, the bib, the straps. That was all I could muster for sure. I set aside the project and got to work on my Kokka Fabric project, which taught me so many things about sewing overalls that I had overlooked in past attempts.
Firstly, the back bib is not a rectangle. Secondly, a facing for the bib makes the project feel more professional. Thirdly, the buttons on the side need to be properly assembled with the fly for the right stability. Finishing the edges with twill tape made from the project’s fabric helped create a crisp look. Fourth, the overalls need pockets in order for the garment to sit well on the body. Lastly, I did not accomplish these with my 1-yard of fabric overalls. I took some shortcuts.
I ran out of fabric for the pockets, the fly, and the twill tape. To remedy this, I kept the shape to a romper style and less of a traditional overall. The bib is rectangular on both the front and back. The pockets were added from a previous project; I upcycled shorts into pockets. The side does not have any fastening, instead I sewed up the seam and let the boxy cut of the shorts and stretch of the fabric help me compensate for my lack of fabric.
So if this project is a pair of overalls that is not a traditional overall, but more of a romper, why am I writing about this?
Well, because the finished product is a wonderfully comfortable garment, practical for many things – gardening, sewing, cooking, knitting, farmers market, apple picking, cleaning, walking in the woods, going to the beach, etc – and I made it without being an expert. I made this garment through hand sewing, so you don’t even need a sewing machine if it’s out of your current budget. I purchased this fabric on sale for 10 USD/yard. I used less than a spool of thread, and repurposed the pockets from an item in my closet that I didn’t want to wear anymore. Have you seen the price of overalls? They are expensive, even the short version. A low-quality version will still set you back 30 USD.
I made these with 10 USD of fabric for a midsize frame, so this is accessible to all of us, not just the slim people. A lot of popular and cheap DIYs on the internet are made for very small bodies, which makes me nervous that if I try it, it will be expensive, but this wasn’t. Making these overalls was incredibly rewarding, too. These aren’t even the best pair I’ve made this summer, I’ll share the other ones soon! But these ones will have a special place in my heart because they are unique, comfortable, and made with my own hands. So if you have an idea of how you could make something by hand, make it happen! It’s a lot easier than you think, a great learning experience, and there are tons of resources here online to help you succeed!
Recently, I shared a Knit Star Plush Keychain Pattern, but that wasn’t the only keychain I’ve been working on. Behold, a knit bunny keychain made from repurposed fabric! This keychain was inspired by my Skzoo Quokka plush keychain which I have styled on my purse and belt loop. I was tempted to buy more as this trend has been all over my feed this year, but that’s unrealistic. So I thought, in Jeremy Clarkson fashion, how hard could it be?
This key chain was made by repurposing a pair of underwear, that was weirdly made without any stretch. They had no purpose but to be trashed, which I didn’t want to do because they were brand new and I liked the pattern and color story. So I wondered, could I translate this to a plushie and I could make this plushie into a keychain without buying any materials beyond the keychain hardware? The answer is yes!
I used a pen to draw pattern pieces onto the underwear by designating the fabric into four ear-pieces, two head-pieces, and a rectangle piece that would be used to connect the keychain hardware. The rest of the fabric was cut into small cut pieces that would be used as the stuffing. This worked like a dream!
I chose to sew this item by hand because of the small nature of the project. The pieces were too small and delicate to sew by machine with any semblance of control or care. It was a quick make and took one day to complete. I sewed 90% of the ears, turned them right side out, stuffed them, and then set the ears aside. Next, I repeated this process with the circle for the head and stuffed it. When I was certain that all the stuffing was divided between the three pieces adequately, I sewed closed the ears and head. Next, I attached the ears to the head. Finally, I sewed the rectangle and threaded it through the loop of the keychain before attaching it to the bunny plushie. I opted for an abstract look so I did not decorate the bunny plush with a face, therefore if it spins around it doesn’t matter what side is facing out.
Overall, this was a quick and thrifty project with the hardware coming in a pack of two for $2.99. I used the other clip on the knit star plush project. This type of plushie could be made with any scrap fabric you have and could be adapted into other animals. It would be an easy DIY gift too!