This is an unplanned part three of my “Drafting Shortalls From Scratch” because I did not succeed in making my overalls for winter. Although I have made shortalls twice this summer, a few silly, but very human mistakes, led to the project going awry. This is what I think went wrong:
Flew too close to the sun when tailoring
Planning < No Plan
Lack of Focus
Measure Once, Cuss Twice
I kinda hate sewing when it feels this hard
Putting too much pressure on myself
Not Buying Enough Fabric
Not Mocking Up
Not using my Patterns when I’m stuck
Research the Basics
It’s so easy to think we’ve got this and be too confident when going into a project. With knitting, this approach of fearlessness had led to some great projects, but with sewing, this artistic type of approach crashes and burns. Sewing is fabrication, as weird as that sounds. I think I was prepared to sew such complex tailoring projects, such as my shortalls, this summer, because I spent the spring building a screened-in porch with Kyle. Woodworking is very similar to sewing, I learned! It is about measuring, planning, creating things in a specific order, and constructing something that is built to last. When we started working on the porch, I never imagined how much it would teach me about garment construction. But it gave me a template to focus on. Who knew that woodworking would be such an inspirational experience for me?
So why am I sharing this? I am really struggling to accept that sewing is not coming easily to me; no matter how much I practice, it continues to challenge me. I’d like to invite you to join me in not giving up on those things in our lives that are hard.
Did you know, that through simple measurements, reference photos, and a few tools, you can draft your own clothes? Not just a t-shirt or a circle skirt, but big projects!
That’s how I have made some of my most ambitious projects, no patterns required!
What is Pattern Drafting?
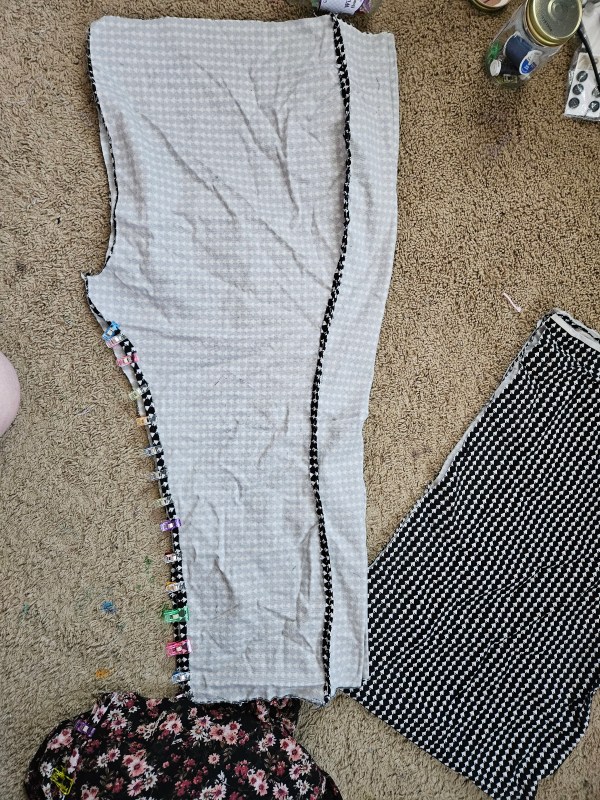
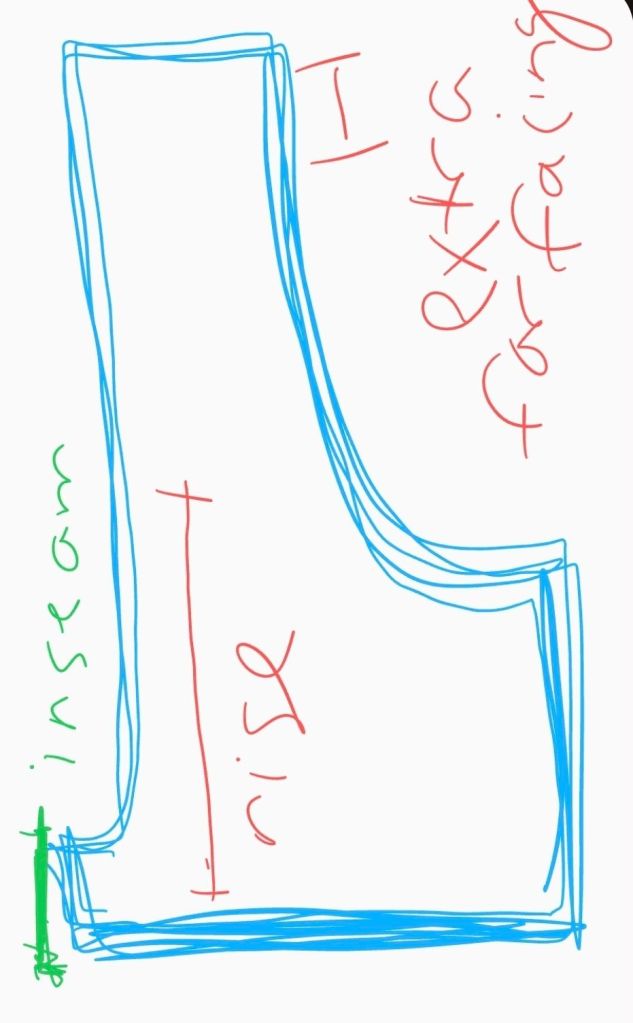
A pattern can be easily made with a tape measure, pencil, and the key places to measure. For my overalls, I was most concerned with the width of the bib, the length of the rise from the top of the bib to the crotch curve, the width of the hip from the center of your body to the end of your hip. You can also measure the circumference of your hips but I think having separate measurments for the front of the pants compared to the back of the pants. The back is usually wider.
For the overalls, I worked in four pieces. Front left, front right, back right, and back left. To do this I marked out the front left and front right on the fabric, accounting for the crotch seam which is part of the leg. I added a 2-3 inches to the width of the hip measurement of each of the four pieces to make the curve with my french curve.
When planning pants, keep in mind that you don’t need as much inseam as you think to make shorts. What you will need is a long rise because you can always cut more, so be cautious and double check the measurments of your rise.
Now for the bib, the top portion of the overalls, I plotted the width of the bib above the pants portion and with pencil I carefully drew a tapered curve upward. I cut this extra long to have excess fabric to fold over to make the facing. This fabric is like a lining for the top of the bib, the part you are most likely to see.
Always use pencil or a tailors chalk and take your time. Using a mock up fabric is a great idea to get the cut right. After repeating this for both front pieces, remember to adjust the width of the hip for the seat of your pants, all while remembering to account for the french curve line of the inseam.
After cutting all for pieces you will need to set aside fabric for pockets, I added 5 to mine. A bib pocket, two side-front pockets, and two back pockets. You will need fabric for the straps, measure accordingly based on the height of the bib, over your shoulder and to the back bib, remembering to add more length to tie.
Next is scrap scavenging! You will need small pieces for the loops to tie the straps around on the front bib. This will call for two loops. You will also need bias tape sized pieces to finish the edges of the overalls on the bib. Finally, save some fabric for the button flies on either side of the overall legs to help you get in and out of the garment.
It’s a lot of information to sift through but I hope this small tutorial will help you sew overalls if you wish with free instructions. I will be following up with a second post that explains the order of operation, to make sense of all these pieces, to help these fabric pieces transform into a wearable garment you can enjoy!
It’s a bit silly to think about now, but learning how to sew from Youtube meant that using all the correct drafting tools, was a process of failing in order to realize I needed them.
I made a series of pants and shorts in 2021, 2022, and 2023. Some were okay, many were awful, some turned out better than expected because of a pattern. What I was missing in my sewing tool kit though was the predictability of the french curve.
Once I began drafting with this wonderful comma, I saw an improvement in my pattern drafting, ease of wear for garments made with this tool, and a reduction of fabric waste from cutting the curve wrong.
This year I’ve been transferring designs that I like onto my own paper patterns for a quick reference when planning projects and cutting out garments. It has also opened a new world of pattern hacking my own patterns! I’d heard of pattern hacking before but mainly in the context of pattern hacking pieces from the big four, either by altering the lines of the pattern piece or mashing up patterns from different garments to create something new. Trying it with my own patterns has been incredibly fulfilling and made designing a lot easier. I’m wasting less fabric and having a much easier time tailoring my garments, which means when I start designing to sell I’ll have this process down instead of being lost. It’s exciting!
One of the patterns I hacked into something new was the bodice pattern from this Henley top I made from a ribbed knit fabric from the Walmart remnant bin, it was a major score! This pattern has a scoop neck and a relaxed shoulder line that extends off the shoulder.
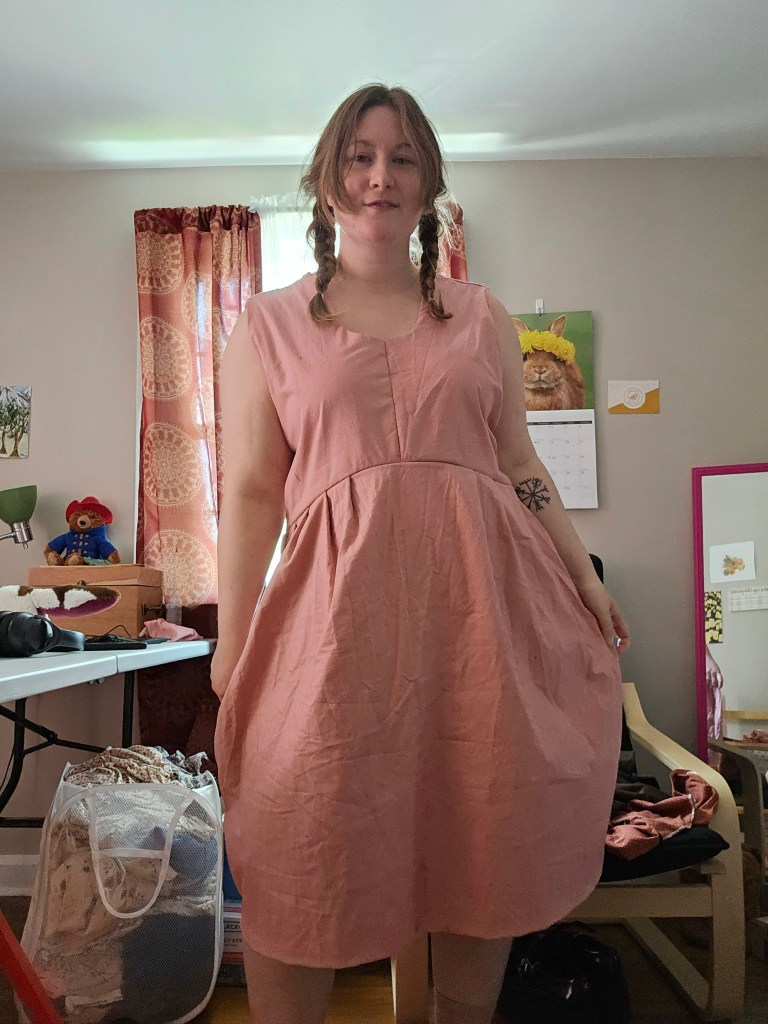
I used this pattern to make a pinafore-style dress from blush pink cotton with a micro polka-dot pattern in a vintage fabric from my Gram’s stash. She had 8 yards of it, and since it was translucent I decided to double layer the dress, the result has been one of the most well-finished garments I’ve made because of using the pattern and fully lining it. The first time I wore this dress out was actually to tour the house I ended up buying – good memories!
Because this was a pattern hack project, the original top may be a little tricky to see in the lines of the finished dress at first. The scoop is less deep and the relaxed shoulder I brought up an inch to make the sleeves a bit more graceful to wear on its own or with another garment underneath in the winter.
Another change was the v line in the back instead of being a crew neck, I also cut the back bodice pieces on an angle to create a better fit which worked well. I changed the line of the waist too by swooping the line upward in a half-moon shape which has been one of my favorite hacks so far. With the gathers on the skirt and minimal print, it draws the eye to style lines in the garment which is a different technique from how I normally design. It feels like a level-up of my skill set and I hope to keep exploring this style.
Earlier this year, when I was planning what I wanted to make as additions to my wardrobe I found a brown, I believe it is taffeta fabric, in my stash. I’ve been at a loss of what to do with it since I got it because it’s so different than what I usually sew with, but that’s a good thing! I know it will push me out of my comfort zone with its hue and shiny finish, so I want that garment to be special when I finally make something out of it. I do not want a repeat of the pink scuba pants!
I’ve pondered using it as a lining fabric for my pirate coat, I’ve also considered using it as an underlayer for a sheer fabric I have in my stash, etc. So far nothing felt right, aside from an idea I saw while watching one of my favorite sewing channels on YouTube. She makes fabulous dresses from self-drafted, big four paper patterns, and buys indie PDF sewing patterns that all turn out so lovely, I want to try them all.
So on a whim, I went first to Mood Fabrics’ Sewciety page to see what they had to offer in their free selection and eventually found myself on Etsy, looking at the exact dress pattern she made on a video I was watching. Spontaneously, I clicked purchase on a dress pattern and clicked instant download. A dress, I thought, that would be perfect! I can style it up and down, in heat and in snow, it will be my go-to piece! To quote Lee Corso, not so fast!
It was mighty easy, but also mighty paper-hungry. This was something I was not expecting. You see, as far as PDF patterns go, I knew they required printing, but I always thought it was like 10 pages max. It seemed like something that would be straightforward. You know what I mean? To my surprise, it was 29 pages of just the pattern plus 5 more pages for the instruction and sizing. Um, holy lots of ink!
Yeah, I was not expecting that from my first one. So I looked more closely at the Mood patterns I was browsing to see if those would be any better and I saw another flaw in my plan, the patterns specifically from Mood use a ridiculous amount of yardage. Like a mini dress was calling for 5 yards of 57″ across the fabric. I can make a mini dress in 3 yards or less. Is this just a ploy to sell fabric? Mood Fabrics’ average price is USD 14-18 per yard, multiplied by 5 and it is beginning to be a very expensive project if you follow the fabric suggestions. I have a lot of questions now.
But anyway, I went back to the Etsy PDF pattern and decided to throw caution to the wind and begin printing. And print we did! The gentle hum of the printer slider traveling to and through filled the room, with the chorus of the squeaky paper roller delivering page upon page of freshly printed pattern sections to be cut out and taped, onto the desk. As I sat, staring at the screen, I began to get fidgety. I began to look around the room and stare at my computer screen, eventually perusing the listing again, and I noticed one small potential problem in this plan. As the pattern maker was an American, I thought for sure the sizing would be in US sizes, but alas the numbers on the chart were slightly askew from the standard. And I realized two things I would have to face, comparing the yardage to the pattern and taking my measurements to determine my size.
It was a slip dress, so the 3.5 yards I had available on the opaque fabric seemed like an obvious choice. There certainly would be enough, surely there would be enough, but oh no, there wasn’t. The pattern wanted more. I also grabbed the measuring tape and prepared for battle because no matter how badly I didn’t want to care what those numbers said. Those numbers always intimidate me. So with butterflies in my stomach, I grabbed the tape measure and learned that it wasn’t going to be my weight that would keep me from being able to make this but my literal body proportions. My frame. My long torso. My straight up-and-down waist.
I didn’t fit into any size proportions, none. Going up or going down a size was all off. As the freshly-inked paper kept rolling off the presses I felt stress, uncertainty, and frustration at myself for being such a novice thinking this would be easy!
But why isn’t it simple? When I buy paper patterns from the big four it is simple! When I’ve looked at vintage patterns, yes there is a little bit of knowledge needed to understand the sizing – your measurements – but other than that simple! Was I really going to have to pattern hack or pattern grade specific pieces on this paid-for, already drafted pattern? Was it basically going to be as complicated as making my own from scratch?
In that moment, I was incredibly humbled. Here I was learning to sew, designing my own clothes, I want to turn it into a business with the most logical option seeming to be PDF sewing patterns, but my word, this is a tough product to produce! This is incredibly more difficult than I imagined and I don’t think this is how I want to contribute to fashion space. Because not only do you have to make the pattern, the instructions, and go through testing, but I think on a PDF format, if you don’t have a vast size range or even a curvy or athletic build variation, I don’t think the pattern is being done properly.
I could not make the slip dress pattern work because it was cut for an hourglass shape and I have a straight up and down waist, no matter how skinny I get, it’s never going to fit me properly without alterations to the lines of the dress. That discouraged me. I stopped the printing and chose to call it a mulligan. The same issues with standard sizing hit me like a wall in a place I never expected.
What the answer is, I don’t know. But I do know I think the PDF pattern market may be the same ship different day repackaged in a way that creates more work and potentially less waste? On that, I’m not convinced because it is so much ink and paper. I don’t know. It still felt like a lot of consumption was happening. It’s a shame. I feel like I accomplished nothing in the long run. I believe I’ve found a problem I’d like to address if/when I ever figure out how to make my own patterns. Thankfully there are a lot of creative people in this world who may be developing the solution already. I hope so.
What about you? Have you purchased an indie PDF sewing pattern? Were you pleased? Did you feel like it was easier than buying paper patterns or self-drafting? Thanks again for spending time with me today, dear reader. I hope you have a lovely day. ❤
When I put this jacket top on for the first time, the finished piece, I felt this sense of completeness. What I used to sketch, what I would aspire to be, the aesthetics I was drawn to during those formative years of finding my personal style in the late 2000s and early 2010s before life got a bit weird, this was the type of fashion I wanted to be a part of. It’s the kind of thing I’ve been waiting for my skills to develop to reach the imagination held inside. Waiting for the chance to express itself in more than paper and pen, in thread and fabric and form!
My early projects were a product of the times, a year spent online instead of in the world, historical fashion, cottage core, and dark academia, but not the personal style I had cultivated. Big projects were hard, blazers seemed impossible. But they are so iconic. I crave structured pieces like that in my wardrobe, I mean I wrote an entire essay on the jackets and structured fashion that is the Don’t Stop Music Video by Ateez. That is 4 minutes of glorious outerwear inspiration!
This project at times seemed borderline cursed. I cut this jacket out the day I screwed up my tweed coat and notched lapel pattern by forgetting to mirror the pieces. Not the best start to a day of design work, but perseverance and clear-headedness prevailed to keep this pattern on track. But then, it sat in my stash waiting for me to get started. I hid from it in case I failed it.
One day, I put the pieces on the form and began to pin. The lines of a jacket, structured shoulders, and excess fabric hang around the collar, waiting for the traditional form to take shape. I pinned it exactly how I thought I wanted it, and the sewing process made a few edits for me and my plan. My machine took the lead and created the happy accident, the darts around the neckline. The collar was inserted with more attitude than my intention but I prefer the edge, the little twist on the blazer that has become the Marguerite Jacket.
With the wide lapels, I pinned them back against the jacket to create these triangle shapes on the body of the jacket top. I decided to lean into the attitude of the silhouette to add an exposed zipper and black buttons for a bit of a British punk little spice. I anchored the collar down in the front, balancing the chaos and structure into a garment that walks the line between blouse and blazer. It’s comfy, it’s fun, it’s versatile. I’ve styled it with flare, baggy jeans as pictured. I’ve styled it as a blazer over a cocktail-style dress. I know it will be fun to try it out over cargo pants, skirts, shorts, etc. I look forward to it! I also look forward to wear my designs evolve from here as moving forward I plan to become more cohesive in my aesthetics and collections.
To develop a pattern I could rely on I’ve been studying mittens. Different shapes, proportions, and ribbed versus knit-purl have been tested to see what I like to wear and make. It’s been a fun journey! A journey where I’ve learned how pattern development involves skill refinement.
October 2022
The brown mitten was developed first. It was a project on a whim to make better hand-warming devices than I had before. In the Fall and Winter of 2021, I made mittens out of cheap, bulky weight yarn that while soft looked like whales breaching out of the water instead of hand-shaped mittens. They lacked dexterity, polish, and honestly, lacked taste. They were ill-fitting because they were a prototype and I tried wearing them but tossed them at the end of the season to try again. Enter the brown mitten.
The brown mitten had a good shape. It was created from a worsted weight yarn on size 7 needles compared to the previous bulky yarn on size 11. The brown had even stitches, warmth, and potential! I got so excited that I forgot to write my project notes and boldly decided to make the second one later. This never happened. This mitten floated in my cold-weather accessory bin until I let it go.
August 2023
Next, I worked on the black rib knit mitten. Instead of a knit-purl structure I made a crucial error and decided to make the entire mitten, not just the cuff, with a rib knit. Why was this an error? Well, the tension across the yarn was stiff and this made the mitten difficult to wear. It also looked messy because I had to reduce my stitches to achieve that curved shape at the top. When you are developing a pattern you are improvising and experimenting so as you can guess my reduction led to uneven ribbing and wonky texture.
It was not my best work and harkened back to that weird breaching whale shape. Not a fan!
September 2023
The Blue Sheep mittens were a wonderful delight! I picked up a blue tweed yarn at Joann’s on a sale and began making things that made me happy, like this recreation of my Blarney Woolen Mills gloves from the early 2000s. My mom and I bought matching sheep gloves in this color when we visited in 2001. As they wore out we repurchased them online until Blarney Woolen Mills stopped offering them.
I don’t currently have the understanding of how to make gloves so I tried recreating them in mitten form. They worked well except for the fact that I made them too wide at the top and too short at the bottom. I added a piece at the bottom to make the cuff longer. The little sheep brought me so much joy! Unfortunately, I forgot to take notes on this one too, and was unable to make a matching one. I recreated the blue tweed mittens in another batch that I scaled too big and passed them on to my husband because they were simply too big for my hands.
November 2023
The hot pink mittens are my gold standard. The fit is sublime. The shape is lovely and yes I took notes and changed my order of construction in order to make mittens that match in size and shape. I now knit the mitts first, so four in total, then the cuffs, and lastly the thumb pieces. Then I sew them together at the same time. This system works. The proportions are perfect for my hands and have truly saved this study of mittens from feeling like a multi-year flop!
Project Takeaways
Always take notes of your stitch count and needle size to make the project repeatable!
Never stop between mittens, trust me you will not go back to finish the second.
Cute details like sheep or other motifs are kind of awesome! I plan to experiment with this technique in the future.
Reduction speed will affect the shape and potential wonkiness of the mitten, proceed with caution.
Mittens are actually a great beginner project. They are quick and easy.
The clearance section of a fabric store may be my biggest design inspiration. It is in the bolts of discounted fabrics from seasons past that you can find some real gems in my opinion. My brain gets a break from the items deemed trendy or seasonal for a moment to look for something new and at a reasonable price to justify taking a chance on something new. That is how I took a chance on this two-sided scuba fabric that is hot pink and light pink. Not really my cup of tea! But it was 2 USD per yard and honestly a fascinating texture and weight. It was worth the leap to try something new, so I did!
Now, do I always have a garment idea in mind when I pick out these cuts? Nope. Should I? Probably. But some magic can happen as they hang out in my fabric stash like inspiration finding its way to me, which is quite fun.
For this cut, in particular, I was a scuba newbie. The weight was hefty with a bit of stretch, so it needed to be a garment that could handle the heavier textile. The two-sided nature provided two color palettes in one. I considered a jacket, a coat dress maybe? The thing that was working against my creative brain was the Barbie movie. I did not want to make a Barbie cosplay, simply because Barbie was not my favorite toy. I was an American Girl Doll and a Fashion Polly girl through and through. Making a Barbie-inspired garment would not be authentically me nor would it be something I would wear because, did I mention I don’t really wear pink? Yeah, I don’t love pink, especially hot pink, so why did I buy hot pink fabric fabric? I think I like pushing myself to a place of adventure with the clothes I make. I don’t want to make boring clothes if my skills will allow me to do so. No matter what I did with this fabric it was not going to be boring.
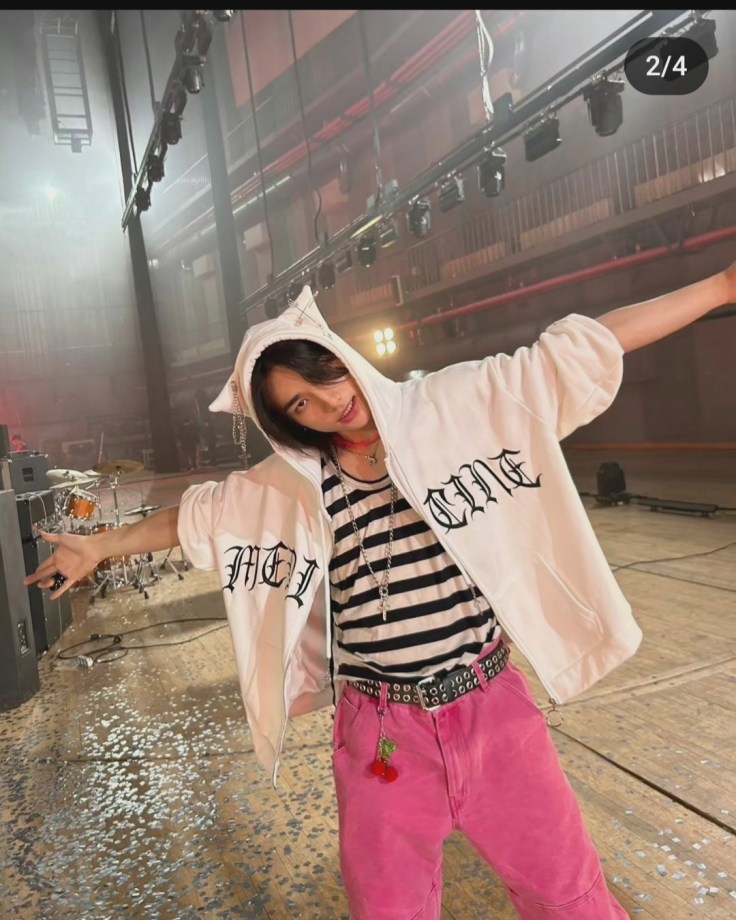
One day I saw this photo of Hyunjin on Instagram and it hit me, why does this pink scuba fabric half to be made into a feminine Barbie cosplay? Hot pink looks fantastic in a masculine silhouette. Making a neutral garment, like a pair of pants could be just the thing I need to make this fabric feel accessible to me and my own personal style. A pink dress felt too on the nose for me to get any wear out of and that is a big thing for me. I don’t want to make things I am not going to wear just for the heck of it. Maybe one day if I have a way to sell things that aren’t my personal style but right now that would be a poor use of resources and excess clutter my closet doesn’t need.
I knew I wouldn’t be able to make a hot pink pair of jeans like Hyunjin is wearing, I simply don’t have a jeans pattern in my stash, but I do have a menswear trouser pattern. I chose to use that instead of free-handing a jeans pattern so this garment would have the best chance of success. Jeans have an incredible amount of details that make them distinct and classic. The pants I drafted were going to be far more simple as these would be my first attempt at sewing my own trousers. It was a big moment!
I altered the menswear trouser pattern I had for a better fit by raising the rise for a higher-waisted fit. I did this to fit my waist better and to give more room to my hips. I was nervous these were not going to fit me right because I was grading the pattern to my own design so I cut a generous seam allowance around each piece. (A little too generous I will find out later.) This fabric cut like butter and did not make a mess, which was a huge victory after my Jack Sparrow Inspired Coat corduroy left a layer of fluff on my floor that I still find remnants of today.
To match the crotch lines better, I tried something new from my previous shorts projects and sewed the front and back seams first and then I worked the inseams, working my way out the outside leg seams last. I don’t know if this is the proper technique for sewing trousers but it worked well for this project. I tried them on and the pants fit well, a little wonky at the front because I left too much seam allowance, but they looked like actual pants that an actual person would wear. It was around this point that I realized I needed to do more than just sew two leg tubes together, these trousers would need pockets, fastening, and belt loops to be a properly finished garment.
I recently learned how to make button holes which I shared in My First Buttondown Shirt and with this newfound knowledge I decided to go in a Spicy direction, literally like the Aespa Spicy M/V, I was going y2k! What was cooler than popstar fashion when I was a kid? Nothing. I wanted these to feel like Destiny’s Child or a backup dancer for Proto Zoa would wear.
I decided the best way to accomplish this would be to make cargo pockets for a funky twist and place them higher like you would normal pockets, to hide the weird fit around the front of the pants. These pockets I designed to be usable, big enough for my phone, and secure, with proper button closures. This was my first attempt at cargo pockets and belt loops and I have to say, they were not as scary to make as I thought, especially with the use of my heavy-duty sewing machine.
Final Thoughts
So as far as my first pair of proper pants, not just lounge pants, I am supremely pleased with how they fit. I can see the flare leg starting at the knee. I like how they fall around my hips. I like the length and the rise of the waistline. The pockets were stronger than I anticipated and the belt loops were functional, which came in handy because these pants were a bit big and continued to stretch as I wore them. Styling them was a bit of a challenge, as I realized I didn’t own much in my existing wardrobe that paired well in color and proportion to the silhouette of these pants. Shoes were also a challenge, I opted for a pair of Converse high tops since I believe they go with almost anything.
This is where things got interesting. I wanted to show my mom and my excitement bested my judgment. I unwisely decided to wear these pants out and about for a day of running errands in Wexford. This was my first mistake. My second mistake came from my unwise decision to cut the pieces with an extra seam allowance that made the front of the pants fit weird. The waistband was a bit big which I thought I could remedy with a belt. It did work for a bit until the fabric began to stretch, and stretch it did! The belt stopped working which was awkward, as every few minutes I had to adjust the belt.
My third mistake was not inserting a zipper to take the waistband in, which I should have planned for. I got excited and sewed the seams before I remembered the zipper. This scuba fabric showed every hole, whether pin or needle, therefore seam ripping and inserting the zipper worried me because the fabric was weaker in those spots. I was concerned the pants would rip (foreshadowing) so I left the pants as is to depend on that belt for structure. The side was the only place to put the zipper because the front was fitting so weirdly I did not want a zipper shining a big spotlight on that error.
Herein lies my final boss of mistakes, the fabric versus my thread tension. It was a mele. With thick fabric, I raise the thread tension because it helps the needle sew through the thicker fabric. Being unfamiliar with scuba I didn’t know how the scuba would respond. The scuba did not like the high tension nor did it like being sewn. I was able to get the pants, the pockets, the waistband, buttons, and belt loops on, but there were times I could barely get a needle through. The tension came back to bite me in the butt as my wear test went on. By the end of the day, I was incredibly thankful we headed home early. The thread on structural seams, like the main ones in the front, back, and sides had begun to rip through the fabric. The seams were on their last leg.
I’ve never had this happen with a project before! I was incredibly frustrated as this project took days to sew. My fingers were scratched up from the pins and the needle accidentally stabbed me as I hand sewed the buttons. There was no way to fix them, they were toast.
And so ends the journey of the pink pants. They had a good day out. A one-time adventure. They were good pants that deserved better. In my short time with them, they taught me a lot. Thank you pink pants and random scuba fabric. I will never purchase scuba again!
Last night, I decided to be productive. I gathered my scissors and descended on my fabric stash. To the cuts of fabric, I’d left for the first hint of 30 degrees, to make a tweed coat and plaid trousers. Oh how excited I was to have a tweed fabric that was free from wool, and on clearance no less. What a thrill!
For months, I browsed Pinterest through the forest of street-style pins to the flowing river of coat inspiration. I studied the silhouette, the collar, and the button placement. Oh yes, I was going to do this right. I referenced pattern against pattern, for the right feel. The right lapel.
For moral support, I played a fellow chaos sewist in the background, Stephanie Canada, and laid my fabric on the floor. I determined my cut lines and set them to work, as Stephanie set to work on her #grimgrinninggarb I set my scissors to work carving out the back coat panel.
With a smile, I draped it against my frame to see that the arm holes were placed correctly. The opening for the neck, cut as a slim yoke, compared to the wandering necklines of my past attempts.
Next the sleeves were ready to take shape, a careful gusset planned for the armpit. “What mobility I will have,” I thought, “sweaters, hoodies, flannels – none will be too bulky for this!”
But then the summit appeared in the distance. The jacket front and collar! It was time for the big hurrah, the moment I studied and planned for. I smoothed the yardage to the floor with care to ensure the edges were plumb. With a careful swoop, the arm holes were placed. I steadied myself for the neck opening and lapel.
I stood, I pondered, I cut. A neckline sloping down, reaching outward towards the heart. A lapel. Large enough to fold over and sit regal down the coat. With satisfaction brimming, I carried on to the collar. Easy peasy right? After such a feat! I referenced my pattern one more time and cut it. I placed. I saw what I have wanted to see for years now. A coat with collar, notch, and lapel to follow.
Alright! This is going to work. This is my dream coat. A piece of outerwear ready for Friday Night Dinner. It was sharp. It was, just one. But two? Where’s the second piece?
With horror, I realized my mistake. I laid the second piece to see that I once again forgot to mirror the pattern. It was perfectly cut, backward. The lovely lapel was inside out. I had two lefts and no right.
And I had no more yardage left, on a clearance find remnant. Game over.
No tweed coat. No coat project at all. It was over. Fin.
Sewing humbles me every time. I know one of these days all my practice and failures are going to produce something made with care and wisdom. But dang, I feel so dumb!
If you are feeling discouraged today, remember, that we’re all in this together. 🫶 Hopefully we can all find a way to laugh through our mistakes and keep looking toward what the future holds. We got this! 😁
I tried an experiment. This spring, instead of planning out a schedule of sewing projects, I decided to balance my time between my sewing workroom and my other projects by the changing of seasons.
Now, as a type B person, I’m a bit of a procrastinator. My creative nature doesn’t lead to a rigid structure, even though I wish sometimes it did so I could be an organized maker. But I have the personality that I have, and that is okay. I can still be productive even with a procrastinating nature. That’s what I did this spring. At times it felt like pushing off work that I needed to do, but really I learned that living seasonally means there are rhythms to the process at hand.
What made this plan interesting to me was the unknown. I didn’t know how the schedule for making items would come together. I didn’t know if the weather would dictate more lightweight tops first or lead me into shorts. It was purely figured out by what item in my wardrobe I thought I would need next.
Sewing Schedule
As I mentioned before in Sewing When I Lost My For It I decluttered the warm weather clothing that no longer fit me, was worn out or simply was not working anymore. So I was going into the new season with nothing but my workout shorts and shirts. I wanted to challenge myself to find my style by brainstorming on Pinterest and planning items that I actually want to wear.
For this summer wardrobe, I knew I wanted a few basics, statement tops, flowy skirts, comfortable but cute shorts, and a dress if I found a style that I liked. I wanted to design clothes differently than I had in the spring and summer of 2022. Last year I focused on reading patterns, and trying out new types of garments like blouses and pants. My guiding force was found in tutorials and patterns instead of my own style sensibilities. This produced items that were average, not my style but not unwearable. Not exciting though.
I didn’t want to make the same mistake and so from fabric shopping onward, I decided on a motif. I chose a color palette of greens, black, brown, and blue and decided on a closet of shorts, a few skirts, t-shirts, and sleeveless blouses to mix and match. Everything with easiness, like the athletic shorts I used to wear to work for the paint crew. My design philosophy was decided – movement with effortless style, able to style with sneakers.
In total, I’ve created 8 pairs of shorts, 11 tops, one skirt, and two dresses. I made these items off and on since the end of February, so around two and a half months of work. I planned my sewing days based on the forecast for the upcoming week. Spring came early and so I began March making at least three pieces a week. If the weather cooled down I would stop sewing and switch to other projects. If a warm spell came through I pushed to make four or five items to be ready to wear on the incoming 80-degree days. Back and forth like tides of the ocean. Sometimes I barely sewed at all, and other weeks I did nothing else but run my machine.
The Results
What did I learn from this experience?
Planning out your fabric choices and the color palette is a fantastic use of time. This keeps you on track with creating pieces that not only go together but will pair well with the items in your closet. In fact, reviewing my current wardrobe before I purchased fabric kept me focused while browsing so that I bought the fabric I would actually wear instead of fabric that looked cool on the bolt.
Seasonality does not produce balance. Although it was fun to create by the weather and made me more in tune with the changing of the seasons, it did not provide a healthy balance work-life balance. During those sewing benders, I made a lot of things to be ready for the warm temperatures but it also hurt my neck, back, and shoulders to use my machine for 8 hours a day, day after day. Sewing is truly hard work.
I have a greater appreciation for the people who make clothing. Not the designers, the underpaid workers who sew for these brands we buy from. Sewing is hard on the eyes and the upper body, it requires attention to detail. Without the men and women who make our clothes, we would be lost. I have a greater appreciation for those who cut out the fabric, threaded the machines, sewed the armholes, hemmed the pants, and put so much care into items that we so easily take for granted in America.
Will I Do This Again?
I think I will do an adapted version. I like the seasonality of the project and how it allowed me to see the changing season in the same way gardening has. It makes you appreciate the passing of time. That being said, I need more balance. If anything this system showed my type B personality, that type A personalities have a point when it comes to organization. I would prefer an actual schedule, that I could use to keep myself accountable. Not to keep myself from procrastinating, but to keep me on track with stretching, water breaks, and workouts. I neglected a healthy pattern of rest and exercise which made my mind feel cluttered and my shoulders quite stiff.
So, next time you are getting dressed, look at the careful stitches of the garment. Note the complexity that is garment construction. Look at the label and see where it was assembled. Take a moment to appreciate whoever made your clothes and be grateful that someone took the time to pattern and sew your wardrobe so that you could get dressed today.