Stashbusting in 2024: Color Palette Knitting

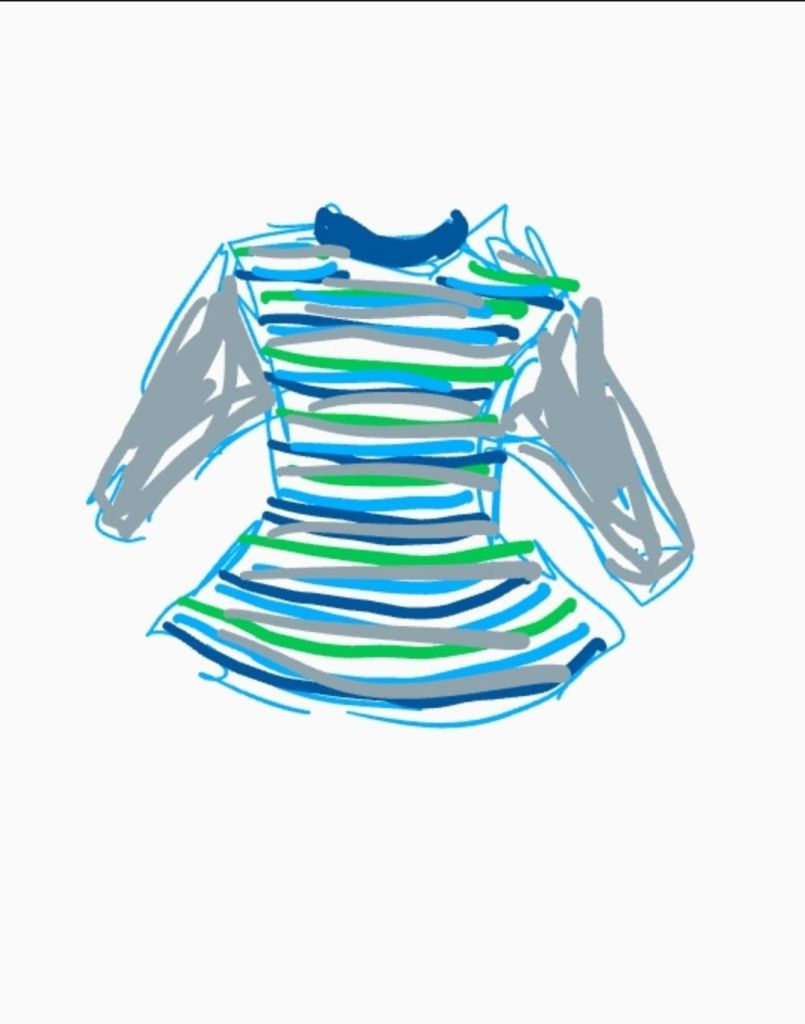
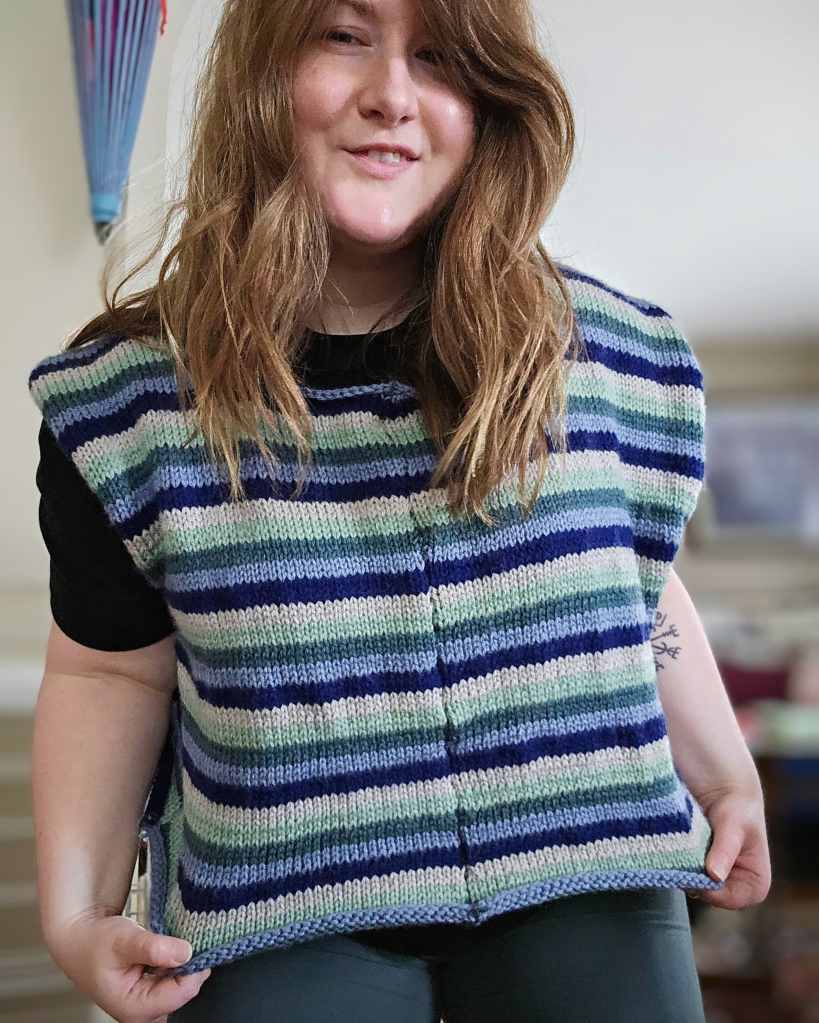
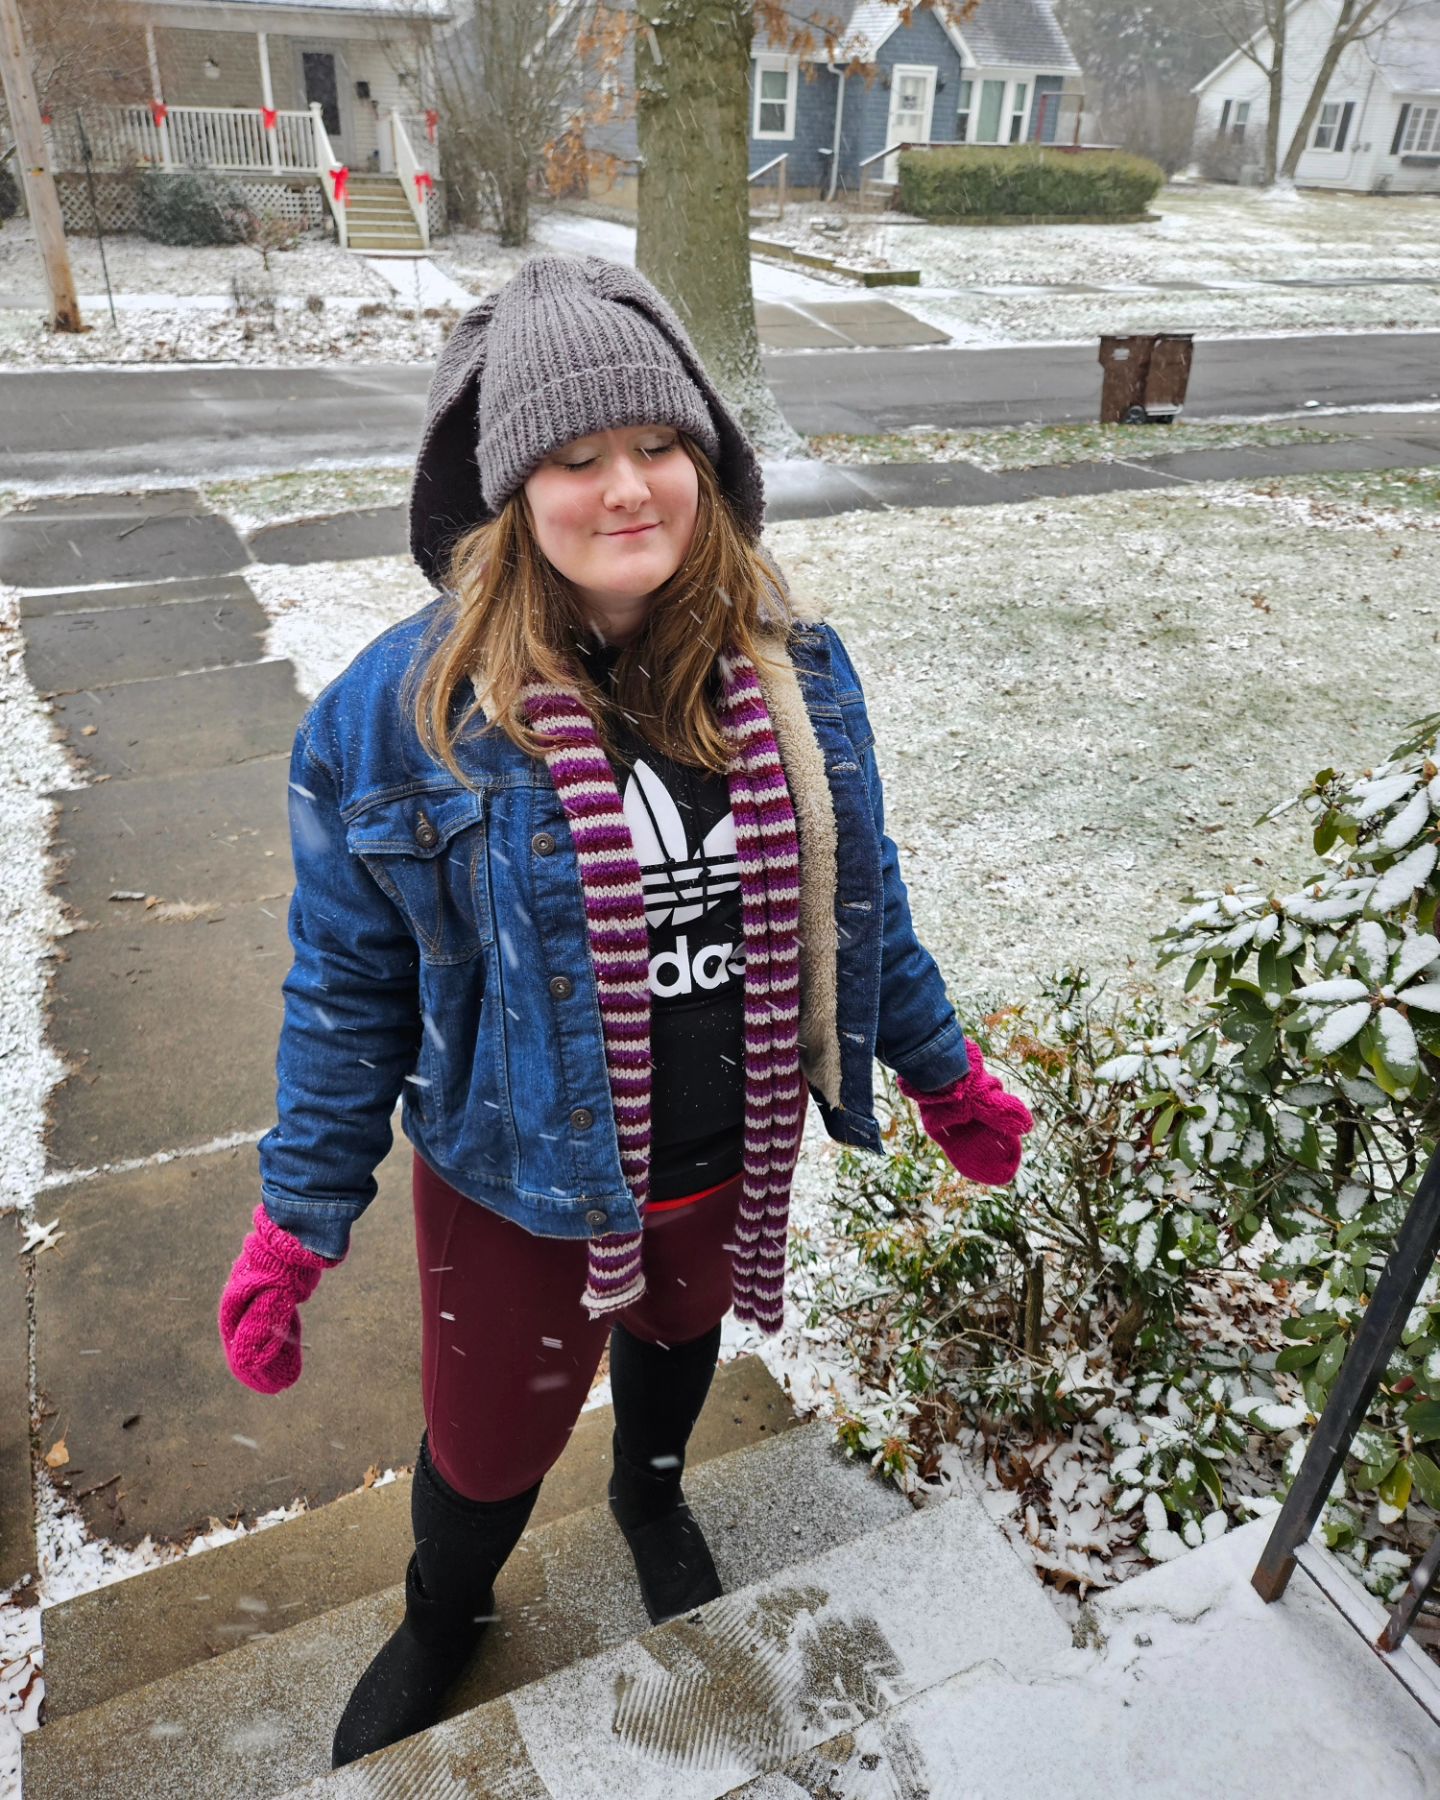
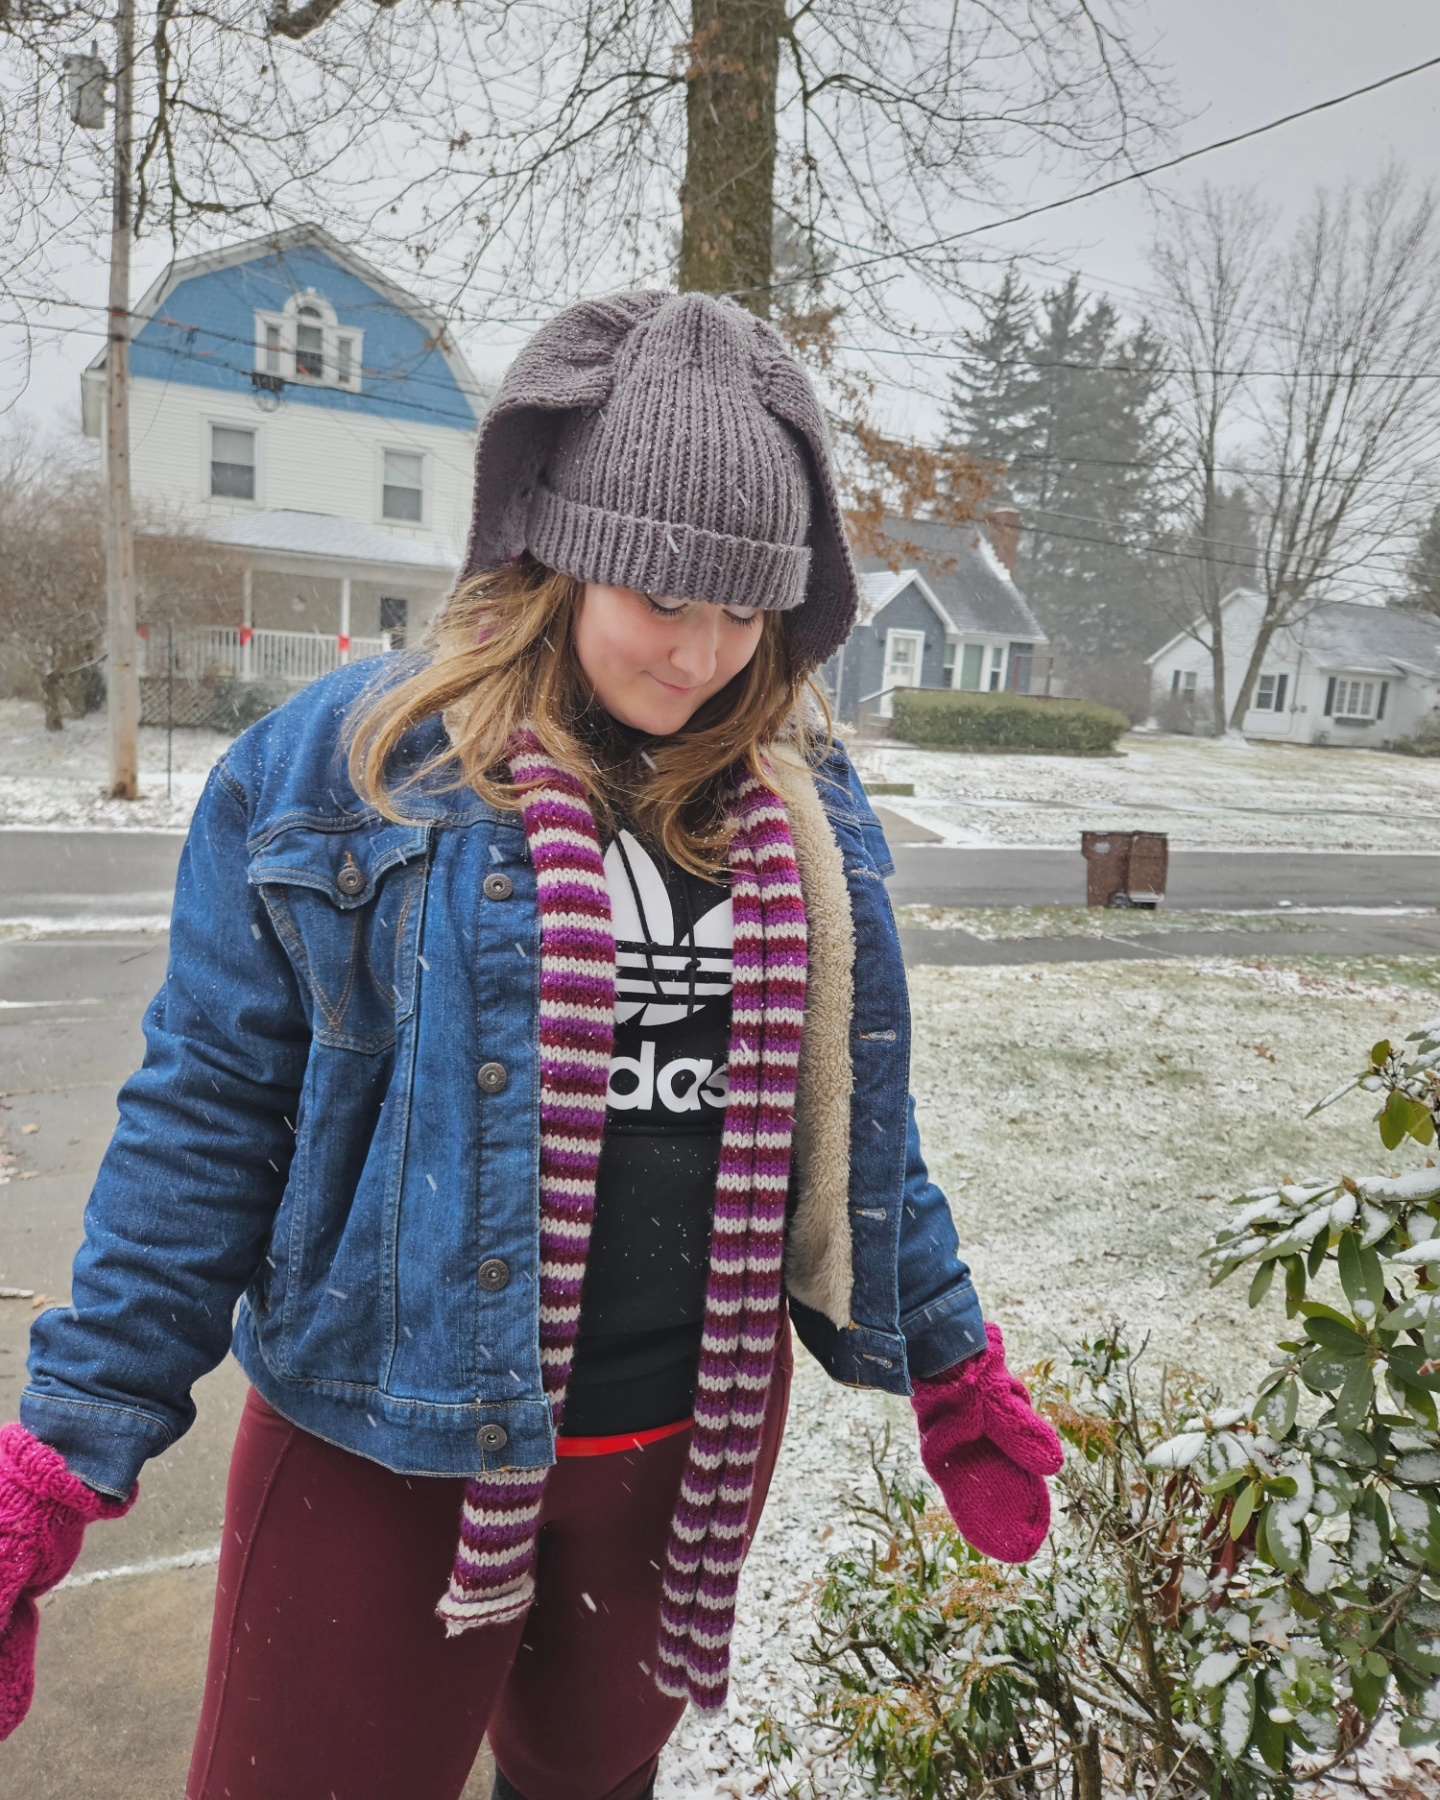
A goal I have in 2024, is to go through my yarn stash and use what I have to create unexpected pieces. A lot of my yarn has been sitting on my yarn shelf for a year so I decided to try a new approach to my design process – to create a garment from a color palette. I chose these five yarns to make a striped and joyful sweater that encapsulates the coolness of a winter landscape, yet the minty green hints at the spring yet to come.

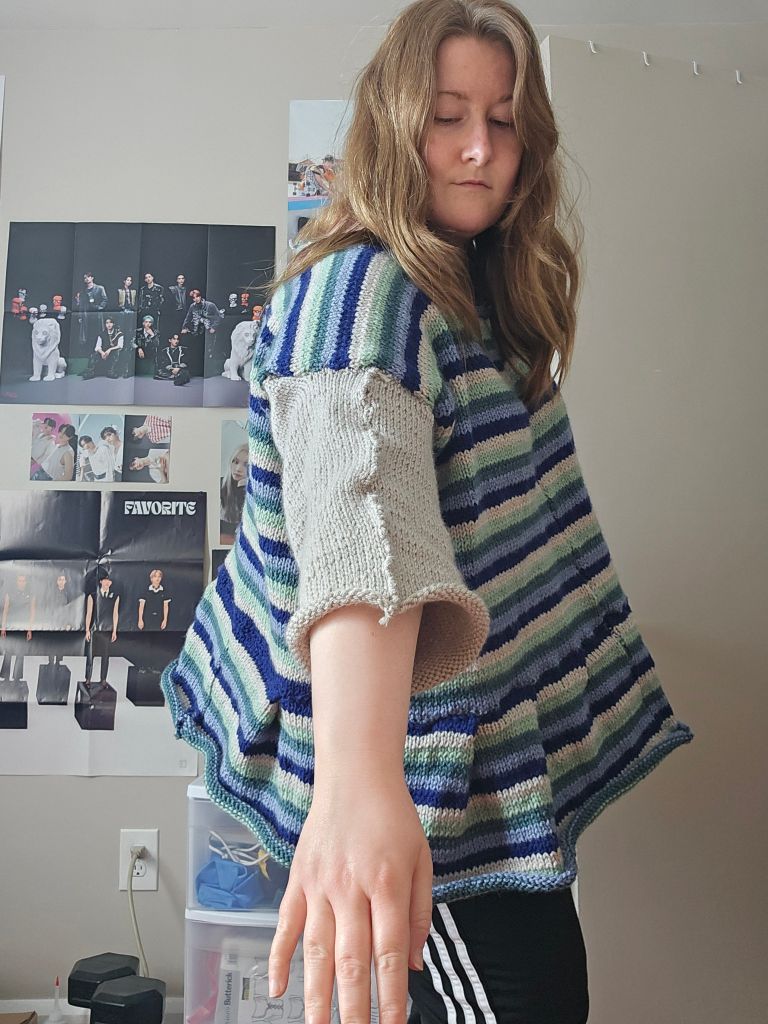
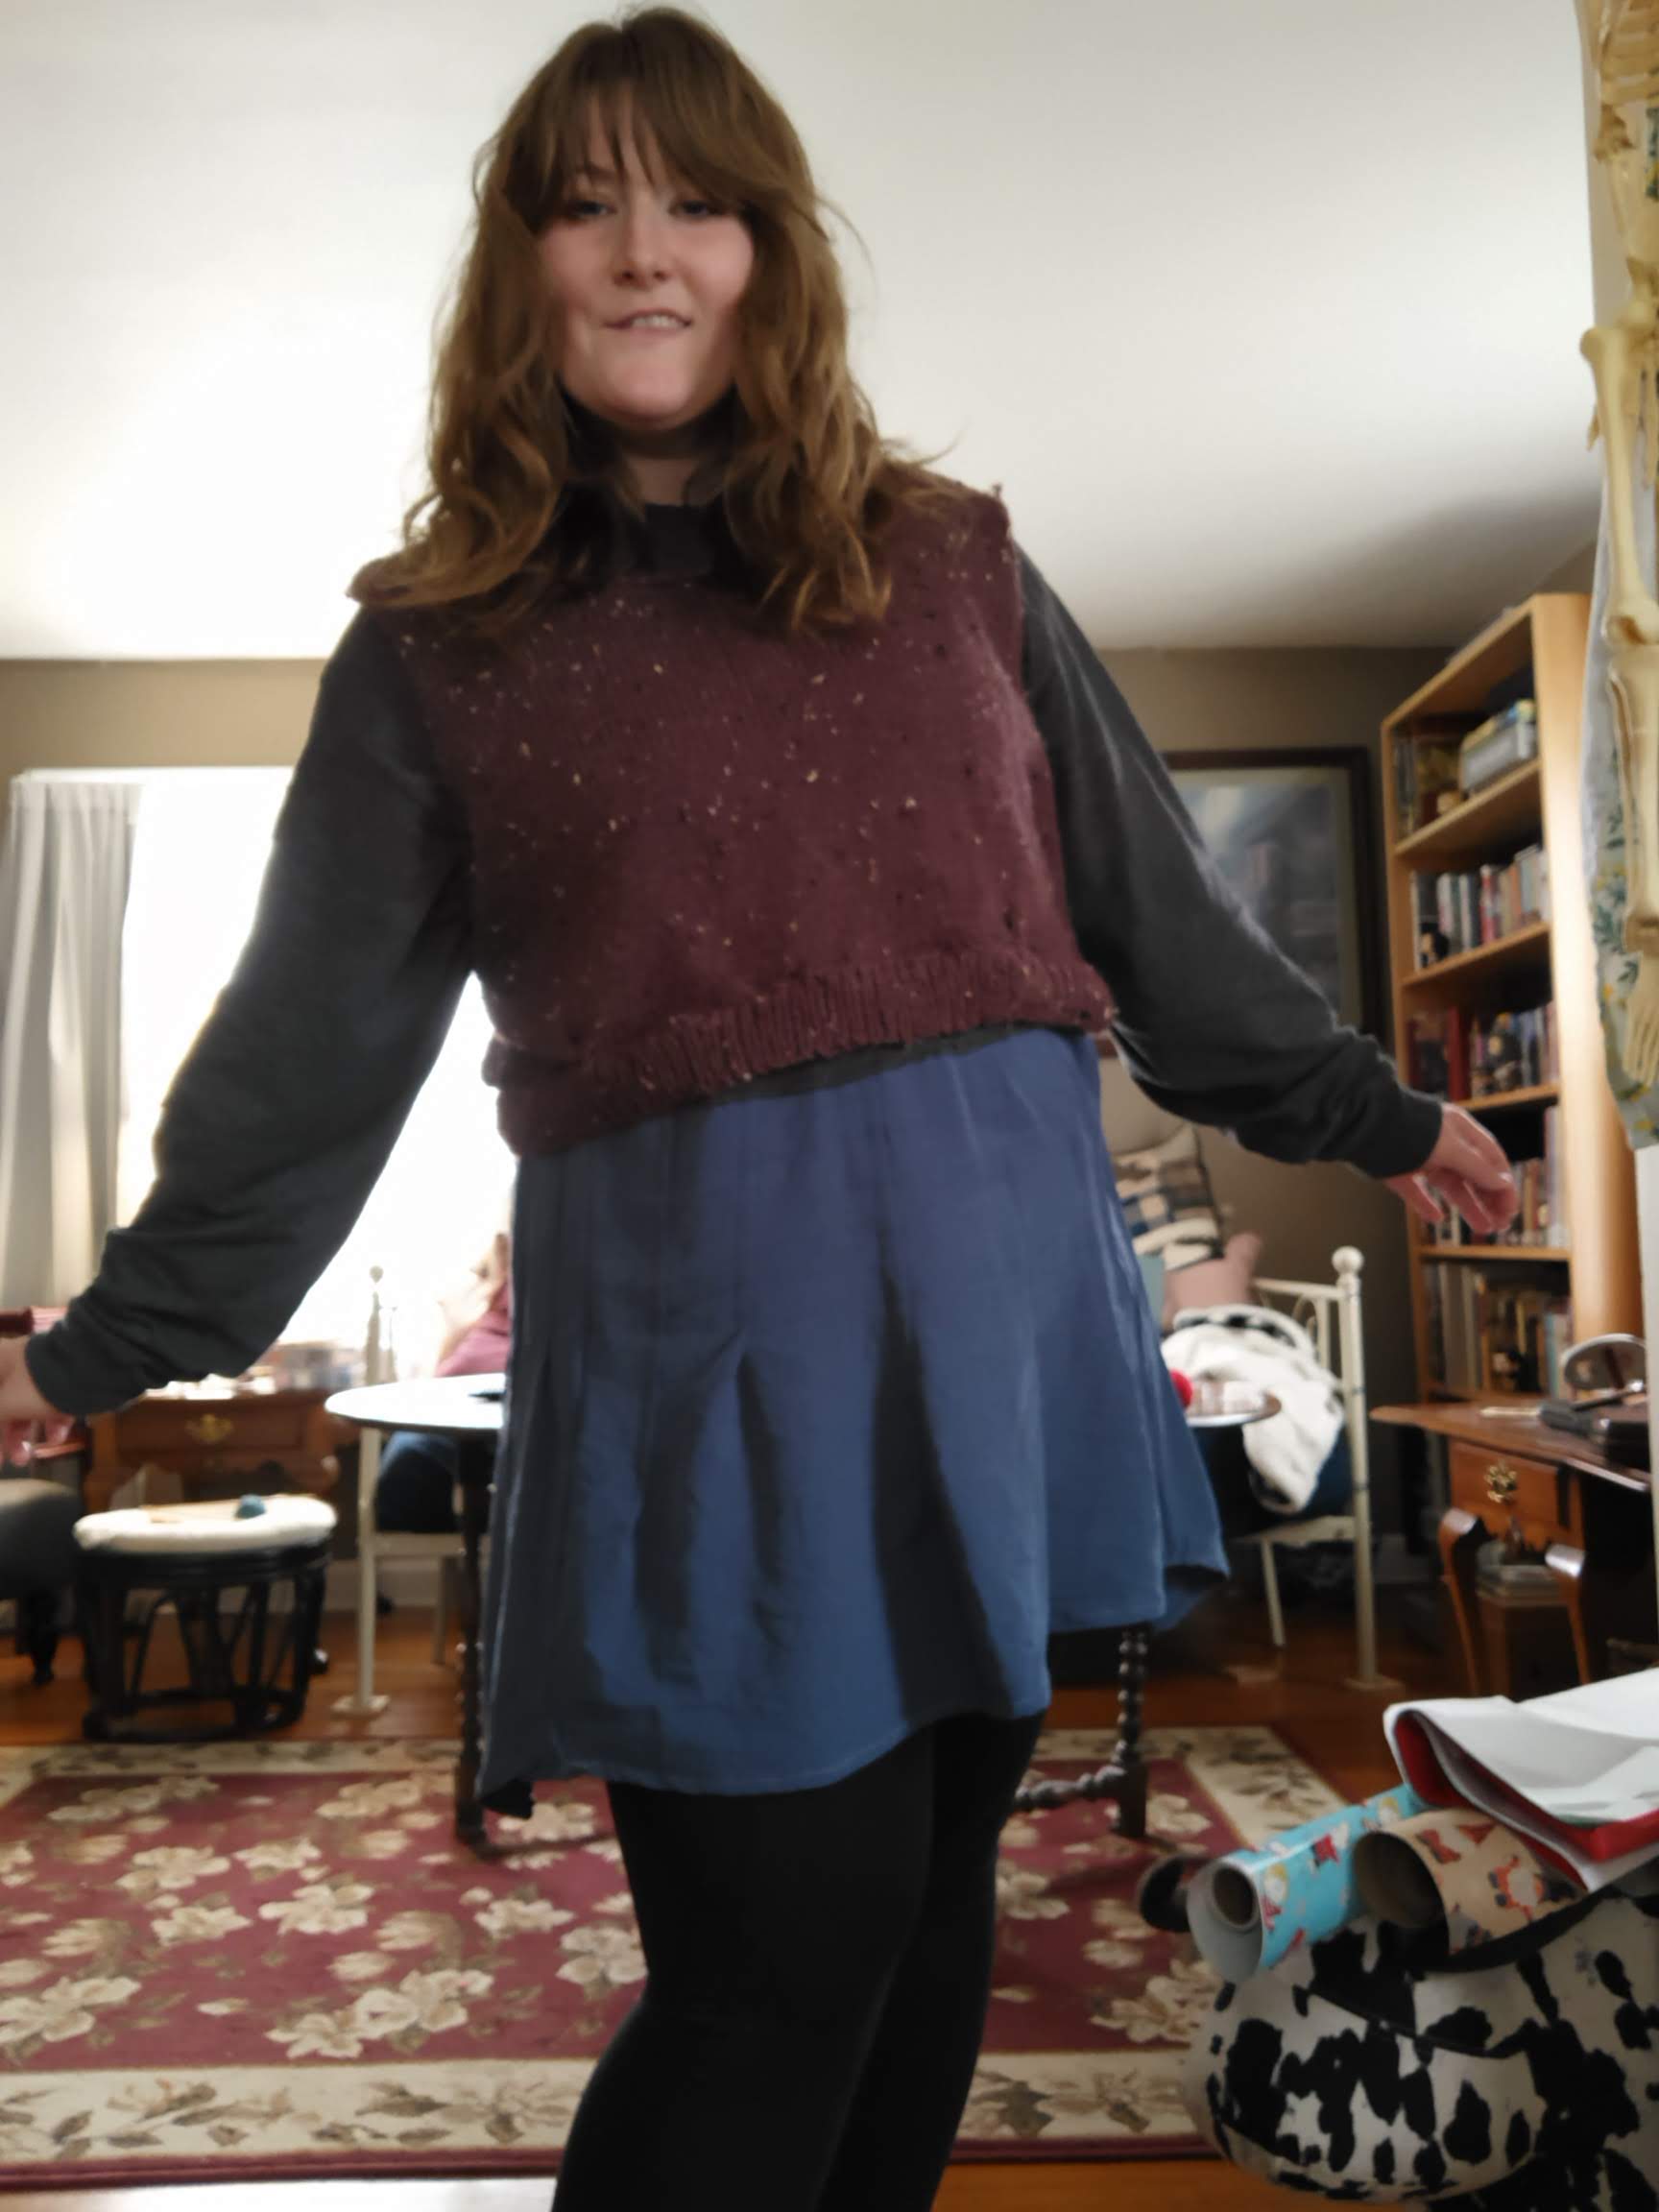
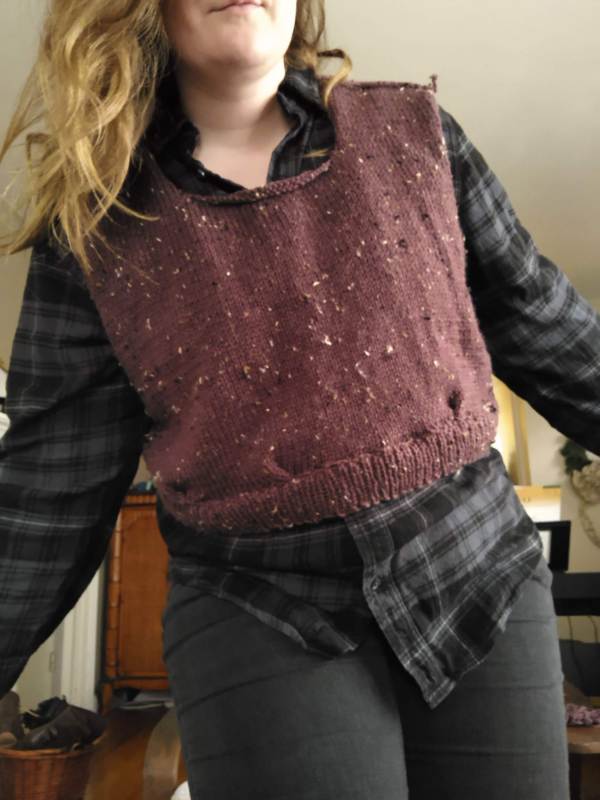
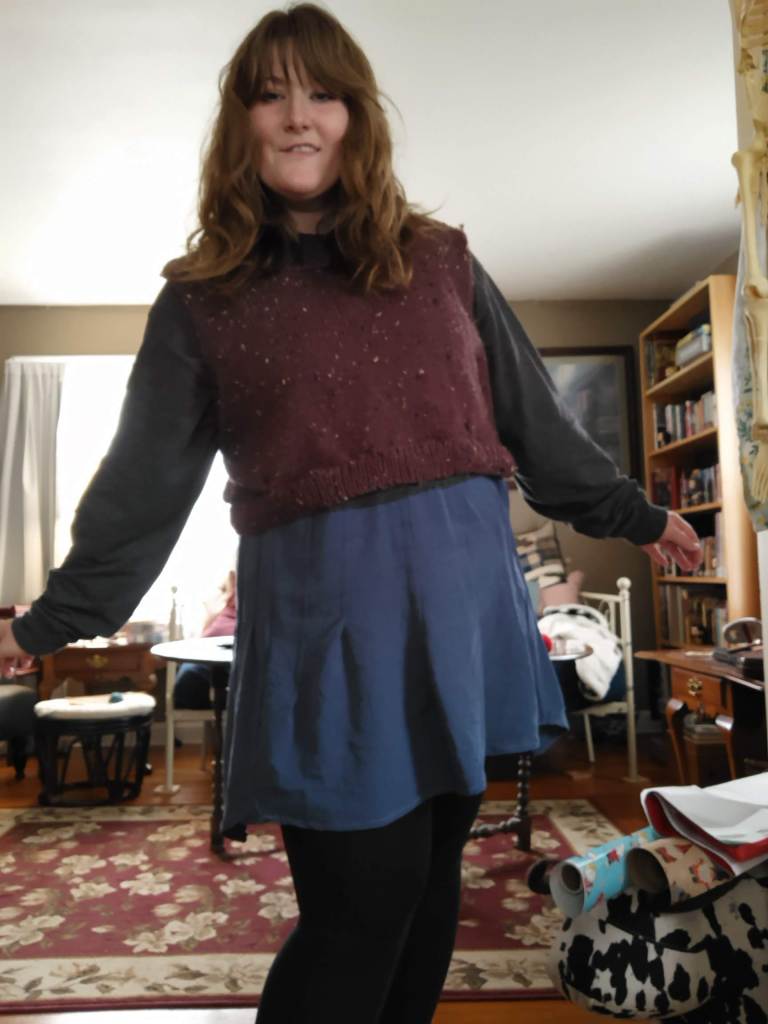
This project was a journey! I didn’t quite know where it was going to end up. At first, my plan was to make a striped cardigan, but I worried about the sleeves. I thought the stripes would be too busy if carried on to the arms. I also had fears of playing yarn chicken. So I pivoted to an unusual piece because of how cool the bodice looked over a t-shirt. In the climate I live in there is no reason to wear an acrylic yarn vest over a t-shirt, but I couldn’t get the image of that out of my mind, so I made a “t-shirt” looking sleeve with the light gray yarn. For length and a bit of vintage flair, I added a peplum that took this piece to a place of whimsy that brings me joy.

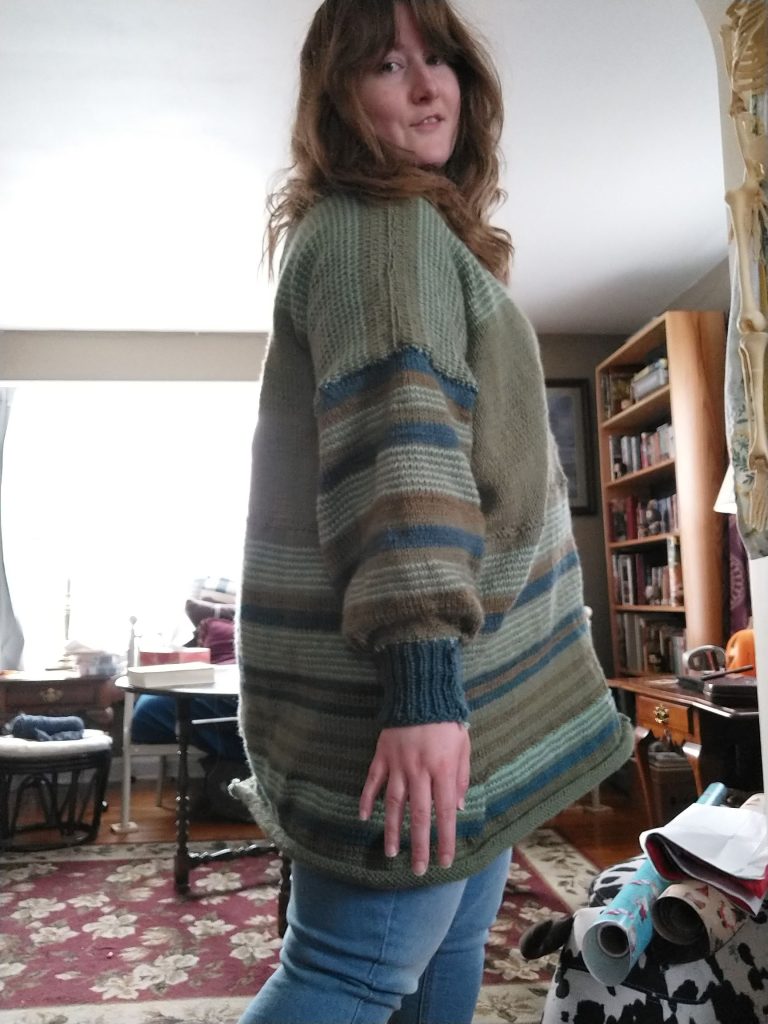
When I look at this piece, I smile. When I wear this piece, I am filled with joy and sunshine. It is the first piece of knitwear I have designed that I think would show wonderfully on the runway and that is freaking cool! Lastly, I added a navy blue collar to the neck opening and gathered the neckline slightly so that it sat on my shoulders properly. The peplum was knit in two pieces where I continued the pattern and knit the sections wider than I needed to pleat it. Now that I’ve blocked the piece in the dryer it floats over the body and looks so effortlessly.

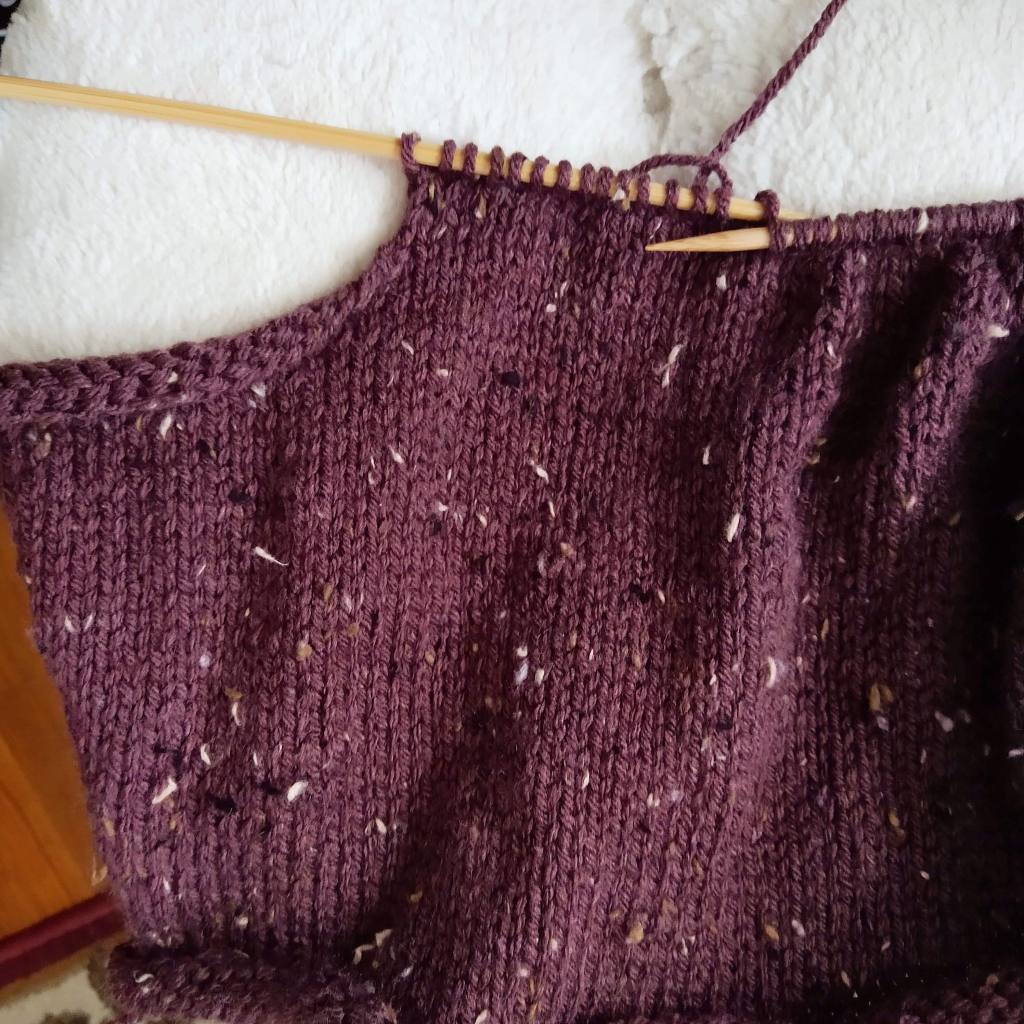
A new technique I used for this sweater was to knit one side at a time. I knit I believe 60 stitches across and began my striping pattern, switching colors after three rows. Next, I bound off stitches at my desired armhole position and carried on to the neckline where I again bound off stitches which made the shoulder more narrow than the rest of the garment. I then continued to knit down the back of the piece, mirroring the neckline by casting on a new row. I continued on to the armhole where I again, cast on more stitches and then followed the piece down to match the length of the front.

I did this a second time on the other side, mirroring the original. It is important to make sure you are mirroring so that the two pieces will match up knit side + knit side or else one side will be inside out – which is easier to do than you think! I ruined a previous project by doing that and had no choice but to rip it out. That’s okay! It’s all a part of the learning process!

If you’re a knitter or crocheter, I hope this project inspires you to get creative with your stash and make something out of the box. Or if you’re an artist, a maker, or just a human reading this, get creative with what you have! It is a fun journey. Thanks for taking time with me today! I hope you know that you are worthy, you are loved, and you are special to me. Until next time ❤

Using Stretch Fabric and A New Technique

Stretch fabric and I have been at odds since I began sewing. I fight with it during the cutting process. The pins slip out while sewing. I’ve cut on the wrong stretchway and ended up with ill-fitting items and not enough scrap to fix it. My Heavy Duty Singer sewing machine which is named, Señor Senior Singer, tends to eat my flimsy knit fabric and lightweight gauze projects, dragging them underneath to jam the machine, and ripping the fabric in the process!

It’s overall been a losing battle, so much so that I have been wary to purchase stretch fabric unless it is on a ridiculous clearance sale because my patience is shot.

This is literally how I feel when the fabric gets trapped under the needle plate and the only way to jailbreak it is to rip it. It drives me bonkers! Why must it keep eating the nice fabric I cut, pinned, and draped into this beautiful form. Was it done so that you, my sewing machine could devour it like a snack?! I digress.

This is where I had to humble myself, accept that something was missing in my technique, and do some research. It turns out I needed to change my approach, which is progress! I first, took a break from my machine sewing, because we needed some relationship counseling at this point, and returned back to hand sewing. I took an approach that matched the speed of a tortoise, sewing small pieces together each day. Work on it no longer than 90 minutes or give my fingers a break or the tendonitis returns in my knuckles. It was tough to keep myself to this snail’s pace of a schedule. It took a week to sew one shirt. That is incredibly slow, even for me when I was hand sewing, but it allowed me to remember, and appreciate, why my relationship with my sewing machine is important. And why I needed my technique to change because this pace drove me mad.

It turns out the secret fix to my woes was adjusting my tensioner on the machine way down, like below five to a section of the dial I didn’t realize actually existed. I thought this would make my garments flimsy but instead, it allowed my fabric to feed under the needle without getting gobbled up.

Secondly, I needed to begin seams about an inch or two away from the edge and sew from there, backtracking at the end to finish the seam. This allowed the fabric to have a tail that guided it over top of the needle plate as I started sewing instead of getting drug underneath by the needle.

Lastly, Kyle helped me add some structure to my sewing table, by adding support under the middle of the table directly under my machine to keep the machine from vibrating and bouncing my seams into nonsensical shapes. I purchased an anti-vibration mat for my machine to sit up on and a matching anti-slip mat for the pedal to have more control and finesse in my sewing, instead of chasing my pedal with my foot.

It was a night and day difference. Dare I say fun? Yes, it made sewing the stretch fabric and the light flimsy fabric a blast. A quick, neat seam was no problem in my sewing studio now!

Here’s the result of my new-found knowledge – four new properly sewn stretch garments that make me feel properly chuffed! The moral of this story is to not give up but to have a teachable spirit when life throws you some curve balls. There is always room to grow and improve if we are willing to seek out the wisdom.

#48 – Craft Paper

An item that I added to my sewing tools in 2024 is brown craft paper and it has been a game changer! It’s not only transformed my creative process but has helped me create new garments that fit me better with less fabric waste. How cool is that?

Learning is Hardwork

As with every new skill, the first phase of creating is messy and full of flaws, this was my creative process. You have to start and in starting you are an imperfect sewist, fitting and pattern cutting are tricky and this really bothered me to accept. I like getting things right the first time. Learning to accept that this was going to be a journey, was frustrating at first. I have a vision in my head but I can’t always execute the vision at this stage. These things are part of the learning process, like using existing patterns to learn the techniques and accepting that things are going to fit poorly until I can learn to tailor them. Which is happening! With each garment I make, I can see a progression toward the goal, slow and steady but still moving forward.

But there has been a process I did not expect and that is making pieces with my silhouette and my body type in mind, not just my measurements. Things I want to make may not look fantastic on my proportions. That was a time of trial and error in my creative process that I wasn’t expecting because when you go to a store and try on clothing, the design decisions are already made and you only have to decide on which silhouette you would like to choose. But with fashion design, self-drafting patterns in particular, I realized what was going to make me happy was experimentation. Trying a little bit of everything and playing around with different styles to see what I liked and what looked good on my body.

Sometimes just an inch here, a lowered line there, a rise adjustment, or nipping in a shoulder can transform a project from a flop to a success. It’s subtle yet effective and a skill I see you are only capable of learning from experience, either from your own by the process of being self-taught or from the instruction of more skilled designers. It is sculptural, artistic, and honestly sometimes like architecture or construction. It may be fabric and tread but the same principles apply. The foundation is crucial, and the foundation of any garment is the fabric and how you cut it.

Enter the Craft Paper

How do you replicate a project that works? You need a template, a jig, or a blueprint. A pattern. I thought that understanding the dimensions alone would suffice when I am cutting, but there is nothing like having the template to keep my cutlines accurate for curves and hem allowance. It takes the guesswork out of this process which if you are cutting blind is like a chess match with the fabric and your memory of what you have made before. It’s too difficult so I needed to work smarter and make my own pattern pieces out of paper. There were two tops that I had designed that fit me quite well out of a stretch knit and before they were properly sewn together, I took the pins out and traced them onto my craft paper.

Two bodice types – one scoop neck, one v-neck, and one sleeve template. From this inexpensive paper I have found a cipher to make things with more finesse. A tried and true bodice and sleeve that can be used for tops or dresses. A foundation to build upon that has streamlined my making process. You don’t have to be an expert at your craft to make a template, I thought I had to reach mastery before I was worthy to do this, it is simply part of the making process to make things with excellence in mind.

Fix On

I’ve watched a few creators for too long without questioning why “good enough” was their motto. I in turn also fell back on this type of approach to my designs as I learned because learning is hard work. Striving to be better is not fun, it’s maintaining a critical eye and raising your standards for yourself. In this sewing journey of learning and making, instant gratification and impatience are my Achilles heel. I want to do things quickly because everything is done quickly now. I get stuck in that loop of making more, making faster, chasing after goals, and feeling left behind because I am still not selling my patterns or garments, still.

But “good enough” is fine for Youtubers who have an established brand and following, but that’s not going to get me anywhere near my goals of design. I have to continually “fix on” as Mingi says, to the goal ahead and stop paying attention to what others have done to achieve their success. They are already in that space and that is the path their life has taken, I have to find my own thing and continue to work hard.

I’m sharing this to encourage you dear reader to not settle and to challenge yourself to be your own person. I believe that God gave you unique talents and has a plan tailor-made for your life so fight the hive mind of our current world and do the strange thing – work hard, strive for excellence, and be uniquely you! I hope that wherever you are today you remember that you are special, you are loved, and that you have potential for excellence. No matter what has happened in your life and how gray the skies are above you, there is still hope for a future.

Knitwear Designer

To start the path of becoming a knitwear designer, I first had to quit knitting, totally walking away from it to understand that it was something I was passionate enough to keep growing, pursue, and be willing to fail at to create something beautiful. Sometimes personal growth requires surrendering your plan to find the plan you were called to follow.

These pieces were made two years apart and yet I think they fit seamlessly together even though they were not planned. None of my knitting pieces from 2023 onward were planned because I decided to quit knitting in 2021 and was feeling pretty lost and frustrated in 2022. Knitting became a place of competition with my mom, a comparison with more advanced knitters, and a direct competitor to my sewing process.

It took a while for me to see this skill as an art form instead of a distraction. An extension of fashion design, storytelling, and fiber art. These forms are symbiotic, yet the way I was approaching it created struggle in my mind and it wasn’t until I made peace with the process that I could see how this was a way to continue self-expression and design.

It took being willing to approach knitting the way I feel comfortable instead of the way others feel comfortable, like knitting on straight needles, and taking the scenic route in my knitting technique to learn and improve. I had to accept that my pieces were going to look different because my approach was different than how I was being taught. Because of my background in art and sewing, I think about garment creation as I would in sewing. Knitting is the opposite, instead of cutting shapes out of a whole, you are making the whole shape out of nothing, it’s a brain teaser. It was at least until I took time to think about it.

After I completed the scarf, I put my needles away, donated my excess yarn stash, and walked away. For a year, I didn’t want to knit. I wasn’t inspired, I wasn’t interested. But at that time, I was designing with fabric. I was tailoring and learning how to read patterns. That’s when it clicked. All of it clicked.

It wasn’t that I couldn’t figure out knitting, I needed a better approach! My brain needed time to process the knowledge that I was learning from sewing and knitting. My mind was figuring out what kind of story it wanted to tell. Making a collection in 2022 for my family and friends got the ball rolling in my mind. I realized it wouldn’t be that difficult to be a successful knitter, I just needed to be a knitwear designer and go that extra step to create my own pattern and my own plan. Knitting hadn’t clicked before because I was trying to be like other knitters, instead of experimenting and finding my own style.

Just like personal style, creative writing, and art, you have to find your thing! The process may not feel like progress and that is where falling in love with the process is such an important piece of the puzzle. I have a passion for designing clothing, I’ve had it my whole life, but I was divorcing clothing from knitwear because I was not pushing myself to make clothing. Once I got serious and dove into making an actual garment it transformed my perspective. They are the same just different approaches. One does not need to be a distraction from the other, they can work in sync. That’s when the light bulb went off in my mind – so can accessories. Layers are little things that make a piece pop. If I am going to go all in for design, then a symbiotic relationship between what I design with thread and what I design with yarn must play off of each other. This is how I realized being a knitwear designer was as much a part of me as being a fashion designer, a sewist, an artist, and a writer.

Skipping Stitches

Skipping stitches, a court of witches has taken my needle by storm.

Stretch knit slips. Stretch knit slips!?

Another scarred and tattered hem.

Gremlins in the machine? I think I’m going to steam!

From my face, the anger boiling in my heart…

Was this project doomed from the start?

Making a Pocket for My New Phone

When I purchase fabric, I aim to use as much of it as I can. Whether this means altering the project to incorporate as many large scraps as possible, saving some scraps for future mending projects, or creating a secondary garment from the scraps – I’m in! My recent corduroy trouser project left behind a particular set of scraps, a set of pockets that I chose to leave out of the finished trousers. These made the perfect scraps to make an unexpected project for the new year!

Upgrading My Tech

Around Christmas, I saw an interesting sale – a discount on a phone with an impressive camera and quite attractive collaboration. Since leaving my family’s Verizon’s new every two for my own plan I’ve kept it cheap. I’ve had some bad spills with my phone like shattering my phone camera’s lens on I’m assuming my keys as it bounced around my bag. I also lost my most expensive phone, the LG Voyager back in 2009 by losing it in the ocean. I had it for a month when it dropped out of my pocket one fateful evening and made its way out to sea. The last thing I saw was the screen light go out as it was swallowed up by the incoming tide. So going above the USD 99-149 price range I was a bit nervous about myself and my propensity for mayhem.

This is the Galaxy S23 with the SL/BS JYP Entertainment Skzoo Collaboration case. I got it 50% off from Google Fi and bought the matching SKZOO Leebit Suitcard to theme the inside of my phone to match the case. It is also lilac, a shade of my favorite color purple. It was a delayed 30th Birthday present, to be honest, and a step forward to improve my photo-taking ability for my designs. The camera is absolutely crisp and sharp compared to my Moto Power which I thought was pretty nice for the $149 price tag. Was I swayed by the color, and Changbin’s song for this phone, yes, but it has shocked me how much the camera and integrated photo editing, like the magic eraser feature, have helped me capture better photos of my work on a budget. Safe to say I’ve been babying this phone – I do not want to ruin this one! 😉

A Pocket For My Phone

Because this is a newish phone, there was the upgrade of my wired headphones no longer being compatible – there is no audio jack. This means an adapter, which I wanted to keep organized while out and about with my earbuds and phone. Creating this little pocket made perfect sense!

To create the pocket, because of the corduroy fabric’s structure, I didn’t include a lining. I began with my two pocket pieces and cut one of them into a square and a semicircle. With three pieces, I matched the semicircle together and pinned and sewed the square onto the intact pocket piece, on three sides. This left an opening for the pocket. Next, I sewed the semicircles together. Lastly, I inserted a zipper to securely close the pocket. I love the finished product!

It’s a cute little pocket that is easy to place in my purse and in my pockets, it gives that extra layer of protection across the camera lenses and screen while keeping those loose little accessories in one place. This project has alleviated a lot of fear I had of breaking my phone in my purse again. As a result, I actually pull my phone out less unless I have a specific purpose for reaching for my phone like answering a text, a call, taking a photo, or listening to music. It’s subtly helping me be more present and in the moment which I greatly appreciate. 🙂

I also love the antique vibe of this pocket. It reminds me of pockets that used to be tied onto skirts in historical fashion. I guess this is the next version of the same concept, and it looks like a pattern from the 1800s, 1700s, etc. Always save your big scraps, they come in handy! If I had purchased a pouch for my phone, I’m sure it would have been fine but it’s an added expense that I want to cut out in 2024. It’s fun using the items at hand to make useful things and cut down on my spending while making use of the entire cut of fabric. Would you make a pocket like this?

The Striped Cat Ear Beanie

The Inspiration

Stray Kids. More specifically, Felix’s hat on stage at the Music Bank Paris performance in 2023 and Hyunjin’s striped crochet beanie during a video in 2023.

The Plan

It seemed simple at first glance but then again, new knitting patterns can be a bit confusing so I did research, to be safe. The cat ear is a corner and the point or drape, depending on the structure of your beanie is created by the length of the hat horizontally across. Once I understood that the shape would be determined by these top corners it was easy to jump in!

So I cast on 50 stitches on size 8 needles with worsted-weight acrylic yarn (I’m allergic to wool) and alternated between olive green and teal every three rows. After 55 rows, I cast off and sewed the two panels together to form this lovely cat-ear beanie. Honestly, such a fun and easy project once the ear structure clicked. 🙂 I’d say if you are an intermediate knitter you could make this over a weekend for sure, potentially in 24 hours if you were in a super rush. As a beginner, I’d say give yourself a week and take your time to keep the stitches even across. Sew up the sides and top with a tapestry needle.

I think the trickiest part was choosing what colors of yarn to use for the striped pattern. I didn’t want to make an exact copy this time, well I couldn’t anyway because I don’t currently crochet, but I wanted to use a unique color palette from my existing stash. These colors are some of my favorites in my stash. I’ve found the color story versatile to style with both cool and warm-toned accessories. I think the earth tones help keep it neutral. I love it and reach for it the most out of all the hats I’ve made in 2023.

The Marguerite Jacket

When I put this jacket top on for the first time, the finished piece, I felt this sense of completeness. What I used to sketch, what I would aspire to be, the aesthetics I was drawn to during those formative years of finding my personal style in the late 2000s and early 2010s before life got a bit weird, this was the type of fashion I wanted to be a part of. It’s the kind of thing I’ve been waiting for my skills to develop to reach the imagination held inside. Waiting for the chance to express itself in more than paper and pen, in thread and fabric and form!

My early projects were a product of the times, a year spent online instead of in the world, historical fashion, cottage core, and dark academia, but not the personal style I had cultivated. Big projects were hard, blazers seemed impossible. But they are so iconic. I crave structured pieces like that in my wardrobe, I mean I wrote an entire essay on the jackets and structured fashion that is the Don’t Stop Music Video by Ateez. That is 4 minutes of glorious outerwear inspiration!

This project at times seemed borderline cursed. I cut this jacket out the day I screwed up my tweed coat and notched lapel pattern by forgetting to mirror the pieces. Not the best start to a day of design work, but perseverance and clear-headedness prevailed to keep this pattern on track. But then, it sat in my stash waiting for me to get started. I hid from it in case I failed it.

One day, I put the pieces on the form and began to pin. The lines of a jacket, structured shoulders, and excess fabric hang around the collar, waiting for the traditional form to take shape. I pinned it exactly how I thought I wanted it, and the sewing process made a few edits for me and my plan. My machine took the lead and created the happy accident, the darts around the neckline. The collar was inserted with more attitude than my intention but I prefer the edge, the little twist on the blazer that has become the Marguerite Jacket.

With the wide lapels, I pinned them back against the jacket to create these triangle shapes on the body of the jacket top. I decided to lean into the attitude of the silhouette to add an exposed zipper and black buttons for a bit of a British punk little spice. I anchored the collar down in the front, balancing the chaos and structure into a garment that walks the line between blouse and blazer. It’s comfy, it’s fun, it’s versatile. I’ve styled it with flare, baggy jeans as pictured. I’ve styled it as a blazer over a cocktail-style dress. I know it will be fun to try it out over cargo pants, skirts, shorts, etc. I look forward to it! I also look forward to wear my designs evolve from here as moving forward I plan to become more cohesive in my aesthetics and collections.

Tweed Yarn Sweater Vest

The sweater vest. It was on my radar but did not become an item I dreamed of until I saw a lookbook from Steal the Spotlight styling Friends-inspired outfits, inspired by Chandler, the sweater vest king. I continued down the rabbit hole and to Katie’s K-pop Comeback Fashion review and I was done for. K-pop fashion, Korean fashion, and the sweater vest were a layering piece I knew I was going to make. Maybe it is the color combinations or the accessories, but how these sweater vests are styled across different boyband concepts just got me. It felt fresh and fun, not preppy or stuffy.

A year later, I was ready to tackle this project. After making a few sweater projects, and learning how to pattern from garment construction, I felt like I had a good understanding of the shape needed to make the sweater. At Joann’s, I found a non-wool tweed yarn and I knew this was the yarn I wanted to start with. It looked like garments I love from Irish Aran Jumpers and was a way to bridge my heritage and this new world I was exploring through K-pop. I like the garments I design to have a story and intentionality behind them.

The New Technique

With US Size 8 needles in hand and one skein of Big Twist tweed yarn awaiting a new form, I began by casting on 65 stitches. Working my way up I did the basic knit-purl stitch and gradually binding off on either side when I reached my desired length for the armhole. I chose to make a cropped sweater vest to accentuate my waist and break up my long torso. The big moment though came when I did some research and made the decision to branch out and knit the shoulder and neckline on two sets of needles. This required knitting, casting off in the middle, and continuing to knit on a second set of needles. It worked!

Learning new techniques is always worth the time and the trial because eventually it clicks and you have something new, you didn’t think you could do, but you can!

Making two instead of four pieces on my straight needles was a time-saver! Honestly, I see why having a teachable spirit is important in all aspects of life because I thought I had a good technique before, but dang, two pieces are such a better experience. Four pieces was a mental game, and I got bored. Hence why my previous sweater projects have taken months and months, and months because I distract myself with palette cleanser projects and then avoid finishing the four-piece projects.

Afterward, I sewed the two pieces together and knit two 65-stitch pieces of ribbed trim for the bottom. I liked how rustic the sweater looked without the ribbing on the neckline and armholes. It looks like an old-fashioned piece, and a bit like armor. Which is cool.

Sweater Vest Fits of 2023

This is how I have styled the finished garment so far! I like it over my black flannel and charcoal jeans for a moody look. It styled surprisingly well over this DIY project where I added a flared skirt to a cropped graphic long-sleeve shirt. This is where I saw the armor aesthetic come through. In 2024 I look forward to playing around with it even more!

Some things I plan on either finding or making, are basic layers I can wear under this vest. Currently, I have my flannels, that random diy-tunic, and maybe some long-sleeve tees but I’m not certain if they are long enough to layer out the bottom of the vest. This is the struggle of adding a brand new item to your wardrobe – how do you integrate it and style it well without buying a bunch of new things? Yeah, I’m figuring that out and until I do it’s going to be some time before I think I can make a truly amazing outfit with this piece. But I’d rather do this responsibly and be a patient person instead of draining my bank account for instant gratification. (Age has done me well in that respect because I used to do the opposite!)

2024 Project Update:

Since finishing the garment, I have either lost weight or the vest has stretched a bit from wear and one wash. It was not sitting well on my waist anymore but ballooning out so I took it in. I took it in at the arm hole seams and gradually took in the waist at the back so the garment has a back center seam which is not the look I was going for but the fit is on point again. Lastly, I knit another section of ribbed trim to lengthen the garment to keep it from riding up, in doing so I made the ribbed trim addition of 60 or 55 stitches, I forgot to take note when I made it, to pull the waist in even more. I like the fit and plan to make another version of this garment with a smaller adjusted pattern.

Create a website or blog at WordPress.com

Up ↑