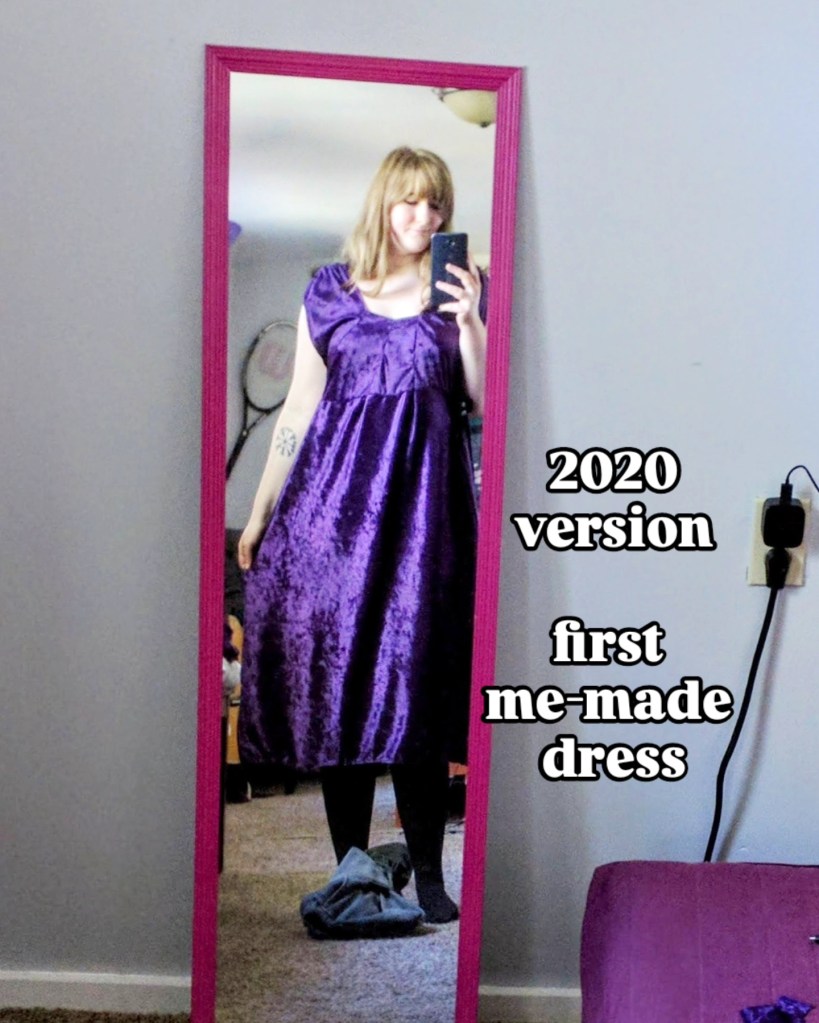
Bunny Plush Keychain

Recently, I shared a Knit Star Plush Keychain Pattern, but that wasn’t the only keychain I’ve been working on. Behold, a knit bunny keychain made from repurposed fabric! This keychain was inspired by my Skzoo Quokka plush keychain which I have styled on my purse and belt loop. I was tempted to buy more as this trend has been all over my feed this year, but that’s unrealistic. So I thought, in Jeremy Clarkson fashion, how hard could it be?

This key chain was made by repurposing a pair of underwear, that was weirdly made without any stretch. They had no purpose but to be trashed, which I didn’t want to do because they were brand new and I liked the pattern and color story. So I wondered, could I translate this to a plushie and I could make this plushie into a keychain without buying any materials beyond the keychain hardware? The answer is yes!

I used a pen to draw pattern pieces onto the underwear by designating the fabric into four ear-pieces, two head-pieces, and a rectangle piece that would be used to connect the keychain hardware. The rest of the fabric was cut into small cut pieces that would be used as the stuffing. This worked like a dream!

I chose to sew this item by hand because of the small nature of the project. The pieces were too small and delicate to sew by machine with any semblance of control or care. It was a quick make and took one day to complete. I sewed 90% of the ears, turned them right side out, stuffed them, and then set the ears aside. Next, I repeated this process with the circle for the head and stuffed it. When I was certain that all the stuffing was divided between the three pieces adequately, I sewed closed the ears and head. Next, I attached the ears to the head. Finally, I sewed the rectangle and threaded it through the loop of the keychain before attaching it to the bunny plushie. I opted for an abstract look so I did not decorate the bunny plush with a face, therefore if it spins around it doesn’t matter what side is facing out.

Overall, this was a quick and thrifty project with the hardware coming in a pack of two for $2.99. I used the other clip on the knit star plush project. This type of plushie could be made with any scrap fabric you have and could be adapted into other animals. It would be an easy DIY gift too!

Knit Star Keychain Pattern

Back in the spring, I had this grand idea that I would learn how to crochet. I had a friend who crocheted next door, I had recently found TL Yarn Crafts on YouTube. Toni made it look so fun. I was enamored by what I saw others creating with crochet hooks. Crochet rose in mainstream popularity again through 2020 and beyond in 2024.

My Impression of Crochet

The internet is chock full of crochet plushies, dresses, sweaters, bags – you name it you can crochet it. I didn’t see this kind of creativity from my corner of the knitting internet. I had this impression that knitters were serious and crocheters were mavericks. So the hook was calling to me.

I bought a crochet hook and spent a few weeks watching videos, perusing a book my neighbor lent me, and getting the hook into some loops. It’s a weird transition from knitting. I apparatus from two is a change. There is a posture, one hand, and yarn holding. There is a new way to keep yarn tension, and there are a lot of new stitches. There was more emphasis on turning your work than the orientation of the wrong side and right side. Single crochet and double crochet were not a one-for-one of knit and purl. That surprised me.

Granny squares were a bit more involved than I expected. It’s an art form that deserves respect. I definitely respect it. It kept me back, I had the tightest tension and felt like I had never done yarn crafting before. I was shocked, shouldn’t this be a piece of cake? I’ve been knitting off and on since 2012. Yeah, it’s not that simple.

Fluff Around and Find Out

To be honest, the way that I learn best is to just go for it, and doing these basic crochet stitches on a project that was a rectangle, all while it looked like a tattered mess was discouraging. I wanted to make one of the little plushies or shapes that seemed to be a sculpture that only crochet could create. But I was seriously not getting it. So I paused and thought about it. Is there any way to apply this creative point of you, the sculpting of yarn that only crochet can, but try it with knitting needles?

This might seem weird to consider if you don’t knit or crochet but the processes seem vastly different to me. There’s a strategy to knitting. You have to do things in stages, like knitting a section and transferring stitches to a stitch minder or picking up stitches that were bound off or are just part of a knit edge. While crocheting builds on itself and is an amorphous thing that is truly sculpting and adding as you go.

So I decided, what if I made something with the sculpting element of crochet but with knitting steps. I decided on a star as you can see above that was crafted out of multiple knit sections that were stitched together. This pattern has a lot of little steps but I think it was effective.

Star Knitting Pattern

Star Point Diamond – Row 1: Cast on, Knit 1, Row 2: Purl 1, Add Stitch, Row 3: Knit 2, Add Stitch, Row 4: Purl 3, Add Stitch, Row 5: Knit 4, Add Stitch, Row 6: Purl 5, Row 7: Knit 4, Decrease 1, Row 8: Purl 3, Decrease 1, Row 9: Knit 2, Decrease 1, Row 10: Purl 1, Decrease 1, Row 11: Knit 1 and Bind Off.

Repeat four times until five are made. Then using a tapestry needle, join the five points together at the center so that you have the base for a star, then join the sides of the diamonds together so that you have a flat star. Repeat the whole process one more time so that you have two flat stars and then sew them together with the tapestry needle.

So now that you have a star what can you do with it? I had planned originally to make a star garland for Christmas, but then the Fire Nation attacked and I had to move.

So we pivot to the bag decoration trend of 2024. This is a combination I’d say of Kpop, Xiaohongshu style trends, and the Japanese Ita bag becoming popular in the West. If you would like to learn more about Ita bags, I would highly recommend Addy’s video on YouTube. And these little stars in the original green and its pink starfish cousin have made excellent DIY plushie keychains.

Finished Product Used as a Keychain

Final Thoughts

I think creativity is about experimentation and learning as you go. I think sometimes it is important to do it the normal way and other times it is more satisfying to try a new method, a new medium, and make something you may not have thought you could. I still have incredible respect for crochet and I also think knitting has more potential than I thought. I have also learned that if a key chain or other small trinkets are not specifically branded I should try making them before I buy. It’s a great way to use up materials in my stash, level up my skills, and keep my consumption down and my wallet happier.

Socks, A Journey

Today I completed the most stressful cast on of my knitting life, casting on a sock. This was with three strands of lace weight yarn and four double pointed needles, size US 1. Why double pointed needles? Why not! It got me out of my comfort zone and pushed me to be a focused, careful knitter with dexterity and cultivated patience for myself, the materials, and the technique.

Once the first round was joined, I felt the tension coursing through my body settle, like a war had been won in needles and yarn.

How will my first sock turn out? Who knows, but I’m optimistic. I have a sock knitting book, a step-by-step pattern, and properly gauged materials. I’d like to have cute socks to wear, the ruffly kind so here goes nothing! 😃

Sewing Stretch Fabric Struggles

Do you ever spend time learning a skill just to forget it when you need to use it? That’s me. That’s how I sew stretch fabric on my machine. I just jump in and completely forget that I need to first properly adjust the tension and stitch type or else mayhem ensues. Mayhem like my machine having a nice little snack on my fabric.

Sometimes the machine gets extra bold and drags the hem under into the bobbin’s domain, jamming the machine. This is what I am talking about:

In the moment of panic, when I realize the fabric is stuck down in the machine a few thoughts dance through my mind.

  • Why didn’t you sew this by hand?!
  • You did it, you finally broke the machine you maniac!!
  • It’s ripped to shreds, isn’t it? The whole project might be gone in a moment.
  • This machine hates me. How do other people sew so effortlessly??

But it’s not the machine’s fault and it’s not the fabric that caused this, and it’s not even my fault. It’s morally neutral, it’s an accident and a learning experience to grow from!

As I was writing this, I caught myself crafting sentences to describe the situation with very negative and demeaning language towards myself for making a simple mistake. (A mistake that once I freed the fabric from the machine, I corrected and carried on to make the finished garment. The tight thread tension actually made a happy accident, a lettuce edge hem.)

It is not something that I should hold with such severity against myself that I internally tell myself I am an idiot, a lousy sewist, or useless.

Because how would I respond to hearing someone say that to another person? I would be disappointed in the speaker and make them stop.

How would I respond if I spoke with such aggression to another person? I would be ashamed.

I am learning through these sewing setbacks to temper the internal monologue and be a more gentle and loving person towards myself, to maintain better mental health, and establish the practice in my mind so that I can be a source of gentleness and kindness to others.

How do you speak towards yourself and others when they make a mistake?

Landscape Painting with Yarn

This year I’ve been looking for ways to use my stash as completely as possible and use up what I have to make new fibers and new projects. One way I accomplished this was through color palette knitting and through the stripe hype sweater. But another project idea I had this summer was to try minimal colorwork knitting by “painting” with yarn through a mix of new cotton yarn I purchased and yarn extras my mom passed onto me. This helped stretch the teal cotton yarn I bought, underestimating how much I needed to make a t-shirt. It was an opportunity to make a “graphic print” t-shirt out of yarn, something I didn’t have in my wardrobe, but sounded like a fun piece to wear.

These are the yarns I decided to use for the landscape painting section of the garment. Cotton yarn that was originally purchased by my mom to create handknit dishcloths in a color selection of blue, green, and pooling gray-to-white-to-blue, a lime green cotton-bamboo yarn, and the teal cotton I purchased. The pooling yarn was perfect for the clouds. Each side of the garment is unique because of this pooling yarn like a real sky. The plain blue was used for water, the dark green for a marshy grown-up bank, and the lime green for sunkissed meadows of grass. The teal was used for a distant tree line that was framed by the clouds.

I opted to make this oversized with a short sleeve opening, somewhere between a vest and a t-shirt because I haven’t decided how I want to wear this. As a t-shirt of course but do I want this to be a layering piece in the cooler months of the year? Or do I want to make detachable sleeves? That is something I am still milling over in my mind. I did split the back of the piece in a moment of indecision, where I thought it would be cute to make it a short-sleeved button cardigan. I may do this in the future. I opted to keep the t-shirt structure for simplicity and the ability to wear it more quickly. I was impatient to wear it.

I love projects that utilize things I already own and use techniques I haven’t tried before. Since this project I’ve begun to learn proper colorwork knitting, it’s been fun. Thank goodness for YouTube and knitting books to make the complicated things, like learning how to switch colors, feel approachable!

How have you been expressing your creativity this week? Do you like getting crafty? Are you a knitter and have you tried colorwork knitting before?

Experimenting with Stitching and Basics

It’s that time of year when I am ready to wear long sleeves but the weather isn’t so convinced. This blouse is a project I made at the end of March 2024-early April 2024, that I completed and put into my closet to wear later. I was excited as soon as it began to cool off for the chance to style this piece! All summer long I’ve worn its sister piece, my denim houndstooth skirt that can also be worn as a dress that was absolutely lovely material to wear. It’s so breathable and has a bit more visual interest than the usual chambray, something I look for. This fabric is from Mood Fabrics, it looks like they no longer carry it which is a shame because I have two pieces from this cut of fabric, and I want to make more.

This piece is special to me because I did something a little different with the collar, I stitched in white the lines of a blazer lapel and lines of a jacket crossing over, for a bit of a formal feel. I originally wanted to make this fabric into a jacket but ran out of material, and I think it worked out for the best. I want to play with this stitching a bit more. It resembles a tailor’s chalk marking to me and I like that.

As the fall progresses and the temperatures continue to drop I’m looking forward to styling this piece with pants, vests, dresses, skirts, boots, scarves, etc. Styling this piece with new color combos excites me. I’ve only paired it with this brown and blue combo so far, which sparks my interest the most. I’d like to try this stitching application on trousers and dresses too with a solid fabric or maybe another pattern.

Do you like contrast stitching? Do you like clothing with a bit of whimsy like this faux blazer collar? Are you a fan of patterns? I like how different we all are and how tastes and preferences make this fashion thing, full of endless creativity. Thank you, dear reader, for stopping by. I hope we meet again soon. ❤

The Candle Light Cardigan

Fall knitting is here! I’ve been working on this cardigan, off and on, amid a myriad of projects since July. As the days have passed, and a slightly cooler air awakens, I am thrilled to say this piece is ready to wear! I used to struggle to finish sweater projects and I would wander along with my yarn, for three or four months, dilly-dallying on a section because I was bored. This led to a lot of plans and not a lot of garments. This is in the past though. 2024 has been the year of sweaters for me, this being my seventh finished sweater this year! And its only September so I’m excited to see what else I can do in the last quarter of the year.

Do you remember what episode of Gilmore Girls this audio clip is from?

This Comfy Cotton Blend yarn from Lion Brand is a 1 to 1 ratio of polyester and cotton and the tag labels this color blend as chai latte. As I knit it, I saw it more as a banana split blizzard color and now in the spooky cloudy light of fall, I see it as candle light with highlights and shadows. Hence the name, the Candle Light Cardigan. I opted for now to keep this as an open cardigan without a button placket. Not out of laziness, but out of my intention to wear it. This was a cardigan I made specifically for the changing seasons, as a piece I could layer over my summer dresses and tops to get a little more wear out of them on these days when it is both cool and warm as the day progresses. I have two more yarn cakes of this color way which I can use to add a button placket at a later time if I change my mind.

I received this yarn as a gift from my mom as she was de-stashing it. It has been a lovely weight to knit and I like how soft it is. My only notes for Lion Brand would be to work on the splitting. This yarn split often as I was knitting which caught on my needles and led to messy stitches. Either because my needle held on to the stitch below or the yarn split and left some of the stitch behind. It was frustrating at times but not impossible to work with. The fabric it made has a good breathability and warmth to it which I was looking for in a changing seasons layering piece. This is a self drafted pattern that I knit on US 7 straight needles.

Happy Fall everyone one! (And Happy Spring to the southern hemisphere!)

My Friday Night Dinner Outfit

The start of September feels like the start of the Gilmore Girls season. Probably because it used to start airing around this time of the year, but also the show follows a seasonal structure. Usually beginning before or during the school year as Rory embarks on her next academic chapter. A key aspect of Lorelai and Rory’s life is the Friday Night Dinners at Richard and Emily’s house, every week. Emily and Richard, being rather formal people, expect a dress code for their family dinners being formal. It reminds me a bit of dressing up for church as a kid.

There is also a silhouette to the outfits each of the Gilmore Girls wear. They wear a lot of dresses with small cardigans over top, but they also pair fitted blouses with a knee length skirt, usually flared for Rory or a pencil skirt for Lorelai. Rory dresses with a more demure style, that reflects her academic personality where as Lorelai is a bit bold with her patterns, textiles, and colors. It matches her personality of being independent and need to separate her life from her parents’ world.

I thought this combination married both the silhouette of Rory’s style with the bold and playful textiles of Lorelai’s personal style. The blazer is not a Potato Technology piece, I ordered it from YesStyle, but the bustier top and skirt are my own designs. The Floral Print Grafitti Bustier Tank, I designed in 2023 from 1/2 a yard of fabric. This piece was draped and cut on the form. I wish I had known about making craft paper patterns at the time because it’s going to be a challenge to reproduce. The Expressions and Lines Skirt is a new design from this summer. It is a satin graphic print that for the first time, I was able to cut out the pattern directionally without any mishaps! I’m so pleased. 😀

I think the combination of pieces look a bit 2000s, mid 2000s for sure, and capture the essence of the time period. The blend of Lorelai and Rory’s style is a reflection of how I consume the show now. Which character I relate to is a blend as I get closer to Lorelai’s age when the show begins instead of Rory’s age, which is so weird to realize. I’ve truly grown up with this story, being just 12 when I first watched it. Lorelai’s story finds me more each time I watch it.

I Made the Stripe Hype Sweater

This is a weird knitting project for me because I usually can’t follow a pattern, at least it has been a few years since I tried to make anything with a pattern, and that was Butterick Retro ’44 #6374 and Butterick Retro ’44 #6485. They didn’t go super well.

This is the only picture I saved from #6485 because it was so bad. It felt like a weird Star Wars dress. But I digress, with knitting, I would like to rectify my aversion to patterns to learn new skills and appreciate the creativity, celebrate even, the creativity and talent of my fellow knitwear designers. So I was inspired by Making Cassie’s Stripe Hype Sweater knitting project and through my move, I decided to use up leftover yarn in my stash to make a sweater someone else designed. It was one of the most rewarding knits I’ve made all year!

Who Designed the Stripe Hype Sweater?

The original Stripe Hype sweater and sweater pattern was designed by Veronika Lindberg and the pattern was published on Ravelry in 2023. Now I didn’t realize there was an actual Ravelry pattern, I just gave it a go off of other people’s versions of the Stripe Hype Sweater on Instagram and YouTube, like playing a song by ear. Whoops! Sorry, Veronika! But here is the link to her pattern.

My Take on the Stripe Hype Sweater

This is one of my favorite sweaters I’ve made because it challenged me to do things I wouldn’t gravitate towards like using white on a sweater. After all, I’m pale and I’m clumsy so stains. But dang it’s a fun background for the colors of this sweater. It taught me how to balance color, to mix colors with more abandon, and to bring balance and order to my pieces. This is also a make that grew my skills as it was the first project where I tried casting back onto sections – such as the ribbed collar and the sleeves.

It was a rewarding experience and reminded me that even though I like designing my own pieces there is always something new I can learn from using a pattern and although I can find it tedious, it puts limits on my creative energy to channel it into a direction I may not have gone if not for the guidance of the pattern. Always have a teachable spirit, my grandma would say, and yeah she’s definitely right about it when it comes to knitting!

Have you heard of the Stripe Hype Sweater? Would you wear or make something like this design? What colors would you choose? Until next time, thanks for being here, dear reader. I hope you have a lovely day!

What I Would Pick for the ‘Sew Your Decade’ Challenge

In honor of National Sewing Month and the 160 years of their existence the big four – Simplicity, McCall’s, Butterick, and Vogue Patterns are taking a look back at their patterns. The Simplicity Creators group turned this little moment of fashion history into a challenge, Sew Your Decade. I first learned about this through a video from Stephanie Canada where she took a look at the patterns Simplicity was highlighting on their ‘Stitch in Time’ historical presentation of patterns and fashions made by these four companies over the years. A lot of them were reproduction patterns and had dubious choices, including some 1950s patterns in the 1960s. But that’s more of an editing problem.

Because I have a lot of other projects in progress but I love historical fashion, I thought I would take a look through the historical pattern wiki and choose a pattern from each decade of what I would want to make if I had the time to make a garment from each era. I’m using the vintage patterns wikia and historical sources instead of the patterns on Simplicity’s site because the originals are just more appropriate and imaginative than the ones selected on the timeline and the reproductions they sell currently.

1800s Era (1860s-1890s)

Butterick 9111; ca. 1897; Ladies’ and Girls’ French Bathing Costume. 
Pictured in September 1897 Butterick catalog.

I choose this bathing costume because it is such a unique relic from the past but also because we’ve seen some new designs for swimwear come out recently that reimagine the typical 20th century-21st century swim suit, that look less like bikinis and more like a crop top and a skirt.

1900-1910s Era

McCall 1675; ca. 1907; Ladies’ Eton Jacket (with deep armholes).
Featured in McCall’s Magazine September 1907.

What a fabulous jacket! That’s why I would choose this Eton jacket from 1907 because not only would it create a great historical silhouette, I’d love to try styling it with other items from my modern wardrobe.

1920s Era

McCall 4261; ©1926; Ladies’ and Misses’ Bathrobe (Vintage Pattern Wikia)

The flapper dress patterns you see in the store are so played out and inaccurate. My choice was influenced by the wonderfully boxy lines of this robe. It encapsulates the straight up and down silhouette of the time while looking like a piece that could be dressed up or down, for around the house or used for wearable garment in the right fabric.

1930s Era

Simplicity 1832; ca. 1935; Ladies Swagger Coat and Six Gore Skirt. Coat has full raglan sleeve tucked at the wrist, patch pockets, stand-up collar and inverted back pleat.

Oh my goodness, this coat is fabulous. I may try to track this down in the future just to try my hand at it because I love these style lines. I love the raglan sleeves with the contrast of the narrow 1930s skirt. It’s so chic.

1940s Era

McCall 4037; ©1941; Ladies’ & Misses’ Dress

I like the academic style of view A and the elegant style lines of view B. I think I would get a lot of wear out of a dress in this style. The 1940s are one of my favorite eras for vintage fashion, I love the style lines of this time period and the 1920s-1930s.

1950s Era

McCall’s 4674; ©1958; Misses’ and Junior Dress with Attached Petticoat.

The 1950s is not my favorite era of fashion, mainly because this silhouette looks horrible on me and it’s really over done when people think of “vintage” so for inspiration I went to 1958, the year my grandparents got married to find something interesting. I like the bow on the front of this and flounce of the skirt. The shape reminds me a bit of a bridesmaids dress I tried on that my grandma wore for her friends’ wedding in the 1950s.

1960s Era

Vogue Paris Original 1434; ca. 1965; Pierre Cardin – Suit. Side-buttoned jacket with standing, bias ring collar and cuffs. Tie belt at front, welt pocket and three-quarter length sleeves. Slim skirt.

I chose this one, first because I had yet to choose a Vogue pattern and secondly, because this suit is sharp and screams 1960s glamour. I love the over sized buttons. The classic shape and the slightly mod-artsy feel of the over all look.

1970s Era

Simplicity 7887; ©1977; Go Everywhere in Misses’ Jumpsuit and Unlined Jacket: Top-stitched jumpsuit with front seam interest has front zipper, buckled back tabs and optional rolled-up cuffs. Top-stitched jacket with collar interest has front button closing, flaps and long set-in sleeves with button trim.

This is a unique pattern. I like how many styling options we get in the line drawings. It’s an interesting jumpsuit I could see made up in several types of fabric for casual or fancy styling. I should see the blazer made in a contrast fabric or the same. Jumpsuits were a staple of the 1960s and 1970s so I think this is a great option to represent the decade.

1980s Era

McCall’s 8495; ©1983; Misses’ Dress and Tie Belt: Dress has square neckline, elasticized waistline, center back zipper and sleeves with elastic in shoulder casings. Self fabric tie belt.

This pattern is so extra. I didn’t realize how much the cottagecore aesthetic pulled from this time period – wow! I thought the 1980s was just inspired by the 1940s, but there is a lot more there to see. I think this would be a great upcycling project with bedsheets.

1990s Era (I’m vintage?)

McCall’s 7241; ©1994; Misses’ Jumper and Overalls: Loose fitting jumper view A and B or overalls view C with lined bodices have suspenders fastened in front with buttons or overalls buckles; jumpers have side seam pockets; overalls have front yoke and pockets.

I originally wanted to pull from 1993, but this pattern is too perfect for me. I honestly want to make all three of these. I have fabric that would work for view B. I wonder how difficult it would be to track down?

Closing Thoughts

A special thanks to Vintage Pattern Wikia for making it possible to browse vintage patterns and for keeping these moments of fashion history alive. Thanks also to Stephanie Canada for putting this on my radar and for sewists like her who are keeping vintage patterns accessible to us to sew with. This was a fun challenge posed by the Simplicity Creators group and Simplicity itself for putting this on all of our radar. Although I’m not going to sew anything from what I found because I seriously have to many projects to add another right now. It’s a great way to appreciate vintage paper patterns and the effect they have had fashion and clothing in the last 160 years. Sewing your own clothes is such a great way to make things that fit you, and have your own flair, they also combat the unhinged mayhem that is fast fashion. It’s a win win 🙂

Create a website or blog at WordPress.com

Up ↑