I find myself in an October slump which I discussed in a previous post. Last year I was much less productive with my writing goals in October than I wished, and its happening again! I’ve paused on sewing and have taken time to recharge, yet its still happening! I think I know why, the weather.
Since we were in Erie, my hometown has been having some pretty cool temps which has sent me into the knitting zone. I have been working on a cowl, some mittens, leg warmers, and reading up on how to make socks.
It’s been my trend for a while, I tend to focus on sewing fall/winter pieces in August and September to be prepared for the first cool days. Then in October when it drops and I get that first taste of cold hands or ears, I hurry to knit those cold-weather accessories. Like a light bulb goes off. It’s fun making things with the seasons too.
Stray Kids have been going insane with song releases so far this month too with two soundtrack releases for for the anime Tower of God and a third collaboration for Arcane on Netflix. Itzy and Ateez released new albums in October as well, plus Aespa’s upcoming release on the 21st, it’s been a distracting few weeks. Not to mention Mario Party Jamboree which I cannot wait to play tonight!
Currently, I’m dabbling in colorwork and its unlocking this whole world of possibilities for intricate storytelling across the canvas of wool.
I have a few knitting projects I excited to share that were the start of these colorwork projects. I just need to motivate myself to put down the needles and type.
Maybe I’ll do that now? Okay, I’ll meet you back here in a few. 🙂
Earlier this year, when I was planning what I wanted to make as additions to my wardrobe I found a brown, I believe it is taffeta fabric, in my stash. I’ve been at a loss of what to do with it since I got it because it’s so different than what I usually sew with, but that’s a good thing! I know it will push me out of my comfort zone with its hue and shiny finish, so I want that garment to be special when I finally make something out of it. I do not want a repeat of the pink scuba pants!
I’ve pondered using it as a lining fabric for my pirate coat, I’ve also considered using it as an underlayer for a sheer fabric I have in my stash, etc. So far nothing felt right, aside from an idea I saw while watching one of my favorite sewing channels on YouTube. She makes fabulous dresses from self-drafted, big four paper patterns, and buys indie PDF sewing patterns that all turn out so lovely, I want to try them all.
So on a whim, I went first to Mood Fabrics’ Sewciety page to see what they had to offer in their free selection and eventually found myself on Etsy, looking at the exact dress pattern she made on a video I was watching. Spontaneously, I clicked purchase on a dress pattern and clicked instant download. A dress, I thought, that would be perfect! I can style it up and down, in heat and in snow, it will be my go-to piece! To quote Lee Corso, not so fast!
It was mighty easy, but also mighty paper-hungry. This was something I was not expecting. You see, as far as PDF patterns go, I knew they required printing, but I always thought it was like 10 pages max. It seemed like something that would be straightforward. You know what I mean? To my surprise, it was 29 pages of just the pattern plus 5 more pages for the instruction and sizing. Um, holy lots of ink!
Yeah, I was not expecting that from my first one. So I looked more closely at the Mood patterns I was browsing to see if those would be any better and I saw another flaw in my plan, the patterns specifically from Mood use a ridiculous amount of yardage. Like a mini dress was calling for 5 yards of 57″ across the fabric. I can make a mini dress in 3 yards or less. Is this just a ploy to sell fabric? Mood Fabrics’ average price is USD 14-18 per yard, multiplied by 5 and it is beginning to be a very expensive project if you follow the fabric suggestions. I have a lot of questions now.
But anyway, I went back to the Etsy PDF pattern and decided to throw caution to the wind and begin printing. And print we did! The gentle hum of the printer slider traveling to and through filled the room, with the chorus of the squeaky paper roller delivering page upon page of freshly printed pattern sections to be cut out and taped, onto the desk. As I sat, staring at the screen, I began to get fidgety. I began to look around the room and stare at my computer screen, eventually perusing the listing again, and I noticed one small potential problem in this plan. As the pattern maker was an American, I thought for sure the sizing would be in US sizes, but alas the numbers on the chart were slightly askew from the standard. And I realized two things I would have to face, comparing the yardage to the pattern and taking my measurements to determine my size.
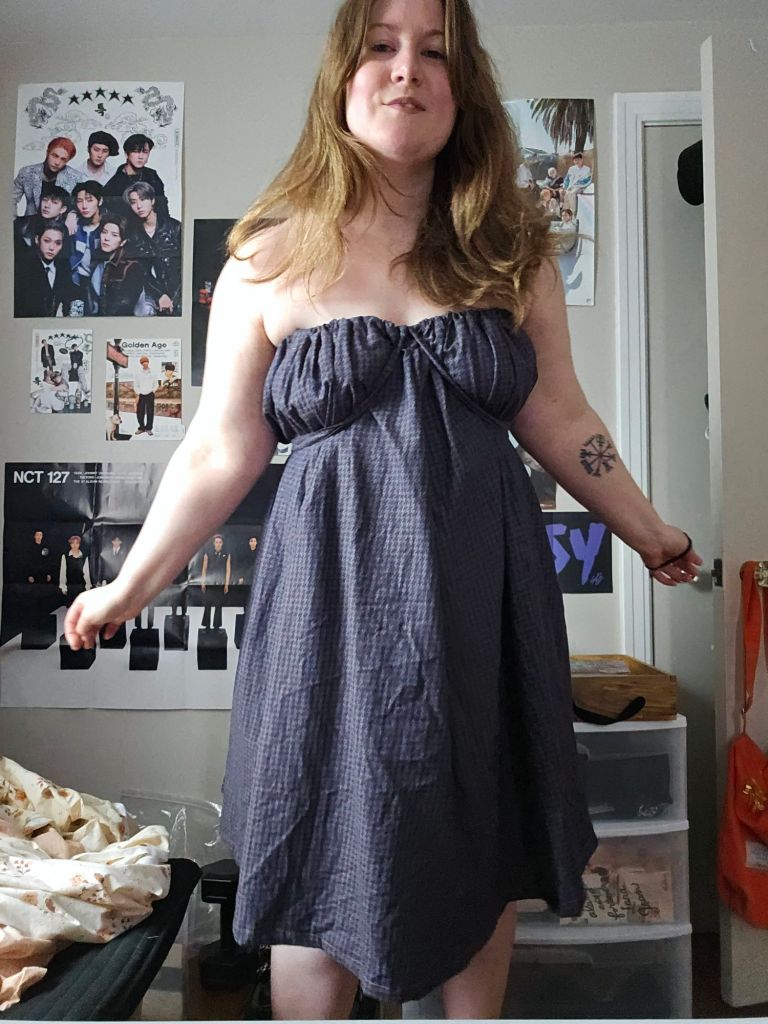
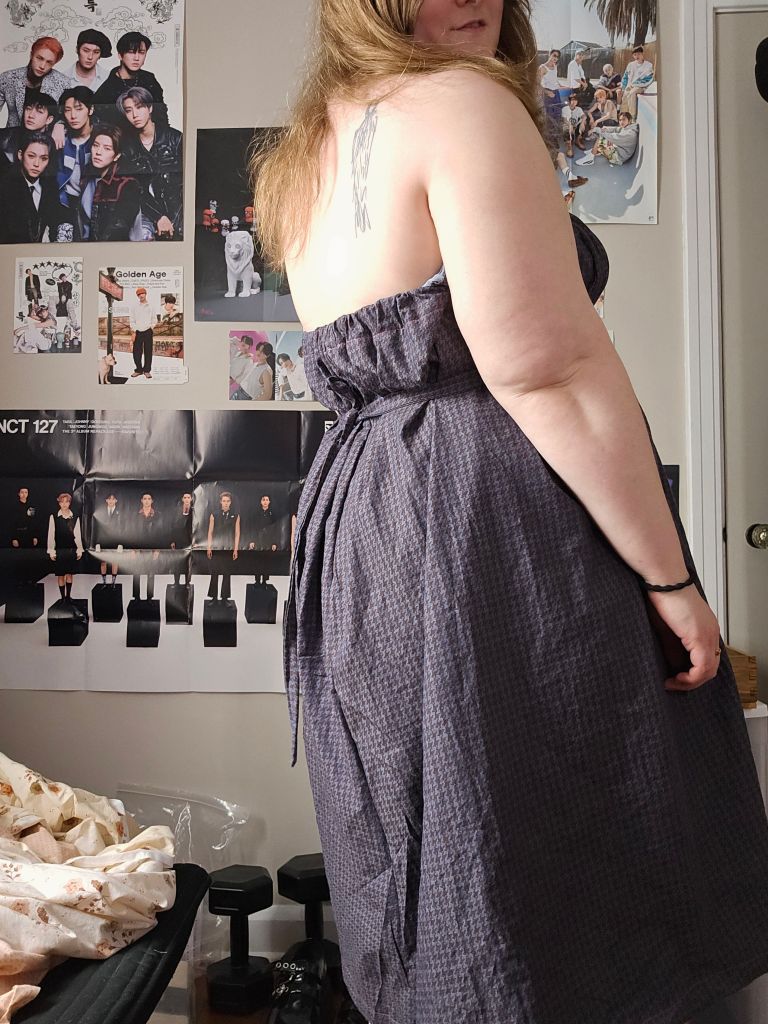
It was a slip dress, so the 3.5 yards I had available on the opaque fabric seemed like an obvious choice. There certainly would be enough, surely there would be enough, but oh no, there wasn’t. The pattern wanted more. I also grabbed the measuring tape and prepared for battle because no matter how badly I didn’t want to care what those numbers said. Those numbers always intimidate me. So with butterflies in my stomach, I grabbed the tape measure and learned that it wasn’t going to be my weight that would keep me from being able to make this but my literal body proportions. My frame. My long torso. My straight up-and-down waist.
I didn’t fit into any size proportions, none. Going up or going down a size was all off. As the freshly-inked paper kept rolling off the presses I felt stress, uncertainty, and frustration at myself for being such a novice thinking this would be easy!
But why isn’t it simple? When I buy paper patterns from the big four it is simple! When I’ve looked at vintage patterns, yes there is a little bit of knowledge needed to understand the sizing – your measurements – but other than that simple! Was I really going to have to pattern hack or pattern grade specific pieces on this paid-for, already drafted pattern? Was it basically going to be as complicated as making my own from scratch?
In that moment, I was incredibly humbled. Here I was learning to sew, designing my own clothes, I want to turn it into a business with the most logical option seeming to be PDF sewing patterns, but my word, this is a tough product to produce! This is incredibly more difficult than I imagined and I don’t think this is how I want to contribute to fashion space. Because not only do you have to make the pattern, the instructions, and go through testing, but I think on a PDF format, if you don’t have a vast size range or even a curvy or athletic build variation, I don’t think the pattern is being done properly.
I could not make the slip dress pattern work because it was cut for an hourglass shape and I have a straight up and down waist, no matter how skinny I get, it’s never going to fit me properly without alterations to the lines of the dress. That discouraged me. I stopped the printing and chose to call it a mulligan. The same issues with standard sizing hit me like a wall in a place I never expected.
What the answer is, I don’t know. But I do know I think the PDF pattern market may be the same ship different day repackaged in a way that creates more work and potentially less waste? On that, I’m not convinced because it is so much ink and paper. I don’t know. It still felt like a lot of consumption was happening. It’s a shame. I feel like I accomplished nothing in the long run. I believe I’ve found a problem I’d like to address if/when I ever figure out how to make my own patterns. Thankfully there are a lot of creative people in this world who may be developing the solution already. I hope so.
What about you? Have you purchased an indie PDF sewing pattern? Were you pleased? Did you feel like it was easier than buying paper patterns or self-drafting? Thanks again for spending time with me today, dear reader. I hope you have a lovely day. ❤
Two summers ago, in 2022, I tried my hand at making dresses and separates with some mixed results. Some pieces I loved but had fit issues, some were poorly constructed and just fell apart, and some were made with the wrong materials for the project and were doomed to fail from the start. But as a new sewist who is self-taught, it was the only way I was going to learn, by experimenting and making and then doing it all over again.
In 2024, I’ve seen a huge jump in my skill level. I’m beginning to feel comfortable with the craft and I’m wiser about my fabric choices, which makes me think about these former projects. Could I make a better version of them? Have I leveled up my skills enough to do these projects justice and have them in my closet for years to come?
The Blanket Dress
Original Materials: Cotton Flannel, Satin Blanket Edging
Issues: Sleeves fall down and fabric stretches with wear. Not enough structure and bad pattern matching.
2024 Plan: Choose a cotton shirting with more body and keep the plaid pattern or if I stuck with the light cotton flannel, I would add a lining to give structure. Pattern match when cutting out pieces because I can tell I didn’t try at all! Add tie to the back shoulders to keep the sleeves on my shoulders. Add a button placket or zipper to fit the dress to my body better. I would make the bodice even, because I can see how each side of it is a different length.
Will I make this again? Most likely! It is one of my favorite pieces from my early designs.
Amalfi Coast Girl Slip Dress
Original Materials: A very lightweight polyester silk that I found on clearance at Joann Fabrics.
Issues: Very thin, made me paranoid. Being a slip dress I felt uncomfortable, like I forgot to get dressed.
2024 Plan: Lining! I would line this 100% now because that was just silly. I would pick a better fabric though, this one was hot and difficult to sew. I would also fix the bunching in the skirt and fit the bodice better because it looks messy.
Would I make this again? Yes! Potentially this summer if I find the right fabric.
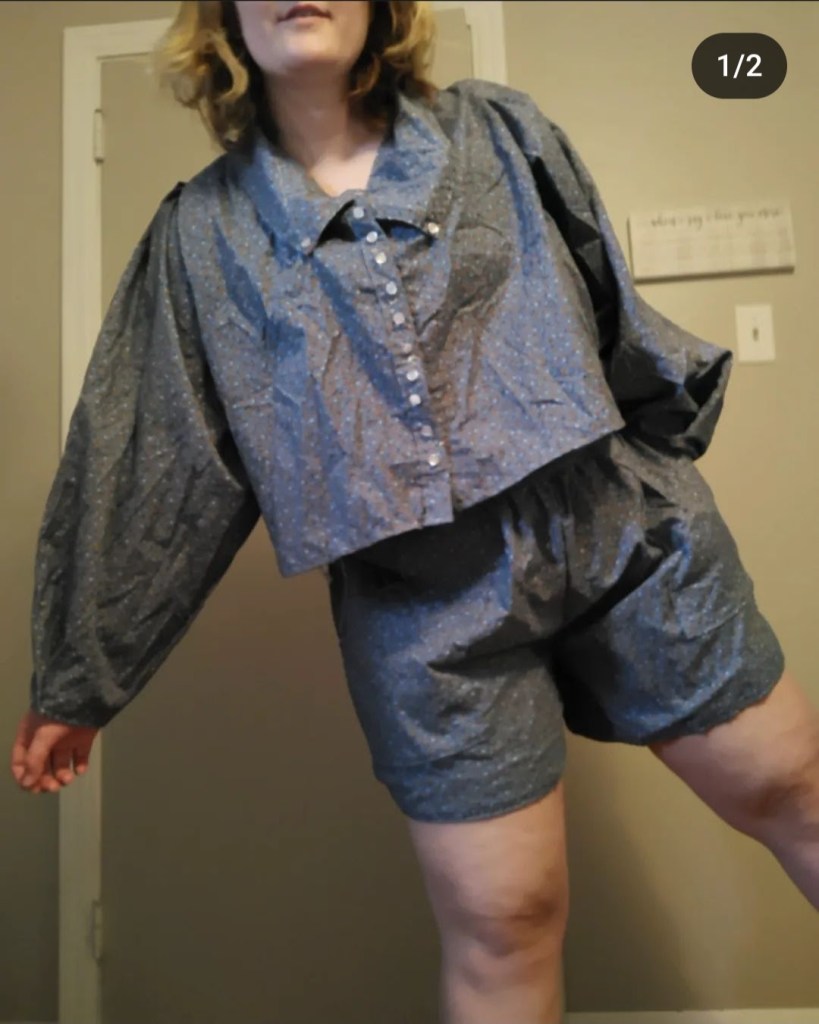
“Linen” Two Piece Set
Original Materials: Vintage Quilting Cotton from my Gram’s stash. Snaps and buttons (because button holes scared me).
Issues: Not real buttons, this was a hassle. The shirt was a bit short and too boxy. The shorts were an absolute mess because I didn’t have a french curve or a proper pattern to make shorts from. The seat was too narrow and the the rise too short, the waist band I didn’t fold over so it provided no structure. A side zip and snaps were an okay closure but they never felt truly secure.
2024: I would buy the cotton gauze fabric or buy linen for the look I wanted. The quilting cotton made this feel like pajamas and it made a little unsure about wearing it out. I would make a proper fitting pair of shorts this time and a real button holes. Other than that, I’m quite pleased with my original idea.
Would I make this again? Yes, it was chic and comfy, if only it had been constructed better I may still have it.
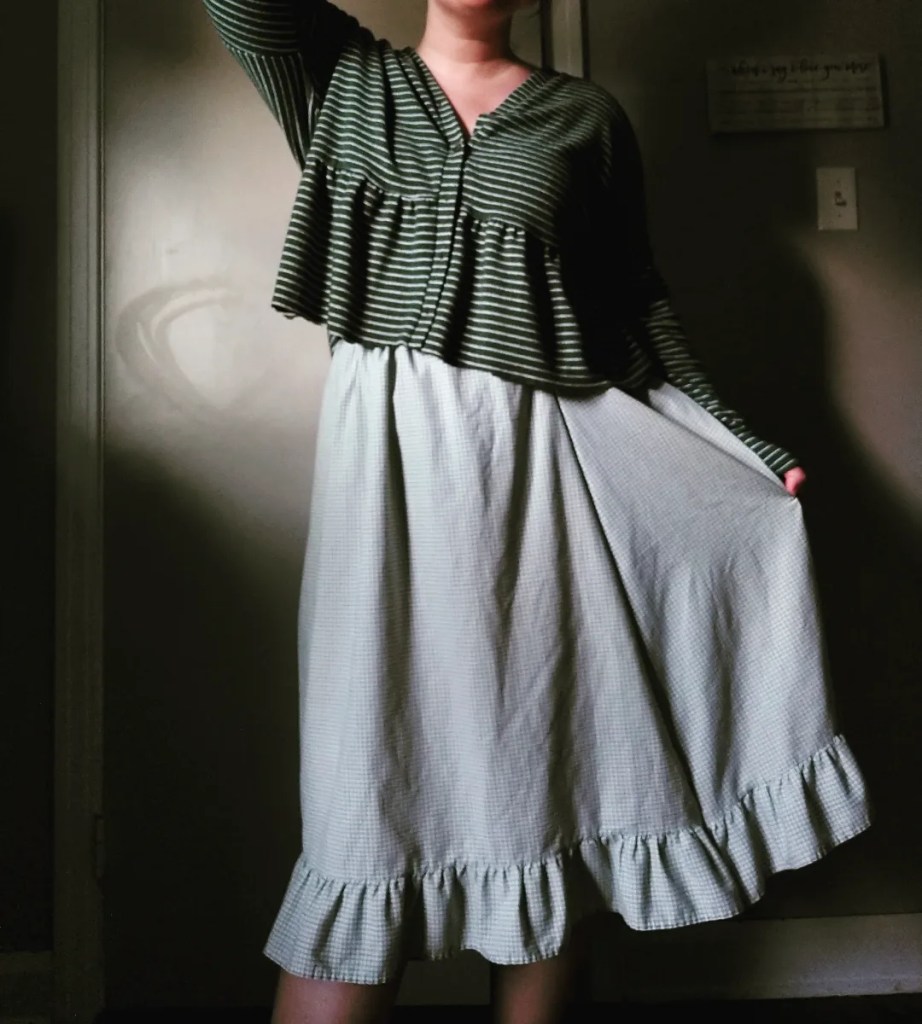
Cropped Cardigan and Ruffle Skirt
Original Materials: Two upcycled pillow cases and a hand-me-down dress I cropped into a cardigan.
Issues: The pillowcase was stained and see through. The cardigan was made from a fast fashion piece that was terrible quality that made it feel weird on the skin. I like the appearance of this look more than I did wearing it.
2024 Plan: Opaque quilting cotton or shirting to feel comfortable. Knit the cardigan in a cotton yarn or a linen yarn to make it versatile for Spring, Summer, and Fall.
Would I make this again? Yes, it’s already on my to do list. I would wear this for so many things.
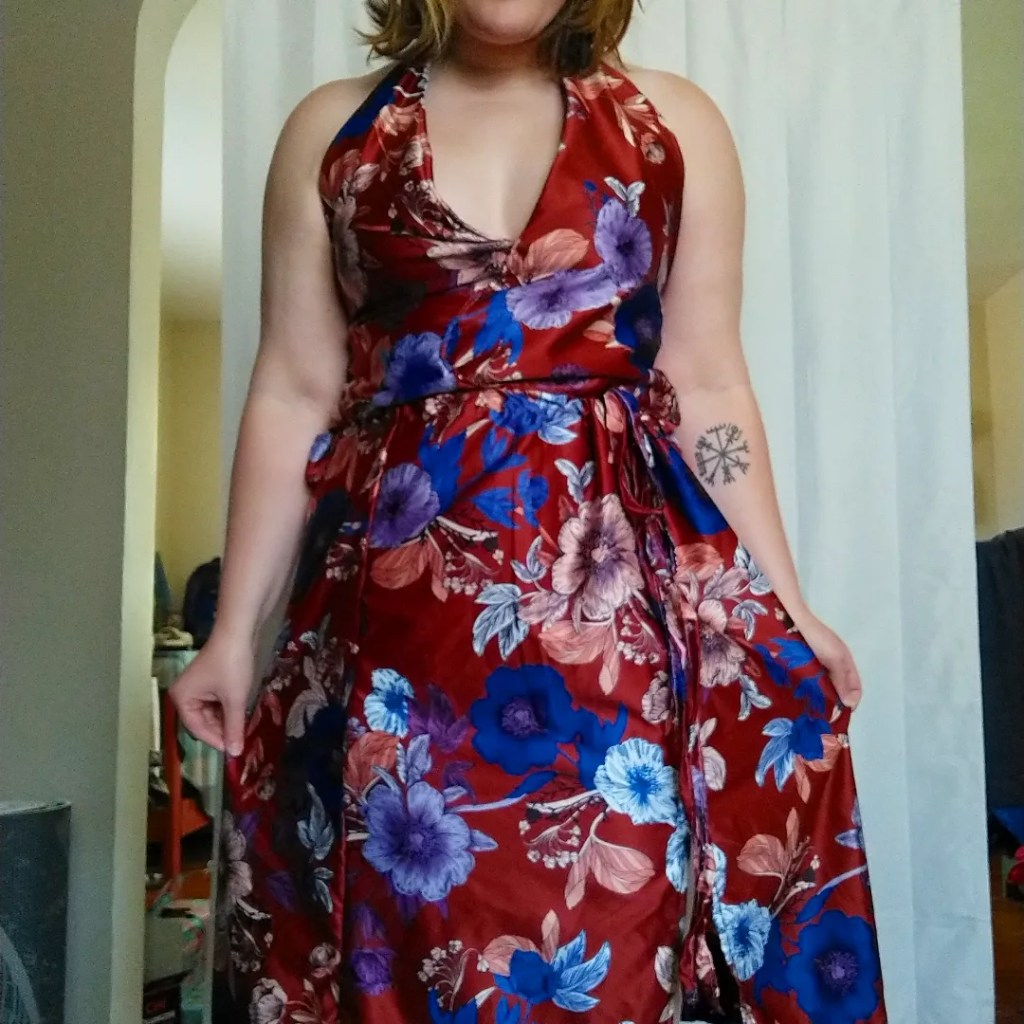
Silk-ish Halter and Wrap Skirt
Original Materials: A satin polyester from Joann Fabrics. Snaps and a tie made from the fabric.
Issues: My halter top gaped, it was poorly draped and did not feel secure at the back snaps or neck snaps. The skirt did not have enough volume. I didn’t feel like myself in it.
2024 Plan: I would properly drape the bodice and add bust cups potentially to the top. I would also not make it a two piece look because I wouldn’t wear the pieces separately. The fabric was nice and I would use something like it again, although I would love for it to not be polyester.
Would I make it again? No, it doesn’t fit into my wardrobe. I would use a similar fabric again for a dress, but not a halter dress.
The clearance section of a fabric store may be my biggest design inspiration. It is in the bolts of discounted fabrics from seasons past that you can find some real gems in my opinion. My brain gets a break from the items deemed trendy or seasonal for a moment to look for something new and at a reasonable price to justify taking a chance on something new. That is how I took a chance on this two-sided scuba fabric that is hot pink and light pink. Not really my cup of tea! But it was 2 USD per yard and honestly a fascinating texture and weight. It was worth the leap to try something new, so I did!
Now, do I always have a garment idea in mind when I pick out these cuts? Nope. Should I? Probably. But some magic can happen as they hang out in my fabric stash like inspiration finding its way to me, which is quite fun.
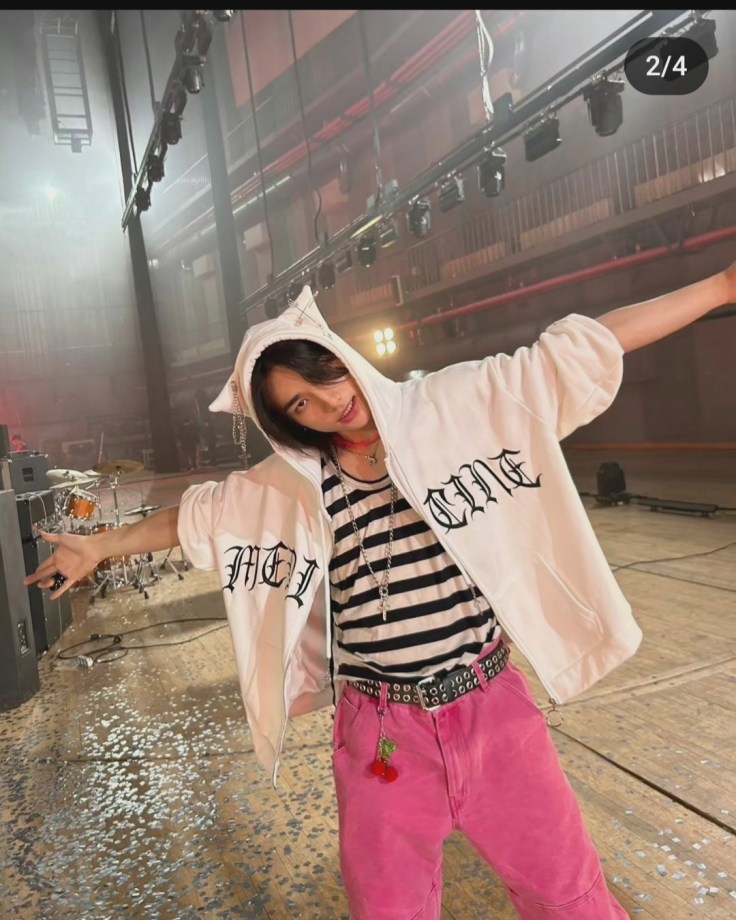
For this cut, in particular, I was a scuba newbie. The weight was hefty with a bit of stretch, so it needed to be a garment that could handle the heavier textile. The two-sided nature provided two color palettes in one. I considered a jacket, a coat dress maybe? The thing that was working against my creative brain was the Barbie movie. I did not want to make a Barbie cosplay, simply because Barbie was not my favorite toy. I was an American Girl Doll and a Fashion Polly girl through and through. Making a Barbie-inspired garment would not be authentically me nor would it be something I would wear because, did I mention I don’t really wear pink? Yeah, I don’t love pink, especially hot pink, so why did I buy hot pink fabric fabric? I think I like pushing myself to a place of adventure with the clothes I make. I don’t want to make boring clothes if my skills will allow me to do so. No matter what I did with this fabric it was not going to be boring.
One day I saw this photo of Hyunjin on Instagram and it hit me, why does this pink scuba fabric half to be made into a feminine Barbie cosplay? Hot pink looks fantastic in a masculine silhouette. Making a neutral garment, like a pair of pants could be just the thing I need to make this fabric feel accessible to me and my own personal style. A pink dress felt too on the nose for me to get any wear out of and that is a big thing for me. I don’t want to make things I am not going to wear just for the heck of it. Maybe one day if I have a way to sell things that aren’t my personal style but right now that would be a poor use of resources and excess clutter my closet doesn’t need.
I knew I wouldn’t be able to make a hot pink pair of jeans like Hyunjin is wearing, I simply don’t have a jeans pattern in my stash, but I do have a menswear trouser pattern. I chose to use that instead of free-handing a jeans pattern so this garment would have the best chance of success. Jeans have an incredible amount of details that make them distinct and classic. The pants I drafted were going to be far more simple as these would be my first attempt at sewing my own trousers. It was a big moment!
I altered the menswear trouser pattern I had for a better fit by raising the rise for a higher-waisted fit. I did this to fit my waist better and to give more room to my hips. I was nervous these were not going to fit me right because I was grading the pattern to my own design so I cut a generous seam allowance around each piece. (A little too generous I will find out later.) This fabric cut like butter and did not make a mess, which was a huge victory after my Jack Sparrow Inspired Coat corduroy left a layer of fluff on my floor that I still find remnants of today.
To match the crotch lines better, I tried something new from my previous shorts projects and sewed the front and back seams first and then I worked the inseams, working my way out the outside leg seams last. I don’t know if this is the proper technique for sewing trousers but it worked well for this project. I tried them on and the pants fit well, a little wonky at the front because I left too much seam allowance, but they looked like actual pants that an actual person would wear. It was around this point that I realized I needed to do more than just sew two leg tubes together, these trousers would need pockets, fastening, and belt loops to be a properly finished garment.
I recently learned how to make button holes which I shared in My First Buttondown Shirt and with this newfound knowledge I decided to go in a Spicy direction, literally like the Aespa Spicy M/V, I was going y2k! What was cooler than popstar fashion when I was a kid? Nothing. I wanted these to feel like Destiny’s Child or a backup dancer for Proto Zoa would wear.
I decided the best way to accomplish this would be to make cargo pockets for a funky twist and place them higher like you would normal pockets, to hide the weird fit around the front of the pants. These pockets I designed to be usable, big enough for my phone, and secure, with proper button closures. This was my first attempt at cargo pockets and belt loops and I have to say, they were not as scary to make as I thought, especially with the use of my heavy-duty sewing machine.
Final Thoughts
So as far as my first pair of proper pants, not just lounge pants, I am supremely pleased with how they fit. I can see the flare leg starting at the knee. I like how they fall around my hips. I like the length and the rise of the waistline. The pockets were stronger than I anticipated and the belt loops were functional, which came in handy because these pants were a bit big and continued to stretch as I wore them. Styling them was a bit of a challenge, as I realized I didn’t own much in my existing wardrobe that paired well in color and proportion to the silhouette of these pants. Shoes were also a challenge, I opted for a pair of Converse high tops since I believe they go with almost anything.
This is where things got interesting. I wanted to show my mom and my excitement bested my judgment. I unwisely decided to wear these pants out and about for a day of running errands in Wexford. This was my first mistake. My second mistake came from my unwise decision to cut the pieces with an extra seam allowance that made the front of the pants fit weird. The waistband was a bit big which I thought I could remedy with a belt. It did work for a bit until the fabric began to stretch, and stretch it did! The belt stopped working which was awkward, as every few minutes I had to adjust the belt.
My third mistake was not inserting a zipper to take the waistband in, which I should have planned for. I got excited and sewed the seams before I remembered the zipper. This scuba fabric showed every hole, whether pin or needle, therefore seam ripping and inserting the zipper worried me because the fabric was weaker in those spots. I was concerned the pants would rip (foreshadowing) so I left the pants as is to depend on that belt for structure. The side was the only place to put the zipper because the front was fitting so weirdly I did not want a zipper shining a big spotlight on that error.
Herein lies my final boss of mistakes, the fabric versus my thread tension. It was a mele. With thick fabric, I raise the thread tension because it helps the needle sew through the thicker fabric. Being unfamiliar with scuba I didn’t know how the scuba would respond. The scuba did not like the high tension nor did it like being sewn. I was able to get the pants, the pockets, the waistband, buttons, and belt loops on, but there were times I could barely get a needle through. The tension came back to bite me in the butt as my wear test went on. By the end of the day, I was incredibly thankful we headed home early. The thread on structural seams, like the main ones in the front, back, and sides had begun to rip through the fabric. The seams were on their last leg.
I’ve never had this happen with a project before! I was incredibly frustrated as this project took days to sew. My fingers were scratched up from the pins and the needle accidentally stabbed me as I hand sewed the buttons. There was no way to fix them, they were toast.
And so ends the journey of the pink pants. They had a good day out. A one-time adventure. They were good pants that deserved better. In my short time with them, they taught me a lot. Thank you pink pants and random scuba fabric. I will never purchase scuba again!