A place I didn’t expect to reach this year, was the mental head space of dislike for a dream I’ve had for most of my life. Now could it be burnout and I just need a break? Probably. But I also think it might a healthy thing to acknowledge something you thought you would love, may not actually bring you joy as you wished.
What am I talking about? Sewing. I don’t like sewing as much as I want to. It is tedious, extremely complicated, and requires a level of patience I lack. I’ve been a sewist for 5 years now. I devoted a large amount of my time over the past five years to the study of garment construction, and I realized that it is not my medium, yarn is, and its not a failure to admit I don’t like sewing as much as knitting and crochet.
I think I have known this for about a year, yet refused to verbalize my feeling because it felt like I failed the one thing I always wanted to do. But why is that a failure?
Just because it’s not my passion, doesn’t mean I am going to stop sewing. I think having this space to put less pressure on it to be “my thing” could make me enjoy it more!
Because then I am free to create, to fail, to be a slow learner, to take breaks from sewing when I am ready to cry. I don’t have to feel pressured to get my skills up to par for selling my work. I don’t have to feel pressure to design my own patterns or build a business on sewing. I can go back to basics of what has always been at my core – art. I am an artist, I don’t set out to be, but I know its there inside me too afraid to commit to the bit.
I love what sewing brings me. It’s a fantastic skill to have. I can design my own clothing made to measure and that is luxurious even if my sewing skills are mid.
I can experiement with my style through upcycling. I love how I can recycle and repurpose fabric instead of donating. That is a important part of comsumption. We buy and buy but don’t think about the life cycle of the garment, but with needle and thread you can leave the buy and declutter cycle.
Sewing has taught me to be a wiser comsumer as well. I buy garments that I can’t sew. Complex garments. I also price compare fabric against pieces in store to figure out what is more cost effective to sew. Such as buying a 6.99/yard, one yard cut of cotton jersey to make one long sleeve basic tee. You can buy these from retailers for 35 USD compared to sewing one for 7 USD.
It’s not always cheaper, but sometimes it is and that is a huge win!
Finally, by allowing myself to feel these feelings, my hope is that I will be free to explore and create unencombered by goals of monetizing my hobby, instead that I enjoy the creative process again.
Have you ever tried sewing? Did you find it challenging?
This is an unplanned part three of my “Drafting Shortalls From Scratch” because I did not succeed in making my overalls for winter. Although I have made shortalls twice this summer, a few silly, but very human mistakes, led to the project going awry. This is what I think went wrong:
Flew too close to the sun when tailoring
Planning < No Plan
Lack of Focus
Measure Once, Cuss Twice
I kinda hate sewing when it feels this hard
Putting too much pressure on myself
Not Buying Enough Fabric
Not Mocking Up
Not using my Patterns when I’m stuck
Research the Basics
It’s so easy to think we’ve got this and be too confident when going into a project. With knitting, this approach of fearlessness had led to some great projects, but with sewing, this artistic type of approach crashes and burns. Sewing is fabrication, as weird as that sounds. I think I was prepared to sew such complex tailoring projects, such as my shortalls, this summer, because I spent the spring building a screened-in porch with Kyle. Woodworking is very similar to sewing, I learned! It is about measuring, planning, creating things in a specific order, and constructing something that is built to last. When we started working on the porch, I never imagined how much it would teach me about garment construction. But it gave me a template to focus on. Who knew that woodworking would be such an inspirational experience for me?
So why am I sharing this? I am really struggling to accept that sewing is not coming easily to me; no matter how much I practice, it continues to challenge me. I’d like to invite you to join me in not giving up on those things in our lives that are hard.
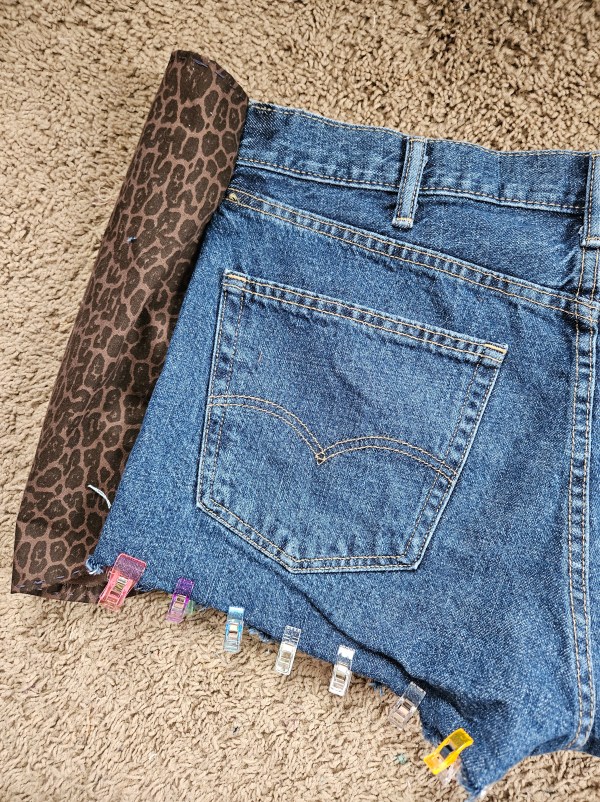
In 2024, I was inspired to start making pants. I had attempted making pants before and they were successful but I struggled to make them feel like more than just a pair of lounge pants. Part of this was caused by not choosing a good bottom-weight fabric, and instead opting for a lightweight summer cotton that draped beautifully but didn’t give me that tailored look. I also tried an ill-fated scuba fabric in 2023 that crashed and burned because my thread tension was off. Enter this checkerboard denim print I purchased at Hobby Lobby. It was denim but lighter, not too heavy to be a problem for my sewing machine. But how would I find the right pattern?
I had a pants pattern in my stash for menswear trousers, that I considered using on this project. It’s a solid pattern and would make a straight-fit pair of jeans, maybe not the style I was going for though. I considered buying a new pattern, but then I fretted that the pattern would fit me weirdly or might not fit at all. The current style in 2024 still featured that tapered-in waist on pants that favor an hourglass figure, not my rectangle athletic build, so should I risk it? A big reason I chose to make pants in the first place was that I was sick of shopping and trying on pants that made me feel weird about my body. The men’s section was my go-to for their up-and-down pattern cutting, compared to the extreme tapering and high waist silhouette of women’s pants. Even low rise was stuck in mid-rise inseam, not the true low waist inseam I was accustomed to in the 2000s and early 2010s that helped me find good-fitting jeans because they favored my shape not the post-bbl world of fashion. I digress, my point is that buying a pattern someone else drafted felt like a risk because the fit is such a personalized thing.
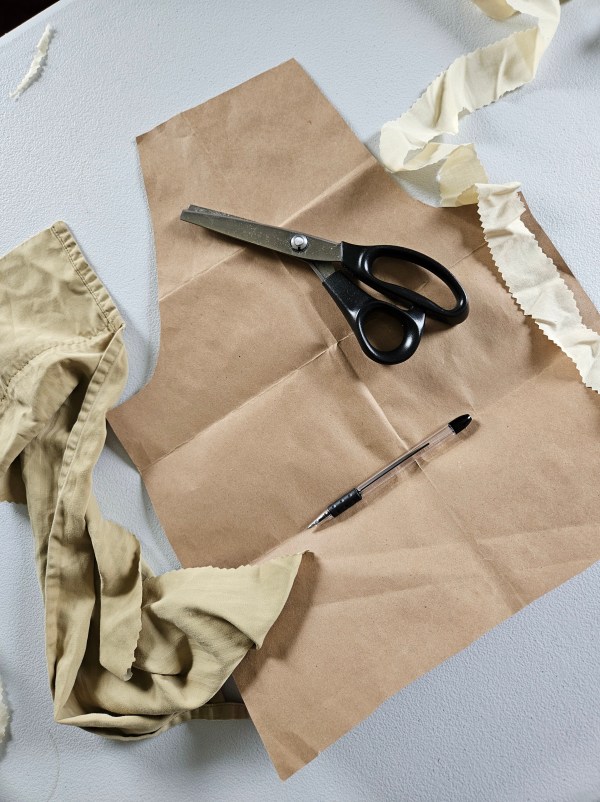
My solution was to take a pair of pants in my wardrobe that I liked the fit of and to trace that pair of pants to gauge the shape. I did this with a pair of jeans that were high waist but had a nice loose fit through the hip and leg for the K-pop-inspired baggy jeans style I was interested in making with this 1990s Vans checker board print. This worked swimmingly! So much so that I traced the jeans onto a piece of brown craft paper for a quick pattern to reach for on future projects.
I chose to record this project, start to finish in video from instead of video to have a memory of how I did this to learn for myself and remember what I did but to also inspire others to try this. Pants are intimidating, especially from a paper or PDF pattern. The written instructions and diagrams have puzzled me in past projects but truly, pants are simple once you see how its done. I wanted to help others feel that freedom to create because at least in my American fashion market, fast fashion has destroyed the craftsmanship of pants and standardized sizing. I referenced this in a previous post, Shaping Up where I had to confront the dressing room terror of things not fitting and seeking to not be defined by my jeans size, when trends and pattern cutting shape shift sizes, but to take control of it on my end and get healthier in 2023.
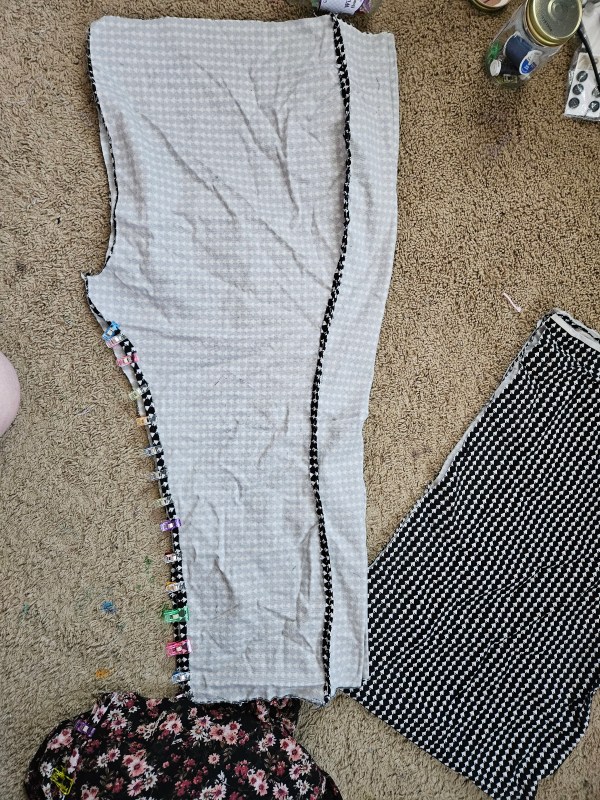
This pants project was one of the most challenging and rewarding projects of 2024. I faced my fear of sewing denim, inserting pockets, and fastenings. I chose to not attempt a fly into I had more pants sewing experience, instead I planned to make what I knew I could achieve under my skill set. I opted for a side closer with a drawstring to have an adjustable fit since the denim had zero stretch. The denim containing no stretch was a feature I sought because I believed it would be easier to work with as it was my first project of this kind, and I wanted a crisp tailoring from the woven fabric. A key thing to note is that the jeans I used for my template also are non-stretch denim. For an accurate this is paramount or else the project will not work. Either you will cut your project too large or too small. It is also essential to leave a seam allowance on your pattern pieces. When self-drafting it is your responsibility to take charge of the seam allowances and plan ahead.
I messed this up with the crotch line and had to make a quick fix. My fix was a diamond gusset. Popular in women’s leggings, this diamond gusset shape piece allows for greater mobility while maintaining the strength of the seams.
The second challenge I faced was the problem of a narrow bolt and an all-over pattern. This fabric was quite narrow and because I was cautious with my seam allowance, I cut my pieces large. This meant that I was not cutting from the longest side, but the most wide. The pattern pieces were cut out missing length on the leg. My solution was to add on to the bottom and pattern match. It’s easier to match than people say, it just takes patience and intentional sewing. I’m pleased with how seamlessly I got my pieces to match up.
The pockets were a challenge. How do you place them? How do you insert them with strength so the pockets can be used without pulling the pants down or ripping? I chose to place them angled on the sides, aligned with my hips so that they would be practical and not create weird bunching at the front of the pants. No wonky crotch fit here!
Would you make your own pants? I hope I inspired you to get creative and go for it if you are sewing-inclined. Thanks, reader, for joining me once again on this quest to grow my fashion design skills. Have a wonderful day!
When I first heard of making small snipping cuts into the curves of seams for necklines and arm openings, I thought this was a bunch of nonsense. An extra step that only overachieving sewing people do. But once I gave it a try – there was night and day difference with how non-stretch fabrics draped against the form. The comfort and fit has been a level up to professional feeling. It’s totally worth it and I can’t believe I was stubbornly against putting the extra effort in. Looking back, there were definitely projects I made that I didn’t like because the neckline and arm openings fit wonky. If only I had tried this weird sounding hack.
In the curve of seams, make a very small cut in the seam allowance, not the actual part of the seam you are going to sew. For structural integrity that’s important. You don’t want your seam to have a cut or it will rip. The cuts in the seam allowance give the illusion of stretch and help the non-stretch fabric curve without warping the line of the curve. It creates shape without bulk and proper fit. The quality of a garment, I’m learning is not the fabric quality alone, it’s the planning and care put into the construction. Proper pattern cutting can make or break the fit of the look you are going for.
The clearance section of a fabric store may be my biggest design inspiration. It is in the bolts of discounted fabrics from seasons past that you can find some real gems in my opinion. My brain gets a break from the items deemed trendy or seasonal for a moment to look for something new and at a reasonable price to justify taking a chance on something new. That is how I took a chance on this two-sided scuba fabric that is hot pink and light pink. Not really my cup of tea! But it was 2 USD per yard and honestly a fascinating texture and weight. It was worth the leap to try something new, so I did!
Now, do I always have a garment idea in mind when I pick out these cuts? Nope. Should I? Probably. But some magic can happen as they hang out in my fabric stash like inspiration finding its way to me, which is quite fun.
For this cut, in particular, I was a scuba newbie. The weight was hefty with a bit of stretch, so it needed to be a garment that could handle the heavier textile. The two-sided nature provided two color palettes in one. I considered a jacket, a coat dress maybe? The thing that was working against my creative brain was the Barbie movie. I did not want to make a Barbie cosplay, simply because Barbie was not my favorite toy. I was an American Girl Doll and a Fashion Polly girl through and through. Making a Barbie-inspired garment would not be authentically me nor would it be something I would wear because, did I mention I don’t really wear pink? Yeah, I don’t love pink, especially hot pink, so why did I buy hot pink fabric fabric? I think I like pushing myself to a place of adventure with the clothes I make. I don’t want to make boring clothes if my skills will allow me to do so. No matter what I did with this fabric it was not going to be boring.
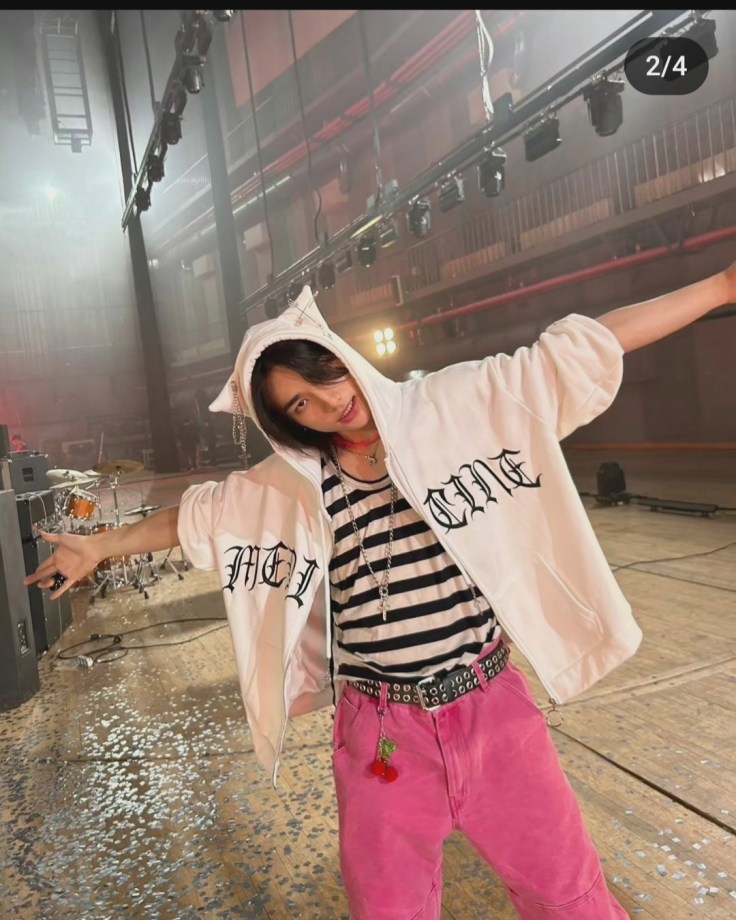
One day I saw this photo of Hyunjin on Instagram and it hit me, why does this pink scuba fabric half to be made into a feminine Barbie cosplay? Hot pink looks fantastic in a masculine silhouette. Making a neutral garment, like a pair of pants could be just the thing I need to make this fabric feel accessible to me and my own personal style. A pink dress felt too on the nose for me to get any wear out of and that is a big thing for me. I don’t want to make things I am not going to wear just for the heck of it. Maybe one day if I have a way to sell things that aren’t my personal style but right now that would be a poor use of resources and excess clutter my closet doesn’t need.
I knew I wouldn’t be able to make a hot pink pair of jeans like Hyunjin is wearing, I simply don’t have a jeans pattern in my stash, but I do have a menswear trouser pattern. I chose to use that instead of free-handing a jeans pattern so this garment would have the best chance of success. Jeans have an incredible amount of details that make them distinct and classic. The pants I drafted were going to be far more simple as these would be my first attempt at sewing my own trousers. It was a big moment!
I altered the menswear trouser pattern I had for a better fit by raising the rise for a higher-waisted fit. I did this to fit my waist better and to give more room to my hips. I was nervous these were not going to fit me right because I was grading the pattern to my own design so I cut a generous seam allowance around each piece. (A little too generous I will find out later.) This fabric cut like butter and did not make a mess, which was a huge victory after my Jack Sparrow Inspired Coat corduroy left a layer of fluff on my floor that I still find remnants of today.
To match the crotch lines better, I tried something new from my previous shorts projects and sewed the front and back seams first and then I worked the inseams, working my way out the outside leg seams last. I don’t know if this is the proper technique for sewing trousers but it worked well for this project. I tried them on and the pants fit well, a little wonky at the front because I left too much seam allowance, but they looked like actual pants that an actual person would wear. It was around this point that I realized I needed to do more than just sew two leg tubes together, these trousers would need pockets, fastening, and belt loops to be a properly finished garment.
I recently learned how to make button holes which I shared in My First Buttondown Shirt and with this newfound knowledge I decided to go in a Spicy direction, literally like the Aespa Spicy M/V, I was going y2k! What was cooler than popstar fashion when I was a kid? Nothing. I wanted these to feel like Destiny’s Child or a backup dancer for Proto Zoa would wear.
I decided the best way to accomplish this would be to make cargo pockets for a funky twist and place them higher like you would normal pockets, to hide the weird fit around the front of the pants. These pockets I designed to be usable, big enough for my phone, and secure, with proper button closures. This was my first attempt at cargo pockets and belt loops and I have to say, they were not as scary to make as I thought, especially with the use of my heavy-duty sewing machine.
Final Thoughts
So as far as my first pair of proper pants, not just lounge pants, I am supremely pleased with how they fit. I can see the flare leg starting at the knee. I like how they fall around my hips. I like the length and the rise of the waistline. The pockets were stronger than I anticipated and the belt loops were functional, which came in handy because these pants were a bit big and continued to stretch as I wore them. Styling them was a bit of a challenge, as I realized I didn’t own much in my existing wardrobe that paired well in color and proportion to the silhouette of these pants. Shoes were also a challenge, I opted for a pair of Converse high tops since I believe they go with almost anything.
This is where things got interesting. I wanted to show my mom and my excitement bested my judgment. I unwisely decided to wear these pants out and about for a day of running errands in Wexford. This was my first mistake. My second mistake came from my unwise decision to cut the pieces with an extra seam allowance that made the front of the pants fit weird. The waistband was a bit big which I thought I could remedy with a belt. It did work for a bit until the fabric began to stretch, and stretch it did! The belt stopped working which was awkward, as every few minutes I had to adjust the belt.
My third mistake was not inserting a zipper to take the waistband in, which I should have planned for. I got excited and sewed the seams before I remembered the zipper. This scuba fabric showed every hole, whether pin or needle, therefore seam ripping and inserting the zipper worried me because the fabric was weaker in those spots. I was concerned the pants would rip (foreshadowing) so I left the pants as is to depend on that belt for structure. The side was the only place to put the zipper because the front was fitting so weirdly I did not want a zipper shining a big spotlight on that error.
Herein lies my final boss of mistakes, the fabric versus my thread tension. It was a mele. With thick fabric, I raise the thread tension because it helps the needle sew through the thicker fabric. Being unfamiliar with scuba I didn’t know how the scuba would respond. The scuba did not like the high tension nor did it like being sewn. I was able to get the pants, the pockets, the waistband, buttons, and belt loops on, but there were times I could barely get a needle through. The tension came back to bite me in the butt as my wear test went on. By the end of the day, I was incredibly thankful we headed home early. The thread on structural seams, like the main ones in the front, back, and sides had begun to rip through the fabric. The seams were on their last leg.
I’ve never had this happen with a project before! I was incredibly frustrated as this project took days to sew. My fingers were scratched up from the pins and the needle accidentally stabbed me as I hand sewed the buttons. There was no way to fix them, they were toast.
And so ends the journey of the pink pants. They had a good day out. A one-time adventure. They were good pants that deserved better. In my short time with them, they taught me a lot. Thank you pink pants and random scuba fabric. I will never purchase scuba again!