On the Saturday before Christmas, Magz and I met at our favorite local coffee shop to hang out and discuss our plans for and thoughts about the 2026 garden. While it was definitely a low-key affair, it was a productive meeting, and we left the coffee shop with clarity over our upcoming garden. Items we discussed included:
Vegetables we want to grow again vs. new vegetables we want to try vs. vegetables we won’t grow again in 2026
Growing habits/types of vegetables that we are interested in
Seeds vs. starts for each vegetable
In the end, we were able to refine our approach to the 2026 garden and feel confident in our plan. Here are some of the decisions we reached.
What Vegetables Are We Growing in 2026?
There are a number of vegetables that we have decided to not grow again in 2026. They are beets, carrots, tomatillos, greens, and bok choy. We were unsuccessful in growing beets and carrots in 2025 and have never had luck with bok choy as much as we love them. We’ll likely revisit all three again in the future. We didn’t enjoy eating tomatillos as much as we thought, so we won’t dedicate garden space to them again this year. Finally, we enjoyed the mustard greens we grew, but we ran out of ideas for how to use them. They needed to be harvested all at the same time, and it became overwhelming.
The vegetables that we’re growing again in 2026 are beans, broccoli, bunching onions, corn, cucumbers, eggplant, ground cherries, melons, peas, peppers, potatoes, pumpkins, squash, and tomatoes. We either had success with all of them in 2025 or want to have another go at growing them.
Finally, there are three new vegetables that we want to try: leeks, okra, and cauliflower.
Varieties We Won’t Grow in 2026
There are also a number of varieties that we attempted to grow in 2025 that we won’t try again in 2026, but it doesn’t mean we’re writing off the entire vegetable or fruit. These are:
Melons: Tigger, Ali Baba, Noir des Carmes, and Kajari
Beans: Chinese Red Noodle Yard Long
Squash: Zapallito Del Tronco
Tomatoes: Yellow Pear, Queen Aliquippa
There were various reasons for not growing these varieties again. Some were because we didn’t like the flavor (Tigger, Kajari), others were because of the texture (Chinese Red Noodle Yard Long bean, Zapallito Del Tronco), and determining when the tomatoes were ripe was a nightmare. Finally, the Ali Baba watermelon probably would have been delicious, but it requires a longer growing season than we can consistently expect and want a shorter-season watermelon for 2026.
Growing Habits/Types of Vegetables That We’re Interested In
In 2025, we learned what growing habits and vegetable types that we like and dislike growing. That was refined during our meeting:
Beans – As many bush habit plants as possible, with one or two pole bean plants sprinkled in.
Cucumbers – Fewer plants overall, with most having a compact growing habit.
Melons – Short-season varieties, with an emphasis on ones that were bred for cooler environments. Also interested in growing varieties that can be trellised.
Tomatoes – As many determinate varieties as possible, and none that stay yellow or green when ripe. They’re too difficult to know when they’re ready to be picked.
A common theme is that we want as many compact plants as possible. While we have plenty of room in our garden, my preference is to not have vines all over the place. Last year, we had vines intersecting each other, which made it difficult to know where each vine originated. Plus, with compact plants, we can actually plant more things.
Seeds vs. Starts
Last year, I was all about starting as many varieties from seeds as possible. We did end up buying some vegetable starts from our local greenhouse, including tomatoes, peppers, eggplant, tomatillos, and ground cherries. This year, we’re going to be really intentional about what vegetables and varieties we buy seeds for and which ones we get starts for.
For example, if it’s a new vegetable we haven’t successfully grown before but want to try, we’ll likely buy starts for it. Broccoli, cauliflower, and ground cherries fall into this category. We want to get really good at growing a vegetable before trying to start it from seed, removing one potential point of failure. There are also some vegetables, like eggplant, that we bought starts for and had a lot of success. We simply want to replicate that success in 2026. We’ll also likely supplement our tomatoes with starts to increase the likelihood that we have plenty of tomatoes for sauce.
Basically, it boils down to this: if it’s a vegetable we have experience with, we’ll grow it from seed. If it’s one we’re inexperienced with, we’ll buy a start.
Final Thoughts
If there’s going to be a theme for this year’s garden, it’s “improvement and refinement.” We want to get really good at growing the vegetables we are already good at. We’re placing an emphasis on growing fewer varieties and vegetables but having a high success rate with the ones we do grow. Last year, we were so excited to have an in-ground garden that we picked far too many varieties, and toward the end of the season, it became a bit overwhelming. This year, we’ll have fewer varieties but grow more of each variety and have an abundant harvest.
Now that we’re in the new year, the excitement is building for the upcoming garden. All but one of our seed catalogs have arrived, and we’re starting to narrow down what seeds we’re going to order. It’s wild to think that we’re only a few months away from getting back into the dirt.
I hate to say it, but I forgot to start this week’s update until Sunday night. Typically, I will start these on Saturday evening, but as I sit here watching the Boston Red Sox lead the St. Louis Cardinals 18-3 on Sunday Night Baseball, I am much later than usual. So, I apologize if this update ends up being shorter than normal, but I was unwilling to push the update back a day or two or not publish one at all this week. To those who read my gardening content: I can’t thank you enough. Writing here has been a relaxing break from work and helps remind me of why I like writing. I don’t want to postpone it any longer: Here’s this week’s update.
Much Germination
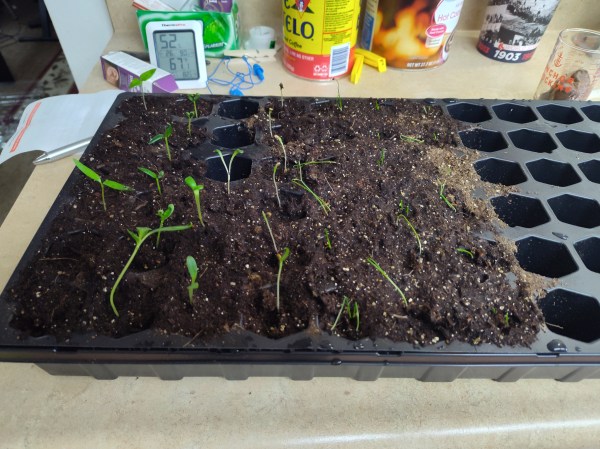
In last week’s update, I discussed the difficulties we were experiencing with getting seeds to successfully germinate. This was largely concentrated to our peppers, where we only had two of our 12 pepper cells germinate. I’m proud to report that after we altered the watering process and re-sowed the seeds, we’ve had much better germination. All six of our bell pepper cells, two of the Scotch Bonnet cells, and one of the Hungarian wax cells have sprouted. The bell pepper seeds have been successful enough that earlier today, we thinned the cells so that only one plant per cell will grow.
Germinated peppers, dahlias, eggplants, and onions
We also had successful germination with all three dahlia cells, all six eggplant cells, and all 21 bunching onion cells. We feel so blessed that we’ve been able to turn the poor germination rate around and have successfully started many other seeds.
We also started some new seeds earlier today:
3 cantaloupe cells
3 ground cherry cells
3 tomatillo cells
6 broccoli cells
And all of our tomato seeds (6 principe borghese, 3 Queen Aliquippa, 3 indigo pear, 3 blue beauty, 3 yellow pear, 3 black krim, and 3 mushroom basket)
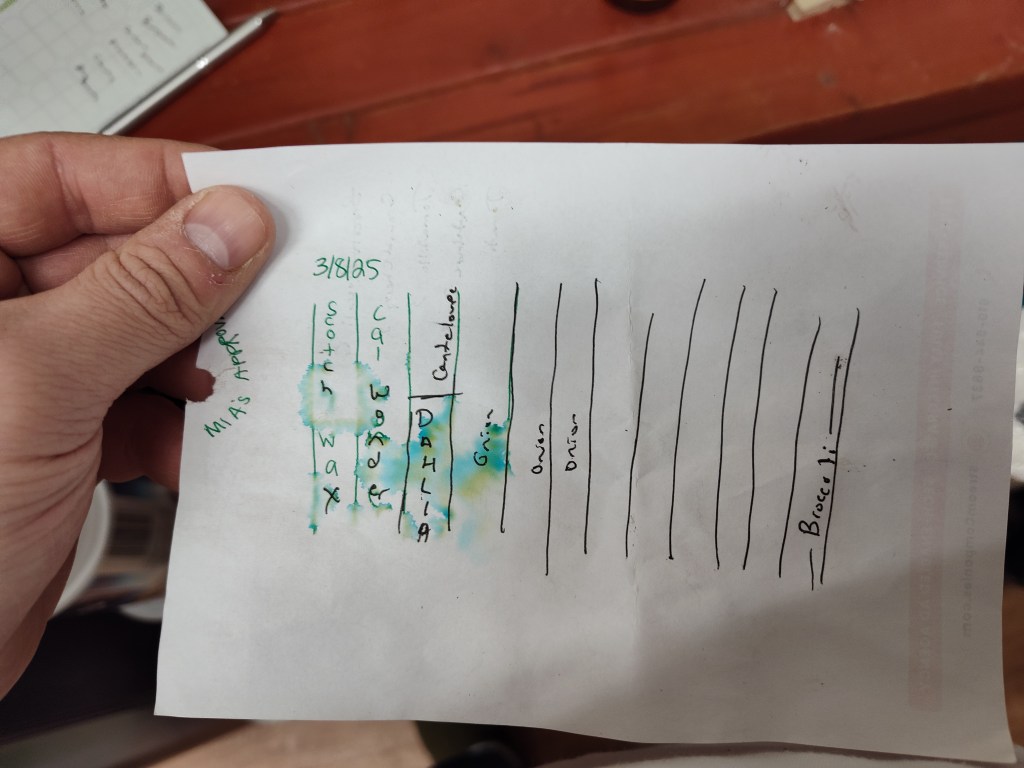
We’ve been very careful to track what we’re planting in each cell. We use a piece of paper with a hand-drawn chart on it for the one tray, and our other tray came with a cardboard chart. I’m also tracking these on a spreadsheet in case the physical copies get destroy or the ink smudges.
Seed Tray ChartSeed Tray Chart
Cleaning Out Our Garden Tote
This weekend, we spent some time in our garage (also my woodworking shop) cleaning it out. I recently finished a guitar stand project, and when I’m wrapping up a project, I tend to make a huge mess and not worry about cleaning up as I go. That leads to a lot of sawdust, tools, and scraps being spewed everywhere. I needed to clean everything up from that project and reorganize everything so that the spring and summer things are at the front, with the winter items moved to the back. In doing so, I uncovered our tote of gardening supplies, which was pretty cool.
I didn’t forget that we have this tote, but I did forget some of the stuff in it. There were a lot of supplies that we used when we had our container garden in 2022, including soil amendments, organic fertilizers, and hand tools. Some things weren’t worth using anymore, such as the open bags of seed-starting mix and peat moss, but the amendments were still good. I actually repurposed the peat moss and starting mix by pouring it on our garden beds. We’re also able to use the larger seed pots by transferring our pepper plants into them when the time is right. It was fun remembering everything we had bought for that garden three years ago. It helped me to realize how far we’ve come in three short years and how thankful I am to be able to garden again, especially with some of the same items.
So Much Rain…
In last week’s update, I said that a goal for the week was to get gypsum into garden beds 3 and 4 and do the final tilling. I was able to do that on Monday before a large weather system entered the area and brought a lot of rain. I estimate that we received somewhere between 2 and 2.5 inches total from Monday afternoon through Saturday. It made our garden beds nice and muddy, so we can see that we’re still having some drainage problems, but it’s a work in progress. Also, it’s been a very wet spring that has arrived on the back of a snowy winter, so the ground was already pretty wet. As the ground dries out this week, the goal is to get back into the garden and till the final two beds and perhaps even get some seeds in the ground. We also need to get the parts we need for the rain barrel, which will help with some of the moisture problems.
Up Next
The weather forecast is much better this week, so hopefully, the garden beds and yard can finally dry out. If that happens, we’ll likely try to start beds 5 and 6. If that happens, it’ll be great, but if not, that’s okay too. We’re in a great place at this time and need to be patient. In the meantime, we’re going to be screening in our back porch in a few weeks and need to get it prepped by taking measurements, cleaning everything, and making sure we have our supplies list figured out so that we can get everything we need. When we pick up the supplies for that project, we’re also going to get some materials to build some planter boxes and a trellis or two.
Picking out a tiller for your garden is a big deal, and there are many factors to consider to ensure you’re getting one that best fits your needs, including size, power method, and price. We recently bought one for our garden and want to share our experiences with picking out the perfect model. We only plan to use ours when initially starting garden beds or turning over soil in flower beds. After that, we’re going to be as no-till as possible, so we didn’t want to pay a bunch of money for something that will only be lightly used after the first year. With that being said, what all went into our decision?
Gas Over Electric
We initially thought that we were going to buy an electric tiller. They’re cost-effective ($150-$200 range), and the reviews for many of them are strong, with people even saying they’ve used them to break ground on gardens. Electric tools have come a long way from the mediocre weed eaters and mowers of the 1990s. Modern tools are durable, powerful, and often do 80% of the work that gas models do. We also liked that an electric tiller would be quiet. So, why didn’t we buy an electric one?
The cost of an electric tiller may be cheap, but 100-foot 10-gauge extension cords are not, which is the length we need for our yard. That would have added at least $100 to the price of the tiller, bringing the total cost closer to that of a gas model. We also started to realize how big of an area we will be tilling and were less sure that an electric model could endure that level of abuse. At that point, we started to consider gas models.
In our price range of $200-300, we knew we’d be looking at a small gas model, perhaps one with a narrower working width than an electric tiller. But because it is gas-powered rather than electric, we had more confidence in its ability to run nearly nonstop for hours without issue. Additionally, if there is an issue with the engine, I can likely fix it. The final item that pushed us over the edge is the cost of electricity vs. gasoline. Our town has pretty affordable electricity, but running an electric power tool all-out for many hours would raise our electric bill. Meanwhile, gas is in the $3.50 range here, and most of the tillers we were considering had fuel capacities of less than 1/2 gallon, so for a little over $3, we could run it nearly all day.
As an aside, we never considered a battery-powered one. We have a few outdoor tools that are battery-powered, including a chainsaw and a lawn mower. Both work great, but I’m aware of the battery life on those and how long they take to charge when completely drained. Being hindered by that was not something we were interested in.
2-Cycle vs 4-Cycle Gas Tiller
We next needed to decide between a 2-cycle (or stroke) and a 4-cycle gas tiller. Both are great and have their advantages and disadvantages. Two-cycle engines are more powerful for their size and have a simpler design. They last a long time and are easy to maintain and work on. However, they are loud, use more fuel, and require pre-mixed gas and oil, which is an extra step.
Four-cycle engines, however, are quieter (think lawn mower vs. chainsaw), easier to operate, and more fuel-efficient. I’m someone who loves the sound of chainsaws every now and then, and I grew up around 2-stroke dirt bikes and 4-wheelers, so I get the attraction to the sound. But we live in town and don’t want to anger our neighbors. Another benefit to the 4-cycle engine is that it is slightly heavier than its 2-cycle cousin, which should, in theory, make tilling the soil a bit easier.
Which Models Did We Look At?
We looked at quite a few tillers, all in the $200-$300 range. I’ll break them down by manufacturer and discuss the individual models.
Earthquake
MC33 10″ 33cc 2-cycle – The same working width as the two that follow but only has a 33cc 2-cycle engine. This is designed for light-duty work like weeding and only weighs 33 pounds. This was available from Amazon for $199 and Lowes for $239.
MC43 10″ 43cc 2-cycle – A 10″ working width with adjustable tines and a powerful 2-cycle engine and weighing 38 pounds. It was available at two stores: Tractor Supply and Amazon, both for $249.
MC440 10″ 40cc 4-cycle – Like the above model, this one has a 10″ working width with adjustable tines but has a 4-cycle engine. This model weighs 37 pounds and is the one we purchased. It was available at Tractor Supply for $299, Family Farm & Home for $299 (on sale for $259), and Amazon for $265. As you know, we bought ours from Amazon.
Badger 21″ 160cc 4-cycle – This one is substantially larger than the other models we considered. It’s a true tiller while the others are technically cultivators. It has a 21″ working width and weighs a whopping 107 pounds! It would have been heavy to move and difficult to lift but would have required no effort to force the tines into the soil. It was only available at Menards for $449, but it was on sale at the time for $299.
Champion
12″ 43cc 2-cycle – Similar to the Earthquake MC43, this model has a powerful 43cc 2-cycle engine but a wider working width than most at 12″. It’s light at 33 pounds and is designed to be operated in small spaces. This was available from Tractor Supply for $297, Home Depot for $299, and Amazon for $299.
Troy-Bilt
TB225 9″ 25cc 2-cycle – This is a very light (23 pounds) model that is designed for weeding existing garden beds or turning the soil over before planting. It was available at Tractor Supply for $230.
TBC304 12″ 30cc 4-cycle – Much more substantial than the 2-cycle model, this machine weighs 38 pounds and is built for a bit heavier work. It was available from Home Depot for $279.
Toro
10″ 43cc 2-cycle – I’m 99 percent sure this is the same model as the Earthquake MC43. They look nearly identical in engine and frame design with the only difference between the manufacturer stickers. This was available at Family Farm & Home for $229 (on sale for $199), at Lowes for $248, and at Tractor Supply for $256.
Predator
9″ 43cc 2-cycle – This is Harbor Freight’s in-house brand of outdoor power equipment but is built similarly to the Toro model above. It weighs 32 pounds and has a narrower working width than some of the other models on this list. It’s only available at Harbor Freight and is $220, so cheaper than the Toro. As an aside, a lot of people are wary of Harbor Freight’s tools, but I’ve generally had positive experiences with them. So far, we have a battery-powered chainsaw and a host of electric woodworking tools and haven’t had any issues with them. If this had a 4-cycle engine instead of a 2-cycle one, we probably would have bought it.
Why We Picked the Earthquake MC440
In the end, we picked the Earthquake MC440 10″ 40cc 4-cycle cultivator from Amazon, as mentioned above. We landed on this model because it met all the criteria we had and was easy to purchase. We were certain we wanted a 4-cycle engine over a 2-cycle for noise and ease of use. We also wanted one with adjustable tines that could go as wide as possible. We later learned about models with wheels that have to be removed before tilling and didn’t want one of those. Finally, we were looking for the heaviest one we could find in our price range. The more a cultivator weighs, the less force you have to apply to keep the tines in the ground.
Recognizing that we were probably going to push it to its upper limits, we wanted a model that would be durable and reliable. Granted, because these aren’t tools you can “test drive,” you have to rely on reviews and how they appear to be assembled. The Earthquake models all had great reviews, especially the MC440. There were many reviews where the person said they used it to dig garden beds into lawns, which, to be fair, isn’t what it’s designed to do.
We’ve now had our cultivator/tiller for close to a month and have used it to establish five garden beds with two more in the works. To say it’s met our expectations would be an understatement. In the next week or so, I will write a full review of the machine. Is there a cultivator or tiller that you use for your garden? I’d love to hear in the comments. Happy Gardening!
Nearly everyone you talk to expresses a desire to shop locally and support small businesses rather than buying things from Amazon and Wal-Mart. Magz and I are no different. We enjoy buying things in person and from a store in our town and try to use Amazon Prime if we strike out elsewhere. An issue we’ve been encountering is that our local stores rarely have what we need in stock, and nowhere has this been more of a reality than with garden supplies.
Our Local Stores
We live in a small town of about 8,000 people. The population has stayed almost the same since 1990. We are surrounded by towns with even smaller populations – 3,500, 800, 1,900, and 2,000. To get to a town with more than 15,000 people, you need to drive about 30 minutes. Our town isn’t void of stores, though. We have an Ace Hardware, a Tractor Supply, an Agway Feed Store, and a small Wal-Mart that doesn’t have a grocery section. Those stores all carry some gardening supplies, but because we are in the center of many small towns, as well as three colleges within a 10-mile radius, these stores have to cater to a large area and a wide array of shoppers.
Photo by Tem Rysh on Unsplash
Ace Hardware has a small selection of seed-starting items, a great selection of hand tools, and a small offering of engine-driven equipment, with most of the in-stock items being fairly pricey STIHL products. Tractor Supply has more power tools, including affordable options, but our local store wasn’t going to have any in stock until April. We could have ordered the tiller we bought at a higher price and shipped it to our local store for free or paid to have it shipped to our house. Either way, it was going to be more expensive than what we got from Amazon.
Agway has a lot of gardening items but few tools. It’s a great store for buying top soil and mulch in bulk, soil implements like diatomaceous earth and fertilizers, and seed-starting cells, but our local store doesn’t carry any tools. Finally, we get to Wal-Mart. We generally don’t like our Wal-Mart. Because it’s a small store without a grocery section, it is limited in the items it carries, and to maximize the number of aisles, there is a less-than-average amount of walkway space between aisles. They have a gardening section with some seed-starting stuff, but ours doesn’t carry cultivators or tillers nor does it keep soil additives in stock. You can buy everything online through Wal-Mart, but that’s no better than purchasing from Amazon.
Moving outside of our town, you need to drive about 30 minutes to shop at a Lowe’s or Home Depot. When we were at Lowe’s a couple of weeks ago, we were pleased with the gardening section they had but didn’t see any gas-powered tillers. We also recently learned that some Tractor Supply stores have a garden center. The ones closest to us don’t have garden centers, but there are a few within 45 minutes that do. In the future, we’ll check one out and see how much more it carries compared to our local store. There’s another feed store about 20 minutes north of us that we want to visit this year to see if they have a better selection than our local Agway.
What to Do When You Want to Shop Local But Can’t
This was a dilemma we found ourselves in. Since we started planning this year’s garden, we’ve looked for local options when making purchases. We did end up buying our starting tray, starting mix, and gloves at our closest Lowe’s. That wasn’t in our town, but it was in person and regional. The frustration has come when looking for larger tools, such as a tiller or cultivator. The tiller we bought, an Earthquake model with a 43 cc, 4-cycle engine, is sold at a lot of stores, including Tractor Supply, Ace Hardware, and Wal-Mart, but none of the stores in our town had them in stock. Menards actually had the best sale, but the closest store is about 50 minutes away, and we were unsure if we’d be able to get there before the sale expired. The only other place we looked into was Family Farm & Home, with the closest location about 45 minutes away. We love the drive, but there was no way to check the store’s stock without doing so in person, and driving that far only to learn it wasn’t in stock seemed like a bad gamble.
It’s a very frustrating spot to be in: wanting to shop locally and in person but being unable to. You don’t want to give in to online shopping for everything, even when it’s cheaper and you’re already paying for an Amazon Prime membership, but we have found ourselves with no alternatives recently. Sure, we could have paid $100 to have a tiller shipped to us from another store or waited for it to be shipped to the local store. We also could have driven to Menards or Family Farm & Home, but at that point, we’re not shopping locally. Family Farm & Home is in a different county, while Menards is in another state. In all these situations, we’d either be paying more money, waiting longer, or taking a chance on it not being in stock. Amazon was simply the best option, and I think that’s okay.
We should be allowed to give ourselves a pass when Amazon is the best option. We also shouldn’t be forced to feel bad because we don’t want to overspend, drive long distances, or buy an inferior product. I think we should look for a local option first, but if the stores in your town won’t carry what you need, it’s not your fault. We ended up buying the tiller that best fits our needs and budget, and we’re happy with it, which is the most important thing.
I try not to complain about things in my writing and won’t make a habit of this, but I’ve been processing these thoughts for quite a while now, and it’s not just with gardening supplies. Do you struggle with the pressure of buying locally or the guilt of shopping online? If so, I hope you can get some reprieve from it and feel confident when you make the best decision for your needs. Happy gardening!
Throughout this year, I am going to publish a weekly blog post with updates from our garden. It will include progress pictures and anything we learned over the past week and will serve as a general update since a lot can change in a week’s time when gardening. I wanted to wait until we started our first seeds, and guess what? We did!
Peppers Have Been Started
I don’t believe that each year’s garden has started until your hands first touch soil in the spring. Buying seeds and purchasing supplies is wonderful, but it’s all still part of the planning process. Getting your hands dirty for the first time moves everything from a concept to a reality. And that’s the step we took Saturday evening.
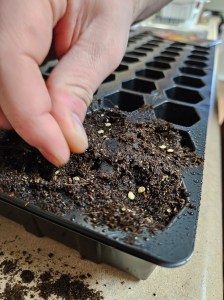
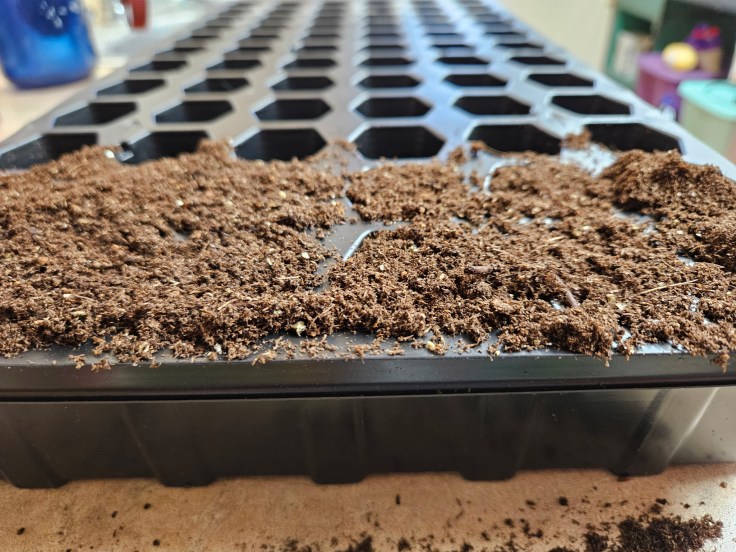
Seed Starting
Earlier in the day on Saturday, we made a trip to the nearest Lowes to pick up a downspout extension and grabbed a couple of bags of seed starting mix, another seed starting tray and flat of cells, and gardening gloves. Brief side story: Neither of us could remember if we needed extra seed starting cells. I would have bet a dollar that we had enough to get us started for the year and only bought the new cells as extra. Boy, am I glad we got them. When we came home, I checked our gardening tote, and the starting tray that I thought had cells in it was empty. It’s funny how taking a two-year absence from gardening and moving can make you forget stuff.
That evening, we unpacked our heat mats and glow light, set up the table we’re using, and ran an extension cord from the nearest outlet. First up on our seed-starting schedule is peppers. (Technically, our mustard greens should already be in the ground, but because they will be directly sown, we have to wait until the ground is tilled). We found our 3 varieties of peppers (California Wonder bells, Scotch Bonnets, and Hungarian Waxes, which I discussed in this post), grabbed our seed-starting mix, and filled a spray bottle with water.
Starting pepper seeds
We decided to grow 3 cells each of Scott Bonnets and Hungarian Wax peppers and 6 cells of the California Wonders. With 2 seeds in each cell, we’re confident we’ll get strong seedlings to transplant later in the spring. Determining how many cells of each variety to start is always a fun process. You want enough to guarantee good germination but not so many that you feel overwhelmed if all of them succeed. Hot peppers are particularly difficult for us because we don’t eat a lot of them and will mostly use the Scotch Bonnets for jerk marinade. We went with 3 cells with the goal of transplanting 2 of them, and if all 3 succeed, we’ll give the third plant away. For the California Wonder bell peppers, we’ll probably transplant as many as we can.
What’s Next?
Next week, we will be starting our eggplant seeds. I’ve been using the seed starting spreadsheet that I created to organize everything and started another page to track the dates and expected germination times for each seed. That will allow us to know if a seed is taking longer than expected to germinate.
We’re also going to be buying our rototiller sometime over the next week. We’re big fans of no-till gardening, but our yard is currently all grass, so we have to break ground. We were originally going to buy an electric tiller since they are cheaper than gas models and we won’t need to use it much after the first year. However, after realizing how expensive 100-foot heavy-gauge extension cords are, we have pivoted to a gas model. We’re still narrowing down the exact one, but I’ll write a blog post about it and how we reached that decision when we get it. I’ll also write a follow-up post reviewing the tiller once we use it. Spring weather is finally starting to arrive after a harsh winter, and we couldn’t be more excited.
Confession time: I love spreadsheets. Dating back to middle school when I first took a Microsoft Excel class, I’ve enjoyed using spreadsheets to organize things, including addresses, finances, birthdays, and more. I love being organized but don’t always take the time to be organized. Thus, I’m very thankful that spreadsheets exist because they help with sorting, filtering, and searching through information much faster than we can do ourselves.
How does this apply to our garden? When we started looking through catalogs and initialing the seeds each of us wanted to grow, I quickly realized that we needed to figure out a way to keep track of everything. In a previous post, I mentioned that we looked at over 5,800 seeds and probably initialed over 1,000. Because of that, it’s really easy to feel overwhelmed by an abundance of choices. I’d like to share the system I came up with to help you if you too have felt overwhelmed by garden planning.
Initial Marking of Seeds
I’ll keep this section brief because I’ve touched on it in other posts, but our planning process started with both of us flipping through the catalogs and marking the seeds we were interested in. We went through all sections in every catalog and marked any seeds we even had the slightest bit of interest in, flowers included. Some of the choices weren’t all that realistic because they don’t grow well in our area or are above our gardening ability at this time, but we didn’t want to miss anything.
A helpful note: Use a pen rather than a pencil and choose one with an ink color that will stand out from the text and page color of the catalog. I made the mistake of using black ink on the Fedco catalog, which is all black and white, and it was easy to overlook some of our marks. I also recommend giving each person a different color of pen. That will make tracking everything even easier.
From Catalog to Notebook
The next step in the process was figuring out what seeds we initialed the most. A lot of the seeds were found in multiple catalogs, so it was important to know which ones we marked more than once, which would indicate the varieties we were most interested in. Eventually, the goal was to track this information in a spreadsheet, but I started with a notebook so that I didn’t have my laptop and all the catalogs in front of me at one time.
I devoted a page in the notebook to each vegetable and went in alphabetical order, beginning with beans and ending with tomatoes. I combined some together on one page to make it easier:
Watermelons, canteloupe, muskmelons, and honeydew
Radishes, turnips, and parsnips
Cabbages, mustards, Asian greens, spinach, and bunching onions
From there, I looked at all the varieties of one vegetable in each catalog, taking note of the ones we initialed. I wrote down the seed name and what catalog we found it in, using an abbreviation for each company. Using beans as an example, it looked something like this:
Blue Lake 274 – RS (Rohrer), PG (Pinetree Gardens), NE (NE Seed), BC (Baker Creek)
Provider – FS (Fedco), HMS (High Mowing Seeds), PG
Here is the corn page from the notebook I kept. My handwriting isn’t the best, but as you can see, all the varieties are written on the left and the seed companies to the right.
I did this for every vegetable/fruit. And by tracking how many catalogs we found the seed in, I could see how interested we were in that seed. So, if a seed was marked in 7 of the 10 catalogs we looked at, it indicated we were more interested in that seed than one we only marked in 3 of the 10 catalogs. That didn’t mean we always purchased the most popular seeds, though. Some seeds were only found in 1 or 2 catalogs, but we were so interested in them that we were going to buy them anyway. Finally, being able to look at a notebook page and see trends across the most popular seeds (such as picking a lot of bush beans, pickling cucumbers, or paste tomatoes) would give us an idea of what we were most interested in even if it wasn’t always the same specific seed.
After I wrapped up tracking everything in the notebook, I moved everything to a spreadsheet.
Building the Spreadsheet
Figuring out all the columns to include in the spreadsheet was the most difficult part of this process. I started by determining the goals of the spreadsheet. I knew that I wanted to be able to visually see which seeds we picked the most from the catalogs, compare the price of the same seed in different catalogs, and have links to quickly access the seeds’ pages on the companies’ sites. With those goals in mind, I set out to create columns that would include the most important information. I created columns for the following:
Seed Name
Variety/Type – This column wasn’t used for all vegetables. I used it for beans (bush/drying, long beans, edamame), corn (flint/dent, popcorn, sweet, ornamental), cucumbers (pickling, slicing, specialty), husk tomatoes (ground cherries, tomatillos), other greens (cabbage, onion, mustard, spinach), melons (cantaloupe, watermelon, honeydew, specialty), peas (snap, shelling, snow), peppers (sweet, hot), potatoes (early, mid, late, fingerling), squash (winter, eggplant, specialty, kabocha, yellow, zucchini), and tomatoes (beefsteak, cherry, paste, pear, plum, slicing)
Organic? – This was a drop-down with “Yes” and “No”
Seed Company – This also was a drop-down with an option for each of the seed companies we were considering.
Page Number – The number in the catalog where the seed is found. The goal here was to make it easy to find the seeds again.
URL – The link to the seed’s page on each site.
Price – How much does the seed packet cost?
Quantity – How many seeds do you get in a packet?
Special Notes – This was the place to add a note if the seed is an heirloom, if it’s sold out or is back-ordered, or is a pollinator in the case of flowers.
This is the Husk Tomatoes page of the seed information spreadsheet. This is one of the smaller pages, so everything can be viewed.
After that, I started filling everything in. If figuring out what to include in the spreadsheet was the most difficult part of the process, filling it out was the most time-consuming. I tried to get through one vegetable per day, but the whole process took roughly 10 days. Once I was done, though, I was able to quickly access any seed, either its webpage or in the catalog, and I could sort by seed name, variety or type of vegetable/fruit, and price, among others. Being able to do that when it was time to make final decisions was priceless.
Lessons Learned/What Did & Didn’t Work?
There were a few things that ended up not being ideal even though there was no way to plan for it or nothing that could be done about it. One was receiving two seed catalogs in the mail after I started filling out the spreadsheet. This meant that the drop-down menus were missing the two catalogs, and I didn’t want to change the drop-down rules and potentially mess up the entire column. Instead, I manually entered the seed company’s name, overriding the drop-down menu entirely.
The second not-so-ideal thing is how big the spreadsheets got. Before starting, my plan was to use the drop-down menu for the seed companies and select all the companies where a seed was available. That wouldn’t have been an issue. The issue would have been adding the URL, page number, price, and quantity for every seed since they all would have had their own line. So, if we found the seed in 8 catalogs, each cell would have been 8 rows tall. It also would have been difficult to compare across the columns.
Now on to some things that I didn’t think about including or messed up and will fix for next year’s spreadsheet. The biggest oversight on my part was not including the price per seed when I originally built the spreadsheet. I only included the price of the packet and the seed quantity, not realizing that it’s more important to know the price per seed since there were large quantity differences. For example, consider the Ping Tung eggplant. We found it at 3 companies. NE Seed sold 750 seeds for $8.95, MI Gardener sold 30 seeds for $2.00, and Baker Creek sold 25 seeds for $3.00. Given the difference in price and seed quantity, it was hard to figure out what was the most cost-effective. I eventually used a blank column to the right of everything to calculate the price-per-seed cost. In this case, NE Seed was the cheapest at $.01/seed. MI Gardener was $.07/seed, while Baker Creek was $.12. Funny enough, we actually bought the seeds from Baker Creek because we weren’t buying anything else from MI Gardener and we didn’t need 750 eggplant seeds from NE Seed.
Similarly, I wish I had created distinct columns with yes/no drop-down menus for heirloom, if flowers are pollinators, how much sun a flower requires, and a separate special notes column where I could write if a seed was out of stock. In general, it was a great first edition of the spreadsheet, but there is always room for improvement.
Bonus: Tracking Growing Information
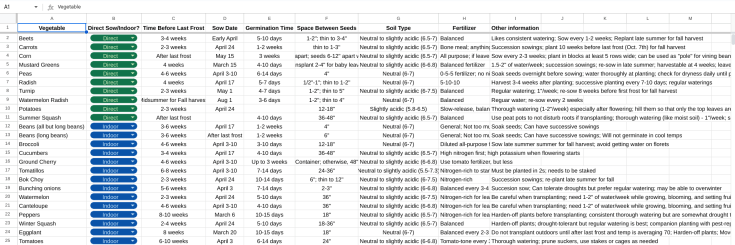
After we ordered our seeds, I created two more spreadsheets. The first is a general growing guide with information that serves as a guide that we can quickly access, sort, and search. Initially, it was just to track the start dates of everything so we could sort and know the order of when each seed needs to be sowed. It expanded to also include columns for germination time, distance between seeds, soil PH, fertilizer needs, watering information, and any other helpful notes. I want to keep much of this content in a field notebook that we can carry out to the garden with us, but this is helpful because it can all be viewed on one screen.
Seed starting information currently sorted by direct vs. indirect start.
The second spreadsheet I created was a companion growing guide. Companion planting is when you grow plants close to each other that benefit one another. The plants can be all vegetables or a mixture of vegetables and herbs or flowers. The idea behind companion planting is that some plants are natural pest or animal deterrents that reduce the need for pesticides or barriers and keep said pests or animals away from plants that normally attract them. Companion planting also works to put certain nutrients (such as nitrogen) back into the soil so that heavy feeders (like corn) will have quality soil throughout the growing season. This can reduce the need to fertilize as often or as much. In the future, I will likely write a standalone post about companion planting, so I don’t want to go into too much detail here, but it’s something Magz and I are interested in. So, I created a spreadsheet to track what plants should be grown in close proximity and which ones should be kept far apart.
A small glimpse at the companion planting guide.
How Do You Plan Your Garden?
I probably overthought organizing and planning our garden, but spreadsheets greatly helped me keep track of everything. Do you use any tools to organize and plan your garden? If so, what is your go-to method? I’d love to hear your thoughts, and if you found this information helpful, please let me know.
When my husband (Kyle) and I bought this house, we were looking for a place that would provide enough room to have a garden. We wanted it to be flat, have good sun, a little shade, and offer room to build the garden we have been planning for years. In our first apartment, we grew shamrocks and a tomato plant with varying results.
With each new place we moved the garden grew bigger. At our place in Meadville, on a steep hill of a plot of land, we bought a Green Stalk system to maximize our vertical potential. In the house before this one, we created a garden of containers utilizing totes we had from moving and five-gallon buckets. It was better but not the best it could be.
Container garden from 2022.
We craved something less plastic, more grounded. And so with 2025 spreading out before us, we have been planning a new project – an in-ground garden full of plants selected carefully, but Kyle can share more details about that in his own words.
I’m excited to read his thoughts here as a contributing writer because his passion for gardening has taught me so much in our 11 years together. As I mentioned in my very first post, this blog is a little of this and a little of that. I’m excited to share more about life beyond the yarn and the thread, it should be inspiring scenery for sketching! Which I have not done since we moved but I am craving to do once again. Here’s a snapshot of what we grew in our container garden several years ago. I hope you will join us on this adventure. 🙂