Part Two: Sewing Overalls Step by Step

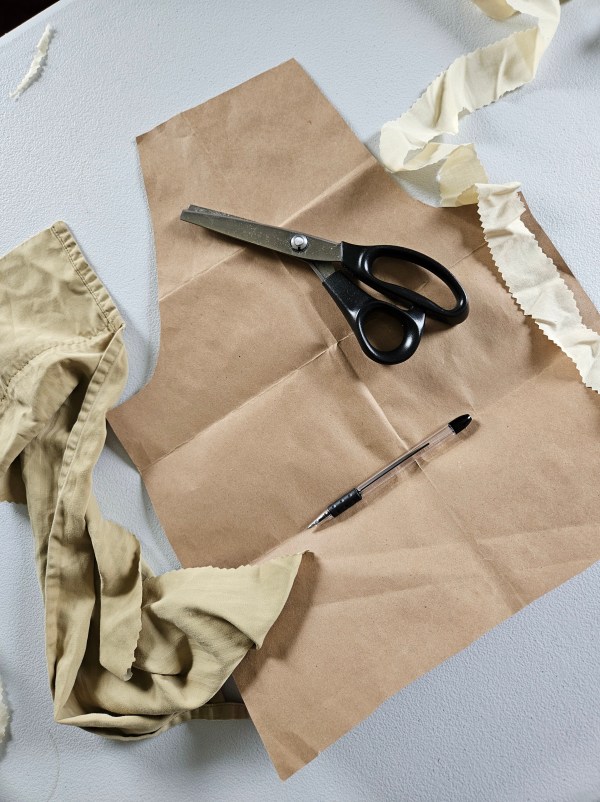
I’ve been looking at how to make a custom overalls pattern, based on drafting techniques, which I began with this post: Drafting Shortalls from Scratch. But how to construct them? Well, that’s what I plan to explore today! To do this, yesterday, I cut out another pair of overalls, this time for the fall-winter-spring season, to retrace my steps.

Step One

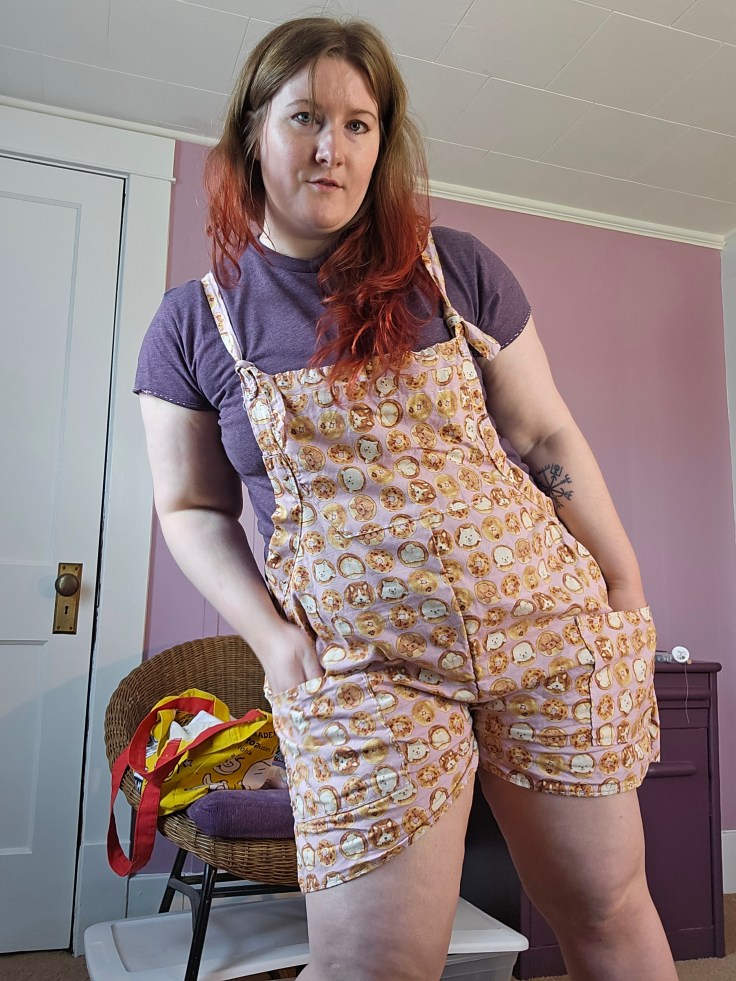
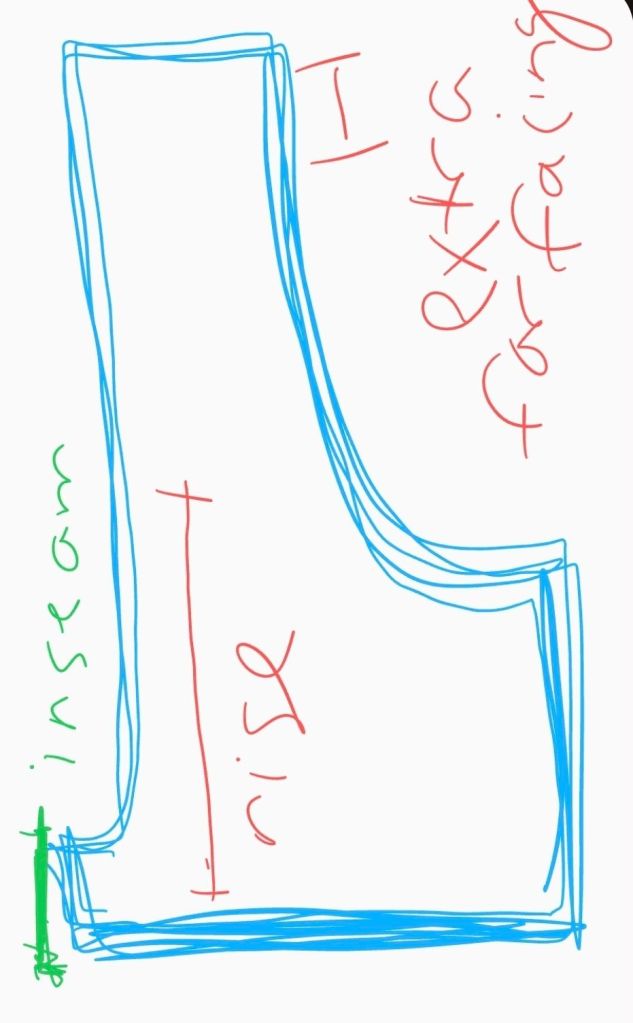
With your pieces cut out according to your measurements, you should have four leg pieces – two front and two back. The next two bib pieces should be cut out, with the back piece cut a bit differently to accommodate the straps. This is to anchor the straps at the middle of your shoulders to keep the overalls securely on your frame.

Step Two

I like to begin with the pants or shorts portion of an overall project, because they are foundational to the silhouette. I like to pin the leg pieces together to try on before sewing. Remember to leave several inches of the outer thigh seams pinned for the flies and buttons.

Once you know that the pieces will fit, with seam allowance accounted for, I begin sewing the leg pieces together, leaving out the crotch seam and the top part of the inseam, to attach the two pieces as one pair of pants. After these have been sewn together and I have tried them on, I will move on to the bib.

Step Three

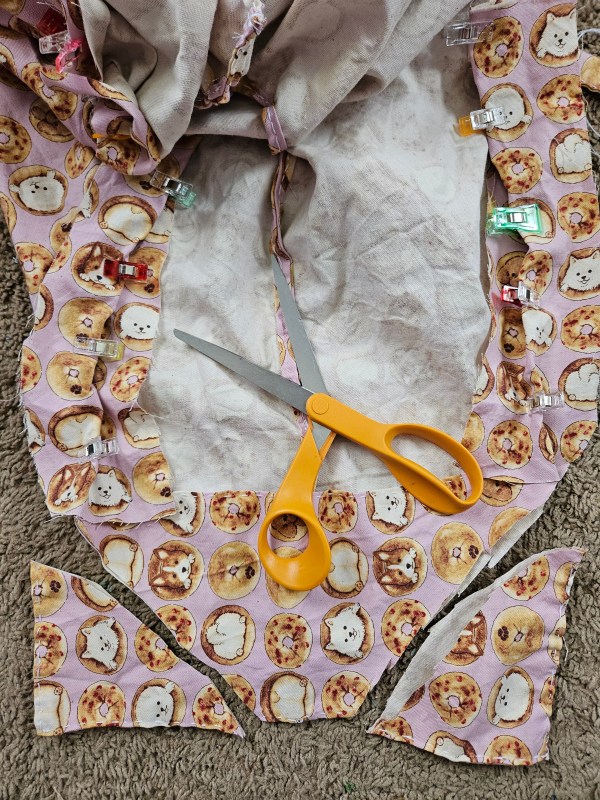
For less bulk, I like to cut the seams of the crotch portion and leg seams that will join together, with pinking shears, to make my hems less thick. This lets the sewing machine, or your hand sewing needle, pass through the seam with ease, and is more comfortable to wear.

How do you join pants? Well, you leave the top of the inseam open so that those two inseams will line up together, making the two legs join at the top where the pelvis is. Remember this is a bifurcated garment, so you want your final shape to be two tubes, joined to make one tube at the top. I’ve messed this up several times; it’s okay even if you sew it wrong the first thousand times. That is what mockups and seam rippers are for!

Step Four

For the bib of these overalls pictured above, they were cut into short pieces, so I just had to join these pieces together. I added a facing to the inside of the bibs, which is just a piece of the fabric’s right side facing inside, so that the bibs are finished cleaner around the neckline.

I inserted the straps between the facing and the bib for a clean and secure stitch. The straps were finished with a loop on either side of the front bib to tie around, instead of the metal fastenings. I was inspired by Lucy and Yak Dungarees.

Step Five

The final touches are the bias tape, the side buttons, and the five pockets. I find the bias tape the most mundane thing; therefore, I choose to do that next, which is a 1-2″ ribbon of the fabric used to finish the raw edges still exposed on the sides.

Step Six

Next, I created the flies on either side by folding over the fabric to make the button placket and button hole placket. This was planned out when I cut out the overalls. After making the button holes and finishing them with either the machine or by hand, I mark out on the other side where the holes overlap to mark for buttons.

Step Seven

Finally, I sew the pockets. I chose a large, half-rounded bib pocket on the front, two smaller rectangle pockets on the backside, and medium side pockets sewn across the hip. Next? Enjoy your creation and feel a sense of accomplishment. You did something hard, and probably felt lost at times, but you persevered to learn a new skill. It’s not cringeworthy to try. So go for it! ❤

Drafting Shortalls from Scratch

Did you know, that through simple measurements,  reference photos, and a few tools, you can draft your own clothes? Not just a t-shirt or a circle skirt, but big projects!

That’s how I have made some of my most ambitious projects, no patterns required!

What is Pattern Drafting?

A pattern can be easily made with a tape measure, pencil, and the key places to measure. For my overalls, I was most concerned with the width of the bib, the length of the rise from the top of the bib to the crotch curve, the width of the hip from the center of your body to the end of your hip. You can also measure the circumference of your hips but I think having separate measurments for the front of the pants compared to the back of the pants. The back is usually wider.

For the overalls, I worked in four pieces. Front left, front right, back right, and back left. To do this I marked out the front left and front right on the fabric, accounting for the crotch seam which is part of the leg. I added a 2-3 inches to the width of the hip measurement of each of the four pieces to make the curve with my french curve.

When planning pants, keep in mind that you don’t need as much inseam as you think to make shorts. What you will need is a long rise because you can always cut more, so be cautious and double check the measurments of your rise.

Now for the bib, the top portion of the overalls, I plotted the width of the bib above the pants portion and with pencil I carefully drew a tapered curve upward. I cut this extra long to have excess fabric to fold over to make the facing. This fabric is like a lining for the top of the bib, the part you are most likely to see.

Always use pencil or a tailors chalk and take your time. Using a mock up fabric is a great idea to get the cut right. After repeating this for both front pieces, remember to adjust the width of the hip for the seat of your pants, all while remembering to account for the french curve line of the inseam.

After cutting all for pieces you will need to set aside fabric for pockets, I added 5 to mine. A bib pocket, two side-front pockets, and two back pockets. You will need fabric for the straps, measure accordingly based on the height of the bib, over your shoulder and to the back bib, remembering to add more length to tie.

Next is scrap scavenging! You will need small pieces for the loops to tie the straps around on the front bib. This will call for two loops. You will also need bias tape sized pieces to finish the edges of the overalls on the bib. Finally, save some fabric for the button flies on either side of the overall legs to help you get in and out of the garment.

It’s a lot of information to sift through but I hope this small tutorial will help you sew overalls if you wish with free instructions. I will be following up with a second post that explains the order of operation, to make sense of all these pieces, to help these fabric pieces transform into a wearable garment you can enjoy!

Flannel Upcycling – Skirt from Sleeves

When planning an upcycle, one thing that I consider with care is how to use the entire garment in the most innovative way possible. Maybe it’s all those episodes of Project Runway guiding me?

When I began my flannel upcycling project, and planned to transform them into vests, they needed a real purpose.

I began this project last year, as the summer was winding down, with fall whispering in the trees. Fall is an unmistakable inspiration for me. I love the color palette, traditional fabrics, and the academic style that returns to fashion every autumn season.

Sleeves Find New Life

Knowing how much yardage there is hidden in those sleeves, I had an idea – a plaid skirt with alternating colored plaid skirt panels connected by a waistband.

To do this, I cut the sleeves carefully from the shoulder seam to retain as much width and length as possible. This would become the bottom of the skirt. Next, I cut the cuffs from the sleeve; this tapered end was perfectly shaped for the waistline of the skirt for a flared effect.

For the waistband, I had yet to understand elastic, and was growing tired of waist ties, so I got a bit creative! I decided to use buttons, four of them to start, and created an adjustable button closure skirt, like the hook and eye of a bra band. The buttons were actually repurposed from the buttons of the shirt. For ease of getting dressed, I sewed the skirt on all the side seams, leaving a 2.5-3 inch opening to adjust the waistband, in a way that the fabric would cross over for security.

If you are looking for an easy and cute fall upcycle for the new season, I would highly recommend this project! You can even pair the vest and skirt together for a complete outfit!

Designing Clothing That Fluctuates With You

This is inspired by a discussion from Maybe Bre, which made me reflect on something I hadn’t discussed before. As well as my own experience wearing clothing, as a garden-variety human who loves fashion but doesn’t always enjoy how our clothing is made.

By this, I mean the patterns and fastening of our modern times. The zipper is a wonderful thing, and so is the structured waistband. I love them in jeans because denim that isn’t compromised by stretch is a rugged and sturdy garment that isn’t a piece that conforms to you; your body is housed within the trousers. I feel the same way about a structured coat. In doing so, I buy these pieces oversized for comfort, which leaves me with a garment that most of the time doesn’t technically fit me. If I did buy it to fit me right now, there is no guarantee that over many decades it would continue to fit me – I’ve been burned before by this problem. Hence, all my “staple, investment pieces” from college no longer live in my closet because they are no longer my size. If I had planned ahead and bought them a bit oversized, they might still be with me, but they wouldn’t have “fit” me at the time.

My problem with clothing is becoming clear, isn’t it? I desire longevity and wearability from clothing, in a way that is not offered off the rack. I desire my clothes to grow and shrink with me, depending on how my body changes over time. This has been my design focus in the last few years as I have placed myself in the driver’s seat of my wardrobe through the process of sewing and knitting.

My idea is not innovative; it is historical. Clothing, because it was so expensive and hard to make, was more adaptable in the past. Fastenings such as tie waist, lacing, and buttons with multiple sizes of tightness were common because clothing was not as easy or cheap, and they were not seen as disposable or replaceable. Changing fashions came with garment reworks, ye olde upcycling as it were. This is what I desire: the ability to change the fit of my garment.

I recently figured out how to sew with elastic, which is a game-changer for shorts and gathered sleeve hems! Before this, though, I was making most of my bottomweight garments with tie waists or several options of buttons to let the garment adjust to the needs of the day, I’ve also sewed with intentional relaxed fit, initially due to a lack of tailoring skill but over time it has been to allow wiggle room in pieces I have spent days or weeks of my life crafting.

Being present in the making process has taught me to treat my clothing with more respect, even when it is time to discard the current version of it for something more useful. I’ve stopped donating as much, decluttering, and rebuying, to be honest, to be more intentional with the garment and its life cycle. I am the one who brought it to life, I can’t simply consume and discard it like it is nothing. I am deprogramming my brain from decades of fast fashion insanity.

I believe if clothing were made with this design philosophy, that clothing would fluctuate with you over time, I believe we would enjoy wearing our clothing more because instead of buying stretch fabric everything, we could still wear good natural fibers, maybe a bit bulkier than spandex and less figure hugging and lurex denim, but would be better for the humans and the planet. Style and substance, as they say on the Great British Baking Show!

Bunny Plush Keychain

Recently, I shared a Knit Star Plush Keychain Pattern, but that wasn’t the only keychain I’ve been working on. Behold, a knit bunny keychain made from repurposed fabric! This keychain was inspired by my Skzoo Quokka plush keychain which I have styled on my purse and belt loop. I was tempted to buy more as this trend has been all over my feed this year, but that’s unrealistic. So I thought, in Jeremy Clarkson fashion, how hard could it be?

This key chain was made by repurposing a pair of underwear, that was weirdly made without any stretch. They had no purpose but to be trashed, which I didn’t want to do because they were brand new and I liked the pattern and color story. So I wondered, could I translate this to a plushie and I could make this plushie into a keychain without buying any materials beyond the keychain hardware? The answer is yes!

I used a pen to draw pattern pieces onto the underwear by designating the fabric into four ear-pieces, two head-pieces, and a rectangle piece that would be used to connect the keychain hardware. The rest of the fabric was cut into small cut pieces that would be used as the stuffing. This worked like a dream!

I chose to sew this item by hand because of the small nature of the project. The pieces were too small and delicate to sew by machine with any semblance of control or care. It was a quick make and took one day to complete. I sewed 90% of the ears, turned them right side out, stuffed them, and then set the ears aside. Next, I repeated this process with the circle for the head and stuffed it. When I was certain that all the stuffing was divided between the three pieces adequately, I sewed closed the ears and head. Next, I attached the ears to the head. Finally, I sewed the rectangle and threaded it through the loop of the keychain before attaching it to the bunny plushie. I opted for an abstract look so I did not decorate the bunny plush with a face, therefore if it spins around it doesn’t matter what side is facing out.

Overall, this was a quick and thrifty project with the hardware coming in a pack of two for $2.99. I used the other clip on the knit star plush project. This type of plushie could be made with any scrap fabric you have and could be adapted into other animals. It would be an easy DIY gift too!

Less Than 1.5 Yards of Fabric to Sew With

In the spring and summer of this year, I was on a self-imposed low buy to sew through my stash in order to use up fabric that had been hanging out in my stash for a few years and have less to move to the new place.

One of those fabrics was this lovely vintage blue that evokes blueberries to me with the dainty floral print. I had made a previous garment with it and had less than 1.5 yards left in my stash. This was a fabric I brought with me to my mom’s while we waited for closing so I set another challenge in front of myself – make something that would use as much of the fabric as possible and make something that would teach me a new skill. It also needed to serve a real purpose in my wardrobe not just something that I “could” make. Something I liked.

I landed on this sundress design with a button front placket, embroidery floss buttonholes, and tapered panels to give the dress an easy flounce. I made the panels similar to skirt panels with a bell shape and gathered them to fit, hiding the gather with the straps. It was a fun little project that taught me how to utilize my stash.

How to Make Curved Seams Lay Flat

When I first heard of making small snipping cuts into the curves of seams for necklines and arm openings, I thought this was a bunch of nonsense. An extra step that only overachieving sewing people do. But once I gave it a try – there was night and day difference with how non-stretch fabrics draped against the form. The comfort and fit has been a level up to professional feeling. It’s totally worth it and I can’t believe I was stubbornly against putting the extra effort in. Looking back, there were definitely projects I made that I didn’t like because the neckline and arm openings fit wonky. If only I had tried this weird sounding hack.

In the curve of seams, make a very small cut in the seam allowance, not the actual part of the seam you are going to sew. For structural integrity that’s important. You don’t want your seam to have a cut or it will rip. The cuts in the seam allowance give the illusion of stretch and help the non-stretch fabric curve without warping the line of the curve. It creates shape without bulk and proper fit. The quality of a garment, I’m learning is not the fabric quality alone, it’s the planning and care put into the construction. Proper pattern cutting can make or break the fit of the look you are going for.

How to Use a French Curve

It’s a bit silly to think about now, but learning how to sew from Youtube meant that using all the correct drafting tools, was a process of failing in order to realize I needed them.

I made a series of pants and shorts in 2021, 2022, and 2023. Some were okay, many were awful, some turned out better than expected because of a pattern. What I was missing in my sewing tool kit though was the predictability of the french curve.

Once I began drafting with this wonderful comma, I saw an improvement in my pattern drafting, ease of wear for garments made with this tool, and a reduction of fabric waste from cutting the curve wrong.

Creating Sewing and Knitting Tutorials on Instagram

In February, I started sharing short content tutorials, micro-vlogs, and step-by-step knitting patterns for free on Instagram reels. After four months of content creation and thinking like an instructor, how has this changed my thoughts on my purpose? Has it changed my own sewing and knitting skills? Let’s jump in!

I began sharing my work on Instagram back in 2017 as a writer, as my interest in clothes-making pivoted in 2020, so did my Instagram. My intention was a portfolio and not a content creator because, to be honest, that term makes me uncomfortable. It has been a barrier to wanting to share videos consistently when actually making videos that share not just what I made but how I made it, bring me the most joy.

In 2024, I began seeking out a sewing community online, and through this, I found shining examples of creative women and men who yes were creating content but we incredibly passionate about sharing their knowledge and skills to help others create and learn. Instead of it being about a platform and social media fame, it was about education and community to keep art forms like sewing and knitting thriving while helping people see an alternative to fast fashion.

It had a purpose that aligned with where I felt called to be. I want to do more with these skills than just sell people something, I want to create change and equip others with life skills. That’s not to say I wouldn’t love to make fashion that people can and want to wear, that would be awesome! It’s complicated.

I have Potato Technology as a name for my “label” but it is more of an abstract than a business. I’d like to expand more on this at another time, but long story short, I’ve been wrestling with what my skills should be working towards. A business? A fashion line? A following on Instagram? What is success in 2024? What should I define myself with? What is my motivation? These are questions I’ve had and been uncertain how to answer.

What has been a breath of fresh air has been seeing how to apply these skills in a way that they can be useful. In practicing for months these little tutorials, I think I’m discovering why I believe sewing and knitting are vital skills to have. It’s been a journey of discovery! I love showing how I make something. From the tools and tips I have discovered over the past four years or what the process looks like, someone can feel inspired and hopefully confident to give sewing and knitting a try!

That matters to me. I learned to sew and knit through YouTube and it was a game changer. But a lot of things at the moment are being put behind paywalls with subscriptions, courses, memberships, etc. I feel like information that you used to be able to learn from your community or family members is slowly being lost and reshelved behind tipping screens. I don’t think it’s right or fair, nor is it good for our culture to lose art forms that are so vital to daily life. We all wear clothing, we all have garments that need repairs, etc. Making should be an option instead of buying being the only option.

My long-term goal is to find a way to share the tutorials here in a way that makes sense for the platform, as I continue to do I realize all this filming has distracted me from writing. Hopefully, I will find a better balance now that I am moved in and settling into new routines at our house. I’m excited to share more on that story too because it taught me so much about agape love, the kindness of strangers, and how important family and community is to making things go right.

Thank you, dear reader, for taking time for me today. I hope that you know that you are loved, you are worthy, and that without you this blog would be simply a girl with a computer typing into a void. Thank you for your support! I always appreciate it!

Making a Pocket for My New Phone

When I purchase fabric, I aim to use as much of it as I can. Whether this means altering the project to incorporate as many large scraps as possible, saving some scraps for future mending projects, or creating a secondary garment from the scraps – I’m in! My recent corduroy trouser project left behind a particular set of scraps, a set of pockets that I chose to leave out of the finished trousers. These made the perfect scraps to make an unexpected project for the new year!

Upgrading My Tech

Around Christmas, I saw an interesting sale – a discount on a phone with an impressive camera and quite attractive collaboration. Since leaving my family’s Verizon’s new every two for my own plan I’ve kept it cheap. I’ve had some bad spills with my phone like shattering my phone camera’s lens on I’m assuming my keys as it bounced around my bag. I also lost my most expensive phone, the LG Voyager back in 2009 by losing it in the ocean. I had it for a month when it dropped out of my pocket one fateful evening and made its way out to sea. The last thing I saw was the screen light go out as it was swallowed up by the incoming tide. So going above the USD 99-149 price range I was a bit nervous about myself and my propensity for mayhem.

This is the Galaxy S23 with the SL/BS JYP Entertainment Skzoo Collaboration case. I got it 50% off from Google Fi and bought the matching SKZOO Leebit Suitcard to theme the inside of my phone to match the case. It is also lilac, a shade of my favorite color purple. It was a delayed 30th Birthday present, to be honest, and a step forward to improve my photo-taking ability for my designs. The camera is absolutely crisp and sharp compared to my Moto Power which I thought was pretty nice for the $149 price tag. Was I swayed by the color, and Changbin’s song for this phone, yes, but it has shocked me how much the camera and integrated photo editing, like the magic eraser feature, have helped me capture better photos of my work on a budget. Safe to say I’ve been babying this phone – I do not want to ruin this one! 😉

A Pocket For My Phone

Because this is a newish phone, there was the upgrade of my wired headphones no longer being compatible – there is no audio jack. This means an adapter, which I wanted to keep organized while out and about with my earbuds and phone. Creating this little pocket made perfect sense!

To create the pocket, because of the corduroy fabric’s structure, I didn’t include a lining. I began with my two pocket pieces and cut one of them into a square and a semicircle. With three pieces, I matched the semicircle together and pinned and sewed the square onto the intact pocket piece, on three sides. This left an opening for the pocket. Next, I sewed the semicircles together. Lastly, I inserted a zipper to securely close the pocket. I love the finished product!

It’s a cute little pocket that is easy to place in my purse and in my pockets, it gives that extra layer of protection across the camera lenses and screen while keeping those loose little accessories in one place. This project has alleviated a lot of fear I had of breaking my phone in my purse again. As a result, I actually pull my phone out less unless I have a specific purpose for reaching for my phone like answering a text, a call, taking a photo, or listening to music. It’s subtly helping me be more present and in the moment which I greatly appreciate. 🙂

I also love the antique vibe of this pocket. It reminds me of pockets that used to be tied onto skirts in historical fashion. I guess this is the next version of the same concept, and it looks like a pattern from the 1800s, 1700s, etc. Always save your big scraps, they come in handy! If I had purchased a pouch for my phone, I’m sure it would have been fine but it’s an added expense that I want to cut out in 2024. It’s fun using the items at hand to make useful things and cut down on my spending while making use of the entire cut of fabric. Would you make a pocket like this?

Create a website or blog at WordPress.com

Up ↑