Weekly Garden Update #23 – Powdery Mildew, Tomatillos, Drought & More

In this week’s update, we had our first encounter with powdery mildew this year. We’ve also been in a drought, which has led us to find creative ways to water. In harvesting news, we got our first ripe tomatillos and long bean. Finally, I’ll go over all the updates from this past week and highlight the seed of the week. Let’s dive in.

Powdery Mildew

Late last week, we were in the garden looking over things, and Magz noticed that a few of our squash and melon plants had powdery mildew on them. Even though we hadn’t encountered it before, she correctly diagnosed it. While still in the garden, I researched how to get rid of it, learning that hydrogen peroxide will kill it without harming the plant. There appear to be several home remedies that can tackle the problem, including baking soda and water and vinegar. I’ve also read of people who don’t treat the mildew and haven’t noticed any negative impacts on their plants. We addressed it because we want our plants to grow in the best environment possible.

First Tomatillos & Long Beans

Our tomatillos have been growing fast and abundantly. I’ve read that once they take off, you can become overwhelmed by how much fruit you’ll have. We have four plants, including three with large fruit on them, so we likely have close to 100 tomatillos growing. On Friday, we harvested the first two ripe fruits. If you’ve never grown tomatillos before (and we haven’t), they are interesting to watch develop. The plants produce blossoms similar to tomatoes and peppers, but from those blossoms appear papery greenish-yellow husks. The tomatillos develop inside these husks, and as they grow, you can feel the fruit get bigger through the husk. Near the end, when they’re close to being ripe, the tomatillo breaks through the husk so that you can see the fruit.

Tomatillo
First Tomatillo Harvest

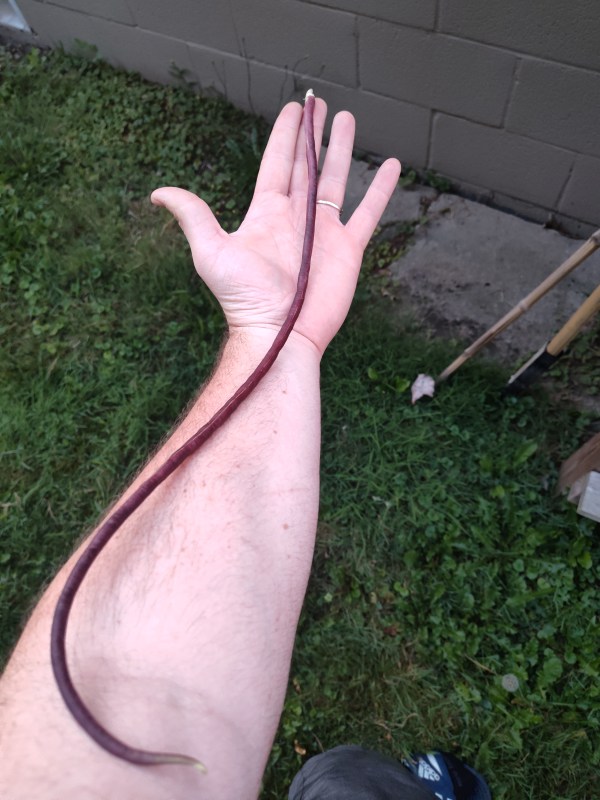
We also harvested our first Chinese Red Noodle Bean last week. This is a bean that Magz has been excited about since she first saw it in the Baker Creek seed catalog. It’s also the one I built a planter box and trellis for, and it’s been a joy to watch these plants grow to the height of our garage roof and see the pods begin to form. We watched the first pod grow for a few weeks, starting from being uncertain if we were actually looking at a bean pod to being nearly two feet long. We haven’t eaten the bean yet, but it’s supposed to retain its color during the cooking process and be very tasty. We have more developing on the vines too, which is exciting.

Chinese Red Noodle Bean

Drought – Eating My Words From the Spring

This spring was one of the rainiest I can remember. I haven’t looked into the historical data, but I’m confident it was one of the wettest on record. There were multiple weeks with consecutive days of rain totals greater than one inch. We went weeks without walking in sections of the garden because we would sink in the mud. The rain also delayed planting some of our seeds for fear that they’d wash away or the conditions would be too damp. At the time, I wanted everything to dry out so badly, but Magz reminded me that there’d be a time in summer when we would be wishing for rain. That time is now. Although it hasn’t been overly hot or humid recently, we haven’t had much rain over the past couple of weeks, with no rain in over a week. Our rain barrel is tapped out, so we’ve had to resort to city water for the garden.

Unfortunately, our outdoor hose spigot also broke last week. It was a pretty old faucet and had been on the fritz since we bought our house last year, but it finally kicked the bucket, snapping the stem off inside. I thought I would be able to fix it, but I was unable to extract the old stem. I also don’t have enough plumbing experience at this time to solder the new faucet to the existing water line and install a shutoff valve inside the house. So, we have a plumber coming this morning to do the work. In the meantime, we had to find creative ways to water the garden because we don’t have another exterior water source. We used teamwork to make many trips inside with our watering cans, empty two-quart juice bottles, and a five-gallon bucket to fill them at our kitchen faucet, but it ended up going smoother than either of us thought it would. While it took longer than it would have with a hose, we were done in about an hour and thoroughly watered every plant and flower. While it wasn’t ideal, it ended up being somewhat of a fun experience.

Notes From the Garden

  • We were finally able to harvest some paste tomatoes after they began to ripen last week. This is the tomato variety I’ve had to be most patient with, as we’ve had dozens of full-size tomatoes for a couple of weeks now, but they’ve remained green until recently.
  • A couple of our Cal Wonder peppers have started to ripen to a lovely orange color.
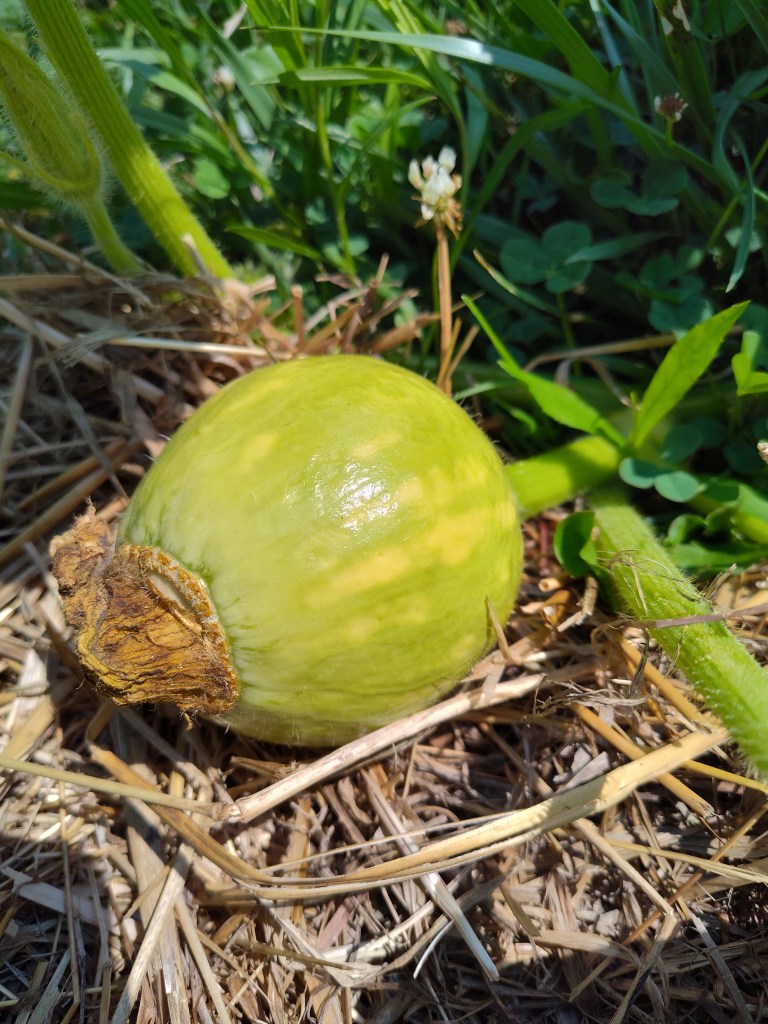
  • The Candy Roaster melon that I discussed in last week’s update is now the size of a volleyball. There are roughly five additional Candy Roaster melons growing in the same bed.
  • We have noticed a lot more small melons growing in recent days, including the Tigger, Kajari, and Noir des Carmes.
  • The first Richmond Green Apple cucumber was ready to be pulled last week. This is the cucumber I was most excited about this year, and I’ve been struggling with patience as we wait for the cucumbers to grow and ripen. We brought it inside and immediately ate it. It’s a wonderful cucumber. It’s crunchier than more common varieties, such as Marketmore or Tendergreen, and is also sweeter. They have no bitterness.
  • We also harvested our first Zapallito Del Tronco zucchini. This is another plant we were excited about this year. Baker Creek says it has a “creamy, buttery soft flesh” and “creamy in consistency.” Other gardeners have called it a cross between a squash and an avocado. It’s also sort of a hybrid between a winter and summer squash, as it ripens in summer like a zucchini but has a more durable rind like a winter squash. We had it for dinner the night after harvesting it. Magz roasted it in the oven with some oil and seasoned salt, which is how we typically prepare our squash. I thought it was delicious, and you can recognize the difference in texture compared to other squashes. However, I think I could have left it on the plant to ripen for a few more days, as the flesh was still green instead of a creamy yellow.

Seed of the Week

This edition of Seed of the Week takes us to the land down under and the Richmond Green Apple cucumber. Because we harvested the first one last week, it’s only fitting to write about it. This is an heirloom cucumber from Australia that has become popular throughout the world. I couldn’t find any historical details about the seeds with a quick Google search, but I’m planning on doing a deep dive this winter to learn more. I love these cucumbers. I described their flavor and texture above, and be assured, these are different from other cucumber varieties. They are definitely worth giving a try, as they’re easy to grow and very productive.

Up Next

We’re holding out for rain. The most recent forecast I looked at didn’t show any potential for rain until Wednesday, but it was a 70 percent chance. Hopefully, that changes, because we need rain. The lack of rain also confirms our plan to add at least one more rain barrel to our setup. It wouldn’t have prevented us from needing to use city water in the garden, but it would have put it off a bit longer. In the garden, we will look forward to harvesting more zucchini, squash, and tomatoes. Happy gardening!

#73 – Welcome, Again!

A lot has changed in the 2 years since this blog was launched, and I thought, it might be time to update my introduction.

In 2023, my plan was to finding a new landing place for me to explore writing again, after Muirin Project, my blog from 2016-2019. I wanted to showcase my novel, catalog my knitting and sewing journey, journal my bible study, and share my love for creative expression in many artistic mediums.

Now I have added some new things to the mix – Japanese learning, Kpop, garment workers/conscious consumption, and most excitingly: gardening! Which welcomed my husband to the site to share his experiences with gardening and bring awareness to why natural ecosystems, seed saving, and eating local matter. He is also preparing to share his other favorite hobby – woodworking.

Now, for something I question – should I change the site name? I am uncertain for SEO purposes and the likelihood of broken links. I don’t think it is wise. But this site is so much more than just my work, it is the harmonizing voices of myself and Kyle which is how I think the world becomes a better place – working together. Let’s keep the honmoon sealed. ❤

Weekly Garden Update #22 – Corn Harvest, Pickles, and Baby Melons

In this week’s update, we harvested our first ears of corn and ate them the same day. We have had an abundance of cucumbers, which led to me making some pickles and giving them to neighbors. Finally, our melon plants are setting fruit, and we’re starting to see what makes each variety unique. Finally, what is the seed of the week in this update?

Harvesting the First Ears of Corn

On Friday, Magz and I harvested the first ears of corn from the garden. For several weeks, our Butter & Sugar stalks have had silk growing, which began turning brown last week. I was originally going to let it go a bit longer because I thought it took a long time to ripen. But, after coming back inside, I researched how to determine when corn is ready to be harvested, and I’m glad I did. If you are like me and don’t know, it’s when the silk starts to dry out at the end. You can also pull back the top of the husk to feel the kernels. If they’re full and have some give, it means they’ve reached the milk stage and are ripe. In total, we harvested about half of the Butter & Sugar ears.

We also checked the Sweet Mexican/Black Iroquois corn that has shown similar progress to the Butter & Sugar – full tassel with silk for over a week. However, the first ear we pulled didn’t have the dark blue to black kernels that define this variety. They also weren’t at the milk stage yet. We’re going to leave them on the stalk for a few more days to a week to see if they’ll be ready at that time. After gathering all the ears, we promptly husked and boiled them, eating about half the ears for dinner. We even split the Sweet Mexican ear that we prematurely harvested. There is nothing like eating corn that fresh. From stalk to plate, it probably only took 30 minutes. The Butter & Sugar was incredibly sweet, with full kernels. It’s every bit as good as that corn you can buy from roadside stands in rural parts of America. The ears weren’t big (about seven inches long and two inches in diameter), but the majority were full.

Making Pickles

Our cucumber plants are regularly producing ripe fruits, and we’re able to harvest at least one per day right now. The only variety we haven’t harvested any cucumbers from yet is the Richmond Green Apple, which is the variety I’m most excited about…because of course it would be. Anyway, last week, we had a half-dozen or so cucumbers in the fridge, and something needed to be done with them, so I made pickles.

I love pickles and have made them before. I’ve tried making both dill and bread and butter versions. Unfortunately, though, they weren’t great. They were either too salty or not dilly enough. They also didn’t retain their crunch. So, this time, I wanted to make refrigerator pickles that don’t need to be canned. By not canning them, chilling the cucumbers and jars, and letting the brine cool to room temperature before pouring it into the jars, the cucumbers can stay firm and retain their crunch. They were a great success. They still have their crunch after a week of being in the brine. The downside is that they won’t keep as long as they would if they were canned, but they can still last more than a month before going bad. The recipe I used came from Love and Lemons. I didn’t have fresh dill or garlic on hand, so I substituted them for dried dill and jarred garlic in oil, and it was still delicious. Magz isn’t the biggest fan of dill pickles, and she really likes them!

Baby Melons

In recent updates, I’ve mentioned that we’ve seen some of our melon plants put on fruit. Since last week’s update, at least one fruit for each type of melon is close to golf ball size. At this size, we’re starting to see small differences develop between the different varieties. Some examples of the differences are:

  • The Candy Roaster Melon/Seminole Pumpkin starts yellow before turning green. It is also staying perfectly round.
  • The Kajari Melon is very small-about the size of a marble-but it already has dark and light green alternating stripes.
  • The Ali Baba Watermelon looks like, well…a very small watermelon.

What I have found fascinating about our melon plants is how the plants look similar to each other. Most have similar leaf structures and vine in the same manner. They also put on flowers that are nearly identical. I knew that the varieties would eventually separate themselves, but I didn’t expect it to happen so early in the fruiting process. I can’t wait to watch them grow more and continue to see each variety’s unique qualities.

Notes From the Garden

  • Our tomato plants’ leaves have been curling recently. I can’t tell if it’s because they need water, have too much water, need nutrients, have too much fertilizer, or have some sort of disease. And the internet isn’t helpful at all. The fruit still looks good, though, so I’m not too concerned about it. I’m also going to water the plants with leaves that are dry on the edges. I’ll probably let the others go.
  • Also about tomatoes, our paste variety has a ton of tomatoes on the plants, but none have ripened yet. It’s a similar story with our Queen Aliquippa plants. Being patient while they ripen is a struggle.
  • Our Hopi Blue corn has reached nine feet, which seemed impossible at the beginning. I never thought that we’d be able to get the corn stalks that tall.
  • In the above section on our corn harvest, I mentioned that the ears weren’t as long as I expected, nor were they as thick. I haven’t done the research yet, but I’m curious to know what causes that. Initial speculation is that there is not enough nitrogen. I fed those plants once a month or so, but I wonder if feeding them every two weeks would have produced larger ears. I’m going to be more consistent in feeding the new rows of corn to see if it makes a difference.
  • We lost our first Spaghetti Squash, which is super sad. The vine it was growing on died out of nowhere. I think it either got too damp and died off or there was a pest problem.
  • We think we know what the mystery melon that’s been growing is. Or at least we’ve narrowed it down to two options: Seminole Pumpkin or Candy Roaster Melon Winter Squash. This plant is one of the starts that I transplanted without a marker, so we have no idea what it is, but the color and shape look like one of these varieties.
  • Our tomatillos are starting to get papery husks on them, which is supposed to be an indicator of them continuing to ripen properly. I’ve read that tomatillos are a vegetable that requires a ton of patience.
  • Our Chinese Long Beans have put on their first bean pod. It’s currently longer than my hand and is a beautiful purple color.

Seed of the Week

This edition of the Seed of the Week takes us back into the cornfield since we harvested and ate many ears of it last week. I’ve already written about the Hopi Blue and have discussed the Sweet Mexican/Black Iroquois corn in several places on the blog. So, I’m going to highlight the third variety we’re growing: Butter & Sugar sweet corn. It isn’t an heirloom, nor does its history span the centuries, but it’s one of the most popular and best-tasting corn varieties grown in the United States. When we were picking corn seeds in the spring, we wanted one variety that was relatively easy to grow and has a track record of success. That led us to this bi-color variety. Ours came from NE Seed in Connecticut.

Up Next

Hopefully, we’ll definitely learn what the mystery melon/squash is this week. The fruit shows visible growth on a daily basis, with the color consistently changing too. It started yellow, went to a light green, and currently has some yellow streaks on it. I’m also hoping that our paste and Queen Aliquippa tomatoes ripen.

Blending Gardening & Woodworking

If you’ve been reading my gardening articles for a bit now, you know I’ve written about using my woodshop to create things for the garden. Some examples are the planter box and trellis for our beans, the trellis system for our snow peas, and the fence posts I’ve been cutting. Lately, I’ve been looking forward to getting back into the woodshop and doing serious woodworking again. The garden and our screened-in porch projects took precedent over woodworking projects this spring and summer, and I’m now ready to get back at it.

As I’m thinking about and planning my next projects, I wanted to write about blending two of my favorite hobbies: gardening and woodworking. I mentioned the ways I’ve used my woodshop to build things for the garden this year, but only the planter box was somewhat serious woodworking. It was the only thing that required glue, but not even that project needed me to use my table saw. In this post, I’ll go over some future project ideas I’d like to pursue and a previous piece that I built and we still use. And if I have fun writing about this, and it seems interesting, I may write more woodworking articles.

A Planting Table

In 2022, I wanted a planting table that would aid in the process of transplanting starts, starting seeds, mixing the soil, and filling the containers of our container garden. I’ve always been a fan of the classic planting table that includes multiple areas for storage, a place to hang tools, and a flat surface to work on. There are a lot of videos of woodworkers and makers building these, including Bob Clagett (I Like to Make Stuff), Norm Abram (The New Yankee Workshop), and Steve Ramsey (Woodworking for Mere Mortals). These three makers represent three versions of a planting bench. Bob Clagett’s was made of dimensional cedar, Norm Abram’s was based on an antique found in Savannah, Georgia, and built from recycled pine, and Steve Ramsey’s was built with scrap wood, largely reclaimed pallets. A planting table can be made as cheaply or expensively as you’d like. I went somewhere in the middle of these three.

I didn’t have any recycled or reclaimed wood to use for the project, so we bought pressure-treated lumber for it. This included two 4x4x8s and numerous 2x4x8s and 1x6x8s. The 4x4s served as the main strength of the table, with one at each corner. The 2x4s were used as the main framework to connect the 4x4s to each other, while the 1x4s became the slats for the tabletop and shelves. Here are two pictures of how it turned out:

This table was a blast to work on. Dimensional lumber, which you can find in the big box stores (Home Depot or Lowes), is really easy to use, and I would encourage everyone to try building one for your gardening needs. I used my table saw to rip the 1x6s down to narrower pieces, but I could have bought 1x4s instead and not needed a table saw. If I didn’t need to rip those pieces down, the entire thing could have been built with a circular saw and a drill. It’s a perfect project to dip your toes into woodworking if you’re curious.

Tips if You Want to Build One

  • Bulk cut all the pieces that are the same length. Because all but one of the slats for the top were the same length, I set up a stop block on my miter saw and cut all the pieces in quick succession. This made it so I didn’t have to measure each piece and potentially have small differences in the lengths. This was also the case with the bottom shelf pieces.
  • Clamps are your best friend. Clamps weren’t required to build this table, but they were really helpful. It can be difficult to hold pieces together with one hand while you’re using a drill with the other. Clamps hold it all together so that both hands can be used for drilling. They also work to prevent the pieces from moving off your mark.
  • Use a level. This applies when you are attaching the 2x4s to the 4x4s. You’ll measure up from the bottom or down from the top to mark where the 2×4 will go on the 4×4, but it’s wise to use a level to ensure the slats will sit flat and the entire table will be level when assembled.

What I Would Do Different

In general, I’ve been pleased with how the planting table turned out and continues to serve us. However, there are some areas that I’d like to improve and address in the future. The first is trimming the table slat closest to the front. It sticks out over the 2×4 framing piece by an inch or so, which has resulted in that piece cupping and needing to be attached with extra screws. I would like to remove this piece and trim it down so it sits flush on top of the 2×4.

I’d also like to add hooks to the bottom of the top shelf and chicken wire to the back to hold tools. The last improvement I’d make is having a water source and a place to rinse veggies when they’re pulled from the garden. This would be a bit more complicated than the other improvements, but I want to cut a hole in the table slats where a plastic bowl or dish washing basin would sit. That basin would have a hole in it with a small piece of PVC attached for the water to drain into a bucket below. I will also need to have a water source. For that, I want to attach a simple outdoor spigot or faucet that a hose can connect to and mount it close to the basin. Because the planting table is close to where we’re going to add another rain barrel, we’ll have a water source without needing to run a long hose. These are minor improvements, but once they’re done, I think the planting table will be even more useful.

Future Woodworking Projects for the Garden

  • Planters – These include all the types of planters, including planter boxes that sit on the ground, ones that are attached to porch railings, and window boxes.
  • Garden Bench – Magz and I want to eventually have our garden be a place where we can sit and enjoy nature. It won’t just be a place to work in, but also a place to relax. Having a bench in our garden would also provide us with a place to rest while working.
  • Whirligigs – Whirligigs are an area of woodworking that I’m interested in. If you’re unfamiliar with them, they are a nifty decoration that spins when the wind blows. They can be bought or made, and there are endless possibilities for design, style, color, etc. Norm Abram built one on The New Yankee Workshop, and the YouTube video below features the Whirligig Festival. I have a lot of ideas floating around in my head of how to build different versions.
  • Garden Gate – We’re eventually going to upgrade our fence, likely to something that we build out of wood. When that happens, I want to design and build an aesthetically pleasing garden gate similar to what you see in English gardens. They are incorporated into the fence and can be as ornate or as simple as you want.
  • Greenhouse – We have talked about wanting to have a greenhouse for some time. We want to be able to start plants outside sooner than we currently can. You can buy greenhouses, but they can be expensive. Instead, we’ll probably build one that perfectly fits our needs and is cost-effective.
  • Swing – I want to build multiple swings. One is a porch swing or bed that hangs from the ceiling. The other is a covered swing in the garden. Similar to the garden bench, a swing would help in our pursuit of creating a relaxing garden.
  • Arbor – I have a lovely vision of an arbor in our garden that you can either walk under or sit under. The arbor will be placed so that vining plants, such as cucumbers, squash, or flowers, can climb the arbor, leaving you totally immersed in nature.

To me, woodworking and gardening perfectly go together. They’re both creative, can be hard work, and result in the satisfaction that you built or grew something from scratch. Building something with one hobby that can be used in another hobby is a cool experience. I also try to build something instead of buying something whenever I can. Is woodworking one of your hobbies? If not, what are your favorite hobbies? I hope you enjoyed reading about my experiences with woodworking and gardening. Have a great day.

Create a website or blog at WordPress.com

Up ↑