

Confession time: I love spreadsheets. Dating back to middle school when I first took a Microsoft Excel class, I’ve enjoyed using spreadsheets to organize things, including addresses, finances, birthdays, and more. I love being organized but don’t always take the time to be organized. Thus, I’m very thankful that spreadsheets exist because they help with sorting, filtering, and searching through information much faster than we can do ourselves.
How does this apply to our garden? When we started looking through catalogs and initialing the seeds each of us wanted to grow, I quickly realized that we needed to figure out a way to keep track of everything. In a previous post, I mentioned that we looked at over 5,800 seeds and probably initialed over 1,000. Because of that, it’s really easy to feel overwhelmed by an abundance of choices. I’d like to share the system I came up with to help you if you too have felt overwhelmed by garden planning.
Initial Marking of Seeds
I’ll keep this section brief because I’ve touched on it in other posts, but our planning process started with both of us flipping through the catalogs and marking the seeds we were interested in. We went through all sections in every catalog and marked any seeds we even had the slightest bit of interest in, flowers included. Some of the choices weren’t all that realistic because they don’t grow well in our area or are above our gardening ability at this time, but we didn’t want to miss anything.
A helpful note: Use a pen rather than a pencil and choose one with an ink color that will stand out from the text and page color of the catalog. I made the mistake of using black ink on the Fedco catalog, which is all black and white, and it was easy to overlook some of our marks. I also recommend giving each person a different color of pen. That will make tracking everything even easier.
From Catalog to Notebook
The next step in the process was figuring out what seeds we initialed the most. A lot of the seeds were found in multiple catalogs, so it was important to know which ones we marked more than once, which would indicate the varieties we were most interested in. Eventually, the goal was to track this information in a spreadsheet, but I started with a notebook so that I didn’t have my laptop and all the catalogs in front of me at one time.
I devoted a page in the notebook to each vegetable and went in alphabetical order, beginning with beans and ending with tomatoes. I combined some together on one page to make it easier:
- Watermelons, canteloupe, muskmelons, and honeydew
- Radishes, turnips, and parsnips
- Cabbages, mustards, Asian greens, spinach, and bunching onions
From there, I looked at all the varieties of one vegetable in each catalog, taking note of the ones we initialed. I wrote down the seed name and what catalog we found it in, using an abbreviation for each company. Using beans as an example, it looked something like this:
- Blue Lake 274 – RS (Rohrer), PG (Pinetree Gardens), NE (NE Seed), BC (Baker Creek)
- Provider – FS (Fedco), HMS (High Mowing Seeds), PG

I did this for every vegetable/fruit. And by tracking how many catalogs we found the seed in, I could see how interested we were in that seed. So, if a seed was marked in 7 of the 10 catalogs we looked at, it indicated we were more interested in that seed than one we only marked in 3 of the 10 catalogs. That didn’t mean we always purchased the most popular seeds, though. Some seeds were only found in 1 or 2 catalogs, but we were so interested in them that we were going to buy them anyway. Finally, being able to look at a notebook page and see trends across the most popular seeds (such as picking a lot of bush beans, pickling cucumbers, or paste tomatoes) would give us an idea of what we were most interested in even if it wasn’t always the same specific seed.
After I wrapped up tracking everything in the notebook, I moved everything to a spreadsheet.
Building the Spreadsheet
Figuring out all the columns to include in the spreadsheet was the most difficult part of this process. I started by determining the goals of the spreadsheet. I knew that I wanted to be able to visually see which seeds we picked the most from the catalogs, compare the price of the same seed in different catalogs, and have links to quickly access the seeds’ pages on the companies’ sites. With those goals in mind, I set out to create columns that would include the most important information. I created columns for the following:
- Seed Name
- Variety/Type – This column wasn’t used for all vegetables. I used it for beans (bush/drying, long beans, edamame), corn (flint/dent, popcorn, sweet, ornamental), cucumbers (pickling, slicing, specialty), husk tomatoes (ground cherries, tomatillos), other greens (cabbage, onion, mustard, spinach), melons (cantaloupe, watermelon, honeydew, specialty), peas (snap, shelling, snow), peppers (sweet, hot), potatoes (early, mid, late, fingerling), squash (winter, eggplant, specialty, kabocha, yellow, zucchini), and tomatoes (beefsteak, cherry, paste, pear, plum, slicing)
- Organic? – This was a drop-down with “Yes” and “No”
- Seed Company – This also was a drop-down with an option for each of the seed companies we were considering.
- Page Number – The number in the catalog where the seed is found. The goal here was to make it easy to find the seeds again.
- URL – The link to the seed’s page on each site.
- Price – How much does the seed packet cost?
- Quantity – How many seeds do you get in a packet?
- Special Notes – This was the place to add a note if the seed is an heirloom, if it’s sold out or is back-ordered, or is a pollinator in the case of flowers.

After that, I started filling everything in. If figuring out what to include in the spreadsheet was the most difficult part of the process, filling it out was the most time-consuming. I tried to get through one vegetable per day, but the whole process took roughly 10 days. Once I was done, though, I was able to quickly access any seed, either its webpage or in the catalog, and I could sort by seed name, variety or type of vegetable/fruit, and price, among others. Being able to do that when it was time to make final decisions was priceless.
Lessons Learned/What Did & Didn’t Work?
There were a few things that ended up not being ideal even though there was no way to plan for it or nothing that could be done about it. One was receiving two seed catalogs in the mail after I started filling out the spreadsheet. This meant that the drop-down menus were missing the two catalogs, and I didn’t want to change the drop-down rules and potentially mess up the entire column. Instead, I manually entered the seed company’s name, overriding the drop-down menu entirely.
The second not-so-ideal thing is how big the spreadsheets got. Before starting, my plan was to use the drop-down menu for the seed companies and select all the companies where a seed was available. That wouldn’t have been an issue. The issue would have been adding the URL, page number, price, and quantity for every seed since they all would have had their own line. So, if we found the seed in 8 catalogs, each cell would have been 8 rows tall. It also would have been difficult to compare across the columns.
Now on to some things that I didn’t think about including or messed up and will fix for next year’s spreadsheet. The biggest oversight on my part was not including the price per seed when I originally built the spreadsheet. I only included the price of the packet and the seed quantity, not realizing that it’s more important to know the price per seed since there were large quantity differences. For example, consider the Ping Tung eggplant. We found it at 3 companies. NE Seed sold 750 seeds for $8.95, MI Gardener sold 30 seeds for $2.00, and Baker Creek sold 25 seeds for $3.00. Given the difference in price and seed quantity, it was hard to figure out what was the most cost-effective. I eventually used a blank column to the right of everything to calculate the price-per-seed cost. In this case, NE Seed was the cheapest at $.01/seed. MI Gardener was $.07/seed, while Baker Creek was $.12. Funny enough, we actually bought the seeds from Baker Creek because we weren’t buying anything else from MI Gardener and we didn’t need 750 eggplant seeds from NE Seed.
Similarly, I wish I had created distinct columns with yes/no drop-down menus for heirloom, if flowers are pollinators, how much sun a flower requires, and a separate special notes column where I could write if a seed was out of stock. In general, it was a great first edition of the spreadsheet, but there is always room for improvement.
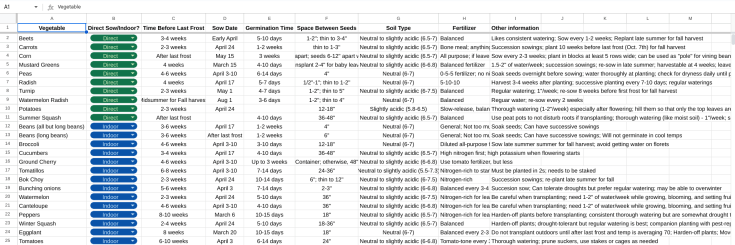
Bonus: Tracking Growing Information
After we ordered our seeds, I created two more spreadsheets. The first is a general growing guide with information that serves as a guide that we can quickly access, sort, and search. Initially, it was just to track the start dates of everything so we could sort and know the order of when each seed needs to be sowed. It expanded to also include columns for germination time, distance between seeds, soil PH, fertilizer needs, watering information, and any other helpful notes. I want to keep much of this content in a field notebook that we can carry out to the garden with us, but this is helpful because it can all be viewed on one screen.
The second spreadsheet I created was a companion growing guide. Companion planting is when you grow plants close to each other that benefit one another. The plants can be all vegetables or a mixture of vegetables and herbs or flowers. The idea behind companion planting is that some plants are natural pest or animal deterrents that reduce the need for pesticides or barriers and keep said pests or animals away from plants that normally attract them. Companion planting also works to put certain nutrients (such as nitrogen) back into the soil so that heavy feeders (like corn) will have quality soil throughout the growing season. This can reduce the need to fertilize as often or as much. In the future, I will likely write a standalone post about companion planting, so I don’t want to go into too much detail here, but it’s something Magz and I are interested in. So, I created a spreadsheet to track what plants should be grown in close proximity and which ones should be kept far apart.

How Do You Plan Your Garden?
I probably overthought organizing and planning our garden, but spreadsheets greatly helped me keep track of everything. Do you use any tools to organize and plan your garden? If so, what is your go-to method? I’d love to hear your thoughts, and if you found this information helpful, please let me know.
